This is an old revision of the document!
Mobile (Android) user guide - new, featuring offline operation
1. Getting Started
Hardware Requirements
Recommended Specifications:
- Display: 800 × 1280 pixels
- Mobile Data enabled (3G minimum)
- Android 4.4.4 or higher
- 1.5 Gb Ram
- Quad-core 1.3 GHz
Minimum:
- Display can be 768 × 1024 pixels
Installation
You can get the latest version from the Google play store
OK. Here we go!
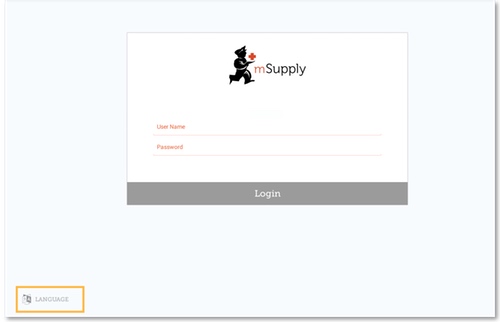
This is the login screen. You will be given a User Name and Password when your tablet computer is installed at your clinic. Your tablet computer can only log in to one facility.
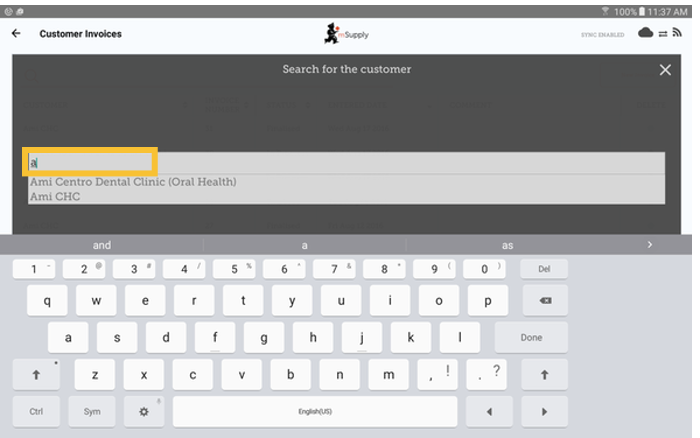
The first thing you will need to do is to choose your preferred language, by clicking 'language' at the bottom left of your screen, as outlined in orange below:
For example, if your first language is Tetum, then you're in luck!

So, once you have selected the language of your choice, enter your User Name and Password and click ‘Login’!

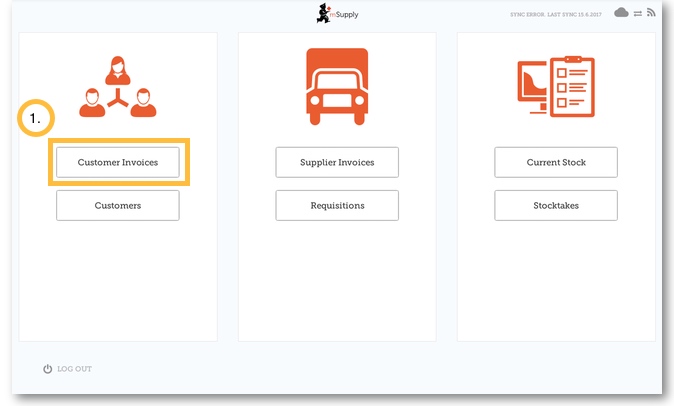
This brings us to the main screen, we will be returning to the main screen a lot as we use mSupply Mobile, so it's important to understand the main functions. Let's go through them one by one.

CUSTOMERS
 The 'Customers' area is for all the stock that goes OUT of your facility. It contains a list of customers and customer invoices. Customers can be other facilities you supply, doctors and nurses doing outreach tours, or individual patients.
 The Customers button will bring up a list of your Customers. From there, you can click on an individual customer and see their details and invoices.
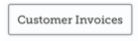 The Customer Invoices list will bring up a list of the most recent customer invoices (orders TO customers) and allow you to create new ones.
SUPPLIERS
 The 'Suppliers' area shows orders that you have sent for your own stock. Usually, you will only have ONE supplier (a medical store or other healthcare facility) and this will be pre-programmed for you. The Suppliers area allows you to place orders (Requisitions), see a list of your pending orders, and shows the stock you have already been sent or are waiting to receive (Supplier Invoices).
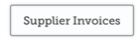 The Supplier Invoices button will bring up a list of the orders you have been sent or are waiting to receive.
 The Requisitions button allows you to place an order and shows you a list of orders you have already placed.
STOCK
 The 'Stock' section shows you a list of your current stock and allows you to do stocktakes. You can also use this area to search for an individual item (“how many paracetamol tablets do I have?”) or to update the stock levels for each item when you realise there is a mistake, or you are doing your regular stocktake.
 The Current Stock button allows you to easily see how much stock you have on hand, search for an individual item, or check expiry dates.
 The Stocktakes button allows you to do a stocktake on all items or a small selection of items and shows you a list of all previous stocktakes.
(and here's the main screen in Tetum!)

2. Customer Invoices
Aspen Medical Centre sends an order to your facility. They are doing an outreach tour to households in a nearby village and would like to collect some items to take.
The CUSTOMER is Ami CHC
They have ordered:
Amoxicillin 500mg tabs x 11 Paracetamol 500mg tabs x 100 Diazepam Injection 5mg/ml Amp/2ml x 50
Let's create a Customer invoice…
1. Click on 'Customer Invoices'
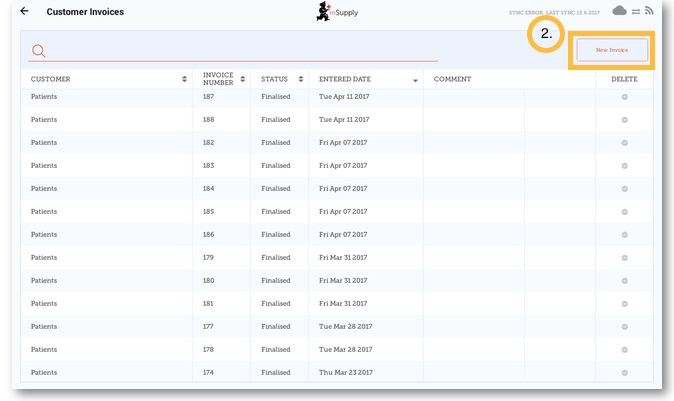
The Customer Invoice button will bring up a list of invoices. If you haven't finished working on an invoice and you have not confirmed it, you can click on it now to bring it up and keep working on it.
2. To start a new Customer Invoice, click 'New Invoice'.
Add the customer you are ordering for..
3. You can add items to the customer invoice one by one. To do this, click on 'New Item'.
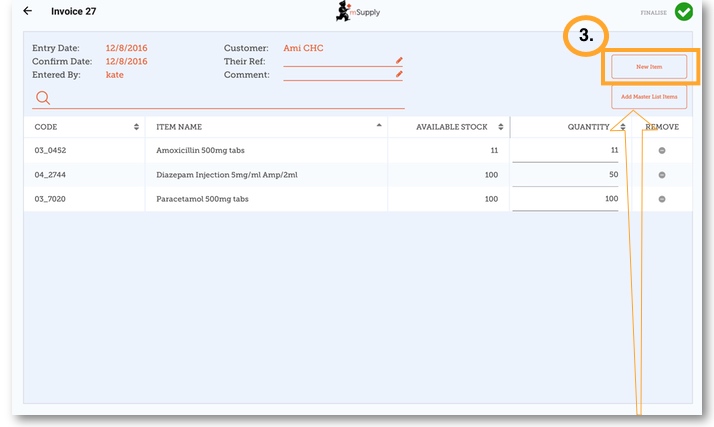
If you have a lot of items to add to the invoice, it can be slow to add them one by one. To add a lot of items at once, click 'Add Master List item'.
Here you can see we have completed this invoice by adding the 3 items we need.
4. When you have finished, click the 'FINALISE' button at the top, and then CONFIRM.
What is a Master List?
The Master List is a list of all the items available to you at your facility. The list is set by your supplier, and/or the Ministry of Health.
3. Supplier Requisitions
You would like to order some stock from your supplier (Medical Stores). You need to place an emergency order for Ampicillin injections and Co-Trimoxazole tablets.
To do this, you must send a 'Requisition' for:
Ampicillin 1g inj x 300
Co-Trimoxazole 480mg tabs x 500
So let's do it!
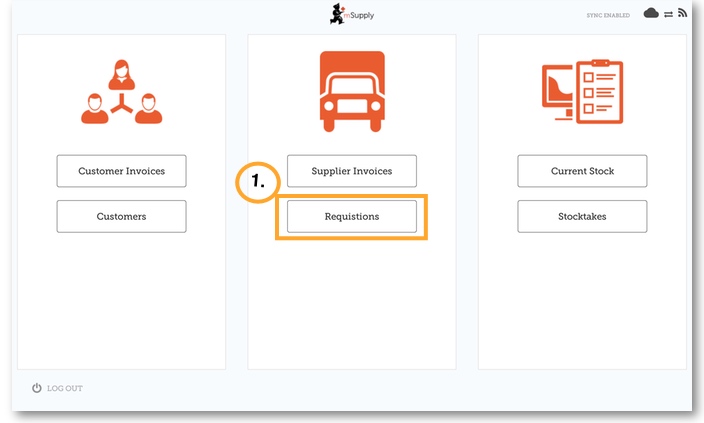
1. Click on 'Requisitions'
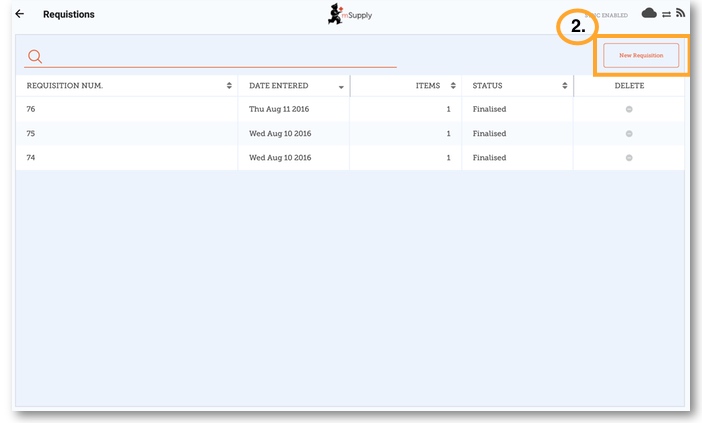
This will bring up a list of recent requisitions you have placed. If you have started working on the requisition previously, it will display in the Status column as 'In Progress'. If you haven't finalised it, you can click on it and keep working on it.
2. Now click on 'New Requisition'.
These are the two ways to add items to the requisition.
To add a lot of items (for example, when you are placing your main order), click 'Add Master List item'.
If you only have a few items, click 'New Item'. This is the best option for small orders.
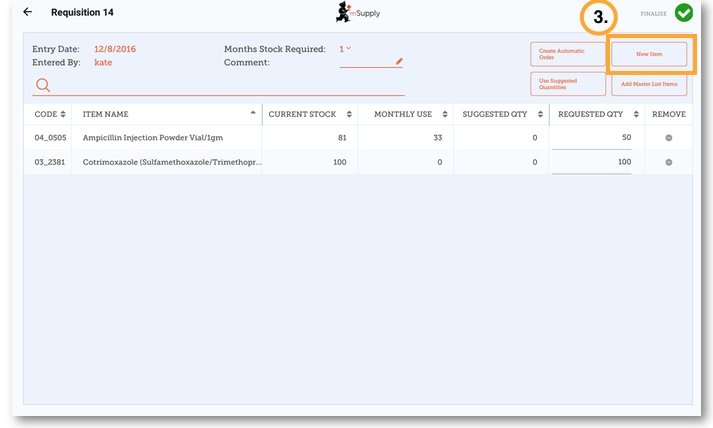
3. We only have two items, so click 'New Item'.
Add in the details for the items:
Ampicillin inj x 50
Co-Trimoxazole 480mg tabs x 100
Make sure your quantities are correct. If you want to change them, click on the 'Requested Quantity' column and change the number.
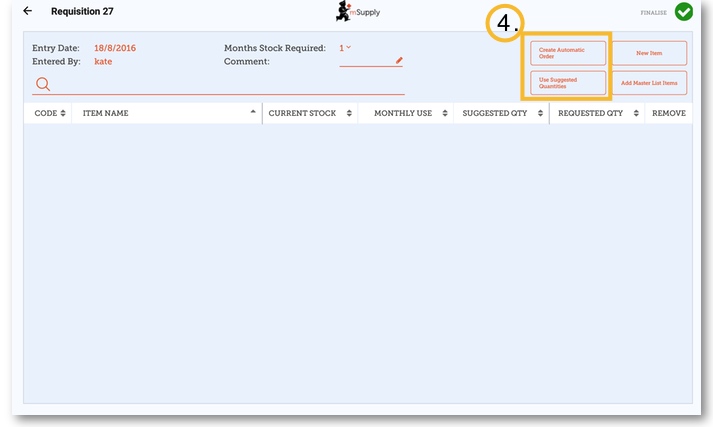
4. You can click on 'Use Suggested Quantities', or 'Create Automatic Order' if you are certain that you are not ordering an item which you have not previously ordered. By choosing one of these options, mSupply will automatically calculate the amounts of each item you require, once it builds up a history of how much stock you're using.
5. When you are completely sure that everything is correct, click the 'Finalise' button, then 'Confirm' and your order will go to the supply store. 
Even if you don't have internet at the time, it's Ok! The order will send automatically when you do have internet later.
What is the difference between a requisition and a supplier invoice?
A Requisition is an order that YOU have placed to the Medical Stores. A Supplier Invoice is a record of what they have sent you. These are not always the same, as Medical Stores might not have had enough stock to fill your requisition, or they might have sent you some stock that you didn't order. When stock arrives at your facility, check it off against the Supplier Invoice - as this is what you were supposed to receive.
Calculating quantities on your requisitions...
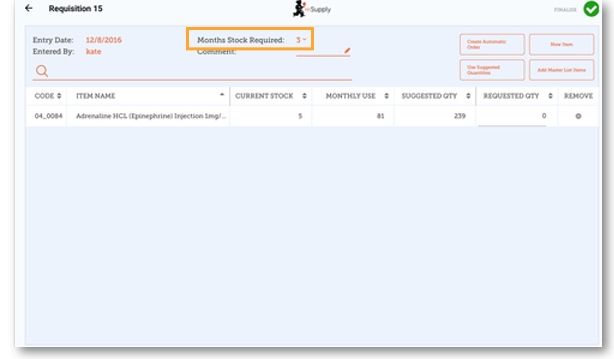
When you are creating a new requisition, mSupply Mobile now has a tool to help you work out how much stock you need to order! In the past, you had to use a calculation formula to work out how many of each item, and you needed to do this for EVERY item in your order.
Now, simply select the 'Months Stock Required' and mSupply Mobile will calculate your order quantities automatically. You can even check the amounts and change them if you require.
4. Supplier Invoices
After you've sent your requisition to your supply store, you then wait for your order to arrive.
And wait and wait and wait…….
Then finally your order will be on the way!
When your order has been prepared by your supply store, you will see a Supplier Invoice. This is exactly like the hard-copy (paper) invoice you would usually receive with your order.
You may still continue to receive a paper invoice when your order arrives, but it is very important you check everything against the electronic invoice on mSupply Mobile when you order arrives.
Remember: The supplier invoice will not always match the requisition you sent.
Also remember that the supplier invoice SHOULD match the stock you are receiving, but it may not. You must always check your order when it arrives. You can make changes to the Supplier Invoice on mSupply Mobile, or you can confirm everything is correct. When you are satisfied that the Supplier Invoice matches the stock you have received, you can 'Finalise' the order and accept it into your stock. Your 'Stock-On-Hand' numbers will automatically update!
Let's go through each step…
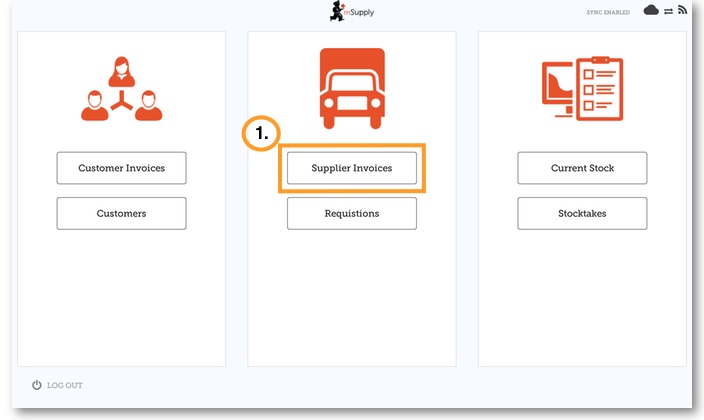
1. Click on 'Supplier Invoices'
A list of Supplier Invoices will appear. You can use the 'Status' column to check which one you have been sent but has not yet been received.
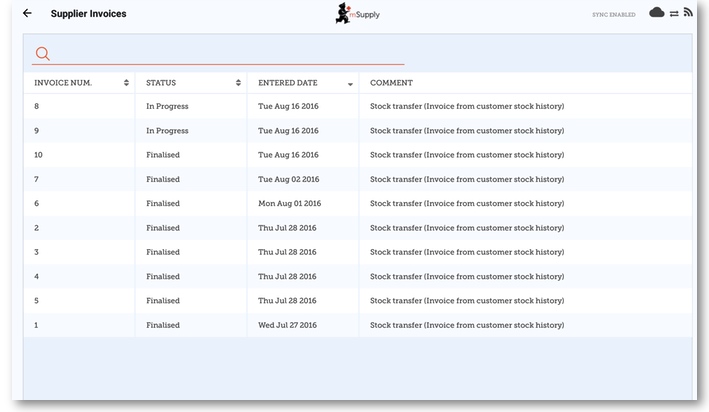
2. Click on the Supplier Invoice you have been sent.
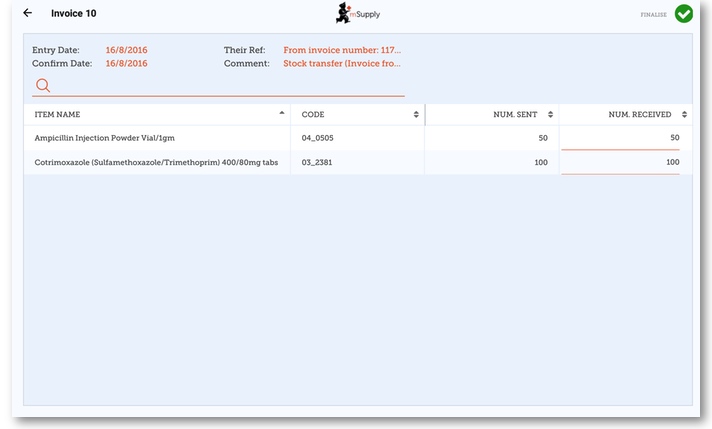
This will bring up your Supplier Invoice. You can see the two items that we entered on the requisition earlier.
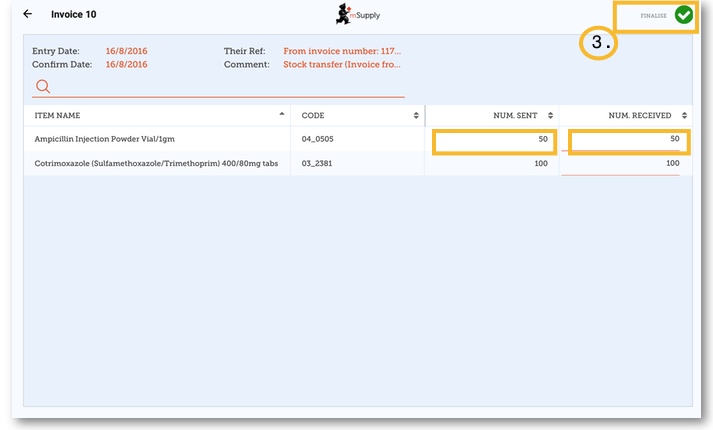
3. Once you are happy that the 'Number Received' column is correct, click 'Finalise', and then 'Confirm'.
5. Current Stock
One of the most important - but easiest - tasks in mSupply Mobile is to check how much stock you have on hand. When you create a Customer Invoice and add an item, mSupply Mobile will tell you if you have enough stock. But at many other times, you might want to quickly check, and it is very simple to do so.
Let's try!
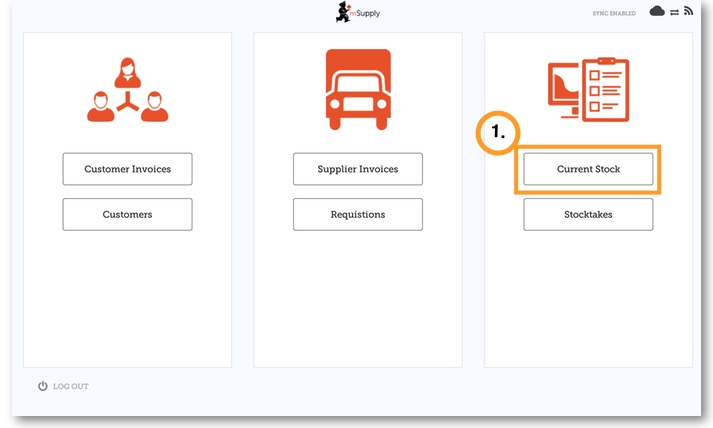
1.Click on 'Current Stock'
This will bring up a list of your current stock-on-hand.You can scroll through this list and quickly see each item's name and 'Stock-On-Hand' (amount of each item you currently have in stock).
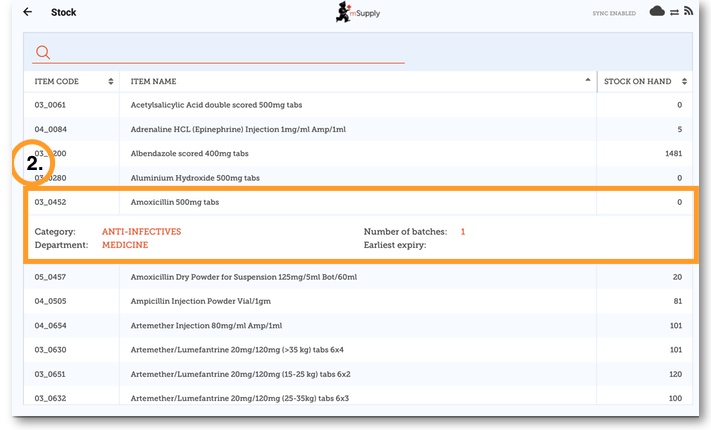
2. If you want to know a little more about an item, click on the item and it will bring up more information, such as the Category, Department, and closest expiry.
If you want to search for a specific item, without having to scroll through, just enter the first few letters into the search bar at the top.
6. Stocktakes
mSupply Mobile will automatically keep track of your stock levels for you, as you receive stock and give it out. But sometimes data gets entered incorrectly or stock goes out without anyone making an entry in the system. Of course, we try not to let that happen - BUT if it does happen, we can make corrections. The easiest way to correct mistakes is to do a stocktake.
With mSupply Mobile, you can easily do the data entry for a full stocktake, OR you can choose to do a stocktake on a limited range of items (such as all your anti-malarials). You can even do a stocktake on a single item, if you notice that the quantity on your shelves is wrong.
Stocktakes
You should already be doing stocktakes with your current ordering systems.
Stocktakes are a very important way to ensure that the orders we are placing are accurate and that the stock will be correct if anyone checks!
Ideally, you should be doing a physical stocktake of each item EVERY time you place a main order- but this depends on your local policies and procedures (and it may not be possible in larger facilities).
Let's learn how to do a stocktake… using mSupply Mobile makes doing stocktake a LOT easier than before.
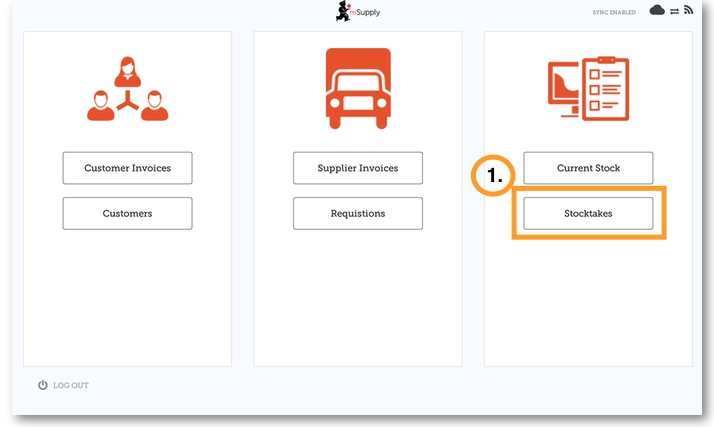
1. In the main screen, click on 'Stocktakes'
This brings up a list of all your previous stocktakes. The description of each Stocktake will be shown, with its date and 'Status'.
There are two stocktake statuses: In Progress (Current) and Finalised (Past).
An 'In Progress' stocktake is one you are still working on. If you want to keep working on an 'In Progress' stocktake, double click on it.
'In Progress' Stocktakes
'In Progress' Stocktakes are the stocktake you are still working on, and haven't finalised.
We strongly recommend only having one In Progress Stocktake at any time. This will prevent mistakes when moving between them.
Finalise or delete old stocktake before starting new ones!
Let's start a new stocktake now…
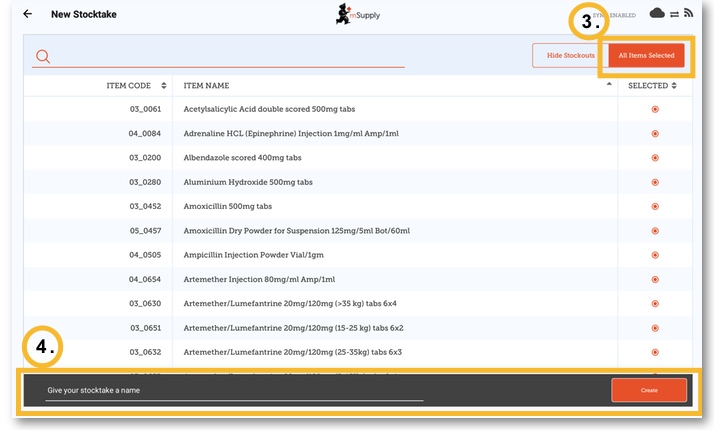
2. Click on 'New Stocktake'

3. Select the items that you wish to count by highlighting them in the far right column.
If you want to include EVERY item or most items, click 'All Items Selected'.
4. Give your stocktake a logical name, such as “April Full Stocktake'., and click CREATE.
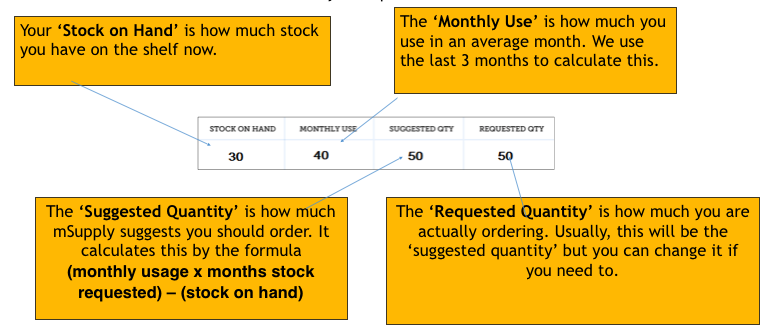
5.This will bring up the stocktake editor. This lists each item, its 'Snapshot Quantity' and its 'Actual Quantity' (from the physical count). The Snapshot Quantity is what the system THINKS you have. If it is correct (when compared with your physical count), you don't need to do anything!
The Actual Quantity is what you have actually counted. You can change this by clicking in that column and typing in the correct quantity.
6. Go through each item and compare your physical count with the Snapshot Quantity. Change each one you have to by clicking in the 'Actual Quantity' column. If you change the amount of stock you have in the Actual Quantity column, this variation will now show in in the Difference column.
This can take some time but remember - if the Snapshot Quantity is correct, you don't need to do anything!
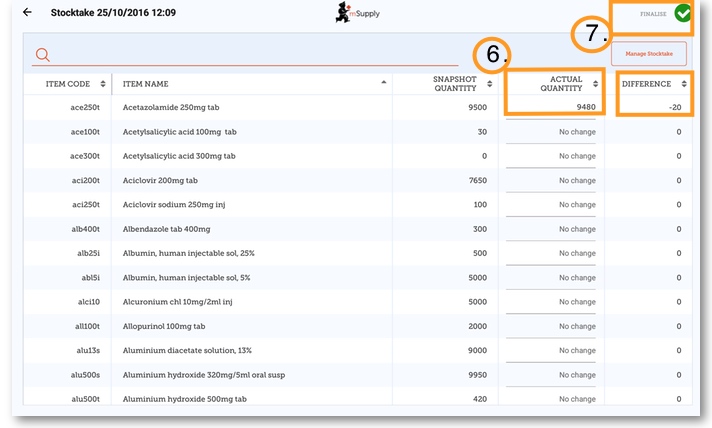
7. When you are finished, click 'Finalise'. This will update all your stock levels to match the quantities you have entered in the 'Actual Quantity' column.
Like always with mSupply Mobile, you don't need internet to do this - the information will sync in the background when internet becomes available.
Previous: Which one? Next: Tutorial Introduction