21.02. Asset management
Assets are the equipment and items used to support a health supply chain, like vehicles, fridges, and freezers.
In contrast, stock or inventory are the medicinal products and consumables that move through the health supply chains to be used by health workers or dispensed to patients. Stock or inventory include items like Amoxicillin 500mg capsules and surgical masks. Don't manage those using the asset functionality!
Different information is important when recording assets including:
- when the asset was purchased as well as when it was sold or thrown away
- current location and maintenance schedule
- current value and depreciation
mSupply allows you to manage the assets you have throughout your supply chain.
Before using this functionality, there is some setup you should carry out first. See the 21.01. Assets setup page for details.
Viewing assets
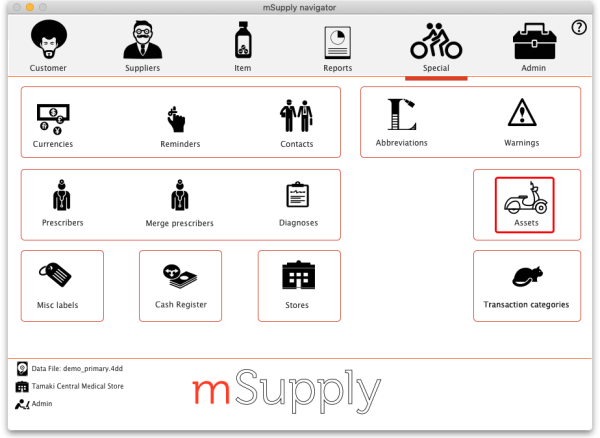
To see a list of the current assets in your system, choose Special > Show assets from the menus or the Assets icon on the Navigator:
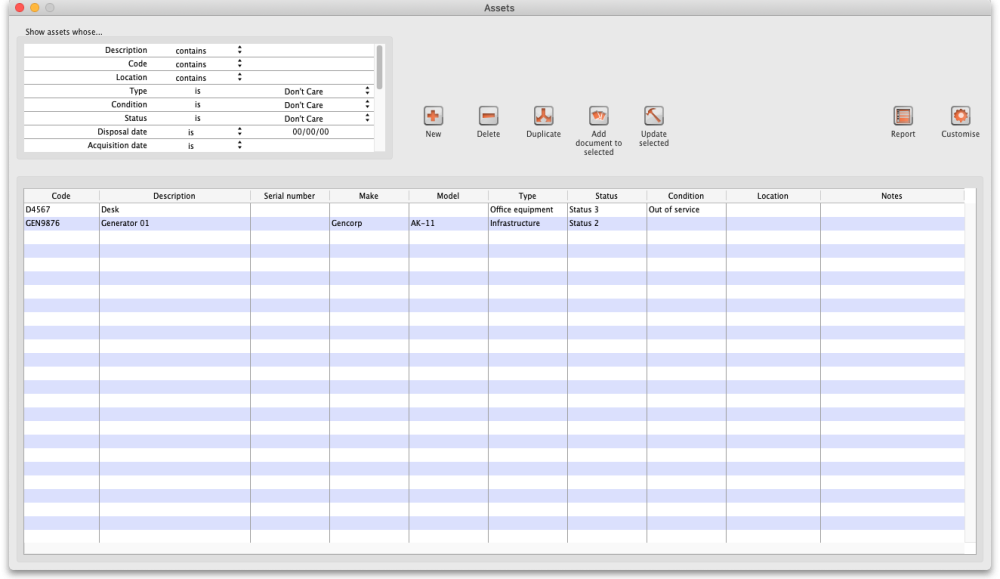
That will open this window:
Filters
The filters are in the Show assets whose… section in the top left corner and they determine which assets appear in the table. There are many filters so you can scroll the filter area to see them all.
- Each filter has 3 columns: the label, the comparator and the search value.
- The comparator is either a drop down list for you to select or fixed at “is”
- The search value is either a drop down list for you to select the value or an empty text field for you to enter the value to be matched against.
- Any filter that has nothing in the right hand column (the search value) is ignored, just like other filters throughout mSupply.
- The filters are all ANDed together. This means that only assets that match all the filters applied will appear in the table e.g.
- By default the only filter applied is “Disposal date is nothing” so all the assets that have no disposal date (i.e. are active) will be displayed.
- When you close the asset list window, the filters you have set are saved for you so that when you open the window again, exactly the same filters will be applied.
- The first filters (down to Renewal date) are fixed and represent some of the standard fields you can enter for assets. The filters after that are for the current active properties (set in asset settings - see 20.01. Assets setup page for details.
Notes about date filtering
- In a date filter, any invalid dates you enter in the right hand column will automatically be turned into an empty date (usually
00/00/00but will depend on your current operating system date settings). - If you do an is empty date search, that will include assets that do not have any value set for that date.
- If you do an is not search on an empty date, that will include all assets that do have that particular date set (to any value).
A note about property filters
The filters after the Renewal date filter are for your currently active asset properties.
If you use an is not filter for a particular property value, any assets that do not have a value set for that property will not be included in the assets displayed.
For example, let's say you have a property called Colour. Asset1 has a colour value of Blue, Asset2 has a colour of Red and Asset3 has no colour value set. If you set the colour filter to Colour is not Red, only Asset1 will be shown. Asset2 is not included because its colour is Red and Asset3 is not included because it has no value set for colour.
Deleting an asset
To delete an asset, simply select it in the table (by clicking on it) and click on the Delete button. You will be asked to confirm the deletion before it is carried out.
Duplicating an asset
To duplicate an asset, simply select it in the table (by clicking on it) and click on the Duplicate button. You will be asked to confirm the duplication before it is carried out.
A duplicate asset will have exactly the same values for all fields and properties as the one you selected to duplicate (including its attached documents) except the Description and Notes fields:
- The Description field of the duplicate asset will have “(Copy)” appended to it.
- The Notes of the duplicate will have the same notes but with “Created by duplication of asset 'description'.” appended to it.
Uploading documents to assets
This function is for uploading the same document to one or more assets at the same time.
Simply select the assets you wish to add the document to in the list (by clicking on them and using Shift+click and Ctrl+click to select the ones you want) then click on the Add document to Selected button. This window will open:
- Choose button: Click on this to choose the file to upload to the asset. A window showing the files available on your computer will open and you can navigate to the file to select it by double-clicking on it. When you do that, the name and path of the file will be displayed in the File name field.
- Document type: Select one of the active document types.
Both these fields are compulsory. You can click on the Cancel button to cancel the upload or the OK button to action it.
After the upload has been carried out you will be shown a message telling you how many assets the document was successfully uploaded to.
Updating several assets at once
The Update selected button allows you to update values of one or more assets at the same time. Before clicking on the button, select the assets you want to update in the table by clicking on them and using Shift+click and Ctrl+click to select the ones you want.
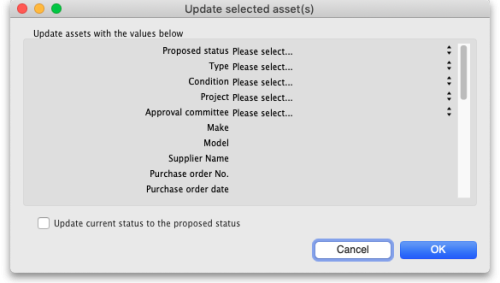
After clicking on the button, this window opens:
The window contains many of the standard fields for assets and all the currently active properties. You can select values in the drop down lists (which are set to Please select… when the window first opens) and enter values in the text fields of the right hand column for as many fields as you wish to update (the list of fields is long so you will need to scroll it to see them all).
All the assets you selected will be given the same values you select and enter in the right hand column so be careful!
If you want to update each of the selected asset's current status to be their proposed status then check the Update current status to the proposed status button.
When you are ready, click on the OK button to carry out the updates. When the update has been carried out, you will be told how many of the selected assets were successfully updated. Any errors will be logged and you can see these logs by going to Admin > View log (see 25.19. The system log for details).
Reporting
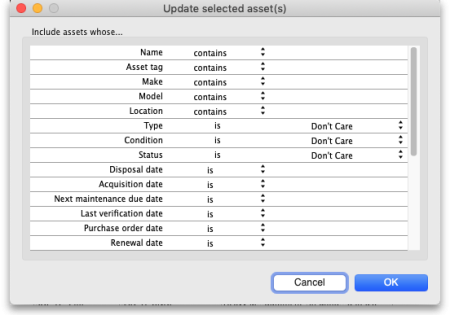
To run an asset report, click on the Report button. This window will open, allowing you to choose which assets will appear in the report:
The Include assets whose… section contains exactly the same filters as the assets list window. The settings of these filters will only affect the assets that are included in the report, they will not affect the selection of assets shown in the asset list window. The settings of these filters are also not saved when the window is closed.
When you have set the filters as desired, click on the OK button to run the report (or the Cancel button to close the window without doing anything).
A spinner will show you that mSupply is filtering the assets - please be patient, this could take a little time if there are many assets in the report as mSupply retrieves them and builds the report information. When this is complete, the report will open automatically in your spreadsheet application. Where you have entered no information, text columns will be blank, date columns will display 00/00/00 (or similar, depending on your operating system date settings) and number columns will display 0.
There is only a single report, which contains all the information about each asset. The first 37 columns (up to, and including, column AJ) are standard information. The columns after that are for the asset properties you have defined in the settings - one column for each active property.
When the report has opened in your spreadsheet application you can format it as you wish and print it from there.
Customising the asset table
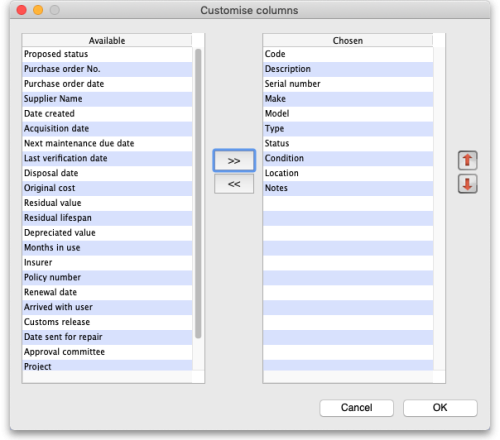
The Customise button enables you to choose which columns will appear in the assets table for you. Other users are not affected by the choices you make.
When you click on the buttonn this window opens:
The Chosen column shows the columns that are currently shown in the assets table. The Available column contains all the columns that you can add to the table (these include a columnn for each currently active asset property).
You can also change the order the columns appear in the table. To do this, click on a column name in the Chosen column and click on the up arrow or down arrow button to move it up or down in the list. The higher up the list it is, the further to the left the column will appear in the table.
Click on the OK button to save the changes you have made or the Cancel button to close the window without saving any changes. The table will update immediately to match any changes you have saved.
Editing assets
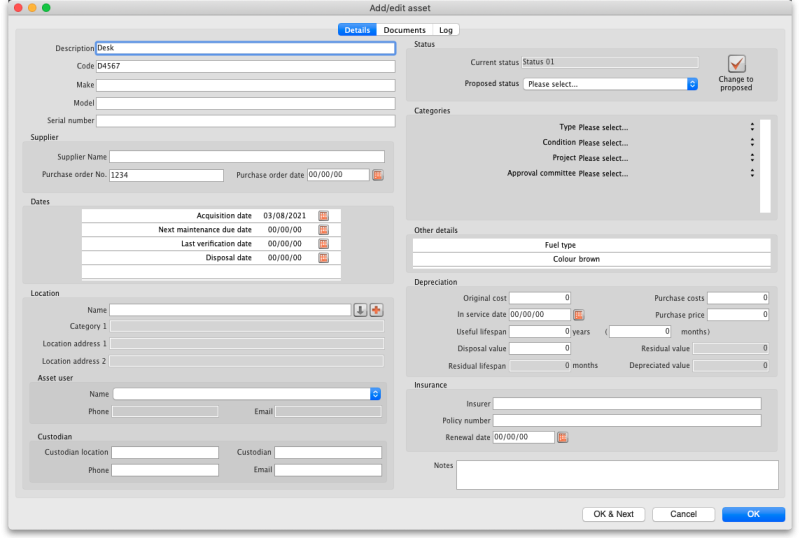
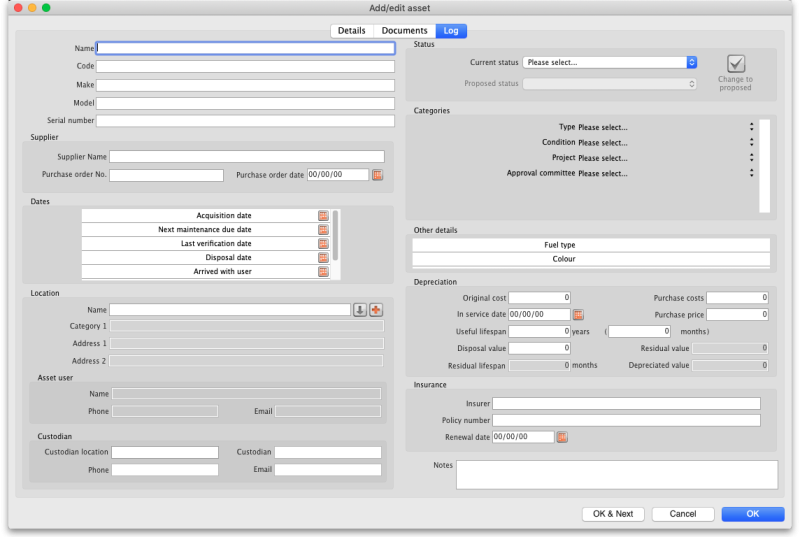
To edit an asset, simply double-click on it in the list. When you do that, the asset detail window will open, allowing you to edit the asset's details. The window looks like this:
- OK button: saves any changes you have made to the asset and closes this window.
- OK & Next button: saves any changes you have made to the asset and displays the information for the next asset in the list. The same tab will be displayed.
- Cancel button: closes the window without saving anything (Note: any documents uploaded to the asset will have already been saved so clicking the Cancel button will not remove them).
Note: if you do not have the Add/Edit assets permission (see 23.15. Managing users for details) then the OK and OK & Next buttons do not save anything.
Details tab
Note that several of the fields on this window have user-definable labels (see the 20.01. Assets setup page for details on how to set them). The screenshot above uses the default labels and we will use them in the discussion below, but this will explain whay you may see some different labels for some of the fields in your copy of mSupply.
The first few fields are plain text fields and allow you to enter the asset's description, code, make, model and serial number.
Supplier section
Here you can enter the details of the supplier who supplied you with the asset.
In the Purchase order date field you can enter the date manually or click on the calendar icon and select a date from there. If you click on the calendar icon and then change you mind, clicking anywhere outsude the calendar that appears will close the calendar and put an empty date in the Purchase order date field.
The date fields and their calendar icons all work the same way on this page.
Dates section
The dates here can be entered manually or by using the corresponding calendar icon.
The first 4 dates are standard dates used by mSupply. If you have any active date type properties they will appear after these 4 in alphabetical order.
Location section
In this section you enter the details of where the asset is.
Name: Here you select the location name. It can be any customer, supplier, donor etc. that is in mSupply. You type the first few characters of the name then press the Tab key to select from a list of matching names (if only one name matches, it is selected for you) as normal.
If the location is not already a customer, supplier or donor etc. in mSupply then you can add it by clicking on the ![]() button next to the Name field. This will open a new name window for you to enter the details; when you clock the OK button on that window, the name will be created (as a customer) and entered in the location Name field on this window.
button next to the Name field. This will open a new name window for you to enter the details; when you clock the OK button on that window, the name will be created (as a customer) and entered in the location Name field on this window.
When a location name is selected, if you want to view the details of the name you can click on the ![]() button next to it; this will open the name details window where you can view and edit (if you have permission) the location's details.
button next to it; this will open the name details window where you can view and edit (if you have permission) the location's details.
- Category 1: A read only field that displays the Category 1 set for the location name.
- Address 1: A read only field that displays the Main/Billing address 1 field of the location name.
- Address 2: A read only field that displays the Main/Billing address 2 field of the location name.
Asset user/User contact: The asset user is usually the person who uses the asset the most or who you would contact if you needed information about it. But you can use this field (and the Custodian fields) to record the contact information you need. The asset user field values are read only and come from contacts of the location name. See 5.01. Names: using, adding and editing for details on how to add contacts to a name. To tell mSupply the contact is an asset user set the contact's Category field to “Asset user”.
- Asset user Name: Select one of the location name's contacts that has a category of Asset user. The entries in the list are made up of the contact's First name followed by their Last name fields.
- Phone: The contact's Phone field value.
- email: The contact's Email field value.
Custodian: The asset custodian would typically be someone in authority who is responsible for the asset or someone who is temporarily looking after it. These fields are all text fields and you can enter the details as required.
Status section
The statuses that an asset can have are defined in the settings (see 20.02. Assets setup for details).
The current status of the asset is displayed in the read-only Current status field.
The status that is being proposed next for the asset is displayed in the Proposed status drop down list. You can select one from the list or leave it at Please select… if no next is to be proposed. The drop down list will contain all the active statuses that were set in the Current status's These statuses can be proposed after this one list (or all active statuses if that field was left empty). However, if the Current status has the This is a final status checkbox checked then the Proposed status drop down list will be disabled because no further statuses can be proposed from a final status.
Change to proposed button: If you have the Change asset status permission (See the 23.15. Managing users page for details) then this button will be enabled. Clicking on this button will update the Current status to the Proposed status.
You cannot undo this action so be sure you want to do it before you click on the button! You can of course, change the proposed status and click on the button again to change to a different proposed status but you cannot go back to the status you were at before if it is not a proposable status from the current one.
Categories section
This section contains a set of drop down lists for you to select various values for the asset. The first two, Type and Condition are standard mSupply categories that will always be present. After those will appear all the active Drop down list type properties in alphabetical order.
Click on the drop down lists and select appropriate values as required.
Other details
If you have any Text type active properties set then they will appear in this section in alphabetical order. Otherwise, this section will be empty.
The names of the properties will appear in a left hand column and a right hand column will contain text fields containing the asset's current values for the properties if any have been set. Click into the text fields and edit the values as required.
Depreciation
Depreciation is an accounting method used to represent how much of an asset's value has been used up. mSupply uses straight line depreciation in its calculations and only includes whole months used.
The Original cost, In service date and Useful lifespan fields must be filled in before the calculations can be made. Once they have been filled in the calculated values will appear in the read-only Residual value, Residual lifespan and Depreciated value fields.
- Purchase price: The actual price of the asset, as quoted by the supplier.
- Purchase costs: Any costs associated with the purchase that can be included in the total sum to be depreciated (e.g. tax).
- Original cost: The total, original cost of the asset before it starts to depreciate. It is the sum of the Purchase price and Purchase costs fields and, if you fill in either of those two fields, mSupply will calculate the sum and enter the value in the Original cost field for you. You can override that calculation by entering a value manually into this field if you wish; doing so will not change the values in the Purchase price or Purchase costs fields. Note: leaving the Purchase price or Purchase costs fields blank will not affect your depreciation calculations, they are there only for your records and benefit. But beware, if you enter a value in either of them it will overwrite the value in the Original cost field.
- In service date: The date the asset went into service and depreciation starts from.
- Useful lifespan: The length of time the asset can be used for. You can enter a value in either the Months or Years fields and mSupply will calculate and fill in the other one.
- Disposal value: The value of the asset when it reaches the end of its useful lifespan e.g. the price you do or can sell it for. Not needed to run the depreciation calculations but will obviously affect the Residual and Depreciated values.
- Residual value: Calculated, read-only field. The current value of the asset (actually the value at the end of the last complete month since the In service date).
- Residual lifespan: Calculated, read-only field. The amount of the useful lifespan that is left in months (rounded down to the nearest complete month).
- Depreciated amount: Calculated, read-only field. The amount of the Original cost that has been lost due to depreciation (= Original cost - Residual value).
Insurance
Enter the name of the Insurer, the policy number and the policy renewal date in these fields.
There is functionality to send reminder emails when an asset's insurance renewal date is a set number of weeks away. Please see the settings in the Assets tab on the 15.01. General preferences page for details about that.
Notes
This is an almost unlimited free-text field where you can enter any additional information you need to record.
Documents tab
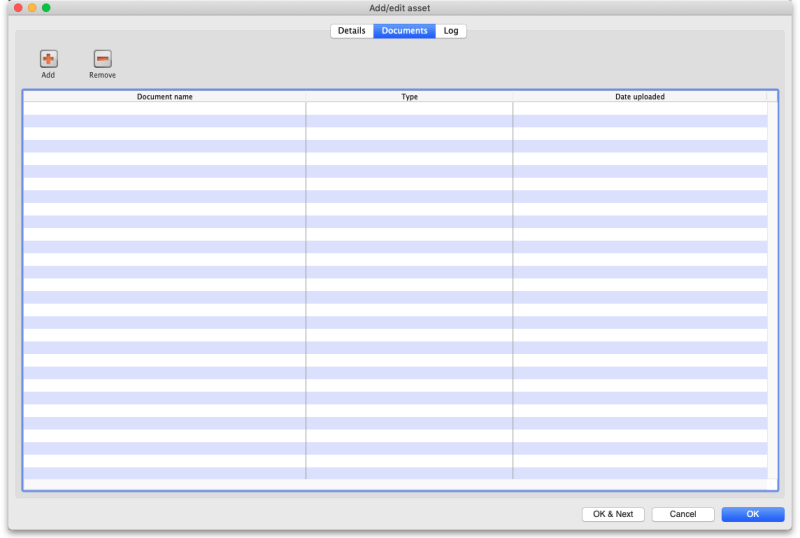
The Documents tab is where you can view and manage the files that have been uploaded to this particular asset. It looks like this:
In the table you can see the documents that have already been uploaded to this asset, their document types and the date they were uploaded.
Viewing an already uploaded file
To see the contents of any file, simply double-click on it in the list. If there is an application on your computer to open the file, it will be opened and the contents displayed for you using that application. If there is no application, you will be given the option to download and save the file on your computer.
Uploading another file to the asset
To do this, simply click on the Add button. This window will open:
- Choose button: Click on this to choose the file to upload to the asset. A window showing the files available on your computer will open and you can navigate to the file to select it by double-clicking on it. When you do that, the name and path of the file will be displayed in the File name field.
- Document type: Select one of the active document types.
Both these fields are compulsory. You can click on the Cancel button to cancel the upload or the OK button to action it.
After the upload has been carried out you will be shown a message telling if the upload was successful. If successful the document will appear in the list of attached documents.
Removing a document from the asset
To remove a document from the asset, select it in the list and click on the Remove button. You will be asked to confoirm the deletion before it is carried out and it is removed from the list.
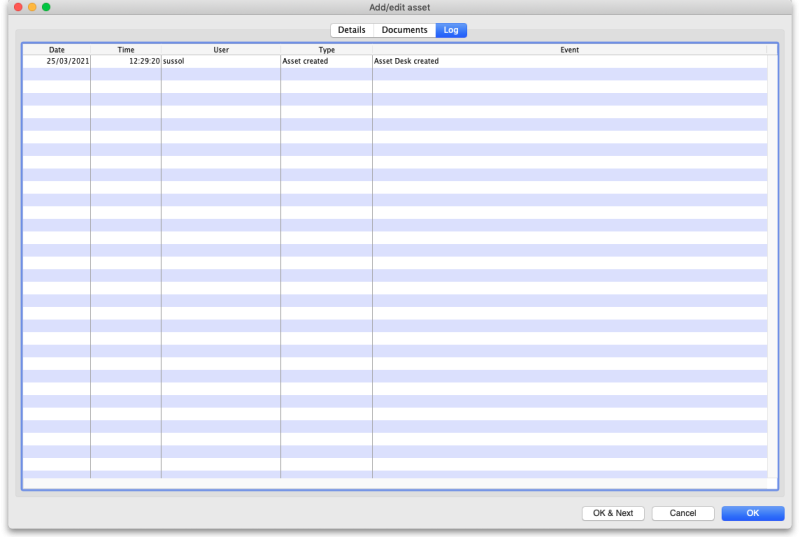
Log tab
The log tab shows you all the logs that have been generated for this particular asset. If you need to see more detail on the log entry then find it in the complete log by going to Special > View log (see the 25.19. The system log page for more details).
Adding an asset
To add an asset, click on the New button. That will open the same window as when editing an asset but it will be empty:
The Current status field is now a drop down list, containing all the active statuses that have the Can be first status checkbox checked.
The Proposed status field is disabled; you cannot set a proposed status for a new asset.
When you have filled in all the appropriate information, you can click on the OK button to create the new asset or the Cancel button to close the window without saving.
The Description and Current status fields are mandatory for a new asset and mSupply will tell you if you do not fill them in.
Connecting assets with stock via stock location (e.g cold chain equipment)
Sometimes it is helpful to make a connection between an asset and the stock of medicines or medical consumables that they contain or affect. You might want to do this for cold chain equipment, for example - so that you can link temperature variations or breaches to the need for maintenance or repair.
You make this connection by telling mSupply what asset a particular stock location is part of.
The details on how to do this are found on the 4.06. Stock locations and location types page.
Assets in a synchronisation system
Asset settings are system data and so they are settable on the primary server only. Any asset settings created or edited here are synchronised to all other sites.
Assets themselves are store based data so they can only be created and edited in the active copy of a store. Assets will synchronise from here to the central server only.
Assets in the Dashboard
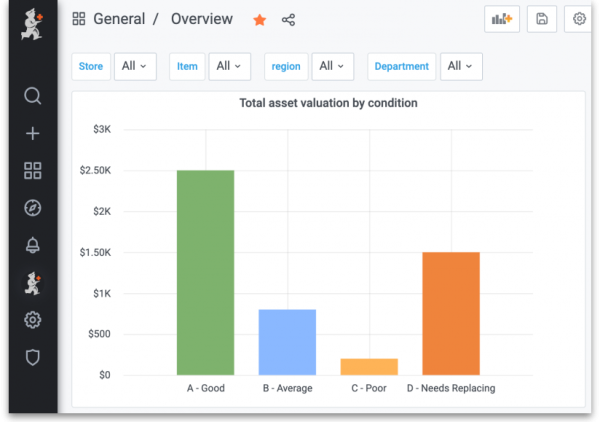
Asset data can easily be included in the mSupply Dashboard, as in this simple example here:
See the https://docs.msupply.foundation/en:dashboard pages for details on the mSupply dashboard.
| Previous: 21.01. Assets setup | | Next: 22. mSupply Mobile (Android) |
