8.06. Box management
Added: Version 3.1
Boxing is telling mSupply which boxes you packed issued stock into. This is helpful for transport and providing more information to your customers. You can either manually pack items into boxes or have mSupply suggest an optimal pack for you.
Manually packing boxes
On the transport tab of a customer invoice window, there are two methods for managing boxes.
- The simple method allows you to directly enter any Box identifiers in the Boxes column
- To use this method you should not turn on the preference mentioned below. You simply click twice (slowly) in the box numbers column of the “Transport details” tab on a customer invoice and enter box numbers.
- If you want to assign exact quantities of each invoice line to a box or boxes, and also possibly record box weights and volumes, you need to turn on the Able to pack items into multiple boxes preference:
- Choose Special > Show Stores
- Double-click on the store in question (you might only have one)
- Click on the preferences tab
- Check the “Able to pack items into multiple boxes” preference - see details on the 24.08. Virtual stores page.
The rest of this page assumes you're using mSupply with the Able to pack items into multiple boxes preference turned on.
Setting up boxes
- Once you've created a customer invoice, and picked goods, the pickers should have marked the pick slip with what quantities of each item were put into what box.
- Now go to the Transport tab of your customer invoice.
- Click Manage Boxes (Note: if you haven't turned on the preference as above, these buttons are hidden)
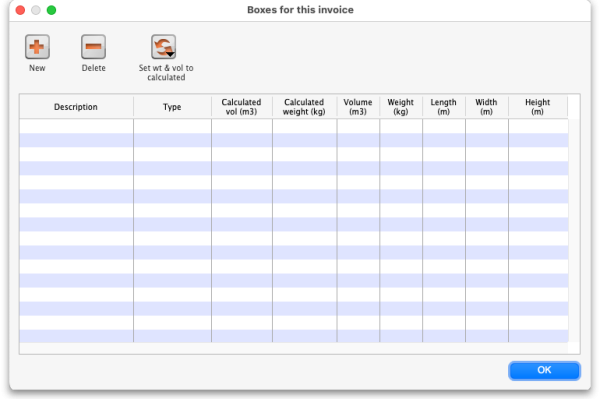
- You'll see this window:
- Click New to add boxes
- We suggest you keep box names short. e.g. 1, 2, 3, 4 or A, B, C, D
- Type a box name, click OK & Next (shortcut: the Enter key) to add another box.
- On the last box click OK to save and close the window.
- If you're Gary, you might have clicked OK & Next one too many times. In that case you can use the Cancel button to close the window.
- Note that you can't have a blank box name, and you can't have two boxes on the same invoice with the same name (You can just use the same series of box names over and over on different invoices).
- If you make a mistake with a box name you can double-click a row to edit it.
- Click OK to close the Box Management window when you're done.
Using the Box Selected Button
- In most cases you will be able to put the total contents of an invoice line in the one box.
- In that case, click on a row, or hold down <control> (Windows) or <command> (Mac) and click on multiple rows.
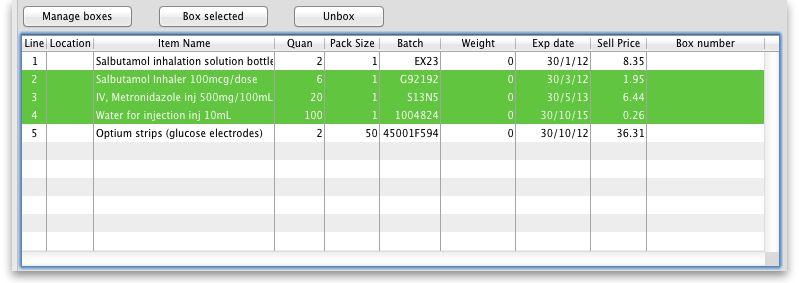
- In the example below we have highlighted rows 2, 3 and 4.
- Now click Box selected
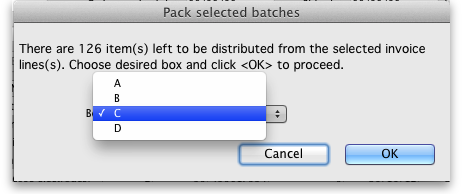
- You'll be shown the “Pack selected boxes” window:
- Choose the box for the items from the drop-down list.
- Click OK to close the window.
- You'll see the boxes column in the list has been filled out.
Splitting a single invoice line over multiple boxes
- If you have bulky invoice lines or large quantities, you will need several boxes to hold the one line.
- Double-click the line to assign to boxes.
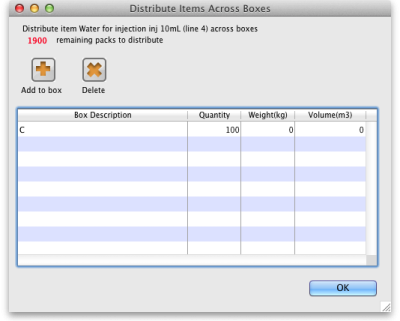
- Let's say in the example above, you got a supplementary request to increase the water for injection quantity from 100 to 2000. You go back to the “general” tab and do this. Now back on the transport tab you double-click the water for injection. This is what you would see:
- Notice that at the top of the window “1900” is in red. That's the quantity still to distribute.
- Click the Add to box button.
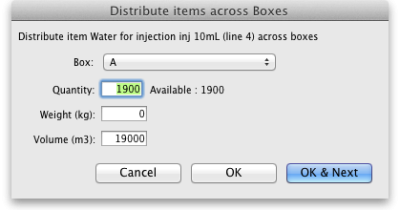
- You'll see this window:
- Let's say we're going to put 1000 in box A and the remaining 900 in box B
- Enter 1000 in the quantity field
- Choose A from the drop-down list
- Click OK & Next
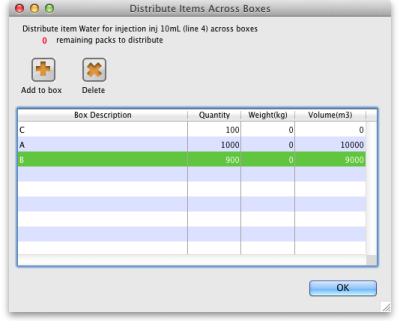
- Fill out the window to enter 900 in box B and click OK to close the window.
- Now your window should look like this:
- You can double-click a row to edit it.
- To delete a row, click on it to highlight it, then click Delete
- Note that the weight and volume for the item will be calculated automatically if you have set them in the item details window, but you can also override the calculated weight/volume when you are assigning an item to a box.
Removing an invoice line from all boxes
- You can use the Unbox button to remove an invoice line from all boxes at once.
- Highlight one or more invoice lines.
- Click Unbox
- You're done.
Seeing what is in a box
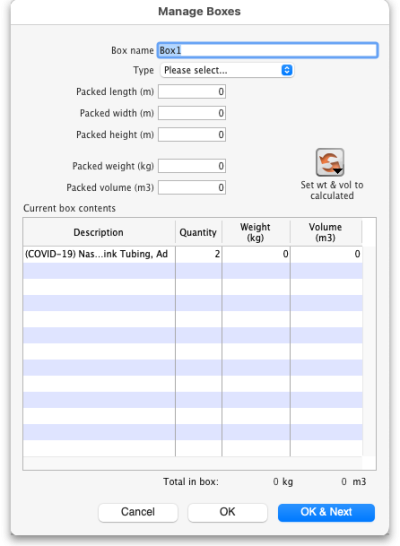
- If you click Manage Boxes and then double-click a box you will be shown a list of items in that box.
- You can also set the measured weight and volume in this window, which will usually be somewhat higher than the calculated weight/volume:
Note that if the box has a Type then the Packed length (m), Packed width (m), Packed height (m) and Packed volume (m3) fields become read only and display the values of the box's type.
Printing packing list for each box
- We have custom printing forms available that will print packing lists for each box. Ask us for more details.
Using mSupply to suggest an optimal pack
Rather than you manually entering which boxes the stock has gone into, mSupply can suggest an optimal pack for you. You can choose to accept or reject the pack it suggests. If you accept it, the stock is automatically packed into the boxes suggested and you can print out a guide for the packers to then follow this pack. Should you need to, you can still edit an optimal pack using the functionality described in the section above.
mSupply uses the volume of the stock and the volume of the boxes to determine what can be packed into which box so it needs both of these pieces of information. mSupply will also use the carton pack size to recognise manufacturer cartons and leave those out of the pack if you enter the carton pack size information when you receive stock.
Setup
Create the standard box types
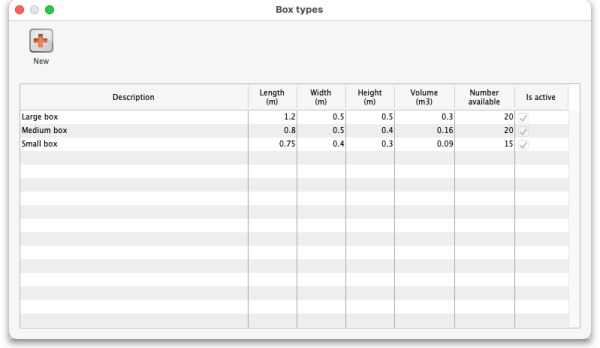
Choose Customer > Show box types from the menus and this window will be displayed:
The window displays the current box types defined in the system. You can create a new box type by clicking on the New button or you can edit an existing box type by double-clicking on it in the list.
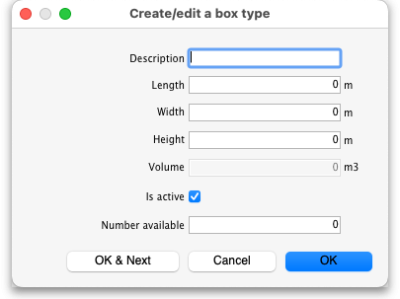
If you click on the New button this window opens (if you double-click on a box type to edit it, the same window is opened but it is populated with the selected box type's details, which you can edit as required):
Enter the details in the various fields as follows:
- Description: The name of this box type (this is not the name that boxes of this type will be given when they are created. It is the name of the type of box only)
- Length: The length of boxes of this type in metres
- Width: The width of boxes of this type in metres
- Height: The height of boxes of this type in metres
- Volume: This is read only and will be calculated for you as the Length, Width and Height values are entered or edited. The value is shown in m3 and is the volume available for filling with stock.
- Is active checkbox: Checked by default for new box types. If checked then this box type is used in suggested packs. If it is unchecked then this box type is not used in suggested packs.
- Number available: The number of boxes of this type that are available for packing goods into. The number is automatically decremented as boxes are used in packs. If it reaches 0 then boxes of this type are no longer used in suggested packs.
When you have finished entering or editing the information, click on the OK button to save the changes or the Cancel button to discard them. To save your changes and immediately add another box type or edit the next one in the list, click on the OK & Next button instead of the OK button.
Set the box packing preferences for the store
There are some store dependant preferences which you can set, as described on the 26.07. Virtual stores page.
Turn on the preference to use carton pack sizes
This is an optional step. If you don't want mSupply to recognise and exclude manufacturer supplied cartons from the pack (and therefore pack all lines on the customer invoice into boxes) then you can ignore this step.
To turn the preference on, choose File > Preferences from the menus and go to the Invoices 1 tab and check the Show inner and outer pack fields checkbox. The preference and what it does is described on the 16.03. Invoice preferences page.
When the preference is turned on, don't forget to tell the users to enter the carton pack size in the Quan per inner field on a supplier invoice when stock is received. Unlike volume per pack, there is no way to add the inner pack size to stock lines that have already been received because this could potentially lead to internal ledger errors.
Enter volume information when receiving goods
Not really a setup step but you need to make sure users know they must enter the volume per pack of stock as it is received. If there is no volume against stock then mSupply will just put it all in the first available box!
Volume per pack for each line of stock is entered at the time stock is received on a:
- Supplier invoice in the Volume per pack field shown on the 7.01. Supplier invoices page or
- Goods received note in the Volume per pack field shown on the 7.02. Goods receipts page.
You can also edit an existing line of stock to add its volume per pack at any time by using the Edit stock line window, as described on the 4.01.05 Items - Stock tab page.
Getting a suggested pack
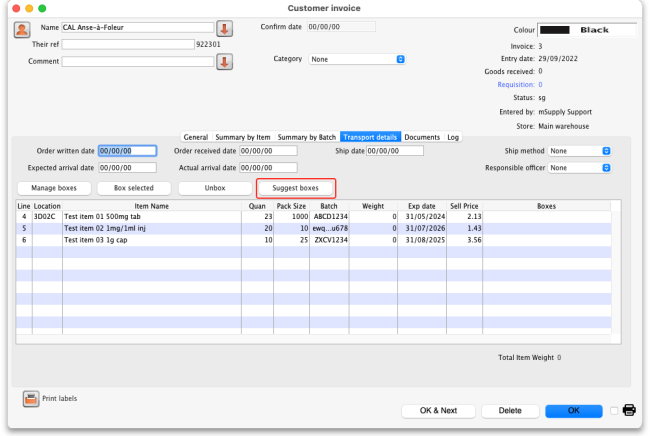
To create a suggested pack, go to the Transport details of a customer invoice and click on the Suggest boxes button shown here:
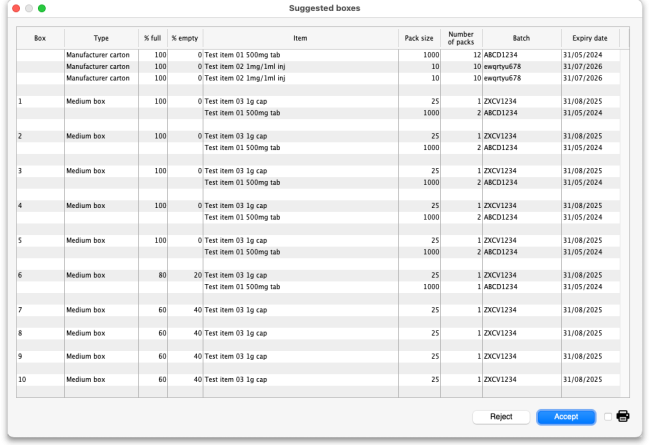
mSupply will calculate the suggested pack and display it in a new window like this (note: any lines that are already partly packed in a box are not included in the suggested pack):
The columns in the table display the following:
- Box: the name of this box (manufacturer cartons do not have a name since they are not packed in a box, they are ready for shipping as they are).
- Type: the type of this box. All manufacturer cartons have the type Manufacturer carton.
- % full: the percentage of the total volume of the box that is filled with stock.
- % empty: the percentage of the total volume of the box that remains empty.
- Item: the name of the item.
- Pack size: the pack size of this line of stock.
- Number of packs: the number of packs of this stock line to be packed in this box.
- Batch: the batch of this line of stock.
- Expiry date: the expiry date of this line of stock.
The manufacturer cartons are shown first (if any have been detected) and will always be shown as 100% full and 0% empty.
They are then followed by the boxes to be packed. The box name and type is shown for the first line of each box only and different boxes are separated by a blank line. So, in the example suggested pack shown above, box 1 is a medium box and should have 1 pack of Test item 03 (pack size 25, batch ZXCV1234, expiry date 31/08/2025) and 2 packs of Test item 01 (pack size 1000, batch ABCD1234, Expiry date 31/05/2024) packed in it.
If you are not happy with the suggested pack you can reject is by clicking on the Reject button. This will close the suggested pack window and log that it was rejected.
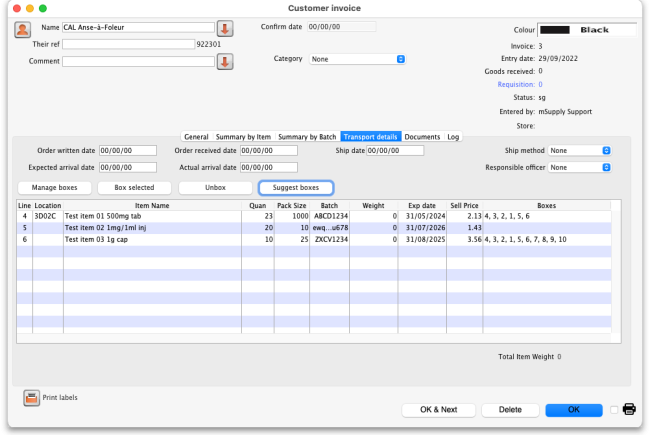
If you wish to accept this suggested pack, click on the Accept button. This will log the acceptance and create the boxes and pack the items into them as shown in the suggested pack. The Transport details tab is then updated ot show the lines packed into the appropriate boxes. This is what the example above looks like after the pack has been accepted:
If you want to print out the suggested pack (might be helpful to help the packers!) check the printer checkbox in the bottom right hand corner before clicking on the Accept or Reject buttons.
Please note: you can edit a suggested pack and the individual boxes created by it after the pack has been accepted if you wish. All the standard box management functions described above will work for boxes created by a suggested pack (including emptying and deleting boxes).
If you accept a suggested pack, partially unbox it (i.e. leave one or more lines still boxed), then click on the Suggest boxes button again, you might end up with one or more different boxes with the same name because the suggested pack function does not check for any existing boxes using the same name as one it is creating for the pack. This might cause confusion when the contents of the boxes do not match what you expect. For this reason, we recommend you always fully unbox an accepted suggested pack before trying it again.
Accepted pack report
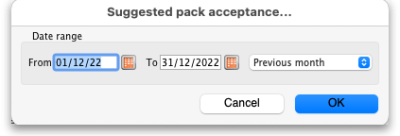
You can run a report on how mamny customer invoices were packed using the suggested pack. To do this, choose Report > Suggested pack acceptance from the menus. The report options window will open:
Select the dates between which the creation date of customer invoices must fall to be included in the report. The Previous month is selected by default but you can select different From and To dates manually, by using the calendar icons or by using the quick selector drop down list.
Click on the OK button to run the report, which will look like this:
The final column shows a Y if the suggested pack was accepted for this invoice, an N if it was rejected and is blank if an invoice has never had a suggested pack.
The report uses the pack acceptance/rejection log entries to decide whether the pack was accepted or not. The last pack acceptance/rejection log entry for an invoice is the one that tells mSupply whether the pack was finally accepted or rejected, regardless of how many suggested packs have been carried out on an invoice.
