4.23. Pickfaces and Replenishments
Before using pickfaces and replenishments there is some setup you need to carry out. To find out about that, see the previous 4.22. Pickfaces and Replenishments setup page. When you've gone through that, you're ready to start here.
Replenishment statuses
Replenishments have two statuses: suggested and finalised. We sometimes refer to suggested as “pending” or “waiting to be actioned” and finalised as “actioned” in the description below.
Like other transactions in mSupply, a suggested status replenishment is only a description of a change that will take place, it has not changed anything in the system yet. The changes (stock movement and repacking) all occur when a replenishment is finalised.
Viewing replenishments and accessing the rest of the functionality
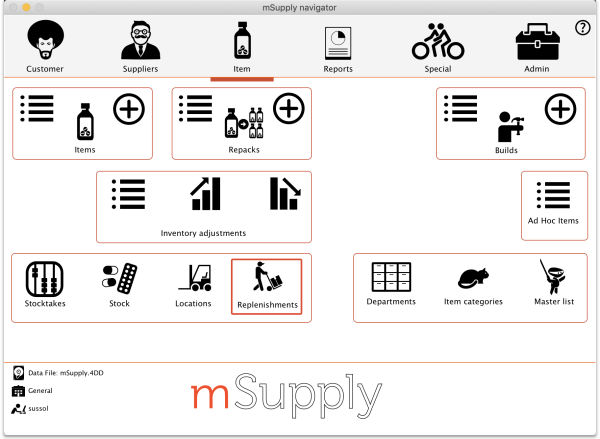
To see replenishments that have been actioned or are waiting to be actioned, click on the Items tab of the Navigator and click on the Replenishments icon:
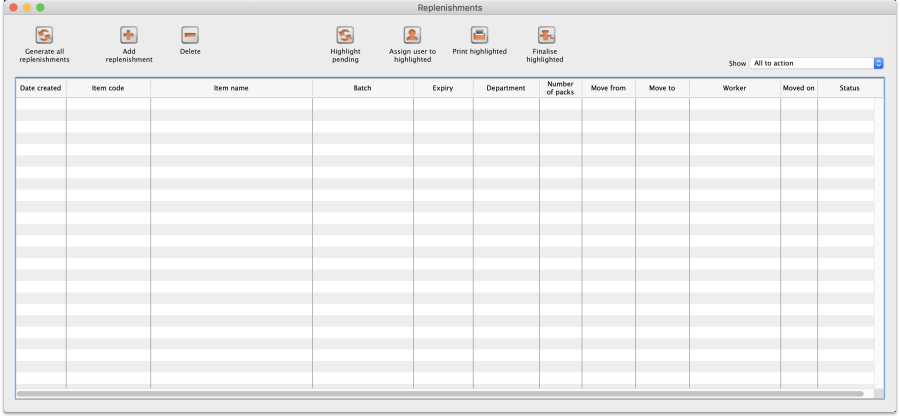
That will open this window:
By default the window will show all the replenishments that are waiting to be actioned (the Show drop down list is set to All to action). These are all the suggested status (sg) replenishments. You can change this to show all the replenishments (pending and finalised) or to show all the pending replenishments for a particular worker; just select the appropriate option in the Show drop down list and the list will update accordingly.
Automatically generating replenishments for all pickfaces
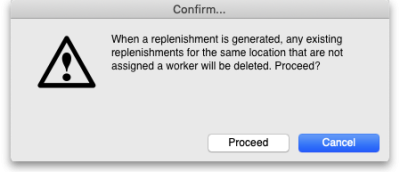
This is probably the most common way you will create replenishments. To do this, simply click on the Generate all replenishments button and mSupply will work out which locations need replenishing and how much stock should be moved into each one and create a line in the table for each replenishment. You are shown a warning message before the process begins:
This is telling you that if a new replenishment is generated by this function and there is an existing suggested status, unassigned replenishment for the same item in the same pickface location then the existing replenishment will be deleted. If you don't want any replenishments like this to be deleted then click the Cancel button and assign them to a worker (see the Assigning users to replenishments section below) temporarily before running this function.
If you click the Proceed button the replenishments are generated.
This is how mSupply generates the replenishments:
- Find all the pickface type locations that have less than the trigger level of stock in them.
- For each one of these locations work out how much stock needs to be moved into them to bring them up to their Replenish up to level.
- Find out what stock is available for this item in bulk type locations and move as much as is needed using these rules, in this order:
- If the item has a preferred bulk location then stock is taken from that location first (ignored if there is no preferred bulk location).
- After the preferred bulk location, stock is chosen from other Bulk type locations in FEFO order, smallest batch first.
- Full cartons (outer packs) only are moved if possible.
- When this process has been done for the pickface locations, the whole thing is repeated for the preferred bulk locations. If you haven't set preferred bulk locations then this part of the process is skipped.
- The final step in the process is to delete all suggested status replenishments that are not assigned to a worker, that are for the same pickface location and item as a replenishment just created and were created before this process was started.
After finishing creating all the replenishments, mSupply will tell you how many replenishments it has created and whether there were any errors. The errors you can get are:
- No bulk stock available: An item's pickface is depleted below the trigger level but there is no bulk stock available to replenish it. This could be because there is no stock of the item available or because none of it is in a location of Bulk replenishment type.
- Partial replenishment only: A pickface is depleted below the trigger level and there was some stock available to replenish it but not enough to fill it up. This could be because there is not enough bulk stock of the item or because there is not enough of it in locations with a Bulk replenishment type.
- Deletion failed: This is more a warning rather than an error. It means that a replenishment was created but an already existing, pending (suggested status) and unassigned replenishment for the same item could not be deleted. This will be because the replenishment is in use by being viewed or edited by another user.
Note about preferred bulk stock location replenishment (only applies if you're using them!): the pickfaces are replenished first from the preferred bulk locations as stated above. When the process moves onto replenishing the preferred bulk locations, the pickface replenishments haven't been finalised yet so the stock is still in the preferred bulk locations. This means that mSupply may well not generate many or any replenishments for the preferred bulk locations. So, when some or all of the pickface replenishments have been finalised simply click on the Generate all replenishments button again. mSupply will now see that the preferred bulk locations have less stock in them and replenishments will be generated as needed.
Also note that any stock that is on hold or in a locaiton that it on hold will be ignored and will not considered as being available for being used in a replenishment.
Manually creating a replenishment
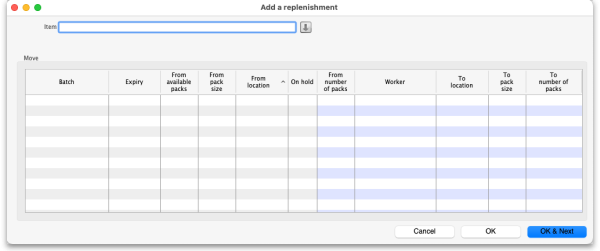
If you need to add an extra replenishment manually for any reason you can do it by clicking on the Add replenishment button. This will open this window:
Start typing the name of the item you want to create the replenishment for in the Item field. A list of items with names starting with what you typed will appear below the field. You can keep typing or scroll the list to find the item you want; click on it to select it. Several things will happen:
- The item name will then be entered in the Item field
- The item code will be shown just below the Item field
- The table will be show all the batches available for that item
- The down arrow icon to the right of the Item field will be enabled. You can now click on it to go straight to the item's details window.
If you chose the wrong one, you can change the item by deleting the name in the Item field, typing again and re-selecting another item.
In the table the blue background columns are editable, the grey background columns are not.
When creating a replenishment you are describing what stock should be moved and where it should be moved to. So, the 'From' columns describe the bulk stock (where it is now), the 'To' describe what it will become in the pickface:
- From available packs: the total number of packs that are available to move to the pickface.
- From pack size: the pack size of the stock in its current location.
- From location: the current location of the stock.
- On hold: contains a checkbox for each row. If the stock is on hold or the location the stock is in is on hold then the checkbox will be ticked and the line will be disabled; it cannot take part in a replenishment.
- From number of packs: the number of packs (of From pack size) that you want to move from the From location to the pickface.
- Worker: the worker assigned to carry out the moving of the stock. Click the appropriate cell to select a user from all those who have the Can action replenishments permission for this store. This is the only column that can be left blank and a replenishment can still be created from the row.
- To location: the pickface location. Type and select one from all locations in the current store.
- To pack size: the pack size the stock will have in the pickface location.
- To number of packs: the number of packs of To pack size that will be present in the pickface after the move.
If the item has a pickface location set then the To location column is filled in with that location and the To pack size column is filled with the pickface pack size as soon as the item has been selected.
If you have entered two of the From number of packs, To pack size and To number of packs values, the third will be calculated and entered for you. If all three have been entered and you edit one of them, one of the others will be edited to maintain the relationship From pack size x From number of packs = To number of packs x To pack size.
When you have finished entering values, click on the OK button (or OK & Next) to save the replenishment. If there is a row of the table that has some values entered but not enough to create a replenishment then you are asked to confirm you wish to proceed because those partialy completed rows will be ignored.
When you have finished creating all the replsnishments, click on the OK button. This window will close and you will return to the main replenishment list window.
Editing a replenishment
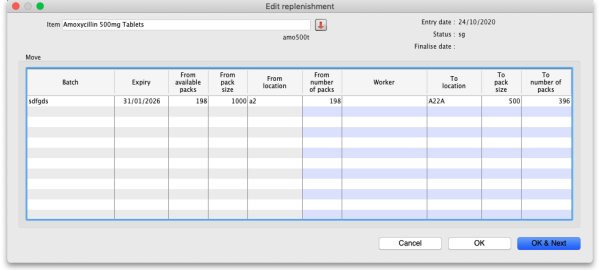
Simply double-click on a replenishment in the list to open it for editing. It will be opened in a window like that for creating a new replenishment but only a single line will be shown in the table and the Item field will not be editable:
If you want to edit the item of a replenishment, you must delete the replenishment and re-create it with the correct item.
Edit any of the values in the blue-background columns and click the OK button to save your changes.
Deleting replenishments
To Delete replenishments shown in the main replenishment list window, simply highlight the ones you want to delete in the list (click to select, Ctrl(Cmd)+A, Shift+click and Ctrl(Cmd)+click all work to help you select the right ones) and click on the Delete button.
Finalised replenishments cannot be deleted and will be simply ignored if they are selected for deletion.
After deletion has been carried out you will be told how many replenishments were deleted and how many were ignored.
Selecting all the pending replenishments in the current list
Click on the Highlight pending button and all the suggested status replenishments in the current list will be highlighted (selected).
This is particularly useful if you want to print all the replenishments waiting to be actioned in the current list.
Assigning users to replenishments
Users are assigned to a replenishment to indicate that they are responsible for carrying out or verifying the replenishment. You might wish to select the appropriate forklift driver for example.
To do this, highlight one or more replenishments in the list and click on the Assign user to highlighted button. A list of users with the Can action replenishments permission in the current store will be displayd and you can select which one to assign by clicking on it. The name will then appear in the Worker column of the list for those replenishments that were selected. If you select the None option in the list of users, any worker assigned to the replenishment is removed.
Printing replenishments
To print replenishments, highlight the ones you want to print in the list and click on the Print highlighted button. The usual print options window will appear. After you have selected the appropriate options, click on the OK button and your printout will appear. The default printout looks like this:
The Worker field will show the name of the user assigned to all the replenishments or the word “Multiple” if more than one different user is assigned to the replenishments shown in the list.
The Done column will show the word “Yes” for finalised (actioned) replenishments or will be blank for those that have not been actioned yet. The user responsible for actioning or verifying the movement of the stock can sign or tick in this column when the move has been physically completed if desired.
If there were any problems or differences between what was done and what was shown on the printout, the worker should mark them on the sheet and give that to the responsible mSupply user. The replenishments can then be edited to match what was actually done before they are finalised.
Finalising (actioning) replenishments
Until they are finalised, replenishments do not affect the stock in mSupply.
They should be finalised at a point which suits your physical restocking process in the warehouse; this could be before the stock is physically moved to the pickface location.
to finalise replenishments, simply select (highlight in the table) the replenishments to finalise and click on the Finalise highlighted button. mSupply will then move and repack the stock as required to match the details given in the replenishments.
Please note: any stock that is in on hold or that is in a location that is on hold will be ignored and will not take part in a replenishment.
Authorising pickface replenishments
When authorisation of pickface replenishments is turned on (see the 4.21. Pickfaces and Replenishments setup page for details) the replenishments list has a new Authorised column:
The column contains a checkbox for each replenishment. Only users with the Authorise replenishments permission can edit those checkboxes. When the Finalise highlighted button is clicked, only replenishments that have a checked Authorised checkbox will be finalised, all unauthorised replenishments will be ignored and left unactioned.
| Previous: 4.22. Pickfaces and Replenishments setup | | Next: 5.01. Names: using, adding and editing |
