4.22. Pickfaces and Replenishments setup
In a large, busy warehouse it is sometimes useful to designate some shelf locations as pickfaces. These locations are easily accessible for pickers, usually at floor level or the next level up in the racking. These pickfaces are then replenished from other, harder to reach locations somewhere in the warehouse.
Typically, these replenishments take place at a time when the activity does not get in the way of the busy pickers; at the beginning of the day or lunch time. A forklift driver will fetch the stock from the bulk location and place it in or near the pickface so that others can place it or open the cartons ready for picking.
Deciding which locations to replenish when can be hard to keep track of so mSupply has functionality to help and this is what is described here. There is quite a lot of setup involved so that's detailed on this page. The next page (4.23. Pickfaces and Replenishments) describes the actual functionality and how you use it.
Create pickface and bulk locations
The first thing you need to do is tell mSupply which locations can be used as pickfaces and which are used to store the bulk stock to replenish them with.
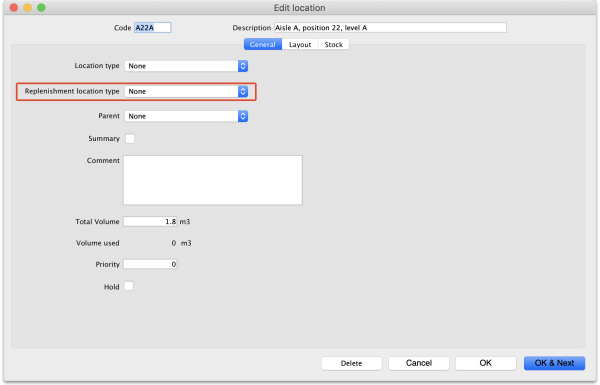
If the location doesn't exist in your system create it, if it does then open it for editing (see 4.06. Stock locations and location types for details). You will see this window:
Click on the Replenishment location type drop down list and select the type this location will be:
- None: The default for all locations and means that the location won't be selectable as a pickface and won't take part in replenishments.
- Pickface: means that this location can be selected as a pickface for an item and will be replenished.
- Bulk: means this location stores bulk stock that can be used to replenish pickfaces. Note that mSupply will only use stock in locations with a replenishment type of Bulk to replenish other locations. Any other stock in locations not set as Bulk type will be ignored in the automatic replenishment process. This means it is possible to protect stock that should not take part in the replenishment process by making sure its location has a replenishment type of None.
When you have finished assigning the replenishment type click on the OK or OK & Next button to save the changes. Repeat this process for all the locations that will be used as pickfaces or that will hold bulk stock that can be used to replenish the pickfaces.
Assign pickfaces to items
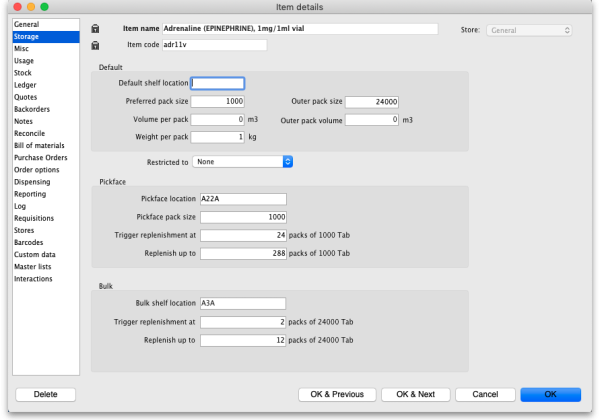
The next step is to assign pickfaces to items. To do this, find the item you want to set a pickface for and open its details window (see 4.01. About items for details). Then click on the storage tab:
On this tab, enter details in the Pickface and Bulk sections. See the 4.01.02. Items - Storage tab page for details on what the various values mean (Note: these settings are all store specific so have to be set for each store separately).
Define the users who can action replenishments
The final setup step is to tell mSupply which users can action replenishments. These are the users you can assign replenishments to.
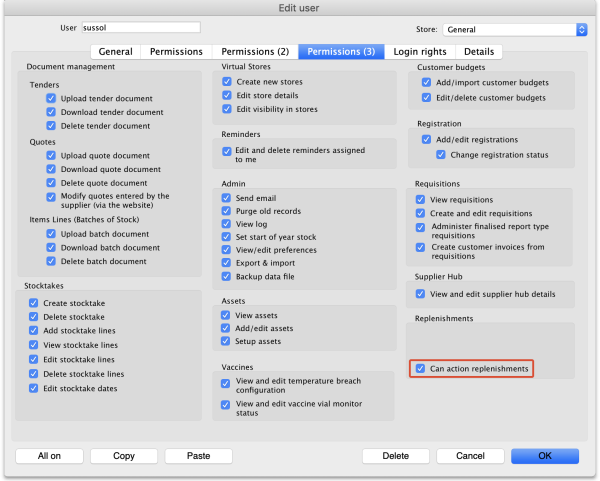
Open a user for editing (see 25.15. Managing users for details) and go to the Permissions (3) tab on the user's details window:
Check the Can action replenishments checkbox and click on the OK button to save the changes.
Repeat this for every user who can be assigned to action replenishments.
This now completes the setup and you're ready to use the functionality. See the 4.23. Pickfaces and Replenishments page for details on that.
Authorisation of replenishments
If you want replenishments to be authorised before they can be finalised then follow these steps:
- Turn on Pickface replenishment authorisation: This is a store preference. See the 26.07. Virtual stores page for details on turning this preference on.
- Give the users who can authorise replenishments the permission to do so: See the 25.15. Managing users page for details on setting user permissions, including the Authorise replenishments permission.
| Previous: 4.21. Forecasting | | Next: 4.23. Pickfaces and Replenishments |


