26.04. Budgets
To show the budgets window, choose Special > Show budgets
Two kinds of budgets
mSupply supports two different types of budgets.
- The budget module described here allows you to track spending and/or sales of items against your targets, which are entered as budgets. Items are grouped together by their account code.
- The customer budget module allows you assign a budget for each supply point (customer), and both report on how much they have been supplied, and limit supply of that item. Information on the customer budget module is available here.
Activating the budget module
To use this feature, you must check Activate budget module on the Invoices 1 tab of the mSupply Preferences window:
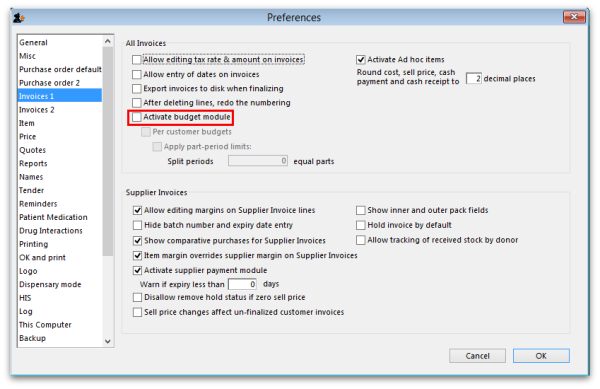 But please note, before you do this you must enter a budget period - see the Adding a budget section below.
Overview
Firstly, you define budget periods which can be any length you choose - months, quarters, years or whatever.
Once budget periods are set up, you must allocate each transaction that issues stock (customer invoice, inventory adjustment - reduce stock or supplier credit) to a budget period (see the Including transactions in your budget section below for details). The items on that transaction will have been assigned accounts (See here for how to add item account codes, and you can then view budget reports based on expenditure or sales broken down by the accounts you have assigned to items.
At the end of a budget period, that budget period may be locked so that no further entries may be made.
To use the budget feature, these are the steps to be taken:
Viewing budget details
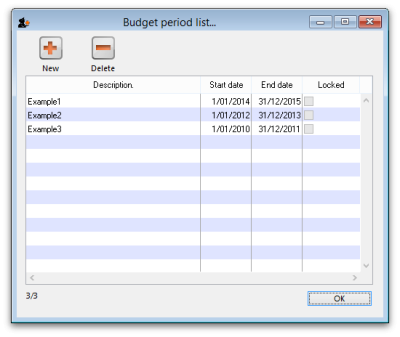
Choosing Special > Show budgets presents you with the Budget period list window as shown (note that the latest entry appears at the top of the list and the oldest entry at the bottom):
Adding a budget
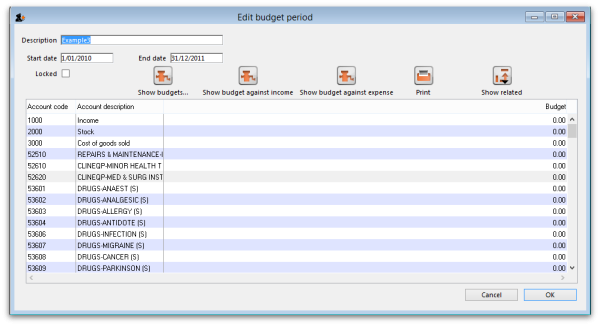
Click on the New button in the Budget period list window to add a new budget. This window is displayed:
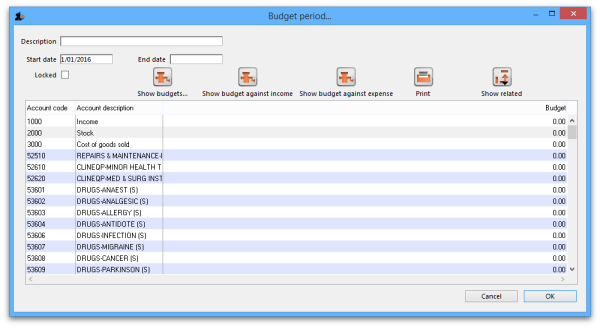
In the Description field, enter the name of the budget period - for example FY 2008.
The Start date is non enterable; the first time you use this feature, the field is set to 00/00/00, on subsequent occasions the it will show the date one day later than the End date entered on the previous occasion.
You should enter the End date, the date the budget period ends.
In the Account Description column, a list of account names and code(s) will be displayed. To set budget figures for these accounts, select the Account to which the budget applies by clicking on the line. Once selected, click on the figure in the Budget column of that line, and enter the budget figure.
Deleting a budget
Select a budget from the list in the budget list window shown above and click on the Delete button to delete a budget. You will be asked to confirm the deletion. Note, you can only delete budgets in order, starting from the most recent and you cannot delete a budget that has been used in any transactions (customer invoices) or has accounts with a budget amount of more than zero.
Editing budgets
Should you wish to edit a figure allocated to an account, double click on the appropriate line on the Budget period list and this brings up the Budget edit window; Click on the Account description, End date and various budget value fields and change them as required. Note that a budget can only be deleted when all of its accounts are allocated zero budget amount.
Budget reports
To find out information like expenditure against budgeted amount for a particular budget (and a whole lot more!) then you need to open the budget first by double-clicking on it in the Budget period list mentioned above. This opens the Edit Budget period window:
The Show budget against income and Show budget against expense buttons change the table to display the selected information for each account for that budget period. The Show budgets button changes it back to show the budget account information for the period.
The Print button prints out the table which is displayed at the time it is clicked.
The Show related button will display all the purchase orders, goods received notes, customer invoices, supplier invoices, supplier payments, customer payments or inventory adjustments which are related to the budget period. You simply click the button and choose which you want to see.
Including transactions in your budget
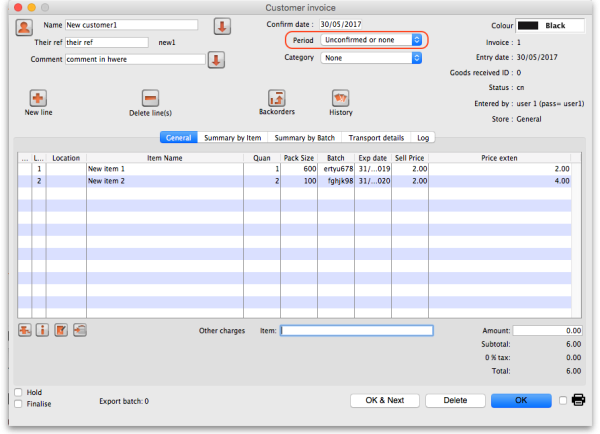
When the budget module is activated, a new Period field appears at the top of transactions that issue stock. Here it is on a customer invoice:
It is set to “Unconfirmed or none” by default and you must select a period before the invoice can be saved or closed. If you don't, mSupply will give you a warning message when you click on the OK or OK & Next buttons.
Note: you don't have to select a period if you're viewing or editing a customer invoice (or other stock issuing transaction) that was created or confirmed before the first budget period starts.
Once the transaction has been saved with a budget period, when it is confirmed the goods on it will automatically be accounted for in your budget and will affect any budget reports you run.
| Previous: 26.03. Transaction Status & Type Codes | | Next: 26.05. Edit menu |

