11.01. Payments to suppliers
Updated: version 3.1
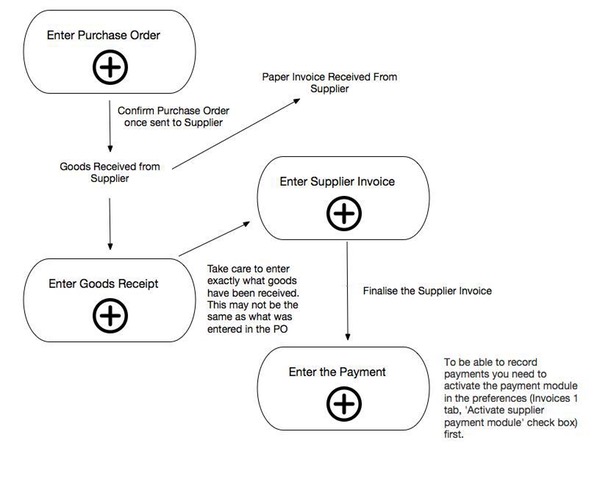
The best practice payment flow is diagrammed below. These steps ensure accuracy is maintained and payments are made for the correct amounts based on the actual goods received.
mSupply can be used to record payments that you have made to suppliers for goods received from them. To do this, you need to activate the payment module in the preferences (Invoices 1 tab, 'Activate supplier payment module' check box) first.
- Any Supplier Invoice that is finalised after the Payments Module is activated will have its amount outstanding recorded (the amount left to pay to the supplier). Payments can then be entered against those Supplier Invoices.
- Therefore, it is important to finalise any Supplier Invoices that have already been paid before the Payments Module is activated. Any Supplier Invoices finalised before the Payments Module is activated will have their amount outstanding set to zero, and so will not show for payment. Use the File > Finalize supplier invoices command to finalise all invoices. Or, view invoices (Suppliers > Show supplier invoices) and finalise them individually once all the details are correct.
- You cannot pay a supplier more than the total outstanding (as if you'd want to!). This is different to a cash receipt, where you can accept an overpayment from a customer.
Entering payments
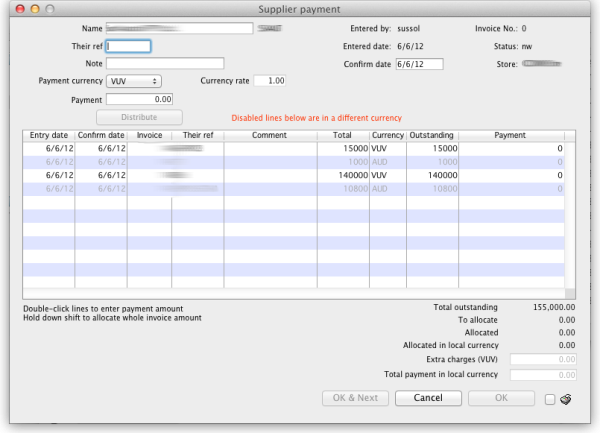
To enter a new cash payment, choose Supplier > New Cash Payment from the menus (or click on the ![]() icon in the Payments section on the Suppliers tab of the navigator to be shown the new cash payment window:
icon in the Payments section on the Suppliers tab of the navigator to be shown the new cash payment window:
The table of invoices you can enter a payment against is populated with all the finalised invoices in the store you are currently logged into (in all currencies).
Entry steps
- Enter the supplier name or code in the Name field. Once you have chosen the supplier, a list of finalised supplier invoices for that selected supplier that still have an amount outstanding will be displayed.
- Enter a comment about the payment in the Note box. If you leave this blank mSupply will automatically create a note containing a list of the invoices the payment is paying off.
- Select the currency you want to pay in. You can only enter payments in one currency at a time so all those invoices that are in a different currency to what you have selected will be greyed out in the list and you will not be able to enter a payment amount against them.
- The rate stored in mSupply for the particular currency you have selected is displayed in the Rate box. If you wish to use a different rate (e.g. the rate you know the bank will use ) you can change the rate to match it (and the calculated payment amounts will be updated automatically). Note that the rate is set to 1 and is unchangeable if you have selected your local currency.
- Enter the total amount you wish to pay in the Payment box and click the Distribute button. This will distribute as much of your payment as it can among all the outstanding invoices in the currency you selected, in the order they appear in the list. If there is any left over it will be shown in the To allocate box.
- Alternatively, you can shift-double-click each non-greyed out invoice to pay the full amount of that invoice. (Note that shift-double-clicking toggles between allocating nothing and full payment against an invoice). A quick way to find out the total outstanding amount for a supplier in the selected currency is to shift double click all the non-greyed out invoices. The total will then be displayed in the Allocated amount.
- To partially pay an invoice you can double-click it's line and enter the amount you wish to pay.
- If there are any local charges that need to be added onto the payment, they can be entered after you have allocated the full amount entered in the Payment box to invoices.
- As well as adding in local charges you can edit the total amount of the payment in local currency if needs be so that the actual payment amount matches your bank records (such a situation might arise if your bank uses a different currency conversion rate to that stored in mSupply® but you don't know what it is).
- Once you are happy with the details, click the OK or OK & Next button. If you want to print the information, make sure the print checkbox is checked.
- Note that the OK and OK & Next buttons will remain disabled until the Payment amount is non-zero and the To allocate amount is zero (i.e. a payment amount has been entered and has all been allocated to invoices).
Viewing cash payments already made
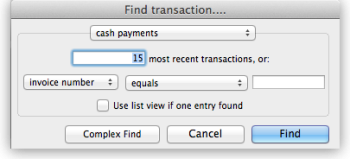
Choose Suppliers > Show cash payments… from the menus or click on the ![]() icon in the Payments section on the Suppliers tab of the navigator. You will be presented with the standard transaction find window which allows you to filter the cash payments you see:
icon in the Payments section on the Suppliers tab of the navigator. You will be presented with the standard transaction find window which allows you to filter the cash payments you see:
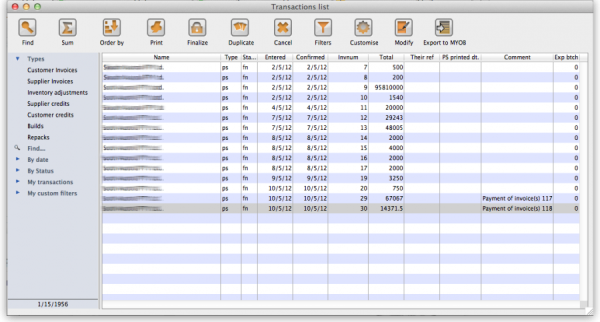
When you click on the Find button will be taken to the usual transaction viewing window with the cash payments you selected displayed:
To view an individual payment simply double click on its line in the list and you will be shown a read-only view of the cash payments form containing all the details of the payment you made and the invoices it was paying. If you have the correct user permissions you can edit the payment note at this stage even if the payment has been finalised.
| Previous: 11. Payments and Receipts | | Next: 11.02. Receiving payment from customers |


