29.02. Synchronisation Sites
Synchronisation Sites, often simply called Sync sites or Sites, are configured for each device that is running mSupply that is using the synchronisation system. The synchronisation system ensures that all data on remote sites are synced to the central server.
How mSupply handles sync sites was 'refactored' and released in mSupply v5.07 (2022-03-22). This refactoring was significant. The main changes that the user will notice / experience are:
- The new Synchronisation button on the Special page of the Navigator which provides a much more user-friendly way of managing sync sites
Type of sites
When thinking about sites, it's helpful to understand which mSupply products are being used - refer Comparison of the mSupply products.
Permissions
As Synchronisation is sensitive to misconfiguration, only system administrators should have permission to edit sites. The user permission to edit Sync settings is found under Edit user > Permissions tab > Admin.
Without the permission, a user may still view sites but may not edit them.
Viewing Sync Sites
From drop down menu Special and click Show Sites… or from the navigator as below:

From here you'll see the list of all sites:

You can see the unique site ID, site name and application type of the remote site here.
Note: The active central server site will always be at the top of the list when sites are viewed on the central synchronisation server.
Note: The X/Y number in the bottom left corner shows the number of sites showing in the table (X) and the total number of sites (Y)
- New button: When clicked, this will open a new site window for you to enter the details. See the Creating New Sync Sites section below for details of all the fields and what they mean.
- Delete button: Select a site in the list and click on the Delete button to delete it. Sync sites can be deleted if they:
- have no stores connected to them (delete the stores in the site first. Note: removing a store from a remote site will add that store to the central server), and
- are not the active site on your current datafile.
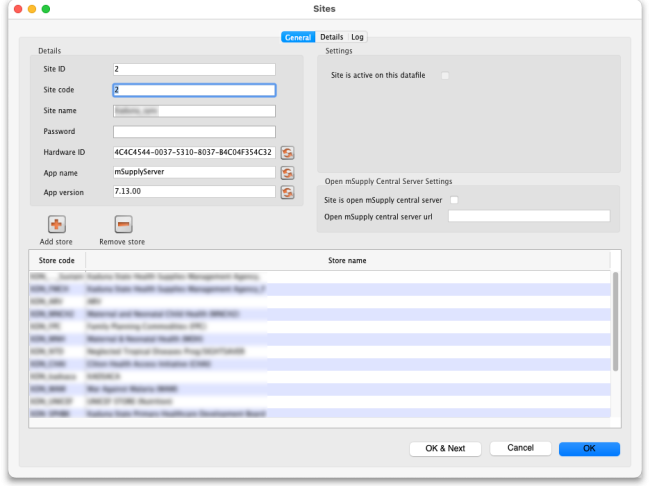
Double-click on a site in the list to open its details window:
The various fields are all described below in the Creating New Sync Sites section.
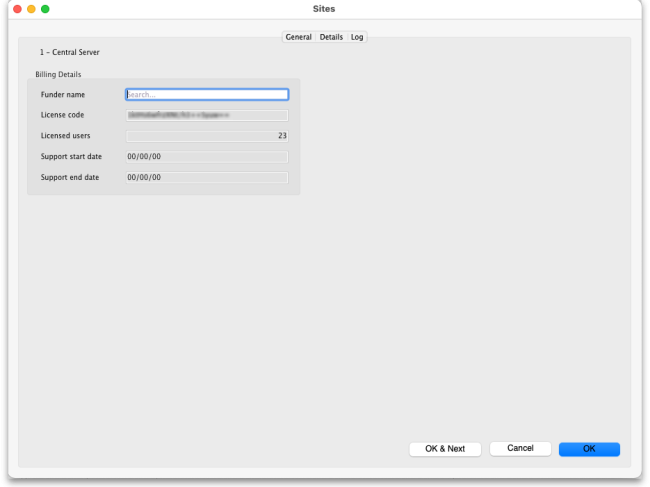
Click on the Details tab to see some details to do with the support contract for this site:
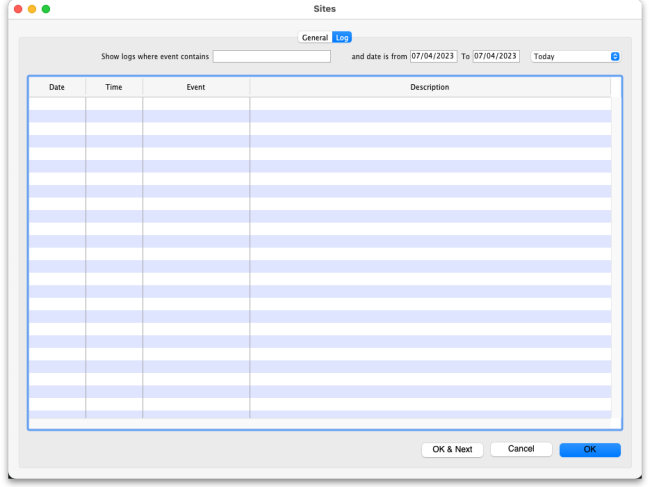
Click on the Log tab to see a list of the logs that have been recorded for that site:
The filters are set to show all logs for the current day by default.
Creating New Sync Sites
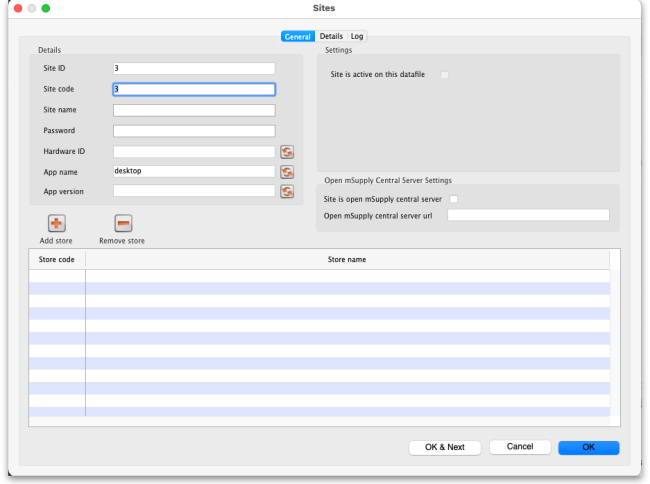
Click the New button in the Site List window above to create a new Site. This will open the Site details window:
The details to be entered are explained in the section below.
While editing a site, no changes that you make are saved in mSupply until you press OK. This allows you to press Cancel to discard all the changes to the site you had entered, including additions or removals of stores.
Editing Sync Sites
To view details and edit any existing sync site, double click any site in the list of sync sites to view the and edit its details.
If the site is blocked because there have been too many failed login attempts then an Unblock site button will be shown next to the Check connection button. Click it and the site will be unblocked so that isers can attempt to login to it again.
Site ID
The Site ID is a unique ID number for the site used throughout the mSupply system. It will be automatically allocated with each new site that you create and is read-only (you can't edit it).
Site Code
The Site Code is a free text field allowing you to set a short human readable code to identify the site. You can edit this at any time and it will not affect any workings of the sync system.
Site Name
The Site Name should succinctly describe the site. The value here will be used in authentication by the remote site communicating with the central server.
Note: due to this being used for authentication, beware editing it. If you change the site name on an actively used site, the remote site will stop syncing. To resume syncing, the site name must be restored to the old value on the central server, or updated to the new value on the remote site.
Password
The password is used by remote sites to authenticate with the central server. It is recommended to use copy and paste so as to avoid data entry errors, particularly as you cannot view the password that is set here.
- Take care to record this password securely as it will be required when creating the datafile on the remote site.
- This password is used for authentication, so beware of editing it. If you change the password for an active remote site, the remote site will stop syncing. To resume syncing, the password must be restored to the old value on the central server, or updated to the new value on the remote site.
Hardware ID
The Hardware ID is automatically set by remote sites when they authenticate with the central server for the first time. It identifies the particular device that is syncing, be it a tablet or a desktop computer. Once set, any sync requests for this site coming from a different device will be rejected, as they'll have a different hardware ID.
This is to protect against having multiple devices syncing to the central server using the same remote site details. If this were to happen, it'd cause both devices to have out of sync data. One would need to be disabled, and the other resynchronised.
If a device is lost or destroyed, you will need to setup mSupply on new hardware. In this case, for the site to start syncing on a new device you'll need to reset the Hardware ID by pressing the reset button to the right of field on the central server.
Type
The site type simply indicates the intent to synchronise the sync site with mSupply Desktop or mSupply Mobile. When a remote site synchronises it will update the value of this. As of v4.12, this setting has no functionality. Functionality around this is planned for the future.
- standalone: mSupply Desktop or mSupply Server
- mobile: mSupply mobile
Site is active on this datafile
If this is checked the site is active on this datafile, which means transactions can be entered in it but master data (like item and customer details etc.) cannot. If unchecked then the site is not active in this datafile and transactions cannot be entered in it.
Use of JS Node HTTP Client
This preference is not recommended and will be disabled in future versions of mSupply (v7.11 and above). Node JS was used in special circumstances where 4D HTTP handlers were not working well on cellular connections for certain regions. This has been improved and Node JS is no longer needed.
Sync interval
Only visible if you are on a remote site. The number of minutes to leave between sending and receiving synchronisation records. Minimum is 1 minute.
Sync request size
Only visible if you are on a remote site. The number of synchronisation records to send and request at a time. Make it smaller if you have a bad internet connection. mSupply will automatically adjust this to optimise the efficiency of communication with the server as synchronisation occurs.
Server URL
Only visible if you are on a remote site. The URL of the server to synchronise with, including the port number if necessary.
Site is Open mSupply central server
In mSupply v7.14.00 we've added an Open mSupply central server settings section. This must be set for all Open mSupply sites from Open mSupply v2.0.0 onwards. The settings are used to identify the Open mSupply Central Server and tell Open mSupply remote sites where their server is.
This checkbox is only editable when the site is not active on mSupply central server. Only one site can be set as the open mSupply central server, an alert will be shown if you try to set this when another site already has it set.
Open mSupply central server url
The URL which points to the open mSupply central server. This URL will be sent to all open mSupply remote sites on every sync iteration, and an open mSupply remote site will, in turn, use this URL to synchronise with the open mSupply central server. This URL can be changed if the open mSupply central server site is relocated.
Adding stores
Note: You can only add a single store to a mobile type site. If you try to add another mSupply will show you an alert telling you that you can't add another.
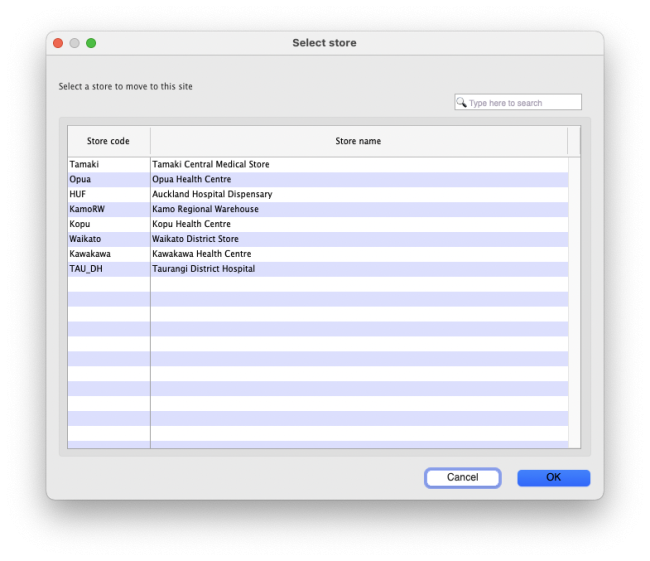
To add a store press the Add store button, which will bring up a list of stores that you may add to the site:
Double click a store, or highlight one and click on the OK button.
The store you select will be removed from the site it is currently active on. The behaviour here will differ based on whether the store was on the central server, or an a remote site:
If the store was on an existing remote site
If the store is currently on another actively used remote site, please use caution. It is important to ensure the old remote site fully stops any usage of the store and synchronises before starting usage on the new site the store was moved to.
If the store was on the Central Server
It is OK to move stores from the Central Server to a remote site, as the Central Server will be guaranteed to have the most up-to-date data.
Store Data
When editing an existing site, all store data of any added stores will automatically be queued to sync to the remote site after pressing OK to save the changes.
Removing stores to the Central Server site
To remove a store, highlight the store you wish to remove in the list of stores in the Site window, then press the Remove store button.
Stores removed from a remote site will automatically be moved to the Central Server site.
Viewing/Editing Site Details on the Remote Site
All explanation of what the site editing is on the remote site.
Coming soon!
Check connection
Coming soon!
Enabling Sync
Coming soon!
Sync Mirror Setup
Coming soon!
| Previous: 29.01. Introduction to synchronisation | | Next: 29.03. Sync Site Wizard (Superseded) |
