3.11. Working with lists
Whenever you perform a search in mSupply resulting in more than one item being found, you will be presented with a list of records (e.g. items, names, contacts or another list) that match the criteria you entered.
mSupply uses two types of list display.
- Shorter lists, such as an invoice or stock lists, are displayed with a striped background. These lists have resizable and moveable columns. They also and have an indicator to show the sorted column. Their use is discussed in the next chapter.
- Longer lists, such as item and transaction lists, which can have thousands or millions of records.
In this tutorial section, look at the tools for handling of the longer lists.
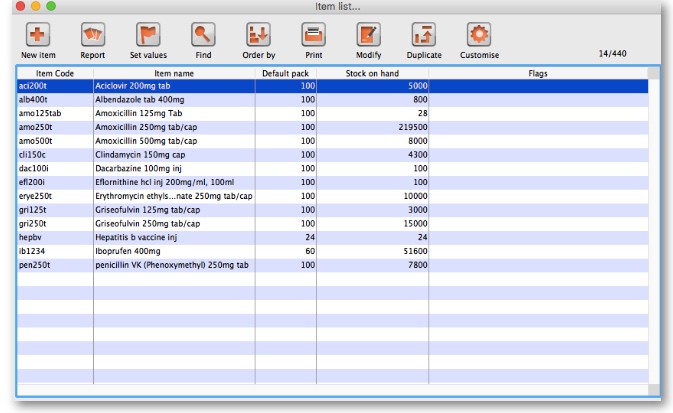
When longer lists are displayed, a series of buttons are available along the top of the window, as shown in the below screenshot (note only a small list is shown for the purposes of the tutorial):
General
Viewing or editing a particular record: To view or edit a record, double-click the row in the list you wish to view. A new window will open showing the details of the record you clicked.
Column widths: The easiest way to change column widths is to drag the dividers (the dividing line) between the columns in the list view. Note that if the total column width is too wide for the window, a horizontal scroll bar is added to the list allowing you to view columns to the right of those displayed.
Choosing the column order: To change the sequence of the columns in a list, drag a column header to a new location.
Customising
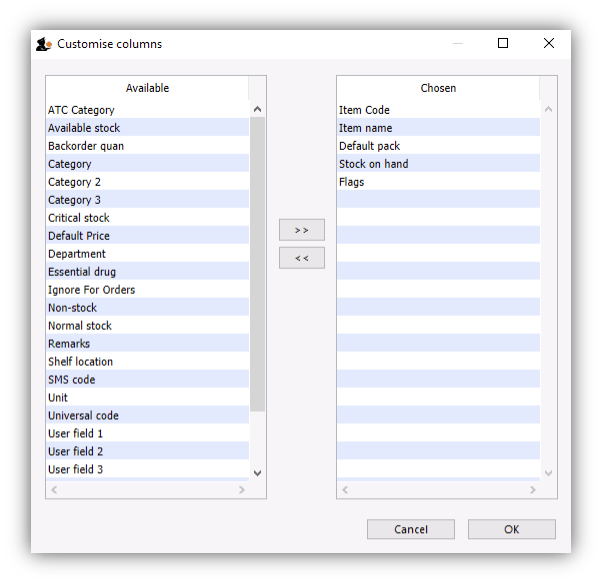
Clicking the Customise button in the toolbar will display this window:
The list on the left-hand side gives all of the available fields (displayed in columns). The list on the right-hand side is a list of fields (columns) you are currently using.
To add a field to your view, click on the field in the left-hand list. You can control-click to add multiple columns at the same time. Then click > >, the right-pointing button, in-between the lists.
To remove a field from your view, select the field(s) to remove from the right-hand list,. Then click < <, the left-pointing button, to move the fields back to the available list.
You can not remove the first column for any list as it is the key column to identify each row uniquely.
Renaming columns: By double-clicking on a field name in the right-hand list you can change the column title.
Ordering
Ordering a list is the same as sorting it. Frequently a column may be ordered by clicking on the column heading. The column will be sorted in ascending order. Ascending means:
- A > Z (upper and lowercase are not considered different)
- 1 > 2 > 3 for numbers
- earlier dates to later dates
Descending means the opposite of Ascending.
Note that ordering a list does not add or remove any records from the list. It simply changes the order in which the records are displayed.
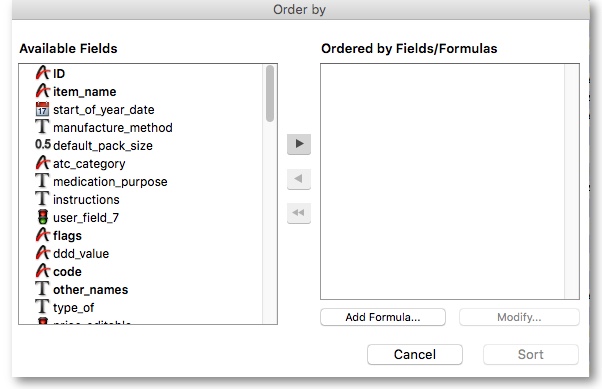
Should you require two (or more) sort parameters, clicking the Order by button opens the following window:
The Available Fields list will reflect the type of records you are viewing. In our example, the list shown is for Items.
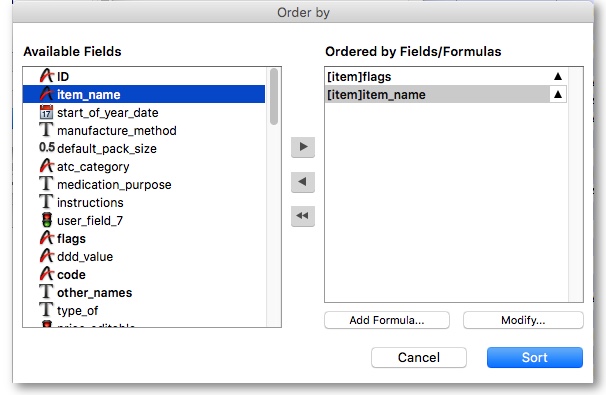
To order by a particular field, double-click it in the left-hand list. You can also drag fields to the right-hand list, or highlight the field in the left-hand list and click the right-pointing arrow. You can order by multiple fields by adding further fields to the right-hand list. Double-clicking on the flags and item name fields in our example results in this window:
To remove a field: Highlight the field in the Ordered by Fields list, then click the single left-pointing arrow between the two lists. The double left-pointing arrow will clear all fields from the Ordered by Fields list
To change field ordering: Each item in the Ordered by Fields list has a small triangle to the right. If pointing up, the ordering will be ascending. If pointing down, descending. To change the direction, click on the triangle for each field.
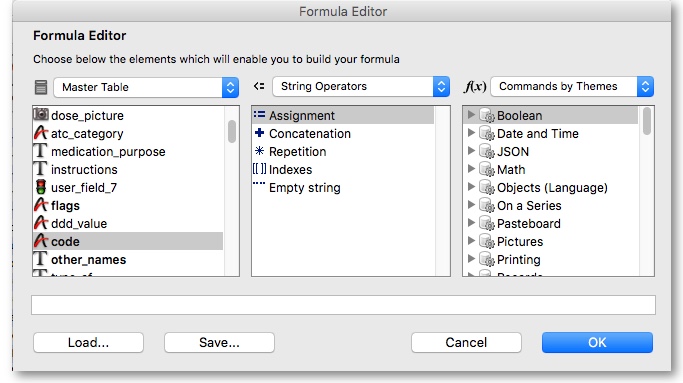
Using formulae: If you want to order by a formula, click the Add Formula button. Here the formula window is shown, and the formula Length([items]code) has been entered.
Using this formula would allow you to identify items whose item code is shorter/longer than your organisation's specifications.
Click the OK button to close the window.
Once the details are entered, click the Order by button to order the list.
Printing lists
You can press the print icon to send the list to Excel. The list will display in Excel with the column headings you have selected.
Find
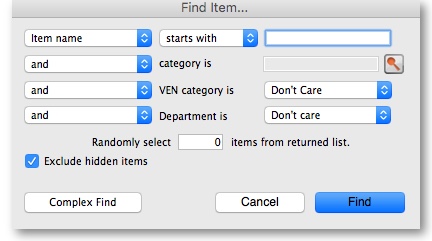
This button opens a simple find window where you can enter the start of the item name or code.
Complex finds: The window shown above has a Complex Find button. This allows you to perform a search using multiple criteria. Clicking this button shows the query editor
Within this window there are four areas from which you have to choose or set a value for each line of a query.
- Available fields, select the field that you are looking for
- Operands, select the operand that is appropriate for your search
- Value, enter your specific criterion
- For queries with more than one criterion, click Add line, then complete as above but also with the appropriate conjunction
For example, if you want to find all items whose default pack size is greater than ten and whose code starts with A these are the required steps:
- Click on default_pack_size in the available fields list
- Click on is strictly greater than in the Comparisons list
- Enter
10in the value field - Click the Add line button
- Scroll down the available fields lists then click on code in the available fields list.
- Click on is in the Comparisons list
- Enter
a@in the value field (note the wildcard character @ has been used to find all items whose code has a as the first character) - Click the Query button to perform the query
Before step 8, the window would look like this:
The upper area of the query editor shows a summary of the query that is about to be performed.
This example will return a list of items where both the search criteria are met because the conjunction And was used. If you wanted to find items that matched only one of the criteria entered, you would click on the second line in the large upper panel to select it, and then click on the Or button where the conjunctions are displayed.
Saving and Using saved queries: If you have spent time on developing a particular query, and you are likely to use the same query in the future, click the Save… button. You will be asked to choose a name and location to save the query. The saved file is very small.
Then when a blank query window is first shown, you can click the Load… button and locating the saved query.
Thanks for working through the tutorial. We hope you learnt something useful, and now feel confident to start using mSupply!
| Previous: 3.10. Entering quotations | | Next: 3.12. Where to now? |
