Table of Contents
4.04. Item master lists
Updated: Version 3.1
Master lists are standard lists of items you would supply to wards, clinics, etc. on a regular basis. Once set up, a master lists can be assigned to customers or Virtual stores, and then used to support Stock Control including imprest orders. Master Lists are useful to stores which have a number of customers or virtual stores that they supply whose lists of stock items are either identical or very similar.
Choosing the Item > Show item master lists… menu item or clicking on the Master lists button ![]() on the Item tab of the navigator displays a list of the current master lists in your datafile in this window:
on the Item tab of the navigator displays a list of the current master lists in your datafile in this window:

Master lists can only be managed (created, deleted, edited, applied to stores or customers) on the Central Server
Buttons on the Show master lists window
Add master list
Click on the Add Master List button and you are presented with this window:


Description
Enter the name of the master list here - this is the list name that everyone will see e.g. All items: General warehouse. Any non-printable characters entered before or after the description will be removed. Any entered in the description will be replaced with an underscore (_).
Note
Add any note or information here that will help you and others understand what the list is for.
Automatically add new items to this master list
If you check this, any new items created, whether manually or during import, will be added to the master list. This is a particularly helpful setting when you are using master lists to control the visibility of items in stores.
This master list is a patient list
If checked, this tells mSupply to use the prices on this master list for any of the items on this list on prescriptions (not customer invoices).
Buttons on the Master list window
Add item
You then populate the list with the required items by clicking the Add Item button:

- On entering the first few characters of the item to be ordered and pressing the Tab key, the (by now!) familiar list will appear from which the desired item is selected by double-clicking.
- If the imprest system is used in your organisation, the quantity is entered in the Imprest Quantity field. If the imprest system is not being used, you don't have to enter anything in this field.
- If you want this list to determine the price of this item for customers using it, the price is entered in the Price field. If not, no entry is required in this field.
Remove item(s)
To remove one or more items from the master list, select (click) the row(s) and then click on the Remove item(s) button.
Save sort order
- The order in which the items are ordered dictates the order in which they populate various transaction forms in mSupply.
- Clicking on any of the column headings allows you to sort the list according to that heading.
- You also have the ability to click on an item in the list, and drag it to a new position.
- Once you are happy with the sort order, click this button to save the order.
Copy to clipboard
The master list is copied to the clipboard when this button is clicked so that you can paste it into other applications on your computer e.g. a word processor or spreadsheet application.
Update prices to 12 month average
Also only visible if the Use program pricing preference is turned on (see the 15.03. Invoice preferences page for details). When you click this button, mSupply calculates a weighted average price for each item from all the cost prices on all supplier invoice lines that were confirmed in the 12 months previous to the current day for each item. That calculated price is then shown for each item in the Price column. When you click on the OK or OK & Next buttons these prices will be saved on the master list, if you click on the Cancel button the prices will revert to what they were before. mSupply will create logs when the function is run so that you have a record of the old and new prices - see the 25.19. The system log page for details on viewing the logs.
Import item list
You can import a list of items created elsewhere e.g. an accounting application or a spreadsheet. This can save you a lot of time when creating a master list!
The file to be imported must be tab delimited text file, which is most easily created in a spreadsheet. The file must contain columns in this order:
- Item code Must match an existing item code.
If you are not importing imprest quantity or price, then this is the only column needed. The following columns are not required.
- Item name For information purposes only and is not actually imported. You can leave this column blank if you like, however, if you are importing imprest and / or price data, then you must include the column, it's just that the entries can be blank.
- Imprest quantity Optional and can be left blank. You would leave the entries blank if the master list is not going to be used for an imprest.
- Price Optional and can be left blank. You would leave the entries blank if the master list is not going to be used for pricing
Records in the file are, of course, separated by the end of line character, which will be created by the spreadsheet when you save the file as a Text (Tab delimited) format.
For example:
| Item code | Item name | Imprest quantity | Price |
|---|---|---|---|
| amo250t | amoxycillin 250mg tab | 800 | 4.50 |
| amo500t | amoxycillin 500mg tab | 300 | 5.50 |
Clicking on the Import item list button takes you to a prompt:

after which you can select the file:

And then the import preview dialogue box is displayed:

On this screen you use the Next and Previous buttons to move through the records and see what details will be imported for each. The First line contains column headers tells mSupply whether to ignore the first record in the import file (checked = ignore first line of file). The first record in the import file often contains headers describing the fields in each record, not actual data.
The Remove quote characters on import checkbox, if checked, tells mSupply® to strip all “ characters from the data. This is recommended. In fact, this option can be selected anyway without detriment to the import.
- Any new items on in the import will be added to the end of the master list.
- If you import items that are already on the master list, they will not be added to the end of the list. The existing entries will have their Imprest Quantity and Price details updated with the imported values.
Clicking the Import now button executes the import with the settings you made and takes you back to the master list screen with the imported items now showing in your master list.
The Cancel button also takes you back to the master list screen but, obviously, does not execute the import.
Search field
If you need to find a specific item in the master list you can type something in the Search items field just below the buttons. Only the items in the list with a name or code that contains what you typed will be shown, all others will be hidden.
Tabs the Master list window
Items
Shows the list of items on the master list.
In use by
Shows which customers the master list has been assigned to (see below).
Delete master list
From the Item Master lists window, selecting the Delete Master List button allows you to delete a list which is no longer required.
- This action has significant consequences for any customers who are users of the list. So to prevent accidental deletion, this action cannot be completed until any customers who are users of it have their assignment with it removed.
- To find out which customers and stores the list is assigned to, open the master list and click on the In use by tab. If the list on this tab is empty, you will be able to remove the master list. Refer to the Assigning a list to a customer section below and the 25.08. Virtual stores page to remove the master lists from customers and stores respectively.
+
Duplicate master list
Should you wish to create a Master list which is very similar to an existing one, click on this icon, and a new Master list with the same name (description) but with ` (Copy)' appended to it is created; this can then be edited and renamed to suit your requirements.
Report
To create a custom master list report, click on the Report button on the Master list window. This will open the custom report editor and you can create your custom report there.
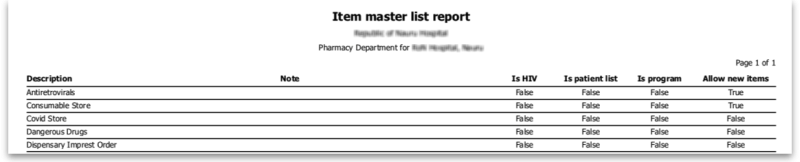
To generate a built-in report based on all the master lists in the list, click on the Print button on the Master list window. You will be given the following options:
- General: This report shows some of the simple settings for all the master lists (whether it is a program, whether it is a patient list, whether it will have new items automatically added to it etc.)
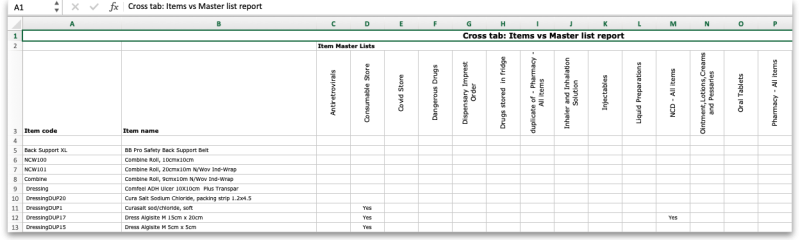
- Cross tab: Item vs Master list: Opens directly in Excel. The rows are all the items on master lists, the columns are all the master lists and the cells contain Yes if the item is on that master list.
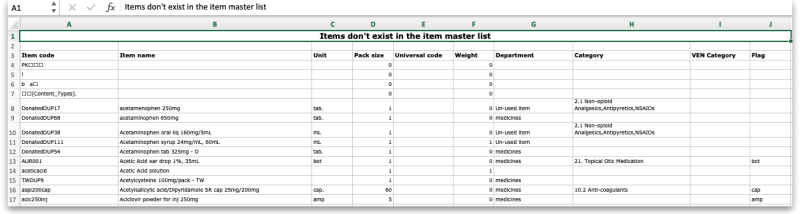
- Items without master list: This shows all the items in your datafile that are not included on any master list.


Assigning a list to a customer
To assign a list to a customer, the customer's details need to be on screen; Choose Customer > Show customers , or using the Navigator, select Show customers , fill in the appropriate details, and press Find, or just press Find, then double click the entry required on the Names list
Once the desired customer's Edit Customer/Supplier window appears click on the Item Lists tab.

Buttons in the Item Lists section:
- Add Master list: Click this to select a master list to add to the customer from a list of all master lists which have been created.

- Delete list: Select a master list and click on this button to un-assign it from this customer. The master list remains in mSupply, it is not deleted.
When operating multiple stores in mSupply, you can sometimes have difficulty with item visibility: an item might be on a master list for a particular customer but if the item is not visible in the store you are logged into when using the list, then the item will not appear.
A temporary fix can be achieved by setting the item visibility in a particular store to match an item list - refer the Visibility tab. This is only a temporary fix. If you add a new item to a master list, the visibility of that item in the stores using that list will not be updated.
To avoid this problem, you can set a preference (see here for details) to have the visibility of items on lists altered to match the visibility of the name for which the lists are made.
- Printing:
- Before printing, choose either Sort by Group or Sort by department
- Choose whether to send to Excel® or your printer.
- Click Generate
Information button
Edit list properties
The attributes of a list are set by double clicking on the name of the list. This window is displayed:

The options should be checked as appropriate:
- Imprest: If checked, this list will populate an imprest customer stock history created for the customer.
- Customer stock history: If checked, this list will populate a customer stock history created for the customer.
- Ordering list for web: Means that the list represents all items that the customer can order using the mSupply Customer interface. If a customer who uses the customer interface for ordering stock does not have a list with this option checked, they will not be able to order any items.
- Price list: Means that the prices on this list will be used for these items when they are being distributed to this customer on a customer invoice. The price on this list will override any sell prices that individual stock lines have. Only one list can have this option checked for each customer.
Using master lists to control item visibility in stores
You can use master lists to control item visibility in each store. This will make the items visible in each individual store match exactly the items included in the master list(s) selected for that store.
Control of item visibility by master list can have drastic unintended consequences!
It affects ALL stores in the system.
- Do not turn it on unless you know what you are doing!
One unintended consequence: An mSupply store can only order from another mSupply store those items that are on master lists which have been assigned to both stores.
For example:
Central store has the following master lists assigned:
- All items (includes all items in the system)
- HIV items
Kathmandu store has the following master lists assigned:
- HIV items
- TB items
Kathmandu store tries to place order from the Central store for:
- Items on the HIV items master list. This succeeds, because both stores have been assigned the HIV items master list.
- Items on the TB items master list. This fails because the TB items master list has not been assigned to the Central store, even though the TB items are all included in the All items master list .
Procedure - item visibility
For example, let's say there are 100 stores, and you want all of them to have the same item visibility:
- Create a master list and add some items
- Go to each store and make sure that the master list is selected
- Turn on the preference:
Automatically update item visibility in all stores to match master lists used by each storeA temporary list is created for each store containing items that cannot be removed from visibility when the master list preference is activated, normally because there is stock of the item in the store.
- Now whenever an item is added or removed from this master list, the preference will automatically update the visibility for all of the 100 stores, so that the items visible for each individual store matches the items included in the master list.
- Adding an item to a master list will automatically add that item to visibility for all stores using that master list
- Deleting an item from a master list will automatically remove that item from visibility for each store using that master list, given it is not included in another master list in use by each store respectively.
When deleting items from a master list, mSupply will first check all stores using the master list to make sure it is safe to remove that item. It is unsafe if the item has stock on hand and isn't included in another master list for any stores using master list you are editing.
If you've been running your mSupply for some time without controlling item visibility by master list and you now want to move to it, you will likely want to start by creating a master list containing ALL items and applying visibility to all existing stores according to that ALL items master list. Then, over time, different master lists can be created and applied to those existing stores.
To create a ALL items master list, you can export all items, and then import them to the master list, refer above.
Master list Tips
Creating a re-ordered master list
You may need to create a new master list which is similar to an existing one, but with significant changes, including, particularly, changing the sort order.
Small master list:
If this is a small list, this is relatively easily achievable by:
- Select 'source' master list
- Duplicate it to the new master list
- Add any new items to the temporary master list
- Re-organise the list to the desired sort order
Large master list:
However, if the list is a long one, then the re-organising can be extremely tedious, especially over a dodgy internet connection to the Central server (editing master lists must happen on the Central Server)! This is best achieved by:
- Select 'source' master list
- Duplicate it to a temporary master list
- Add any new items to the temporary master list
- Copy to clipboard (using button)
- Open a blank Excel sheet and Paste the clipboard in to cell A1
- Delete the first four lines in the spreadsheet
- Filter the table of data
- Do the necessary edits including any re-ordering
- Save as a tab separated values text file
- Back in mSupply, create your new master list from scratch (Add master list button).
- Import master list (using button)
- Once you've verified that it worked the way you wanted it to, Delete the temporary master list
Re-order existing master list
This method can even be used to effectively re-order an existing master list, but be careful; stop any syncing if in a synced system, and take a backup of your datafile before embarking on this:
Method 1:
- Stop syncing (if in a synced system) and make a backup.
- Create your new, correctly ordered master list as described above.
- Assign this list to all the same names as the original master list was assigned to.
- Unassign the original master list to all names
- Delete the original master list
- Rename new list
Method 2:
- Stop syncing (if in a synced system) and make a backup.
- Create the tab delimited text file for your new, correctly ordered master list as described above.
- Delete all but one of the items on the original master list. This one item is ideally the item that will be at the 'top' of the reordered list.
- Import the tab delimited text file to the original master list.
This is scarier (deleting items of master lists is a big deal), but avoids the need for steps 3 - 6 of Method 1.
Removing an item from a master list when it is currently in stock
There are a number of circumstances under which you will need to remove an item from a master list when it is currently in stock including:
- The item is being phased out and you don't want facilities to be able to order it
- The item should never have been on the master list and users have accidentally recorded stock of the item
In these cases, it is relatively straightforward to remove an item from a master list - except that if your system is using master lists to control item visibility in stores, then:
mSupply will not allow you to remove an item from a master list IF any store that is assigned to that master list has:
- The item currently in stock AND
- The item is not on any other master list assigned to that store.
There are two options open to you:
Wait for all stock to be removed
Wait for all stock to be removed from all the affected stores before you remove the item(s) from the master list. This is a particularly painful process if there are many affected stores. While you are waiting for the last store to remove the item, other stores can continue to receive and stock the item!
Use a temporary master list to assist with the process
- Create a temporary master list with the item(s) to be removed.
- Assign the temporary master list to all the affected stores that still hold stock of the item(s).
- Remove the item from the original master list. This should now be possible as the condition above should be met.
- As each store removes the stock of the item(s), un-assign the temporary master list from the store.
- Once all stores have removed stock of the item(s), the temporary master list can be deleted.
| Previous: 4.03. Item categories | | Next: 4.05. Programs |