16.01. General preferences
- The preferences described here (accessed through File > Preferences…) apply to all stores on an mSupply server.
- In a synced system there will be multiple 'sync satellites' and these settings can be different on each sync satellite.
- There are some settings that are 'per store' - refer Store preferences, and store preferences can be different for each store on an mSupply server.
Preferences are used to configure some of mSupply's functionality to more closely match your needs. mSupply is very flexible and highly configurable so there are lots of preferences! To access them, choose File > Preferences… from the menus. There is a scrolling side bar on the left containing a list of tabs; click on the one you want to see the preferences on that tab.
General tab

Organisation name
What is filled in here is quite important. Not only will it print on the top of invoices and various reports, but it is also tied to your registration code. Please think carefully about what it should be before entering it. If you need to change your organisation name, please do so and then re-contact info@msupply.org.nz for a new registration code.
Address lines (1, 2...)
Enter the address information about your organisation that you wish to appear on invoices.
Close mSupply if user is inactive for ''#'' minutes
This preference is only available in a multi-user system on an mSupply client. It will not be visible in any single user copies of mSupply.
This determines how long a user can be inactive on mSupply before mSupply window closes. Entering any value bigger than 9 will close mSupply if the user has been inactive for that many minutes (note: entering any value smaller than 10 will currently not do anything OR will produce a warning - depending on your current version of mSupply. The inactive user logout is disabled if you set a time less than 10 minutes OR if you set the time to 0 - depending on your current version of mSupply). This timer is re-set when:
- a user clicks on a:
- supplier invoice
- customer invoice
- request/response requisition
- stocktake
- anytime the software checks a user's permission (normally when creating a new transaction)
- anytime the software updates some (but not all) progress bars
Synchronisation section
- This datafile is part of a synchronisation system: If checked it means that the synchronisation system is enabled in this datafile. This means that records to be synchronised will be created at appropriate times. If this is unchecked it means that the synchonisation system is disabled completely and records to be synchronised will not be created in this datafile.
- Synchronisation is active: If checked, synchronisation is operating as normal. If it is unchecked, the synchronisation system is paused. Records to be synchronised will still be created but they will not be shared between the central server and remote sites. This is sometimes useful when carrying out maintenance procedures.
Register button
This button is used for registering mSupply. (It will be dimmed if you have already registered). If you have not registered, clicking this button will display the registration details window:

If you check the Connect to hub server checkbox then your copy of mSupply will periodically send information to our hub server. This information includes the mSupply version, operating system details, the active stores and the last date they synchronised with the server and other synchronisation information. This information is used in our hub to support your system and contains no user or personal information.
- Here you are provided with the information needed to register. Two of these, if changed, will invalidate your mSupply registration:
- Your organisation name
- Your hardware ID
- Clicking the Copy details button will copy this information to the clipboard, which you can paste into an email and send to support@msupply.org.nz.
- Once we have received this registration information we will generate a registration code and send it back to you.
- The code is entered by clicking the Enter code button in the window shown above. You will then be shown another window where you can enter the registration details you have been supplied:
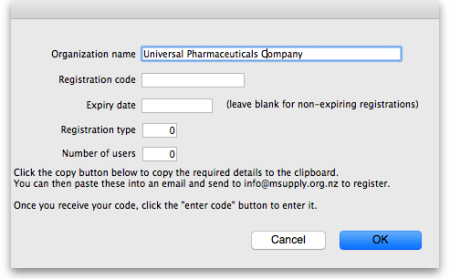 Your registration instructions supplied with the registration code will describe what information to put in each field.

- mSupply registration codes are specific to the Hardware ID, organisation name, Number of users and Expiry date of your licence (if it is time-limited - nearly all mSupply licenses are NOT time limited).
- If you change either your organisation name or the computer on which you are running mSupply, you will need to contact Sustainable Solutions for a new code.
- The registration code depends on the machine UUID which is unique to every single computer and consists of 36 characters. If your machine UUID is blank, please make sure that windows program CMD is allowed to run (it may be blocked by anti-virus or anti-malware software). Please make sure you keep mSupply as a trusted application and unblocked by any anti-virus or anti-malware software you are using.
- If the Hardware ID field is empty, mSupply or the Windows CMD programme is being blocked by anti-virus or anti-malware software. If you need help, please consult Sustainable Solutions.
- If you move your data file to a new computer you will need to obtain a new registration code from us and enter it within 3 months to prevent mSupply from not working.
After entering your registration details and clicking on the OK button in the screenshot above, if the datafile is set to use synchronisatino (see the 29.01. Introduction to Synchronisation page for details) then the following window will appear:

This is a very important window and you must be careful to make the right choice! When a datafile is unregistered, synchronisation is prevented from running for data security reasons. Your datafile is just about to be registered so you are being asked whether you want synchronisation to continue working or whether it should be stopped.
If you select “Stop Synchronisation”, then the synchronisation settings will be cleared and synchronisation will not work. You would select this option if you were using a copy of live data for training, for example.
If you select “Keep Synchronisation working”, then synchronisation will keep working (surprise!). You would use this option if you were using this datafile in a live synchronisation system, either for the first time or if you've moved it to a new computer.
When you have made your choice, type “I understand” in the textbox as confirmation (the consequences of turning on synchronisation to the live system for a duplicate datafile intended to be used in a training environment can be dire!) and click on the OK button. Whichever choice you have made, mSupply will now quit and you will need to restart it.
Hooray, the registration process is now copmplete!
Other fields on the General tab
Default customer
Leave this field blank for normal operation. If you usually (or always) only issue to one customer, enter that customer's code here. You must set the value to the name code of an existing customer. Doing so will mean that this customer's details are automatically filled in when you create a new customer invoice.
Default margin for suppliers
The percentage margin that will be filled in when you enter a new supplier. This value can be edited for each supplier at any time. Enter “0” if you do not apply a mark-up to items you sell (for example, if you are issuing stock to hospital wards at cost).
Default tax rate
The rate entered here will automatically be applied to customer and supplier invoices. Note that this amount can be edited when you are entering an invoice by clicking on the tax rate at the bottom of the invoice entry window.
Period closing
There are two fields allowing the entry of dates:
- The Closed date is the date prior to which no transactions can be entered. Setting the closed date means that all transactions up to that date are finalised and mSupply will not allow the entry of any transactions with an earlier date. The closed date can not be moved backwards- only forwards.
- The Locked date is the earliest date that can be entered for a transaction. The lock date can be moved forwards as far as the oldest non-finalised transaction, and backwards as far as the closed date

If you try to set an invalid locked or closed date you will be warned.
Be very careful setting the closed date. Changes to the closed date can not be undone.
Inactive user logout
This setting is only visible if you are using an mSupply client in a multi-user setup, not if you're using the single user version of mSupply (because it's not applicable to the single user version). This is where you set the time in minutes before the mSupply client is closed and the user is automatically logged out. To disable the function, set the time to 0 minutes (the default setting). This is really useful for preventing inactive users holding onto a user license when they've forgotten to logout of mSupply. Any unsaved work will be lost when mSupply is closed so remember to save your work regularly. The good news is that most of the things you do in mSupply are automatically saved as you do them (adding and removing lines to customer and supplier invoices, inventory adjustments, stocktakes etc.) so the chances of losing work is actually very small!
Misc tab

Own code for electronic invoices The code that customers must have for your organisation in their copy of mSupply. This code is added to invoices you export, and allows customers to import the invoice into their system automatically.
This is an old copy: warn me at startup. You may want to save an old copy of your data (for example the data as it stood on the last day of the financial year). If you check this box, you will be warned at startup if the database is an old copy, to reduce the risk of accidentally entering current transactions into an old file rather than your current file.
Use a lock file to warn if data already open If this box is checked, mSupply will maintain a record of when it is open outside of the database. This option only applies to the single-user version of mSupply. This means that if a second user attempts to open your data file while the data file is already in use, the user will be alerted, and no damage to the data will occur. Note that this option only applies to the single user version of mSupply. The client-server version of mSupply allows multiple users to access mSupply at the same time.
What if your machine crashes? If, for example, you have a power failure and your computer shuts down suddenly, mSupply will not be able to delete the lock file, and you will get a message when you attempt to restart mSupply that another user is already using the data file. If you are sure this is not the case, use Windows Explorer or the Mac Finder to locate the folder that contains your mSupply data. Delete the file that has the same name as your data file but ends in “_locked.txt”. You will now be able to start mSupply.
We recommend you do not turn this option on unless you understand the above paragraph or have a system administrator who authorises your use of this option.
An example of where turning on this option might be useful is when you store your mSupply data on a file server, and allow multiple single-user copies of mSupply to access the same data file. In such a situation to have 2 users attempt to access the data simultaneously would be disastrous.
JSON logging Check this checkbox to turn on JSON format logging of everything that happens in the database. When this is turned on, you must enter a value for the maximum size of the Log folder (once the logs in th folder occupy this much memory, no more logs will be added) and you must select a path to save the file in using the Choose… button.
Allow users to attach documents after transactions have been finalised When this box is checked, users can upload documents to finalised customer invoices, supplier invoices, purchase orders and goods receipts.
Allow to sync documents If this is checked then documents attached to transactions on remote sites in a sync. system will be synchronised to the central server and will be available there. This is oinly advisable is a remote site has good internet because synchronising a large document will block the rest of the sync. queue until it has finished. If this is not checked then documents attached to transactions will not synchronise with the central server and will only be available at the remote site they were uploaded at.
Currency formats This option specifies the format in which currencies will be displayed in mSupply. We provide two preset formats for currencies with 2 decimal places and currencies with none. If you want to enter a custom format you can change the field below the drop-down list. For example you may want to use a different separator than a comma. Note that if you type illogical values into the field the numbers may not display at all, or display erroneous data. Contact Sustianable Solutions if you need more information.
Service items Service items are items that do not have any stock associated with them. For example, a fee for special handling of goods, or for reprinting an old invoice, or a consulting charge.
These Preferences determine whether new items are allowed to be service items or not. Note that changing this preference will not affect existing items.
AMC Data Element The Id of the AMC data element in DHIS2. Now obsolete, see the 23.01. DHIS2 integration page for details on setting up an integration with DHIS2.
Names
- Customer code and charge code must match - If checked, when entering or editing a Customer, you will have to enter the same code for both the “code” and the “charge code” fields. (It is a good idea to leave this checked unless you have several customers that are invoiced separately, but whose invoices are collated onto a single statement at the end of the month)
- Supplier code and charge code must match - If checked, when entering or edit a Supplier, you will have to enter the same code for both the “code” and the “charge code” fields. (It is a good idea to leave this checked unless you have several suppliers that are invoiced separately, but whose invoices are collated onto a single statement at the end of the month)
- Name code for all codes to be unique (both 'store' and 'dispensary' mode) - If checked, when entering or editing a customer or supplier mSupply will not allow the creation of a second name with the same name code.
Labels for custom item fields
mSupply provides you with seven custom fields that you can use to record your own data for each item.
- the first three fields hold text or numbers,
- the fourth field is yes/no (or true/false)
- the fifth field is a numeric field
- the sixth field holds text or numbers
- the seventh field is yes/no (or true/false)
Here you can specify the label(or name) for each field. Note that field one is also displayed when you list items. Note also that when using the search editor to search for items (for example when producing a custom report), the fields are labeled “user field 1” etc.., and not with the labels you might have assigned.
Label for 'Their reference' fields
On various transactions, there are Their ref fields for containing the other party's reference (delivery note number, order reference etc.). You can change the label for these fields on the various different transaction types; simply enter the label you want to see in the text boxes.
Purchase order defaults tab
For an explanation of the sections on Purchase order defaults see the 16.02. Purchase order preferences section of this user guide.
Purchase order 2 tab
For an explanation of the sections on Purchase order 2 go to Purchase Order Preferences
Invoices 1 and 2 tab
For an explanation of these sections see Invoices Preferences
Item tab

Default account code for new items
- There are 3 spaces for you to select the accounts to use. Choose one account for expenses when buying, one account for income when selling and an asset account for stock.
- The accounts you enter here will become the default accounts for newly created items.
- The accounts are used when running reports or exporting to financial software.
Default service item for accounting purposes: This field contains the name of service items that will be used when exporting invoices to financial software.
Title for “N” classification for VEN items: You can choose what the “N” in the “VEN” classification of items stands for in mSupply; Not essential or Necessary. The classification is set for an item in its detail window, see the Item basics, General tab page for details.
Item list (master and local): If you check this box, then the visibility of items in stores will be set to match the items on master list(s) selected to be used by that store. For details on how this works and how to set it up, see the 26.07. Virtual stores page.
This preference can drastically affect item visibility. For instance, if a store has no master lists assigned, all items will be made invisible in that store. This could lead to a scary moment!
If some items that are currently visible in a store are made invisible when this preference is turned on their stock will not be made invisible. All stock, regardless of whether the item is invisible or not, will show in stock lists and will be available as normal for including in customer invoices, prescriptions, inventory adjustments and stocktakes as appropriate. It is not possible to make stock invisible in mSupply!
Do not turn it on unless you know what you are doing! It affects ALL stores in the system.
If the box is unchecked then the visibility of items in a store is not affected by master lists.
Suggest the next available number for new item code If you want item codes to be assigned automatically (they can still be overridden), check this checkbox. If it is checked, when you create a new item mSupply will automatically set the item's code to the next number in an automatically incrementing sequence. You can override this and edit the code as you are creating the item if you wish.
Universal code Enter the URL of the universal code server, used for providing universal item codes for compatibility between different systems. This is set to the default for you but can be edited if necessary. See the 4.01.01. Items - General tab page for details on setting universal codes for items.
Price tab

On checking the box for “Use customer price categories”, mSupply will activate the price categories.
Price categories
By default all customers are assigned a price category of “A”
To assign a different category to a customer, choose Customers > Show customers… and find the customer entry. Then set the price category field to a different value (see the 5.01. Names: using, adding and editing page for details on where this field is).
Here in the Preferences, you specify what percentage change to the default price will be made for each category.
For example, you might have a group of customers to whom you charge commercial prices, which are 20% above your normal price. Enter “20” in the “B” category field, then assign your private customers a price category of “B”
Ignore price categories for items supplied by these suppliers
Suppliers in this list will have no price category assigned to the items they supply. To add a supplier in this list, click the Add supplier button. A window will appear with a space to write the supplier's name. You can write the first character or two and press enter/return to bring up a list of suppliers that start with those letters. You can then select your chosen supplier from the list. To delete a supplier from the list, highlight it by clicking on it and then press the Delete Supplier button.
Quotes tab

Require entry of quote validity date
Check this box if you want a validity date for a quote to be compulsory.
Automatically turn off preferred status after validity date
If you check this box then the preferred status will not appear when the validity date has passed.
Reports tab

Check this box if you want negative stock values to be ignored on stock history reports (negative values can be legitimate but concerning for some users so negative values are left as zeroes if this preference is turned on).
Names tab
 Default field name/Custom field name table: In this list you can change the labels for name categories and custom fields - not the categories themselves (see Name categories for instructions on how to do that) but the labels for the categories. To change one of the labels click on it in the Custom name column to select it and click on it once again to begin editing it. Type the new name and then click outside the label to finish editing it. Now, wherever you would have seen that label in mSupply you will now see the name you have given it. The defaults are shown in the screenshot above.
Example: If category 1 was to be called 'Ownership' and category 2 was to be called 'Classification' then you could change their labels like this:

Now, wherever you would have seen the label 'Category 1' or 'Category 2' in mSupply, you will now see the label 'Ownership' or 'Classification' e.g. in report filters or, as in this screenshot, the General tab of the name details form:

Labels for custom fields on name category: Here you can enter labels for the custom fields used when creating or editing name categories. The labels you enter here will appear on the New/Edit category window instead of the Category_user_field_1 and Category_user_field_2 labels. These labels are used in some reports.
Tenders tab

Tender letter section
- Title: The title for the printed tender letter. If nothing is entered in here mSupply will use 'Invitation to tender'.
- Tender reference: The reference for the tender so that, when you communicate with others, you both know which tender you are referring to. If nothing is entered in here mSupply will use 'Tender reference'.
Health Supply Hub section
Note: From version 7.04 of mSupply, the Health Supply Hub has replaced the remote tender module, which is now obsolete and will be removed.
This section of preferences is for the connection to the Health Supply Hub, the replacement for the remote tender module where you can upload yourt tenders for suppliers to enter their quotes and many other things.
- Use Health Supply Hub integration checkbox: If checked, this tells mSupply that the you are using the Health Supply Hub and certain small changes (extra buttons) will appear in the tenders module. All the other fields in this section are disabled until this is ticked.
- Integration username: enter the username provided by mSupply for you to login to the Health Supply Hub.
- Password: enter ther password provided for you to login to the Health Supply Hub.
- Use custom server checkbox: If checked, tells mSupply to use the server defined by the preferences below it rather than the default, mSupply Foundation server.
- Health Supply Hub URL: The URL of the server.
- GraphQL port: The port used by the Health Supply Hub database.
- Front end port: The port used by the Health Supply Hub interface.
- Test connection button: When this is clicked, mSupply will attemnpt to use the settings you have entered to connect to the Health Supply Hub. You will be told whether the connection is successful.
Reminders tab

Reminders provide a simple to-do list built into mSupply.
If the Show reminders on startup box is checked, any reminders that are not completed and whose due date has been reached will be displayed in a window when a user logs on.
See Reminders
Patient medication tab

Here you can add a header and a footer that will appear on patient medication records.
Drug interactions tab

When operating in dispensary mode, you can choose to have mSupply alert you to drug interactions. Dispensary mode is covered fully in this section
The number of days of patient history… field determines how far back from the current date mSupply should look for drugs that have a known interaction with the drug you have just entered.
When drug interactions are activated, you will be shown a warning message when you enter a drug on a patient invoice that interacts with other medicines dispensed to that patient during the history period specified.
See the 10.02. Prescription entry page for details about how interactions are used while dispensing to a patient.
Registration tab
If you have a license for the Registration Module (see 26.12. Product (drug) registration), you will need to check this tick-box, and click OK in order to activate it.
You can specify the number of months before a drug registration expires. So when you register a drug, the expiry date of your registration will be calculated automatically by adding the number of months you have specified to that day`s date. For example, if you specify 24 months until a drug registration expires and you register a drug on 24/07/2016, the expiration date will be set automatically to 24/07/2018. If you leave the number of months at 0, you will have to set the drug registration expiry date manually.

Printing tab
For an explanation of this tab please refer to the 16.04. Printing preferences section of this user guide.
OK and print tab
For an explanation of this section please refer to the ok_and_print section of this user guide.
Logo tab
Here you can paste in a logo you have copied to the clipboard - you must copy the contents of a file to the clipboard, not the file itself. The file can be in .jpg, .png, .bmp, .gif, or .tiff format. This logo will be displayed at the bottom right of the navigator.
Make sure the image you use is twice as wide as it is high. If it is not, mSupply will convert it to this ratio which will make it look squashed or stretched, sometimes with interesting results!
For more information on this see the 16.06. Entering a new logo section of this user guide.
If you want the logo to be printed on invoices, check the display logo on invoice checkbox.
Please note that not all printing forms include the logo. If you would like customisation or assistance, Sustainable Solutions can quickly customize forms for you to meet your requirements.
If you have set a separate store logo (see the 26.07. Virtual stores > logo_tab) for the store you are logged into this will be displayed on the Navigator and invoices instead of the one saved here.
![]()
Dispensary mode tab

See Dispensary mode preferences for more details about how these preferences are used in practice.
Label printing section
Message on labels The text you type here will be displayed on medicine labels on the last line.
Label format Select the format you want you labels to print in:
- Default. Example:

- Item name large, over two lines. Example:

- Store at the top, no item expiry date and other details. Example:


Custom identification code If you wish to identify the origin of the dispensed item, e.g. In-Patient Dispensary or Out- Patient Dispensary, create an identification code, and enter it in this field. It will then appear as the last item printed on the the right of the third line of each label.
Label body font size The font size, in points, to use for the font in the main body of the label. Selecting Auto means that mSupply will adjust the font size depending on the amount of text to fit in the space.
Footer font size The font size, in points, to use for the font in the footer of the label (the part right at the bottom that is repeated on every label). Selecting Auto means that mSupply will adjust the font size depending on the amount of text to fit in the space.
Printing options for units These are the units applied to items (tablet, vial, tube etc.). Three options are available from the drop down menu. You can choose to always print the units on labels, you can choose for each item whether or not to print the unit or you can choose to never print the units.
Label body font size This defines the size of the font used in the body part of dispensary medicine direction labels. It is set to Auto by default, which means that the text will change size as the amount of text grows so that it can all fit onto a single label. If you choose one of the other sizes (the bigger the number, the bigger the font size), the body text will remain fixed at that size and, if the text cannot fit on a single label, it will overflow onto another label. Please also note that, by default, a double separator line is printed below the header of the label. The second of these lines will be removed if needed to give more room to print text.
If you use a fixed font size, be careful to make sure you get all the labels that belong to a particular prescription after printing them out, you could easily miss one if the directions are unusually long!
Footer font size This defines the size of font used to print the footer of the label, the part that prints at the bottom of every label. It is set to auto by default, which means it will change its size depending on the amount of text there is - more text means a smaller foint so that it fits on the label.
Print prescription label per item If checked, when prescription labels are printed, a separate label will be printed for each line on the prescription. If it is unchecked (the usual setting), lines for the same item will be consolidated into a single line (with the correct total quantity).
Show direction entry in dispensary If checked, users can enter patient directions for dispensed items on a prescription.
Turn off cell padding in between direction and patient name mSupply will automatically pad the cell (leave some space in the cell) between Direction and Patient name. If you do not want this to happen then check this box.
Print full prescriber name on label To have the prescriber's full name printed on labels, check the box in Print prescriber full name. Otherwise, the initials will be printed.
Print organisation address 1 as separate line By checking the box Print organisation address 1 as separate line , you can print organisation address 1 as separate line . You have to set the text in Preferences: General »address 1 field. The text which you type here will be displayed on medicine labels on its own line.
Print patient category on label If checked, when a prescription label is printed the patient's category will be printed alongside the patient's name in the following format; Patient name (category). Note that if the Print Patient code on label option is also checked then the patient's code and category will be printed alongside their name in the format Patient name (code/category).
Print Expiry date of Item on label When checked, the stock line's expiry date will be printed on the label.
Rotate label 180 degrees When checked, labels will be printed out rotated by 180 degrees. Perfect for turning labels the right way up if they come out upside down. Can be an issue if pre-printed labels are used and they are the opposite way round to what you expected.
Allow users to select ward on prescriptions If checked, Patient type and Ward drop down lists are displayed on prescriptions. If Inpatient is selected as the patient type then the Ward drop down list is enabled and the patient's ward can be selected.
Print Sales value of item on label When checked, the stock line's sales value (based on its sell price) will be printed on the label.
Print Patient code on label If checked, when a prescription label is printed the patient's code will be printed alongside the patient's name in the following format; Patient name (code). Note that if the Print Patient category on label option is also checked then the patient's code and category will be printed alongside their name in the format Patient name (code/category).
Print Batch on label When checked, the stock line's batch number will be printed on the label.
Don't print placeholder lines If this box is checked, placeholder lines will not be printed.
Print a receipt on labels by default mSupply allows you to print a patient payment receipt on a label. If you check this checkbox it means that the Print receipt checkbox on the Payment tab of a prescription will be checked by default for all prescriptions.
For more information on printing receipts, see 10.02. Prescription entry
Patients section
Default Patient category The text you enter into this field will be assigned to the category field for new patients.
Default Prescriber name With the cursor in this field, enter the first letter or first few letters of the prescriber's name and press Tab. A window appears displaying prescribers who meet the criteria typed; note that both first and last names appear, and you should select the desired prescriber and click OK to make that prescriber the default one.
Auto-generate patient code If this box is checked each new patient created will have a serial number assigned to them. The assigned code can be overriden by the user.
Prefix codes with The text you enter in this field will be used as a prefix for automatically generated patient codes. e.g. if you enter “t” codes will be assigned “t1”, “t2” etc.
Capitalise patient names Does what it says. The shift key will still override this option.
Prescriber must be entered If this checkbox is checked, then the user will be warned if a prescriber has not been entered when they click the OK button for accept and print a prescription.
Expand abbreviations in patient address fields In the patient address fields, any abbreviations will be written out in full instead of the abbreviation if you check this box.
Share patient prescription over stores If this box is checked, viewing a patient history in one store will show transactions entered in other stores.
Alert if repeat is dispensed before the defined interval of X days If checked then, if a repeat prescription is issued to a customer before the elapsed number of days, an alert is shown to the user for them to confirm whether they wish to continue dispensing the repeat.
Payments section
Default prescription status to finalised: If this is checked the Finalise checkbox on a prescription will be checked when it is first created so that it will be finalised by default when the prescription is first saved. Payments can only be received against finalised prescriptions so if you're going to receive payments from the prescription window on the Payment tab it would be wise to check this preference too.
Receive payments from prescription window: If checked then a Payment tab is added to the prescription entry window and the patient's payment can be entered there. You can still enter a patient's payment separately in the Customer receipts module if required. Whichever of the 2 places you enter the payment, they create an identical transaction. Please note that to activate this preference requires the Activate customer receipts module preference to also be turned on (see General preferences, Invoices 2 tab). If it isn't turned on already you will be asked to confirm that turning it on is OK.
Apply stock to placeholder lines section
This section gives you the ability to apply stock to placeholder lines on prescriptions. We know that in a fast moving dispensary it's sometimes hard to keep up with the stock coming into the dispensary so, sometimes you can get into the position where you physically have stock on the shelves to dispense to patients but you haven't been able to enter it into mSupply yet. mSupply allows you to keep dispensing by automatically adding placeholder lines to the prescriptions instead of normal stock lines. When you eventually enter the stock that you physically dispensed to the patients into mSupply, you need to allocate it to the prescriptions to keep your mSupply stock levels correct. This is the function to enable you to do that.
Simply select the dates between which you want mSupply to look for placeholder lines on prescriptions by manually entering them in the From and To fields or selecting one of the preset selections in the drop down list. Then click on the Apply stock button. mSupply will then search for placeholder lines on prescriptions between the dates you chose. If it finds one it will attempt to replace the placeholder line with real stock from your store on a FEFO basis. If there is enough stock then mSupply will replace the placeholder with a real stock line. If there is only enough to replace part of the placeholder line then it will allocate what stock there is and will leave a reduced quantity placeholder line to represent the stock that still couldn't be allocated.
HIS tab

Backup tab
This tab is used to configure 'primary' backups to be performed automatically according to a schedule.
- These Preferences are applicable only in single user mode (including single-user sync).
- In client-server mode, these 'primary' backup details are set on the server.
- Supplementary backups need to be configured on the Backups 2 tab, regardless of whether you have a single-user or client / server machine.
- You can perform a manual backup (File > Backup) at any time, independently of this automatic backup schedule.
- Manual backups will be performed according the the configuration in the lower half of this tab, which can only be changed after automatic backups are enabled.
- It is not necessary to quit the database before performing backups, manual or automatic.

Automatic Backup
- To enable automatic backups, the Automatic Backup checkbox needs to be checked. This will then allow you to configure the backups.
Choose backup folder
- Click the “Choose” button to specify the destination of the backup files.
- The default location is the same folder as the database itself.
- If possible, select a different physical volume from the one where your mSupply data is stored.
- In any case, it is better to locate this in a folder which is available to any user, e.g.
D:\mSupply backups
Compression rate
- This option selects the compression of the backup.
- Unless you have a very large database and a big bandwidth secondary backup solution, choose Compact. This will give the smallest backup size, but it will take longer to run.
The duplication and block-level comparsisons that services such as Spideroak use mean that it may be better for you to use fast (uncompressed) mSupply backups, as then only the changed portion of your data file will be backed up.
Verify data file after backup
- This option causes the backup to be verified after each backup is made. This is extra insurance against hardware failures and other factors that can lead to data corruption.
- We recommend selecting this option.
Restore last backup if database is damaged
- This option will cause mSupply to attempt to restore from the last backup if the database is found to be damaged.
- We recommend selecting this option.
Use log file
- This option causes a log file of mSupply activity to be created. This is like a running an interim backup in that it can be used with the next option to recover any lost activity since the last backup.
- We recommend selecting this option.
Integrate last log if database is incomplete
- If your database becomes damaged and this option is checked, then mSupply will automatically restore the data from a backup and use the log file to restore all transactions between the last backup and the end of the log.
- We recommend selecting this option.
Backup 2 tab
The Backup 2 tab allows configuration of supplementary backups. This is useful for making copies of just some of your backups that you can then send off-site, e.g. using Dropbox or Google Drive, etc.

Automatic backup to secondary folder:
- Checking this option results in mSupply trying to copy completed backups to another folder which you specify with the Choose button below. Fill in the Backup every …..th file… field with number of backups out of which one copy will be kept. That is, entering 7 will result in one backup per week being copied.
- You will need to configure your online backup software to use the folder chosen as the secondary backup location as the source folder for backups. Note that if you have plenty of upstream bandwidth, you might choose to ignore this Backups 2 tab and simply set your main mSupply backup folder as the source folder.
Secondary backup options 1, 2, 3
mSupply allows you to make up to 3 secondary backups to separate locations if you would like to. You can use 1, 2 or all 3 if you would like to. At least one is recommended for security purposes.
Email tab
You can choose to send orders, reports, invoices and notifications to recipients using e-mail in mSupply. However, before mSupply can send anything by e-mail you must tell mSupply about the server you wish to use and details of the e-mail described below:

Provide me with a mail server to send emails
If this is checked you will use mSupply's own internal email server to send emails. The sender email address will be set to remote@sussol.net and the email address will be set to the sender's email address for all mSupply generated emails.
If it is unchecked you will use your own email server, the details of which you must enter in the Mail server name, Username, Password, Port and Use SSL fields described below.
Please note: it is possible that emails sent from mSupply could end up in the recipient's spam or junk folder. If this happens, ask the recipient to find the email and mark is as not spam to fix the problem. This problem could be particularly present with Google controlled email addresses because of the way Google processes emails. Please be assured that our email servers are fully compliant with all the latest security procedures and protocols.
Mail server name
The name of your mail (SMTP) server. eg “mail.mac.com”. You can only enter this if you are not using mSupply's inbuilt e-mail server (i.e. Provide me with a mail server to send emails is unchecked).
User name
The username mSupply will use to authenticate itself to the mail server. Only needed if you are not using mSupply's inbuilt e-mail server (i.e. Provide me with a mail server is unchecked).
Password
The password which goes with the username. (Only when not using mSupply's e-mail server)
Use SSL
If this is checked mSupply will use the Secure Socket Layer protocol to send e-mail. A more secure way of sending e-mails but only check this if your mail server can support SSL.
Port
The port on the mail server which mSupply will send e-mail to (must be the same port the mail server is listening on!). (Only when not using mSupply's e-mail server)
Return email address
Enter an email address you would like any response to come to. mSupply cannot send email unless it also has a return address for email.
Signature
The text you enter here will be added to the end of all e-mails you send. You might want to put your organisation contact details here. It is generally poor etiquette to make your signature too long.
By default use a mono-spaced font to view text
A mono-space font such as “Courier” or “Monaco” is better for viewing text in columns, such as is produced by the automatic order generation in mSupply . However, visually it has less 'eye appeal'.
Default subject line when creating orders
When mSupply automatically turns an order for a supplier into an email, the text entered here will be put in the subject line. For example you might want to put “Acme Hospital order” to advise the supplier of its contents. Note that you can edit the subject line of automatically generated emails before you send them.
Sort order lines for email and HTML export by item name
This option allows emails generated automatically to be sorted alphabetically by item name before the email is created. If this option is left unchecked, emails will use the creation order of the order lines to create the email.
Server tab

These settings are all for mSupply's built-in webserver, which is used for things such as the Dashboard, mSupply mobile, online catalogue and the Customer interface. Note: To use this feature an additional license is required. Please contact The mSupply Foundation for further information.
Start web server on the server when mSupply server starts
The web server can be started automatically when mSupply starts by checking the box (it will only start on the central server!), or manually when you want to use it by clicking the Start Web server button.
Run the web server on port
The default port is 8080. This is the port used for non-secure http connections.
Use the following port for SSL
The default port is 2048. This is the port used for secure https connections.
Web URL
The URL of the web server to connect to. If this does not begin with “https://” you are shown an alert. You most likely do want to use https if you're making these settings in a live envoronment. And if you're setting up synchronisation then you won't get any connection if you don't use https.
Enable Support DB Integration
If this checkbox is checked (only possible on the central server) this copy of mSupply will send support information to The mSupply Foundation's support database once a day during a time of low activity on the server at night: this is information about all the remote sites, their names, the type and version of mSupply they are running, whether they are registered, the time they last synchronised with the central server, when their latest transaction was entered and when their first stocktake was created.
- Username: The username to use when connecting to the support database.
- Password: The password to use when connecting to the support database.
- URL: The URL of the support database.
- Test connection button: Click this to validate your settings and check the connection to the support database. An alert message will tell you whether the test was successful or not.
- Push now button: Click on this button to send the support information immediately rather than waiting for the automatically scheduled time. You will be shown the progress of the data send and told whether it is successful or not.
Disable the customer order web module and display the following message:
Check this if you want to take the customer ordering module off line and enter the message you want to display to customers who access the module.
Web URL
The address of the remote authorisation web app. This is used by mSupply when emailing authorisers to tell them that a requisition needs their attention in the remote authorisation web app. Enter the full URL, starting with “http” and including any port that is used. See the 26.15. Remote authorisation page for details.
Inactive users are logged out after X minutes
For clients connected to an mSupply server, this is the maximum period of inactivity after which the user is automatically logged out. The user must then log in again to continue using mSupply. A setting of 0 disables this function and then inactive users are never logged out.
Default store for web interface
Choose which store you want to be the default for the web interface (only applicable if you have more than one store). Be careful when changing this option because it will change the default store that all the web interfaces will use to get information from mSupply, not just one of them.
User can create XX uncompleted orders at a time
This limits erroneous submission of too many orders. Choose the maximum number of orders that a customer can make. If they have reached the maximum amount, they will be able to create more when other ones are completed.
Maximum allowable time a mobile interface request can take
This sets how long mSupply will keep trying to supply report data before it gives up and displays an error message.
Synchronise tab
For an explanation of this section please see the 16.07. Synchronisation preferences section.
Customisation options

Should a client wish to have customised features which are specific to their version of mSupply, we are happy, whenever possible, to incorporate such features.
If you are running such a customised version of mSupply, you will have received from us a Customisation code . To activate the customised features, that code must be entered in this field.
Moneyworks tab

If you use the superb Moneyworks accounting software, you can have mSupply directly input invoices into Moneyworks.
Contact info@msupply.org.nz for more information on these options.
Visit http://www.moneyworks.sussol.net for more information on Moneyworks, including a free demonstration version.
Link to Moneyworks accounting software
The Moneyworks application must be installed on your machine, and this option establishes a link between mSupply and Moneyworks. Don't turn it on if you don't know what you're doing, or if you haven't set up Moneyworks as described below.
Three options are presented in the drop down menu:
- Gold - select this option if the Moneyworks application you are using is the one installed on your computer.
- Gold Client - select this option if you are connecting to the Moneyworks application installed on another machine on your network.
- Data Centre Client - select this option if you are connecting to a Moneyworks Data Centre
Export to Moneyworks when finalising individual invoices
This allows for production of individual invoices, e.g. for non credit customers, who make cash purchases; if you have such customers, check this box , but if all your customers are credit customers, receiving monthly statements, it may be left unchecked.
Location of the Moneyworks application
mSupply needs to know the location on your computer of Moneyworks , and by clicking on the Choose button, a window appears, and you should navigate to the location of the Moneyworks .exe file
Document log on
Enter your logon details to access the Moneyworks document that you want to access.
Data center log on
If you are using a partitioned data center, enter your logon details to gain access to the partition where your document resides. If you are not using a partitioned data center then leave this section blank.
Location of the Moneyworks document (datafile)
You need to identify the Moneyworks document (datafile) you are using
If your link is to Gold, this is done by clicking on Choose , and navigating to the file's location. If access to the file is restricted, you need to complete your user name and password in the fields under Document Logon
If your link is to the Client option, when you click on Choose , a window appears and you need to enter the name of the Moneyworks datafile to which you are connecting; the file's restrictions will require you to enter your user name and password in the fields under Data Centre Logon
Type of customer invoice export
The drop down menu allows you to choose from several options:
- Single income account
- Separate income accounts by item account
- Choose for store
I.P. address of machine using Moneyworks
You only need to fill in the I.P. address here if:
- You are on Macintosh and
- You are connecting to a remote machine across a network.
If you are on Windows or a Mac connecting to a local installation of Moneyworks, make sure this field is empty.
Notes on setting up Moneyworks
- The import into Moneyworks relies on using an import map. The map for supplier invoices must be named “si_import.impo” and the map for customer invoices “ci_import.impo”. These map files must be stored in the “Import Maps” folder inside the “Moneyworks Customer Plug-Ins” which is next to your data file.
- The advantage of using import maps is that it gives you flexibility in deciding which accounts will be designated for sales and purchases, and the way the fields exported from mSupply are used inside Moneyworks.
- If you would like sample import maps from Sustainable Solutions, please email us at info@ss.org.np.
- Once you have set up the import maps and turned on the “Link to Moneyworks accounting software” checkbox, mSupply will attempt to send invoices to Moneyworks that are finalised using the “finalise customer invoices” and “finalise supplier invoices” commands.
- Note that the “Export invoices when finalising” option must also be checked. (See Preferences> Invoices)
- If you get an error when exporting, usually you will get a message telling you what the problem is. Things to check include
- Is Moneyworks running …… it must be!
- Make sure the correct I.P address is specified if connecting to a remote machine on Macintosh.
- Make sure any charge codes used are actually present in the Moneyworks data file you are using. We can supply a version of mSupply that automatically adds names to the Moneyworks data file if they aren't found when exporting, but this costs extra!
- Make sure that Moneyworks has open periods for the dates of the invoices that are about to be imported.
- If you still have no success, turn off the Link to Moneyworks. .. checkbox, and produce a file. Then manually import the records into Moneyworks using the File > Import > Transactions command (making sure you load the correct import map using the “Load” button). The file has errors, Moneyworks will give a more complete error report.
- Note that if export to Moneyworks is not successful, the transactions will not be finalised in mSupply, so you will not get invoices that are missed in Moneyworks.
We are also able to provide a similar option to link with Quickbooks accounting software. Please contact info@ss.org.np if this is of interest to you.
FrontlineSMS tab
If you use FrontlineSMS for sending information to mSupply via SMS messages (using mobile phones), this is the tab where you enter all the settings.
For an explanation of this tab please go to FrontlineSMS preferences.
eLMIS tab
This tab contains 2 different interfaces to OpenLMIS variants. The first is for an earlier variant and uses a common internet based folder to process incoming orders and create outgoing shipment files in csv format (for more information on this interface please see the 23.04. mSupply eLMIS interface section). Countries such as Zanzibar and Tanzania use this variant.
The second is for a slightly newer variant of OpenLMIS used by countries like Côte d'Ivoire and sends requisition information from mSupply directly to the OpenLMIS database.

The eLMIS Preference fields:
Fields updated in mSupply v4.03
- eLMIS Interface
- Use the eLMIS interface: Check this box to enable the interface.
- Interface Folder: Click on the Choose… button to select the main folder that eLMIS and mSupply will use to share data. For information on creating this folder please see the 23.04. mSupply eLMIS interface > setup section in this user guide. DO NOT click on the Choose… button unless you're using an mSupply client that is running on the mSupply server computer. Otherwise, you'll set a local folder on your local computer which the server will not be able to reach and the interface will not work.
- Time between scans for new information from eLMIS: Enter the number of hours mSupply will wait between checking for new files to process.
When the Use the eLMIS interface checkbox is checked this setting tells mSupply to check the Interface folder > Orders > Incoming folder every X hours for any new order files to process. - Scan now button: Click this to make mSupply check the /Interface folder > Orders > Incoming for new files to process immediately. Useful if you have manually added a file to the folder and want mSupply to process it immediately instead of waiting for the Time between scans for new information from eLMIS interval set above to elapse.
- Send errors to this email address: The email address mSupply will send any error information to. This would normally be the address of your eLMIS helpdesk.
- eLMIS Requisition Integration
- Use eLMIS requisition integration: Check this box to enable the interface.
- URL: The URL for the eLMIS server. This must be in the form http://xxx or https://xxx
- Username: Your eLMIS database username
- Password: Your eLMIS database password
- Test connection button: Click this to test the account credentials you have entered. You must have the Use eLMIS requisition integration: check box ticked to use this. An alert will tell you whether the test connection was successful or not.
LDAP tab
This section is where you define the details of the LDAP (Lightweight Directory Access Protocol) server you are using to provide user authentication for logging into mSupply. There is no need to fill in these fields if you are not using an LDAP server to check user logins:

Server URL or IP: enter the URL or IP address for your LDAP server.
Port no.: enter the port number your LDAP database is being served on.
Dashboard tab
See the 16.05. Mobile Dashboard set up (before v4.0) section of this user guide for a detailed description of the process.
Note, from mSupply v4.0 and later, this dashboard tab has been removed and a new and improved dashboard has been introduced. The new dashboard has a different setup process, see the 19.06. Mobile Dashboard set up (after v4.0) section for details.
DHIS2 tab
See the 23.01. DHIS2 integration section of this user guide for a detailed description.
NHLMIS tab
This is for integration with the Nigeria Health Logistics Information System. Please see the 23.07. NHLMIS integration page for detailed information.
NHLMIS 2 tab
This is for integration with the Nigeria Health Logistics Information System. Please see the 23.07. NHLMIS integration page for detailed information.
Stock tab
This section is where you tell mSupply which custom stock fields a user can fill in when receiving stock on a supplier invoice. There are 8 fields available. Fields 1 to 4 are free text but fields 5-8 contain values which are selected from a list you define:

Each of the fields you tick the “Show” checkbox for will appear on the bottom of the supplier invoice line detail form when receiving stock. The first 4 fields will also appear in a goods received note and several other places throughout mSupply where stock lines are shown. They will appear with the label you give them in the “Display name” column (click once in the column to make the cell editable then type the name).
The values you enter in these fields (or select for the fields if it's one of fields 5-8) will be attached to the stock and follow it through the system. See the 7.05. Custom stock fields section of this user guide for details.
Custom fields tab
You can create custom fields that appear in different areas in mSupply. These allow you to record additional information and customise mSupply for your needs. See the 16.11. Custom fields section of this user guide for details.
Barcode scanning tab
This contains the settings for your barcode scanner. See the 16.09. Barcode scanning preferences section of this user guide for details.
Options tab
You can create a list of options (or reasons) for the user to select from when they use perform certain transactions in mSupply. See the 16.10. Options (standard reasons) section of this user guide for details.
mSupply Link tab
The mSupply Link is an intermediary service for requesting, sending and receiving stock between discrete mSupply instances. For information on this please see the 12. mSupply Link (Supplier Hub) section.
Alternate server tab
The alternate server is used for a few functionalities in mSupply e.g. sending cold chain notifications (20.03. Cold Chain App Notifications and barcode scanning (15.08. Barcode scanning with handheld computers (The Zapp App)).
To turn on the alternate server, choose File > Preferences from the menus and click on the Alternate Server tab:

- Start alternate web server button: Click to start the alternate webserver with the settings in the table. The button label Will change to Stop alternate web server and clicking it will stop the alternate web server. When the web server is running you cannot edit the settings in the table. To edit them, stop the web server first.
- Reset preferences to default button: Clicking this when the alternate web server is not running will reset the settings in the table to their defaults (shown in the screenshot above).
If you would like this server to start up every time mSupply is started, check the Start web server on this computer when mSupply starts checkbox. This is a good idea if you're using cold chain notifications or barcode scanning so that, if the mSupply server is restarted for any reason, the alternate server automatically restarts with it and barcode scanning and cold chain notification functionality can continue without further interruption for users.
The settings in the table:
| Server parameter | Description |
|---|---|
| HTTP port number | The port number the alternate web server will use for the HTTP protocol. |
| HTTPS port number | The port number the alternate web server will use for the HTTPS protocol. |
| Maximum size (in bytes) of incoming HTTP requests | Requests over this size (in bytes) will be ignored by the alternate web server. |
| Parse header timeout (milliseconds) | The maximum time it can take to parse incoming request headers. Requests with headers that take longer than this to process will be rejected. |
| Parse body timeout (milliseconds) | The maximum time it can take to parse incoming request bodies. Requests with bodies that take longer than this to process will be rejected. |
| Worker threadpool count | The maximum number of staff you can have in a swimming pool at any one time. Just kidding! This is the maximum of threads the server will use to process an incoming request. |
| Log level | 0: No logging, 1: Log only 500 responses, 2: Log all responses, 3: Log all responses and requests. |
| REST API enabled | Check this if the alternate web server REST API is to be enabled. Functionalities like cold chain notifications and barcode scanning require this REST API so turn it on if you're using one of them. |
The default HTTP Port number is 8081 and must be different from the port number used by the mSupply server set on the Server tab (see the 16.01. General preferences page for details). If you inadvertantly try to set both servers to the same port, mSupply will warn you and prevent you from saving your settings.
Please note that setting either the HTTP or HTTPS port to 0 will turn off the alternate server for that protocol.
Assets tab

- Send insurance renewal emails checkbox: If this is checked then mSupply will check every night for assets with an insurance renewal date that is X weeks away from the current date (where X is set in the next preference below). If there are any then mSupply will send an email with a list of all the assets whose insurance renewal date is X weeks away to the email address specified. Only one email will be sent for the assets.
- Send email X weeks before insurance renewal date text field: The number of weeks before the insurance renewal date that an email should be sent. Must be greater than 0 and must be entered if the checkbox is checked.
- Send email to text field: The email address to send the email to. Must be in the right format and must be entered if the checkbox is checked.
Web catalogue tab
This tab determines all the settings for the online catalogue:

If the web server is running (see the Server tab section above for details on how to turn it on) but the Publish item list on web checkbox is not checked, when a user goes to the catalogue web page (see the 19.07. Online catalogue page for details) any message you enter in the Would you like to display any messages on the web? text field will be displayed on the page instead of the item catalogue. This would typically be used if the catalogue is under maintenance because the prices or other item details were being updated.
If you check the Publish item list on web checkbox the Would you like to display any messages on the web? text field is removed and replaced with a Catalogue display settings section:

In this section you select which columns are displayed, what their label will be in the catalogue and whether they are searchable in the web catalogue.
For details on how to configure the web catalogue generally, see 9.07. Online catalogue.
In the catalogue, the details of items matching the search filters are displayed in a table. That table has various columns which can be selected and defined on this tab.
- The Available list shows all the columns that are available but not chosen for diaply in the catalogue.
- The Chosen list shows you all the columns that are chosen for display in the catalogue - they will be displayed when the user visits the item catalogue.
- The Display list shows the display name of the corresponding Chosen column i.e. what name it will have in the catalogue.
To make a column shown in the Available list display in the catalogue, select it by clicking on it and then click on the ![]() button to move it to the Chosen column.
button to move it to the Chosen column.
To remove a column from display in the catalogue, click on it in the Chosen list then click on the ![]() button to move it back into the Available column.
button to move it back into the Available column.
By default, any column in the Chosen list is given the same Display name. If you want it to have a different display name in the catalogue, simply click on it in the Display list and edit the name there.
To allow users to search by a column, check the checkbox in the Search by list. Any columns that have this checked will be added to the filters available in the catalogue.
HL7 Integration tab
See the 23.08. HL7 and Tamanu/Patis Plus integration page for details on this tab.
| Previous: 16. Preferences | | Next: 16.02. Purchase order preferences |