Table of Contents
20.03. Cold Chain App Notifications
This functionality is only available in v5.01 and above.
If you have the mSupply ColdChain app, you can set up mSupply desktop to show notifications from the app, so you can keep an eye on your cold stores while sitting at your desk. mSupply will show a temperature log for each sensor, alert you to any hot or cold breaches, and allow you to change the stock location a sensor is monitoring.
Setting up
1. Turn on the Alternate Server
mSupply uses the Alternate Server to receive data from the ColdChain app. To turn this on, go to File > Preferences and click on the Alternate Server tab. For full details about this, please see the 16.01. General preferences page.
2. Set up store user credentials
To match an mSupply desktop store to the ColdChain app on a tablet, you need to set up the store's credentials in the store settings. See the 25.08. Virtual stores page for details on doing that.
Viewing sensors and assigning locations
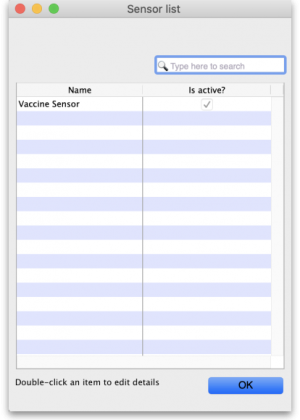
To see all sensors used in the system, choose Items > Vaccines > Sensors from the menus. This window will open, showing you a list of each sensor and whether it is active:
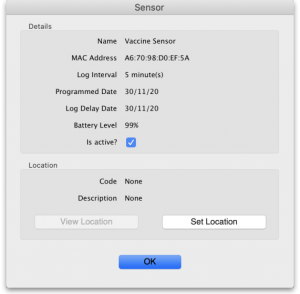
Double click the sensor name to view the sensor's details. This window will open:
If the sensor belongs to the store you are logged in to, you can change the active state of the sensor and assign a new location to it. If the sensor is located in a different store, all the details will be read-only.
- Is active? checkbox: If checked the sensor's readings are recorded and usable in the system. If unchecked, the sensor is ignored and notifications will not be shown for it (unacknowledged, acknowledged, current or historical).
- View location button: When clicked, will open a window containing the details of the location the sensor is assigned to.
- Set location button: When clicked, will open a new window showing you all the locations in your store that do not have a sensor allocated to them already. Select one by double-clicking on it. This is not reversible so be careful!
- When a location has been assigned the button's label will change to Unassign location. Clicking it then will remove the location from the sensor.
Viewing sensor temperature logs
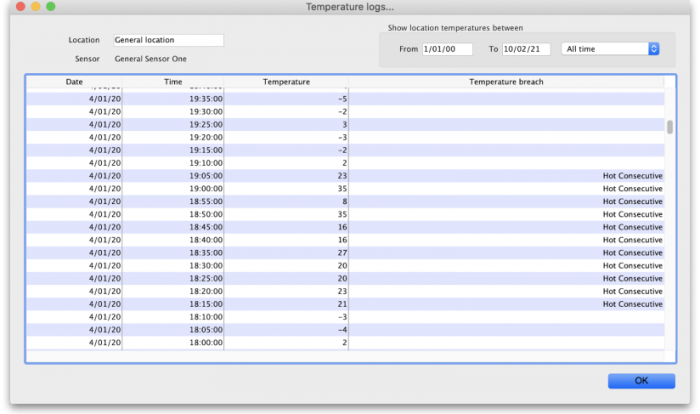
Choose Item > Vaccines > Temperature logs… from the menus and a window showing you the temperature logs for all locations assigned to sensors in the system will open:
The Temperature breach column will contain a description of the breach (e.g. Hot Consecutive or Cold consecutive) if the log represents a breach, otherwise the column will be empty. So an empty column is good news!
Use the filters in the top right to filter the logs by date.
Use the Location field in the top left to filter by location. Type the first few character's of the location's code and press the Tab key on the keyboard to select the location to view logs for from the list of all locations that have a sensor assigned and have a code starting with what you typed. Double-click a location to select it and the logs for the sensor attached to that location only will be displayed in the list.
Viewing breach notifications
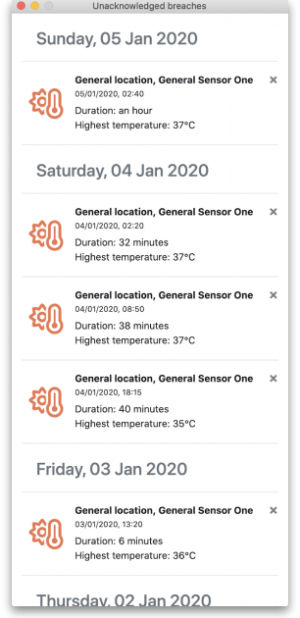
Once the ColdChain app is set up with mSupply desktop as above, you will start receiving notifications about any unacknowledged temperature breaches:
This window will open automatically on startup or when mSupply receives data from the tablet, and show up to the right of your mSupply Desktop app.
You can remove a single notification by clicking on its close button or you can close the entire window. This does not change any notification's state to acknowledged - you can only acknowledge notifications (breaches) in the ColdChain app itself.
The notification window will show the sensor's location and name, the date, time, and duration of the breach, and whether it was a cold or hot consecutive breach by displaying the “Lowest” or “Highest” temperature respectively.
You can turn off breach notifications for users in different stores separately if a user does not want to see these breaches. See the 25.15. Managing users page for details.


