26.07. Virtual stores
From the Special menu, choose Show stores
What is a virtual store?
In mSupply a virtual store is a way of segregating particular stock so that some users only see that stock and the transactions associated with it. When a user logs into mSupply, they choose a particular store to login to - this we call the current store. mSupply then operates as if:
- The stock in that store is the only stock available.
- Only stock from the current store will be available for issuing,
- Reports will relate to stock in that store
- Issues from and receipts to that store only use the stock in that store
- Only suppliers and customers sets as “visible” for that store will be able to be chosen for receiving and issuing goods
- Only items set as “visible” in that store will be usable (So for example if you have a store that handles only vaccines you can make vaccines visible in that store (and invisible in all stores that don't handle vaccines)
Many users of mSupply will only have a single store, and so will have no need of this functionality.
The following examples illustrate situations where you might want to run more than one store.
- A hospital pharmacy where you have two dispensing locations: an inpatient pharmacy and an outpatient pharmacy.
- A pharmaceutical warehouse where stock from a particular donor is received, issued and accounted for separately to stock in the rest of the warehouse.
- A hospital pharmacy where the pharmacy store stock is treated separately to the dispensary stock. You would set up mSupply with a store called “Pharmacy store” and a store called “Dispensary”. You would use the function covered in section 8.05. Transferring goods to another store to move stock from the pharmacy store to the dispensary.
- A pharmaceutical warehouse where you have 2 or more actual warehouses. These may be adjacent or several hundred kilometres apart. (Of course you need network connectivity between sites to run mSupply at each site).
- You're using mSupply mobile- each mobile site will synchronise data with a virtual store on the mSupply server.
Note: In the above examples, when you log on, you would select the appropriate mode - see table:
| Examples | Stores | Log on mode |
|---|---|---|
| Hospital Pharmacy | In-patient Dispensary | Dispensary |
| Out-patient Dispensary | Dispensary | |
| Hospital Pharmacy | Pharmacy store | Store |
| Dispensary | Dispensary | |
| Warehouse | Adjacent Store | Store |
| Remote store | Store |
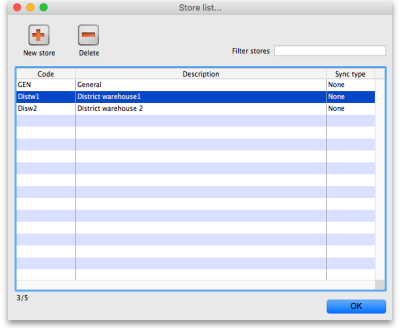
Viewing available stores
From the Special drop down menu click Show stores… The Stores list window (shown below) appears and displays a list of all the stores which currently exist including their sync type:

You can customise the columns that show on this window. Click on the Customise button and this window will show:

The columns in the Chosen list are displayed in the table, the columns in the Available List can be shosen to be displayed. Select a column you want to show in the Available list and click on the » button to move it to the Chosen list. Similarly, click on one in the Chosen list and click on the « button to move it to the Available list and remove it from the display. You can also drag items in the Chosen list up and down to change the order they appear; top of the left is the leftmost column, bottom of the list is the rightmost column.
Editing a store
Double-click on any store in the list in the View stores window described above to view or edit its details. You will see the same window as in the Creating new stores section below but the various fields will be filled in with the store's current settings. You can click into the fields and edit them as desired. Note that in the top left of the window, the name of the store you are editing is always displayed, regardless of which tab you are on, so that you always have a reminder of which store you are editing!
If you're working within a syncing system, stores and their settings/preferences can only be created and edited on the central server, and all stores exist on the central server. A mirror sync setup is slightly more complex - stores themselves and any settings related to name visibility are only editable on the central server (or the primary server in versions of mSupply older than v7.13), but master lists and item visibility settings are only editable on the primary server. In this case, all stores exist on both the central server and the primary server.
Creating new stores
This new store will inherit the same user and group permissions (but not login permissions!) as the store which you are logged in to when you execute it. It is therefore worth logging in to a store that has similar user and group permissions to those that you want to have in the new store. Often the supplying store will be a suitable store for this purpose.
As noted above, in a syncing system you must be logged into the central server to create a new store - it will be synced to any site where it is visible to any stores active on that site (which will also include the supplying store). When a store is created, it is made active on the central server by default - see sync sites if you want to move it to (make it active on) another site.
To create a new store click the New store button in the Store list window shown above. This will display the Store details window shown below, which allows you to enter the details of the new store:

If you want to create the store for an existing customer, don't follow the rest of the instructions here. Refer to Transition a customer to a virtual store.
Name
The name used to identify the store throughout mSupply. It must be unique and mSupply will tell you if another store has the same name; you will need to change it before you can save. Any non-printable characters entered before or after the name will be removed. Any entered in the name will be replaced with an underscore (_).
Store code
The code used to identify the store. If you have a lot of stores it would be helpful if you decide on a good pattern to use for the codes. The code must be unique too; mSupply will tell you if the code is already in use and you will need to change it before you can save it. Any non-printable characters entered before or after the code will be removed. Any entered in the code (and spaces) will be replaced with an underscore (_).
Store type
Set in the drop down list to the right of the Store code field. Can be one of:
- Store: a normal store used for managing inventory and issuing to customers
- Dispensary: a store used for managing inventory and dispensing to patients
Organisation name
The name of the organisation running the store. Defaults to the organisation name entered in File > Preferences.
Address details
Enter the address and contact details for the store in here if there are any. These details can be used in reports. Note that these fields will be copied to the Main/Billing Address fields in the store's name record (see the 5.01. Names: using, adding and editing page for details) if they are updated.
Turn an existing customer into a store
Only visible if you are creating a new store, not if you are editing an existing one. If this is checked then the Name field becomes a search field for the customer: enter the first few characters of the customer's name and press the Tab key on the keyboard to select the name from all those that begin with what you entered (or mSupply will select it for you if only one customer matches). When the OK or OK & Next buttons are clicked, the existing customer record will become this new store.
Down arrow button
Only visible if editing an existing store, not when creating a new one. Clicking this button will open the store's name record (see the 5.01. Names: using, adding and editing page for information on names) where you can view and edit things like categories.
Disable this store
Check the Disable this store checkbox to stop the store from being used. You might want to use this feature if the store is not ready for use yet or is no longer to be used and can't be deleted. You will be asked to confirm the disabling after clicking on the OK button on this window.
Responsible officer
Select the officer responsible for the store in this drop down list. A helpful reminder for others and can be used in reports.
Store credentials
These are used when the store needs to be identified securely over electronic communications. An example of this is when using the cold chain app for monitoring temperature in cold storage and freezers.
To tell mSupply to use the credentials, check the Use store credentials checkbox (unchecking it deletes the store's credentials so please be careful before doing so).
This will enable the Username and Password text fields and you can enter the appropriate details.
- The Username will be set to the first three letters of the store's code by default.
- The Password must be at least 4 symbols but not more than 30 symbols, and can contain letters and numbers.
If you need to view the password you have entered to check it is correct, click on the ![]() button.
button.
Tags
Tags are used in several ways:
- for determining which programs a store can use.
- for controlling some customisation features.
- for reporting to group stores together.
This area shows the tags that the store currently has. To add a tag, simply click into the area and type the tag's name. When you have finished typing the tag's name then press the Tab or Space keys on the keyboard (not Enter or return, that will close the window!). You know when you have done it right because the tag will appear in its own little box with an 'x'. If you want to remove any tag from the store, simply click on that 'x'. In this way you can add or delete as many tags from a store as you like.
When you click on the OK, OK & Next or OK & Previous buttons, any new tags you have created here will be added to the list of name tags in your system. See the 5.05. Name tags page for details.
After having created a new store, the Stores list window will display the new list of all stores and you may double-click an entry to edit that store's details. A number of things that will need to be attended to are:
To do a number of the following steps, you will need to log in to the new store. To do this, you will need to give yourself access to the new store as shown in section 25.15. Managing users. Any other users who need to access the store will also need their permission altered accordingly. After giving yourself permission to log in to the new store, log in to it and carry out these steps.
- Set the preferences for the store.
- Set the store's logo so that it can appear in print-outs and reports.
- Set the visibility of names and items in the store. All items in the system will be set to invisible in the new store when it is created. You will need to modify visibility of items in order to be able to handle stock of those items.
For any system bigger than the most basic operation, you will likely want to use Item master lists to control item visibility - refer to the Item list (master and local) option under the Item tab
- Setup any custom store data (used for reporting).
Preferences tab
- The preferences described here are set 'per store' and can be different for each store in an mSupply datafile.
- In a synced system the store preferences will be synced along with the store to any sites where the store is visible.
- Other preferences (accessed through File > Preferences…) apply to all stores in an mSupply datafile.
- If you have to set the same preferences for lots of stores you might like to try the 26.08. Bulk Store Preferences Editor. It just might save you some time and your sanity

This tab contains the preferences that can be set for a store. Each store has its own settings for these preferences: this is different for the settings in File > Preferences which apply to all stores in an mSupply datafile.
This is what the tab looks like:

The Search store preferences search bar at the top is used to find a particular preference. If you type something in here, preferences which contain the text you have typed only are displayed, all others are hidden. There are a lot of preferences so this should help if you just can't find the one you want!
This is what each preference does:
| Preference | Description |
|---|---|
| Sort available batches by VVM status rather than Expiry | When issuing stock, this will sort the list of available batches by vaccine status first, then by expiry date rather than by expiry date first (e.g. 8.01. Issuing goods to a customer (customer invoices)). |
| Patients created in other stores not visible in this store | If this is checked, patients that are created in other stores across all sites will not be visible in this store. If it is off, all patients from all stores from all sites will be visible to this store. It is set to true by default when a store is created. USE CAUTION: Turning this OFF for many stores does not scale well and can overload the sync system. See the 10.03. Patients page for more details. |
| Names created in other stores not visible in this store | If this is checked, names (customers, suppliers, manufacturers, donors etc.) created in other stores in the same site will not be visible in this store. It is set to true by default when a store is created. |
| Allow users to enter total quantities to distribute to appropriate packs | On a customer invoice an additional Total field is displayed so that users can enter the total quantity of units that they wish to distribute or the number of packs. |
| Round up the distributed quantity | The value for distributed quantities will be rounded upwards. |
| Able to pack items into multiple boxes | Checking this enables the functionality for packaging goods into boxes on the Transport tab of a customer invoice. See 8.06. Box management for details. |
| Store: Able to issue in foreign currency | Foreign currencies can be used on supplier invoices for overseas suppliers. |
| Allow editing selling price on customer invoice lines | Individual selling prices can be edited on customer invoice lines. Please note that the Price editable when issuing checkbox on the General tab of an item's details page must also be checked for each item that the price is to be editable for. |
| Purchase order must be authorised | Turns on purchase order authorisation. See Ordering Items From Suppliers. |
| Finalise customer invoice automatically | Automatically finalise customer invoices with confirmed status, which is normally when the goods are dispatched. |
| Customer invoices must be authorised | Turns on customer invoice authorisation (i.e. goods can only be sent to a customer after the action has been authorised). See 26.14. Authorisation for details. |
| Authorisation needed only if over budget | This additional option is enabled when customer invoice authorisation is turned on. |
| Confirm customer invoices automatically | Set a New Customer Invoice status to confirmed when the OK button is clicked. This means that it is not possible to print a picking slip for the issued goods. |
| Supplier invoices must be authorised | Turns on supplier invoice authorisation (i.e. goods can only be brought into stock when the action has been authorised). See 26.14. Authorisation for details. |
| Confirm supplier invoices without asking | Sets a new Supplier Invoice status to confirmed automatically when it is saved (i.e. when the OK button is clicked), with no request for confirmation. The goods are made available in stock without informing the user. |
| Disallow adding expired stock to supplier invoices | If checked then a user will not be allowed to add stock which is already expired to a supplier invoice. If a user does this, they will be shown an alert message saying that the line is expired and they will not be allowed to save it. The same check is also performed when adding lines to a goods received note, an inventory adjustment - add or a customer credit. |
| Goods received lines must be authorised: | Turns on goods receipt authorisation (i.e. only authorised goods receipts can be processed for the goods to be made available in stock). See 26.14. Authorisation for details. |
| Locations must be entered for goods received | A shelf location must be entered on the goods receipt item line form when receiving goods into stock. |
| Able to specify manufacturer when receiving, ordering or quoting for items | Gives users the option to record the manufacturer of goods when making purchase orders, goods receipts or entering a quotation from a supplier. |
| Show item unit column when issuing | If checked, when goods are issued on a customer invoice or prescription, an Item unit column is included in the window used for selecting items to add. |
| Log transaction edit | |
| Set pack to one for all visible items in this store | This controls the two Item preferences Allow pack to one conversion and Convert pack to one when receiving for ALL items visible in this store. If the preference is turned on then it turns those two preferences on for all items visible in the store, if it is turned off then it turns them all off for all items visible in the store. |
| Use remote authorisation for response requisitions | Turns on remote authorisation for response requisitions. See 26.15. Remote authorisation for details. |
| Include requisitions from this store in suppliers' remote authorisation processes | If checked then requisitions from this store will appear in the requisition approval processes of the suppying store. See 26.15. Remote authorisation for details. |
| Can manually link requisition to supplier invoice | When receiving stock, users can match the supplier invoice to the initial requisition. They can then add items from the linked requisition, speeding up the process of creating the supplier invoice. This is useful for stores requesting and receiving stock from suppliers that do not use mSupply. See the 7.01. Supplier invoices page for details. |
| Automatically populate supply quantities with requested quantities | On requisitions, automatically populate supply quantities with requested quantities, instead of 0. Supply quantities can still be edited. |
| Show extra fields on requisitions | When a line is selected on a response requisition, an extra box is displayed under the table of requisition lines to show the calculations behind the suggested quantity. The extra field is currently only populated for Côte d'Ivoire users. |
| Keep requisition lines with zero requested quantity on finalise | If this is checked, lines on requisitions that have zero requested quantity are kept when the requisition is finalised. Otherwise they are deleted (normal behaviour). |
| Show comment field when entering supplier invoice lines | Allows users to type a comment for individual items received on a supplier invoice. |
| Use EDD placeholder lines in supplier invoices from this store | If turned on, any placeholder lines on a customer invoice that is a stock transfer are duplicated on the supplier invoice in the receiving store when the customer invoice is finalised. The placeholder lines in the supplier invoice appear on an Unsupplied items tab (see the 7.01. Supplier invoices page for details). Note: the placeholder lines are not duplicated on the supplier invoice if the receiving store is an mSupply mobile store (placeholder lines are not used in mobile stores). |
| Consolidate batches | Items with the same batch, expiry date, pack size, location, donor, cost and sell price will automatically consolidate when bringing goods into stock from a supplier invoice or doing a stocktake. |
| Edit prescribed quantity on prescriptions | When checked an additional Prescribed quantity field is available when entering a prescription line. See 10.02. Prescription entry for details. |
| Allow users to choose diagnosis on prescriptions | When checked an additional Diagnosis drop down list is available on a prescription. See 10.07. Diagnoses for details. |
| Use consumption and stock from customers for internal orders | If checked, when calculating the current stock and consumption figures (to calculate the suggested order quantity), the stock issued to all customers and the total stock of all customers will be used instead of the current stock and consumption of the current store. Note that customer stores are all those stores that have this store set as their supplying store. See the 6.04. Ordering from one store to another (internal orders) page for details about internal orders. |
| Items received on a purchase order must be within a minimum expiry date | When turned on, stock cannot be received if it has an expiry date that is before a date set on a purchase order. See mSupply mobile setup for details. |
| Store credentials are controlled on the central server | In a syncing system, if this preference is checked, then the Store credentials preferences (see the Store credentials section above for details) can only be edited on the central server, rather than on the site where the store is active (where they are usually edited). |
| mobile: Alert if a patient is dispensed the same vaccine multiple times in a week | This preference only has an effect if this is an mSupply mobile store. See mSupply mobile setup for details. |
| mobile: Enforce lookback period | This preference only has an effect if this is an mSupply mobile store. See mSupply mobile setup for details. |
| mobile: Uses vaccine module | This preference only has an effect if this is an mSupply mobile store. See mSupply mobile setup and also 20.01. Vaccine Vial Monitoring (VVM) for details. |
| mobile: Uses dispensary module | This preference only has an effect if this is an mSupply mobile store. See mSupply mobile setup for details. |
| mobile: Uses dashboard module | This preference only has an effect if this is an mSupply mobile store. See mSupply mobile setup for details. |
| mobile: Uses cash register module | This preference only has an effect if this is an mSupply mobile store. See mSupply mobile setup for details. |
| mobile: Uses payment module | This preference only has an effect if this is an mSupply mobile store. See mSupply mobile setup for details. |
| mobile: Uses patient types | This preference only has an effect if this is an mSupply mobile store. See mSupply mobile setup for details. |
| mobile: Uses Hide Shapshot column | This preference only has an effect if this is an mSupply mobile store. See mSupply mobile setup for details. |
| Pickface replenishments must be authorised | If checked, pickface replenishments in this store must be authorised by a user who has permission to authorise them before they can be finalised. See the 4.21. Pickfaces and Replenishments setup and 4.22. Pickfaces and Replenishments pages for details. |
| Able to specify VVM status when receiving items | If checked then a new VVM status field will be available on a supplier invoice for the user to select the current VVM status of the batch when it is received on a supplier invoice or inventory adjustment. See the 7.01. Supplier invoices and 4.18. Inventory adjustments pages for details. Also, if checked then an additional Doses column is displayed on a customer invoice. See the 8.01. Issuing goods to a customer (customer invoices) page for details. |
| Finalise stock transfer supplier invoice automatically | If this is checked, supplier invoices that are created in this store as the receiving side of a stock transfer are automatically received into stock and finalised. This is set in the receiving store. Only users who have the Edit store details permission set can set this preference (see the 25.15. Managing users page for details on setting user permissions). There is another preference that does a similar thing that is set in the sending store. See the For stock transfers the supplier invoice in the receiving store should be... section below for details on that. |
Notification preferences
These are used by the notification/alert functionality described on the 14.01. Notifications (Alerts) page. The notifications inform users of situations that need their attention. The thresholds that give rise to some of the notifications can be set here.
Threshold for overstock
The months of stock of an item for it to be considered as overstocked.
Threshold for overstock is NOT relevant to the potential of stock to expire. Whether you have expiring stock is driven by the shelf life and AMC of the stock that you have, not some arbitrary number of months. The Expiring items report will provide insights into this.
In most real-life situations, the volume of storage available is limited and the Threshold for overstock might assist in managing storage space by preventing space being unnecessarily occupied. An alert is triggered for an item if the total quantity in stock (including all stock lines) divided by the AMC of the item (calculated using the last 12 months' usage in the current store) is greater than or equal to this threshold number. The default is 6 months.
Clearly, the Threshold for overstock must be more than the Threshold for understock. The default Threshold for overstock value of 6 may be suitable for a store with a 1-monthly order cycle. For a central store with an annual order cycle, then this figure should probably be set to no less than 36
In any case, if storage space is what is driving this threshold, then it would be more valuable to have some parameter associated with the volume of stock, rather than the number of months' worth of stock. This is an imperfect parameter, and can only be used as a very rough indicator
Threshold for understock
Also called Buffer stock, this is the number of months of stock that an item must have less of, to be considered understocked i.e. in danger of not having enough to meet demand. An alert is triggered for an item if the total quantity in stock (including all stock lines) divided by the AMC of the item (calculated using the last 12 months' usage in the current store) is less than or equal to this threshold number. The default is 3 months.
This alert should only be triggered when your stock levels fall below your buffer stock levels. Based on the formula developed in Calculating the required stock quantity, Buffer stock (months) = 2 x Ordering cycle. The default value of 3 is suitable for a store with a monthly order cycle. For a central store with an annual order cycle, then this figure should be set to 24. That is a lot of space for a national store with several thousand items 
Expiring items period
An alert will be triggered for an item if a batch is due to expire in less than this number of months. The default is 3 months.
This alert should be triggered if there is a reasonable risk that your store, or your store's customers will need to dispose of stock due to expiry. However, this is only a real concern if there are significant quantities of the item with short expiry. So, in isolation, Expiring items period is a bit arbitrary. As a rule of thumb, the Expiring items period can be set to equal the ordering cycle. On that basis, the default value of 3 is suitable for a store with a 3-monthly order cycle. For a central store with an annual order cycle, then this figure should be set to 12
Custom data
This section is for store specific custom data fields that must always be present. User definable custom fields are handled on the Custom fields tab (see the Custom fields tab section below for details).
Monthly consumption lookback period: The number of months of consumption information to use when calculating average monthly consumption for this store. Currently only used when the Côte d'Ivoire customisation is enabled.
Months lead time: The number of months before ordered goods normally arrive. Used to calculate how much stock to order for the suggested quantity in requisitions, for example. Currently only used when the Côte d'Ivoire customisation is enabled.
Suggested packing in boxes
These preferences affect the suggested pack functionality described on the 8.06. Box management page.
- Prefix for generated boxes: Defaults ot no prefix. Each box created in a suggested pack has a number which starts at 1 and increments by 1 for each new box created. Whatever you enter in this text field will be added before these numbers to give you the box names. For example, if you enter “Box-” then the boxes will be created with names “Box-1”, “Box-2”, “Box-3” etc.
- Percentage space to leave empty: Defaults to 0. Boxes will be packed as close to 100% of their volume minus the value entered in here. This is helpful to account for situations where the size, shape and possible orientation of packs make it hard to pack them all into the actual volume expected.
When finalising a goods receipt
There are three options:
- Don't receive goods into stock until supplier invoice is taken off hold - for goods to enter stock you must finalise the goods receipt and then take the automatically generated supplier invoice off hold
- Receive goods into stock, and leave supplier invoice confirmed - goods enter stock as soon as the goods receipt is finalised. The automatically generated supplier invoice is created with confirmed status.
- Receive goods into stock, and finalise supplier invoice immediately - goods enter stock as soon as the goods receipt is finalised. The automatically generated supplier invoice is created with finalised status.
How you set this preference is determined by how separate your goods receiving and finance sections are. If they are not in the same building, you might want to use the “Receive into stock and leave confirmed” option, as this will allow you to proceed with issuing goods without waiting for the finance department's approval.
table at the to
For stock transfers, the supplier invoice in the receiving store should be...
This option applies to all stores that this store transfers stock to.
This option is used to determine whether stock transferred from this store (the sender) to another (the recipient) is received to a destination store and automatically introduced to stock or not. The On hold option prevents stock from being introduced, while the Finalised option automatically makes the stock available for use in the destination store - without the receiving store having the opportunity to amend the Goods Receipt.
- Choose Finalised if there is no need to check / alter the quantity received compared to what was sent.
- Choose On hold if the store is being used by mSupply mobile, and the goods receipt needs to be confirmed before receiving.
This preference is set in the sending store. There is another preference that can be set in the recipient store that will do the same thing but from the recipient's point of view. See the table at the top of the Preferences tab section above for details on that.
Location code pattern
This is used with phased stocktakes (see the 4.18. Phased stocktakes page for details) to tell msupply which parts of your shelf location codes (see the 4.06. Stock locations and location types page for details) represent the aisle, level and position of the location.
An aisle is a whole row of racking like this:

A level is a horizontal level of the racking like this:

And a position is a vertical column of the racking like this:

Use the letters A, L and P to represent the aisle, level and position parts of the location code.
Let's use an example to show how it works. Let's say that the shelf location codes are in the format B01.C.01 where B01 represents the aisle, C represents the position and 01 represents the level. Then in the Location code pattern text box you would enter the text AAA.P.LL
It doesn't matter what characters you use as separators, mSupply only looks for the positions of the letters A, P and L. If more than one character is used to define any of the three parts of the location then they must appear together in the location code pattern.
Logo tab
![]()
Here you can set the store logo by pasting in a logo you have copied to the clipboard - you must copy the contents of a file to the clipboard, not the file itself. The file can be in .jpg, .png, .bmp, .gif, or .tiff format. This logo will be displayed at the bottom right of the mSupply navigator screen when you login to this store only.
This store logo will override the logo saved in the Settings > Preferences > Logo tab.
To print this store logo on standard customer and supplier invoices etc. you will need to go to the Settings > Preferences > Logo tab in mSupply and tick the Display logo on invoice checkbox. When a store logo is set it will print the store logo instead of the logo set on that preferences tab.
Note that after saving the store logo you must login to mSupply again or use the switch function to reload this store to see it.
Custom fields tab

This tab shows the custom fields that have been set up for stores (see the Custom fields section for details). You can also add or edit custom fields directly from this screen.
Adding a custom field
To add a new field, click on the New line button; a new line with default values of “Field label” and “Field value” in the two columns is added to the table and highlighted. Click on the value in each column and type the real label and value for the piece of information.
Editing an existing custom field
To edit the label or value of any custom field, simply click on the cell in the table and edit the entry.
Deleting a custom field
To delete any custom field simply select its row in the table and click on the Delete line(s) button. You can use Shift+click, Control+click, Control A (or Cmd instead of Ctrl if you're using a Mac!) to select multiple lines and delete them all at once if you like.
Master lists tab and Visibility tab (controlling item visibility)
Controlling the visibility of items in different stores is important because you can only order, distribute, receive goods for, and report on items that are visible in your store. It's also important that stores don't have items visible that they don't use so that they don't accidentally order them etc.
In a syncing system, item visibility and master lists can only be edited on the primary server ⇒ if it's a mirror sync system, then you'll need to create the store first on the central server and wait for it to sync to the primary.
If you have lots of stores in your data file, managing item visibility can turn into a difficult task. Thankfully, mSupply has some helpful tools to make it simple! There are 2 ways to manage item visibility and you use one or the other, not both:
- automatically using the Master lists tab (recommended!) or
- manually using the Visibility tab
Each are useful in different situations and are described below.
Master lists tab
If you have a lot of stores in mSupply, and especially in a syncing system, we recommend that you use master lists to control item visibility, because it means that the visibility of newly created items will be automatically handled correctly. The visibility of items in a store whose visibility is controlled by master lists is immediately updated if any changes are made to any of the master lists. For instance, if a new item is added to a master list controlling visibility then that new item is made visible in all stores that use the master list. And any items deleted from the master list are made invisible in any store using that list.
The first thing to do is to make sure that you have turned on the preference to make master lists control item visibility in stores. Do that in File > Preferences… on the Item tab - see General preferences, the item tab for details.
The next thing to do is to create the master list(s) that will control item visibility. See Item master lists for details on how to do that. Giving your master lists helpful names will help you remember what they're for e.g. “Store xxx visibility list”.
Now edit the store to tell mSupply which master list(s) will be used to define which items are visible in the store:
- Click on Special > Show stores… (or click on the Stores icon on the Special tab of the navigator)
- Double-click the store who's visibility you would like to manage:
- Click on the Master lists tab:
- Select which master list(s) you would like to control the visibility of items in your chosen store by checking their checkbox in the Use master list column:
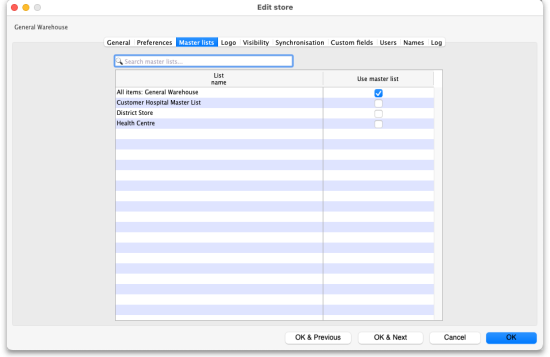 In this example, the All items: General warehouse master list has been selected to control the visibility of the General warehouse store. Please note: If there are a lot of master lists, you can type in the Search master lists field and the list will show only those master lists which contain what you type.
 - Click the OK button to finish. As soon as you do that the items on the selected master list(s) are made visible in the store and any items not on the selected master list(s) are made invisible. Any new items added to the selected master list(s) will be made visible in the store and any items removed form the master list(s) will be made invisible in the store.


NOTE: Assigning master lists to stores can also be done on a master list's details window. See the 4.04. Item master lists page for details.
Visibility tab
In a syncing system, the item visibility icons and fields will be disabled unless you're on the primary server; the name visibility icons and fields will be disabled unless you're on the central server.
You will only be able to use this tab if you have permission to login to the store you have selected and you have permission to edit visibility in that store.
To log into a store you may need to first give yourself permission to do so under File > Edit Users > Double-click your user name > the Log in rights tab. Phew!
The Visibility tab contains tools for manually setting the visibility of items and names in a store.
The item visibility tools are good to use if you do not have many stores in mSupply and only need to make occasional changes to visibility for a number of items. If you want to make a change to a single item's visibility in a single store then you can do that by going to the item's details window and using the store tab (see Item basics, the stores tab).
If you have turned on the preference to control item visibility by master list then you will not be able to use the visibility tab or the visibility settings on the store tab of an individual item's details window.
Here's what the tab looks like:

The buttons provide you with different ways to hide and show items and names in the store (Note: be careful showing names in databases that have a lot of names records. For example if you have 20 virtual stores and 200,000 names in your database, showing all names in all stores will create 4 million (20×200,000) records to map the visibility of each name in each store):
- The Show stats button shows how many items and names are currently hidden and visible
- The Set item visibility to match master lists for this store button matches the item visibility to the master lists that are selected on the Master lists tab. (Note: this is a one-off operation, no changes will be made to item visibility if the master lists are changed after you click this button. See the section above if you want that to happen!) If using this button makes some items that have stock invisible, they will be made invisible (so that they can't be re-ordered for example) but the stock will not be made invisible and can still be viewed in the stock list and included in customer invoices, prescriptions, inventory adjustments and stocktakes as appropriate. Stock cannot be hidden in mSupply!
- The Make all items in this store visible and Make all items in this store invisible both do just as they say.
- The Set pack to one for all visible items in this store will check the Allow pack to 1 conversion and Convert pack to 1 when receiving checkboxes for all items in the store so that all stock received into the store will automatically be received in packs of 1. This is useful in a dispensary store, for example.
- The Set to match button requires you to choose a master list. Clicking the button makes the items that are on the master list selected in the drop down list next to it visible in the current store. Note that it does not hide items that are already visible but not on the master list.
- The Make all names in this store visible button does exactly what it says and makes all names in the datafile visible in the current store.
- The Make all names in this store invisible button does the opposite and makes all names in the datafile invisible in this store. Be careful using this - you won't be able to receive or distribute stock from/to anyone until you make some names visible in the store!
- The Query names button enables you to search for names (customers, suppliers, manufacturers, donors etc.) in the datafile. Every search you run creates a selection which is then operated on by the Make found names visible in this store button.
- The Make found names visible in this store will make all names in the last selection made with the Query names button visible in this store. Ask Sustainable Solutions for help if you're not sure about getting the right selection of names, as the consequences of making a mistake can be time consuming to fix!
Users tab

The users tab shows which users have permission to log into this store.
The table shows a list of all the users in alphabetical order. If a user can login to this store then their corresponding Can login checkbox will be checked. If the store is the user's default store then the checkbox in the Default store column will be checked.
You can add or remove permission for a user to login to this store by checking or unchecking their Can login checkbox (only if you have permission to edit store details though).
Synchronisation tab
mSupply has a synchronisation system designed to cope with environments which have weak or intermittent internet. The system passes information between a server and remote site (or tablet running mSupply mobile) when there is an internet connection, and stores information to be sent when there is not.
See the 29.01. Introduction to Synchronisation page for more details.
This tab displays some of the synchronisation settings for this store:

The Resync patient records when store is saved checkbox forces all patient records to be re-synchrionised with the server when the OK button is clicked. This is useful if there appears to be something wrong with one or more patient records.
Names tab
This tab shows a list of all the customers, suppliers and stores (collectively called “names”) in the datafile and which are visible in this store. If you're on the central server (and you have edit visibility permissions for the store), you are also able to edit the visibility of names:

The table shows whether the name is a customer or supplier (or both). The checkboxes in the Visible in this store column are editable. If checked then the name is visible in this store, if unchecked then the name is not visible in this store. Click on one of the checkboxes to change its state.
- Store checkbox: If checked then names that are stores are shown in the table
- Customer checkbox: If checked then names that are customers are shown in the table
- Supplier checkbox: If checked then names that are suppliers are shown in the table
- Search names field: If you type in here then only names that contain what you type will be displayed in the list. Useful if you want to find a particular name or group of names in a long list.
- All off button: Clicking this will uncheck all the checkboxes in the Visible in this store column (so making all names invisible in this store) and the button will change to All on. Clicking it then will check all the checkboxes in the column (and therefore make all names visible in this store).
- Copy button: Copies the current state of all the checkboxes in the Visible in this store column.
- Paste button: Pastes the states of checkboxes saved using the Copy button to the names in the table. Doesn't do anything if you haven't previously clicked the Copy button.
Clicking on the OK, OK & Next or OK & Previous buttons will save any changes you make on this tab.
Deleting a store
To delete a store, click on the Delete button in the View stores window. Note: deletion of a store is a serious thing to do and is only possible when that store contains zero stock and there have been no transactions recorded. mSupply will check and tell you that deletion is not possible if these criteria are not met. In other words, you can only delete a store that has never been used! If these criteria are not met and you still want to stop people using the store, then you can disable it - see above.
If the store is Active on another site, then this process will not delete the site.
Merging stores
Circumstances change, and you may find yourself in a position where you want to merge two stores. The main benefit of doing this instead of just disabling one of them, is to combine the historic transaction records of both stores into the combined store so that you don't lose some of the transactions.
Merging stores is not reversible.
The merge store feature has only recently been developed (2025). As you can imagine, merging stores is a fairly sophisticated operation, and, when coupled with migrating the combined store to, say, Open mSupply, it can have unintended consequences. Because it is such a dangerous operation, stores can only be merged by a member of the mSupply Foundation support team.
Please email support@msupply.foundation so that the support team can test and see if you will encounter any issues, and then, in consultation with you, carry it out on your Central server for you.
In order to merge stores, both of them need to be:
- Active on the Central server
- Not disabled (Special > Show stores)
It is OK if one or both of the stores are:
- Not visible to each other
- Not visible to the store that the user is logged in to when carrying out the merge
- On Hold (Customer > Show Customer)
Transition a customer to a virtual store
You may have a customer that is about to start using mSupply. That customer needs to become a store in mSupply. There are two ways to do this.
- The 'old' method: Create new store and then merge with the existing customer name
- The recommended
 method: Turn an existing customer into a store
Whichever method is used, this is difficult to reverse. Only do this once you are sure. You have been warned!
Create new store and then merge with the existing customer name
Until version v5.02 (see below), the procedure was:
- Create the new store with a similar name
- Use mSupply's Merge names functionality to merge the two names into one
- You must choose the newly created store's Name as the “Name to keep” and the older Customer's name as the “Name to delete”. However, doing this means that you will lose the original name properties. Therefore you should also take a note or a screenshot of name properties that you want to keep (e.g. address, categories etc.) and then re-apply them to the new store name.
- mSupply may prevent the merge due to unfinalised CIs from other stores in the system. You will need to finalise these CIs on the corresponding stores before the merge is successful.
- These can be hard to find on a multi-store system where the transactions could have come from a number of places. Suggested approach: Use Supervisor mode, view CIs, and customise the list view to show Store name.
- If these transactions are on a number of stores on remote sites with dodgy internet connections, it can take days to log in to the remote sites, finalise the CIs, and sync the finalised CIs back to the central server. Meanwhile, there is a danger that new transactions will be created!

- These inconveniences are why the Turn an existing customer into a store feature was developed
 .
.
Turn an existing customer into a store
Due to the limitations of the method described above, from mSupply v5.02 onwards, you can choose to convert an existing customer into a store, and thereby retain all of its properties.
This method will only work if you are logged in to a store that is visible to the customer.
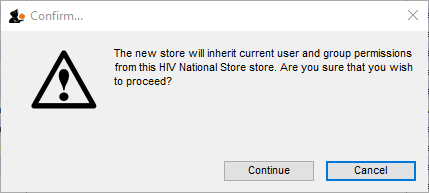
- The new store will be made visible to all stores that the original customer was visible to.
- The new store will have the same User and group permissions as the store you are logged in to
- The only user who will be configured to be able to login to the new store is the user who created the store. User store login permissions are NOT copied to the new store. These will need to be manually configured later.
- Log into a store that
- Is visible to the customer that is to be converted to a store
- Has similar user and group permissions as the new store.
- Customer > Show customers… to find the customer that you want to convert into a store and copy the name. This will ensure that you are converting the correct customer into a store - see warning below!
Step 5 below will be easier and more reliable if you copy the name into the clipboard:
- Click in the Name field
- Select all (Ctrl+a)
- Copy (Ctrl+c)
- Special > Show stores… > New Store You will see an alert like that shown below.:
- Click on the Turn an existing customer into a store checkbox
- Enter the existing customer name into the customer field. You can search for existing customers by typing the first few letters of the customer's name, and then press Tab. To ensure that you are converting the correct customer into a store, paste the customer that you copied in step 2 above.
If you do not see the store code field getting populated, then the existing customer has not been recognised - try again.
- Click OK

| Previous: 26.06. Transaction categories | | Next: 26.08. Bulk Store Preferences Editor |