Table of Contents
4.12. Managing item access with Departments
Introduction
Item departments are a mechanism by which you can restrict item availability to certain customers only.
Item departments are a bit complicated. Here's what you need to remember:
- Each customer can be a member of only one group.
- Each item can be a 'direct' member of only one department. However, a department can be a member of another department, so an item can, in effect, be a member of more than one department
- Each group can have access to items from multiple departments.
The Activate restricted item access by customer group option must be turned on in Preferences>Invoices2 before this option to work.
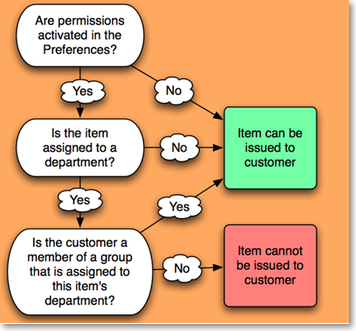
- Here is a summary of how department groups affect whether or not an item can be issued.
- When you attempt to issue stock to a customer whose group does not have access to the department of the item you are issuing, either a warning will be displayed or mSupply® will not allow you to issue the stock - depending on how your preferences are set.
- Items that are not in any department can be issued to any customer
- Items that are members of a department can not be issued to any Customers that are not members of a group.
Creating and editing item departments
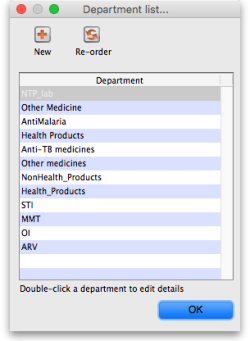
Choose Show departments from the Item menu displays the Edit departments… window. This is where you are able to create and edit item departments. Once you have created departments the window might appear something like this, and you are now ready to assign items to a department:
View item departments
Taking as an example the department Anti anaemic tablets, the items in the department are shown by clicking Show item departments on the Item menu, and then double clicking on the Anti anaemic tablets department:
- Each department can have any number and combination of items and departments in it.
Setting up access from customer groups to item departments
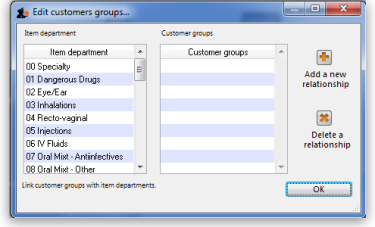
- From the Item menu, choose Manage item access…, and this window is displayed:
- The left hand list shows the available departments
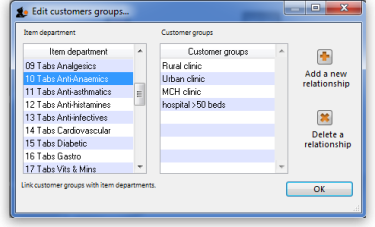
- The right hand list shows the customer groups that presently have access to the department which is highlighted on the left hand side.
- The example shown identifies the four customer groups which are linked to the Anti-anaemic item department:
- The icons on the right side allow you to add and/or remove groups that have access to the highlighted department.
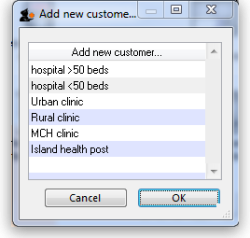
- Clicking the Add a new relationship button shows a list of groups you can add:
- Double-click (or click and then click OK) to add a group to the current department. You will be given a warning if you try to add the same group twice.
Show groups
Customer groups can be used to group customers (or suppliers) together for reporting purposes, and also to set up an item restrictions scheme, allowing some items to be issued only to certain customers.
An explanation of how to set up a restriction scheme is in Managing Item access.
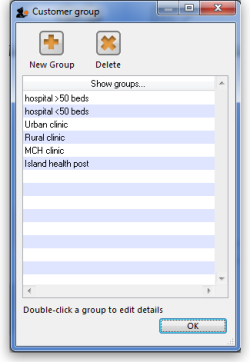
The groups window allows you to set up group names:
- Click the New group button to add a new group.
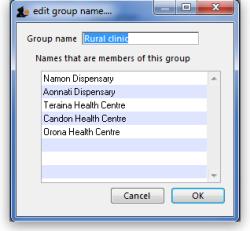
- Double-click an entry to edit its name:
- You can enter or edit the group name in the top field.
- The list displays all names which are members of this group.
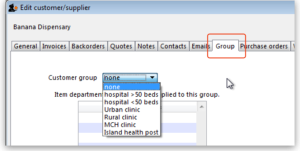
- Click the Delete button to delete a group. You can only delete groups that have no names as members. You can remove group members from the Groups tab of the name viewing window (From the Customer menu, choose Show Customers and find the required customer in the usual way.)
- The drop down list displays the group to which this customer belongs, and to remove the customer, make sure none is selected from the drop down list; to assign the customer to a different group, highlight the new group in the drop down list.
- Click OK to leave the window.
Departments
Overview: A manufacturer might create departments for raw materials, packing materials, and quality control reagents. A drug store or hospital might create departments according to dose form or according to pharmacological classification, etc.
From the Item menu, choose Show departments …; you are shown a list of departments:
By default the list displays in alphabetic order; clicking on Departments toggles between alphabetic order and reverse alphabetic order; you may also drag and drop individual departments to any position in the list to suit your own requirements, and on clicking OK you will be asked whether or not you wish to save the list in the order you have specified.
To add a new department, click the New dept button.
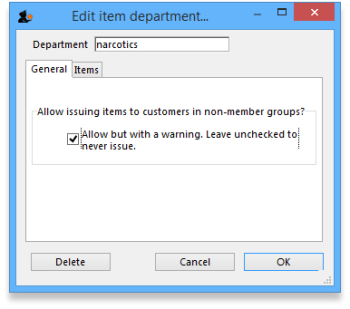
To edit a department, double-click the department you want to edit. You are shown a window allowing you to edit the department name:
The radio buttons allow you to choose what will happen when you attempt to issue an item to a customer who is not a member of a linked group. Either the user can be warned or the issue can be disallowed. This only applies if you have Activate restricted item access by customer group turned on in the Preferences - otherwise you can ignore this setting.
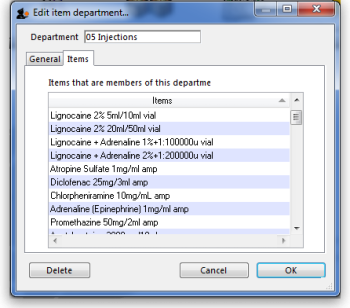
The Items tab displays a list of items that are members of the group you are viewing:
To delete a department
Double-click it to display the entry window, then click the Delete button. Note that you can not delete a department that has item members. You will be warned if you try to do this. To delete a department with Items, click the items tab and note the items that are members, then edit those items (using the Items > Show items … menu command) and set their departments to either none or a different department. You will then be able to delete the department.
| Previous: 4.11. Managing drug interaction groups | | Next: 4.13. Prices in mSupply |
