15.04. Barcode scanning and stocktaking
Added: Version 4.01
During a stocktake, it is possible to save a lot of time and increase accuracy by using barcode scanners to scan stock instead of manually counting it.
Stocktaking with barcode scanners is a little different to doing it without them. With barcode scanners, the assumption is that you will go to a particular location in your warehouse and then scan everything in that location. As you scan, mSupply counts the stock in that location. This means two things:
- You must tell mSupply which warehouse location you are currently counting
- When first created, a stocktake with barcode scanning turned on has a zero in the Counted number of packs column for every line. Without barcode scanning turned on, the Counted number of packs is set to the Snapshot number of packs when it is first created.
Here's how it all works.
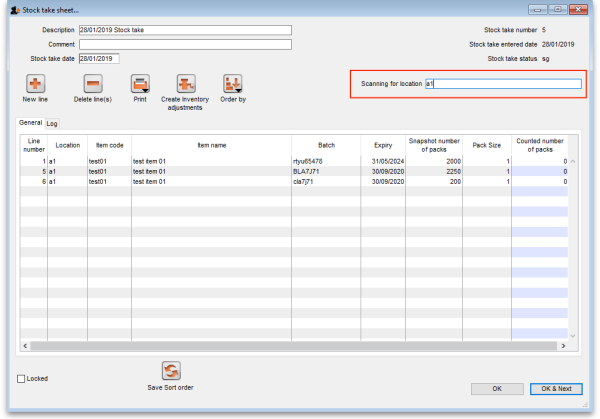
Create a stocktake in the usual way (see Stocktakes for details). The stocktake window is exactly the same as when not using barcode scanners, except that the item filter has changed to a location filter:
Edit the Description and Stocktake date fields as required as usual and enter any comments in the Comment field. Now enter the location you are going to count in the Scanning for location field. As you type the location name, the lines that have locations starting with what you have typed remain displayed in the table, all others are hidden (The line's locations are shown in the Location column). What you enter in the Scanning for location field must result in lines for a single location only being displayed in the table. If you start scanning before this is the case you will be shown a warning message and nothing will be counted.
Note:
- The Scanning for location field is not case sensitive
- You can enter “none” in the Scanning for location field if you want to count the lines that have no location. Very handy if you don't use locations in your warehouse.
When you have correctly entered the location you want to count in the Scanning for location field, you can start scanning the physical stock in that warehouse location. Be careful to scan the correct GS1 barcodes on the stock. mSupply will ignore anything you scan that is not GS1 compliant.
There are a number of possible outcomes of the scan:
| Scan result | What mSupply does | What you should do |
|---|---|---|
| The barcode you scanned matches one of the lines in the location you are scanning for | The line's Counted number of packs value is increased by 1 | Scan the next box in the location |
| The barcode matches a line in the stocktake that is not in the current location | mSupply asks you whether you want to move the line to the current location. If you say yes, the line's location is changed to the current location and its Counted number of packs value is increased by 1. If you say no, the line is left unchanged and the scan is ignored. | Scan the next box in the location |
| The barcode matches an item not in the stocktake | A line is added to the stocktake in the current location for the item with the pack size assigned to the barcode. The batch and expiry date of the line are taken from the barcode, the Snapshot number of packs is set at zero and the Counted number of packs is set at 1 | Scan the next box in the location |
| The barcode is not a valid GS1 barcode | mSupply displays an error message and the scan is ignored | Scan the correct GS1 barcode on the box. If the item doesn't have a valid GS1 barcode on it, either: 1. print a barcode label for the box (see Barcode label printing) and try the scan again or 2. manually edit the appropriate line in the stocktake or add it as a new line |
| The barcode is a valid GS1 barcode but it is not registered against an item in mSupply | mSupply displays a warning message and ignores the scan | Register the barcode with the item (see Adding barcodes to items) then try the scan again |
Continue scanning items until you have scanned everything in the location.
Then, enter the next location in the Scanning for location field and start scanning the items in that location.
When you have scanned the stock in all the locations in the stocktake, you've finished the count. When you're sure you have finished, click on the Create inventory adjustments button as normal to finalise the stocktake and make the stock in mSupply match what you counted.
