This is an old revision of the document!
4.13. Prices in mSupply
mSupply has many different mechanisms for altering the sell price of items in invoices depending on many things. Below in this article:
- Item Margins
- Per customer price lists
Elsewhere:
Customisations for certain clients (give us details of your situation, and we may be able to extend the functionality to your needs). Ask about:
- Unified selling price (built off Catalogue Price)
- Weighted Average Price (Built off Catalogue Price and similar to below two)
- Price averaging derived across supplied cost prices at each store
- Price averaging derived by the central warehouse applied to master list
Pricing With Default Settings
There are two key values associated with all stock and invoice lines:
- Cost price: this is simply the price that the store paid the supplier for the goods.
- Sell price: this is recorded price that is expected for the goods to be sold to customers at. There are many pricing strategies that modify or override this value throughout mSupply which we'll detail below.
1. Purchase Order (PO)
At the first instance, stock is often introduced into the supply chain via a purchase order. Each item ordered will have a price per pack which is carried through the next steps.

Note in this instance, the supplier uses the currency AUD. Our system is using USD. This Forex (Foreign exchange) rate will be used later.
2. Goods Receipt (GR)
Next a user would create a Goods Receipt linked to this Purchase Order in order to accept the physical stock arriving. They'd add the lines from the original PO and enter the verified count of items into the GR. Finalising this GR will create a Supplier Invoice.

3. Supplier Invoice (SI)
A Supplier Invoice is automatically created by the GR of the previous step. This invoice, also known as a transaction, is used to record the ledger of the stock entering the mSupply stock system.

At this point the user has an opportunity to adjust cost and sell price.

Note:
- The currency exchange rate has been applied (and can be further edited).
- There is an opportunity to apply a margin. It has been set to 10%. (there are multiple places in mSupply to configure default margins)
- A sell price per pack is first recorded here. It is 10% higher than the cost price. It can be further edited manually.
Once finalised this will be available as stock in mSupply
4. Checking introduced stock
Under the Items menu, you can search for and view our item's stock. Note the other lines of stock which have different cost and sell price. This is because this stock was received or added at another time, with different prices applied at the time. All stock has it's own cost and sell price associated. Keep in mind that there are settings for centrally controlled sell prices for items, so that all customers pay the same amount regardless of the specific stock line they're receiving.

Editing our line of introduced stock, we can modify cost and sell price again.

5. Customer Invoice (CI)
If we create a new customer invoice to a facility, when adding an item we'll see our stock line is available with the prices carried through from the supplier invoice that introduced the stock.

Now added, we can see in our Customer Invoice the stock we added and see that it's Price Extension (the total sell price for the line) is 5x the sell price, as we are providing 5 packs.

6. Prescriptions
For a Prescription to a patient, it is much the same as a customer invoice.

The key difference here is that there are several patient specific pricing modifiers that can be configured in mSupply which we'll see later.
Sell Price Settings
At either introducing stock or at the point of distributing/selling/dispensing stock, there are settings that can modify the sell prices saved in the system or simply override the sell price when distributing. Hold on you your hats 😉.
Default Price List
A Default Price list is one of mSupply's approaches to standardising pricing across the whole system. This is useful when you want all customers/patients to pay the same amount per unit of an item regardless of what any particular line's sell price has been set to (usually related to cost price). This is useful when receiving stock from multiple suppliers, via various shipment methods (Air vs sea freight) where prices of different lots of an item received can vary greatly. Some donor stock might be free!
This setting is managed through 4.04. Item master lists. A Master List can be configured as a “Default Price List” by checking the checkbox shown below.

Items in this list will override the sell price of all outgoing stock in all stores across the entire mSupply system, including those that are active on remote sites. To set the price for the item, edit the “Price per unit” column.
Make sure you enter the Price per unit of the item, not the Price per pack. As an item can have many stock lines with differing pack sizes (e.g. blister pack of 10 vs 20), the system will adapt the sell price according to the stock line's pack size multiplied by the Price per unit.
When making a customer invoice we can see that all prices have been adapted when selecting our item from earlier in this guide. The default price is 1 per unit, and the pack sizes have been multiplied by that to determine the sell price.

Any item not in the Default Price List will use the sell price of the stock being used.
The Default Price List applies to prescriptions as well, but note that the similar Patient List setting for setting a global price for patients will override the Default Price List value if an item is in both lists.
Patient Price List
The Patient Price List setting is very similar to the Default Price List setting, but only applies to prescriptions. This is useful if not interested in changing prices for stock being distributed to other sellers/stores/pharmacies, but do want to set a standardised price for patients to level out cost fluctuations of stock.
To make a Master List a Patient Price List, check the setting “This master list is a patient list”.

If an item is in both the Patient Price List and the Default Price List, in a prescription the Patient Price List price will take priority over the default price list.
A Master list may be both a Patient Price List and Default Price List, but it is redundant 😉.
Discount Lists
Discount lists are a simple mechanism for setting a discount percentage rate for a set of items. They can be configured by simply adding a value to the Discount % field of a Master List. This discount rate will be applied on included items in all stores in mSupply.

This will be applied when adding items to a Customer Invoice. Below we can see the the Default Sell Price (per unit) applied to our stock lines has had a 50% discount rate applied. If item selected is not in the Default Price List, it's normal sell price of the stock line selected will be used.

Discount rates do not apply in Prescriptions. We may add settings for facilitating this in the future!
Item Margins
The price you charge customers for your goods is, of course, very important. mSupply provides you with several different ways to set the selling price of your goods. Here they are:
- Each supplier has a margin field that determines how much to add on to the cost price when buying from that supplier
- Each item has a margin field that determines how much to add on to the cost price when buying that item
- There is a preference ( File > Preferences > Invoices 1 ) which controls how these 2 margins relate:

- If this preference is ticked then the item margin will be used instead of the supplier margin. If it is unchecked then the supplier margin will be used instead of the item margin.
- You can set custom margins for each customer group ( File > Preferences > Invoices 2 )
- You can fix the item price under the General tab in the Item details window.
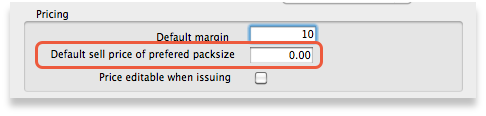
- Note that setting an item price here will set the price of new stock as you receive. It will not affect the price of existing stock- you can change existing prices if you have permission to do so by viewing an item and going to the “Stock” tab.
- You can set item prices when setting up a data file by importing an item list. (see below)

Per customer pricing
Updated: version 3.12
Alternatively, individual prices can be set for each customer. This can be done in the Edit Customer/Supplier window which you can find by:
- going to the Customer tab of the Navigator
- click on the Show Customers button
- find the customer you wish to customise prices for
- double click the customer line
- choose the Item Lists tab (see below)

To customise the pricing, add a list to the Favourite Lists column (either by clicking Add master list, Add local list or Copy from master list) or edit an existing list by double-clicking on it. Check the Price list checkbox from the window that comes up and any other checkboxes that you require.
- You only need the Price list check box marked to customise prices
- Only one list per customer can be price customised

Make sure the list is selected and then go to the Items section of the window. Enter the corresponding prices that you would like to assign to each item for that customer by clicking on the item and then clicking on the price (“0” by default). You can also add items to the list by clicking Add item and entering the item name and the price in the window that appears. The customer will now be charged the prices set in the list instead of any other price set.
| Previous: 4.12. Managing item access with Departments | | Next: 4.14. Repacking items |