This is an old revision of the document!

7.05. Custom stock fields
Custom stock fields are a useful way of tracking your stock. You can think of them as providing stock tags or categories which can be seen wherever stock is viewed throughout the system and can be used for filtering reports.
There are 8 custom stock fields available. The first 4 are free text (the user can enter any text they like) and the final 4 allow the user to select values from preset lists defined by you.
Setting them up
You turn them on in the stock tab of File > Preferences. See here for details.
To define the lists the user can select from for custom stock fields 5 to 8, click on the Item > Show custom stock field value lists… menu item. This window is displayed:

In the Show drop down list, select the custom stock field you want to add/edit/delete values for. Note that the items in the list will be “Custom stock field 5” to “Custom stock field 8” but those fields which have been given a Display name in the preferences will be replaced by it. In our example, Custom stock field 5 has been given the display name “Programme”:

The custom stock field values table below the drop down list shows all the values currently in the list for the selected field.
New button Click on this to enter a new item for list for the custom stock field currently selected in the show drop down list. Note that the list of items will always be displayed in ascending alphabetical order for a user to choose from.
Delete button select an item in the list and click on this button to delete an item from the list
Double click on an item in the list to edit its name
Using them
Now that they have been set up, when you receive goods in on a supplier invoice the enabled custom fields will appear on the supplier invoice line detail window. Enter the values in there as you receive stock into mSupply. The values will then appear wherever you see stock in the system e.g. on the stock tab of an item's details window.
The fields will also be available for filtering on when you are running any of the stock based reports.
7.06. Managing donors
What / who is a donor?
In mSupply, we have the idea of a 'name'. A name can be a customer, a supplier, a patient, … or a donor.
A donor is normally the name of the organisation that has paid for, or somehow managed, the supply of certain stocklines.
A donor can also be a supplier and / or a manufacturer or they can be just a donor. mSupply allows for any combination of that.
mSupply allows you to specify the donor for each incoming stock line independently of the supplier.
For example, GlobalFund might agree to supply certain malaria medicines, and then contract a supplier to deliver them to you. mSupply allows you to record this accurately, and to track and report on all the stock and transactions relating to those medicines donated by GlobalFund.
The Donor feature was designed for the purposes of tracking and reporting on stock that has been funded by a donor. However, the feature can be used for more than just tracking donors. For example, In many countries that use mSupply, most medical supplies are supplied free-of-charge to the health facility by a government agency. But if the government agency has not supplied stock, the facility might decide to procure the stock 'privately'. The facility management will often want to keep track and report on this privately procured stock. The donor feature can be used for this purpose. The 'donor' name for this purpose might be called Privately procured.
Using the donor module
To use the donor module, you must first turn it on:
- Click drop down menu File>Preferences…
- Click the Invoice 1 tab in the left-hand list
- Check the box Allow tracking of received stock by donor
![]()
Once you have done this you can add donors and track stock by donor.
Adding or editing donors
To add or edit a donor you should first bring up the list of donors. Do this from the Navigator:
- Go to the Suppliers tab > Show Suppliers and check the box beside Donors so that the list shows donors rather than suppliers.
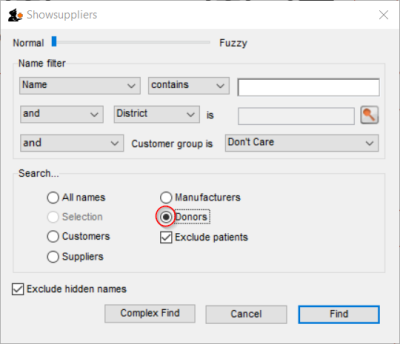
- Click Find. This will bring up a new window showing any donors that have been added to mSupply in your system
- You can edit a donor by double-clicking on it.
- You can add donors using the New tool bar at the top of the window. This will bring up a window like this:


- Now add your donor details and click OK.
Track a donor in mSupply
Donors and the purchase order
- Create a Purchase Order in one of the usual ways - refer Ordering Items From Suppliers.
- With donor tracking turned on, the Donor field will appear in the window - see below. The value you enter here will be tracked from this point on through to receipt, stock transfers and dispatch.

- In the Donor field type the first few characters of the donor name or code (or enter the wildcard character '@' in field) and press the Tab key on the keyboard. This opens the window below, showing the donor that match what you typed:

- If your donor does not exist, you can add it at this point by clicking on the New button - see Adding or Editing Donors above.
- Once you have selected your donor, click on the OK button and the donor's name will appear in the Donor field:

- Add your Item line(s), check your order is correct and click the Confirm button to make the order available for Goods Receipt in the normal way - see Ordering Items From Suppliers for more details.
Donors and the goods receipt function
Receive goods in the usual way - see Receiving goods (Goods Receipt function). The only difference is that the Donor's name is now present in the Donor field:

Donors and the supplier invoice
- Clicking Finalise on the Goods Receipt generates the Supplier Invoice in the usual way (see Receiving Goods - a Supplier Invoice). Note that you can see the donor identified in the Purchase Order in the Default donor field:

Default donor for each stock line
- Each stock line on a Supplier Invoice will inherit the Default donor from the Supplier Invoice.
- The Default donor can be edited.

Changing the donor for a particular supplier invoice line
- There may be circumstances when delivered stock may be from a mix of donated and non-donated, or from different donors. You can change the donor for any stock line on a supplier invoice when editing the details of the stock line (double-click on the stock line).

If you change the Default donor, you will be presented with the following options:

- “Do nothing”: The change will have no effect on existing invoice line(s).
- “Update existing donor lines with this donor”: existing donor lines will be updated to match the newly selected donor.
- “Assign this donor to the lines with no donor”: lines with no donor selected will be updated with the newly selected donor.
- “Assign this donor to all lines”: all lines will be updated with the newly selected donor.
Donors and the customer invoice
Customer invoices, including stock transfers for donated goods are created in the usual way - refer Issuing Goods to a Customer (Customer Invoices).
- They key thing to note is that when selecting from the stock lines to add to the Customer Invoice, the donated stock lines can be distinguished from the other stock lines by the donor name in the Donor column - see below:

mSupply will always suggest stock lines according to selection criteria (primarily, FEFO). If you want to overide this:
- If a donated stock line is not the first expiring and you do want to issue it, you will need to manually select it.
- If a donated stock line is the first expiring and you don't want to issue it, you will need to manually de-select it.
Reporting
Obviously, one of the points of entering all this donor information is to be able to report on it. When the donor tracking preference has been turned on, many of the stock based report filters in mSupply will have an additional donor filter added to them. Simply enter the donor filter settings you need, as appropriate, to filter the reports accordingly.
| Previous: 7.05. Custom stock fields | | Next: 8. Issuing Goods |
7.03. Editing pack sizes
New: mSupply version 3.03
Changing pack sizes for items already received
If you have received goods and the supplier invoice is taken off hold, these goods will go into stock and be available for issue.
You can still edit the pack size if.
- No stock has been issued, or:
- You have the user preference set that allows editing pack sizes even after issue. 1)
Allowing editing of pack sizes

Changing a received pack size after items have been issued
Take as an example chloramphenicol eye ointment; a delivery has been received, comprising 500 tubes, packed in packs of 100 - i.e. 5 boxes, each containing 100 tubes. When the entry is made into mSupply the operator in error enters a quantity of 5 and a pack size of 1, instead of a quantity of 5 and a pack size of 100.

Provided the user permission described above has been set, the error can be rectified, and the invoice altered to show the correct pack size of 100. From the Supplier menu, choose Show invoices to access the required invoice. Select the line Chloramphenicol 1% eye oint,and double click on it. If stock has already been issued, a window will appear to alert you, and allowing you immediate access to the customer invoices detailing the issues.

It should be noted that adjustments may be necessary on these invoices.
Click OK to display the Add/edit supplier invoice line where the correction can be made by changing the Pack size entry from 1 to 100.

How is this different to splitting a stock line?
Splitting a stock line is required when a store receives and manages an item whose pack size contains a number of units in the pack, but typically issues the item to the store's customers in smaller quantities. Taking the example above, the store receives and manages chloramphenicol eye ointment in a pack size of 100, but issues in single tubes.
- Editing the pack size in a supplier invoice, changes the total stock on hand (and / or issued)
- Splitting a stock line does not change the total stock on hand (and / or issued)
The Item details screen is displayed from the Item > Show items menu, by entering the first few characters of the item in the Find item window. From the list on the side bar, click Stock, and on the window which appears click on the appropriate line to select it; the window should now have this appearance:

Click the Split button, and fill in the appropriate details on the form - in this example the 3 packs of 100 are to be changed to 300 packs of 1.

Looking again at the Item details window, the stock is now displayed as 300 single units, and the store is now able to issue as little as a single tube, or any quantity up to the total available.

| Previous: 7.02 Goods receipt | | Next: 7.04. Managing outstanding purchase order lines (pipeline stock) |
7.02. Goods receipts
Entering goods received
If the receiving store is receiving goods from another virtual store in your mSupply system, in response to an Internal Requisition (Purchase Order) from that store, the Goods Receipt will be created automatically - refer Receiving the goods (requesting store). Open this automatically created Goods Receipt. Do not create a new Goods Receipt!
Choose Supplier > New goods received and this window appears:

There is some read-only information at the top of the goods received note that cannot be edited:
- Store: The name of the store the goods received note belongs to.
- Goods received ID: This goods received note's number. The number is automatically incremented and assigned when the goods received note is first created and is unique within a store. Note that goods received notes in different stores could have the same number.
- Created by: The name of the user who created the goods received note.
- Modified by: The name of the user who last modified the goods received note.
- Entry date: The date the goods received note was created.
- Purchase order: The number of the purchase order the goods on this goods received note were ordered on. It is a link and clicking on it will open the purchase order.
- Supplier invoice: The number of the supplier invoice produced from this goods received note. The number is filled in after the goods received note is finalised. Again, it is a link and clicking on it will open the supplier invoice.
- Status: The status of the goods received note:
- nw = new, the goods received note is not complete yet and is still editable
- fn = finalised, the goods received note is complete and is no longer editable
If you have goods receipt authorisation set up in Store Preferences there will be an extra Authorised column - see the Authorising items on goods received notes section below for more details.
Selecting the Purchase Order
In the Supplier field (which displays Search Purchase Order when it first opens), enter the first few characters of the name of the supplier from whom the order has been received. To display all Purchase Orders awaited, enter @ in the Supplier field. (This has been done in the example shown below):

- Supplier column: The name of the supplier the purchase order was sent to.
- PO reference column: The value entered in the Reference field on the purchase order.
- Tender reference column: The reference to the tender this purchase order came from. Will only have a value if this purchase order came from a tender.
- Our PO ID column: The number of the purchase order in mSupply.
- Comment column: The value entered in the Comment field on the purchase order.
If there are a lot of purchase orders in the list you can shorten it by typing something in the Type here to search field. The list will then only show purchase orders for suppliers that have a name which contains what you typed.
From this screen select the entry which matches the purchase order for which you have received stock, either by double clicking on the entry, or by highlighting the entry and clicking on the Ok button.
The New Goods Receipt window reappears with the supplier field and some other details completed.
Filling in general details
At this point you should fill in the:
- Supplier reference field with, for example, the delivery note number
- Comment field with any extra information you need to record about the delivery
Adding items from the purchase order
Next, you should click on the Add from Purchase Order button to add the items which have arrived to the goods received note. Clicking the button brings up the Choose order lines… window:

This window displays the goods on the Purchase Order, and you may either select each item separately (click on a single item), the entire order (click on an item then press Ctrl+A on the keyboard, or Cmd+A on a Mac) or something in between (use Ctrl+click to select individual items and add/remove them to/from the selection and/or Shift+click to select a range of items) to enter the details of the items received!
If you're trying to find a particular item in a long list you can also type the start of the item's name or code into the search box at the top and the list will be filtered to show items which have a name or code starting with what you have typed.
mSupply does allow you to create a Goods Receipt for stock for which you have already received all of the ordered stock, that is, Remaining (outstanding) quantity = 0).
In any case, when you have selected the items to receive, click on the Use button.
Adding un-ordered items
Occasionally goods may be received which were not ordered; when this occurs, click on the Add an un-ordered item button and select the item before proceeding. There is a user permission that can be set to prevent users being able to use this button (see the 25.25. Managing users page for details)
Goods receipt line entry
The lines you have selected are added to the goods received note and you will see them in the table but with no batch, expiry date, location or quantities:

No information about the batches or number of packs that have been delivered has yet been entered. You can set the Quan column (number of packs) to the number remaining to be delivered by selecting the appropriate lines (Click with Shift and Control and Ctrl+a all work as usual) and clicking on the Apply suggested remaining quantity button.
To enter the batch and quantity information for each line, double-click on the first line in the table and the Edit goods received line window will open, populated with the first item:

Let's have a look around the window and see what information is being displayed:
- Item: the name of the item we're entering the information about. At the end of the field is the item's code.
- Remaining quantity to receive: the number of packs we're still waiting to receive from the supplier on the purchase order this goods receipt note is for. This is 0 on the screenshot because, by default, mSupply creates a line in the table which contains all the outstanding stock.
- packs of: the pack size (number of items in the packs) we're waiting to receive. So, the total number of individual pieces of this item we're waiting to receive is Remaining quantity to receive x packs of.
- table: contains all the lines of the item that we're receiving from the supplier. Click on any of the cells to edit them (they are all editable except the Total quan column because this is a calculated column and equal to Quantity x Pack Size). There will be a separate line in this table for each batch or location (and manufacturer if the preference to record manufacturer is turned on - entering a manufacturer is the same as entering a location i.e. enter the first few characters of the manufacturer's name and press the Tab key on the keyboard and select the manufacturer you want from the list displayed or click on the New button to create a new manufacturer). If there are any of the first 4 custom fields described on the 16.01. General preferences page turned on then columns for them will be displayed after the expiry date picker column and you can enter values for each one there.
- Expiry date picker: this is in the column just to the right of the Expiry column. Click on it to select the expiry date from a date picker:
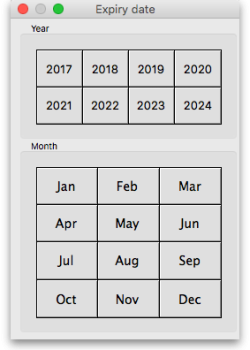 Click on a month and year in either order and mSupply enters the last day of that month in the expiry date column. You can manually edit the date (or manually enter it without using the picker) if you don't want the last day of the month.
 - Volume per pack: the volume per pack for the line currently selected in the table. Will be set to the item's default volume per pack if it has one, otherwise 0.
- Weight per pack: the weight per pack for the line currently selected in the table. Will be set to the item's default weight per pack if it has one, otherwise 0.
- Total line weight: the total weight of this line in the table (= Weight per pack x Quantity column figure for the line)
- Total capacity: the total volume the location for the selected line in the table has. 0 if the location is not set for the line or has no volume set.
- Available space: the available space in the location before putting this line in it.
- Space required: the volume this line requires (= Volume per pack x Quantity column figure for the line). So compare this with the Available space figure to see whether the line will fit in the location selected.
- Comment: Anything you want recorded for this line. Anything typed in here will appear in the Comment column in the table.

If you have set a note for this item on the purchase order (see Notes section in Editing Purchase Order Lines) then an extra Note section will appear at the bottom of the window:

Until the Note has been actioned checkbox is checked, lines for this item will appear in red on the overall goods receipt window (see below).
To add lines for new batches or locations, click on the Add line or Duplicate line line button - they both add a line, Add line adds a blank one, Duplicate copies the line currently selected in the table. No surprises but, to delete a selected line, you click on the Delete line button!
You can edit a row in the table by clicking on the various cells. It is best to click on the left-hand Quantity cell and adjust that one first. Then you can use the tab key to advance to the next cell in the row.
Let's take the following example for amoxycillin 500mg caps.
| quantity | pack | batch | expiry |
|---|---|---|---|
| 648 | 1000 | b1234 | 30/06/18 |
| 324 | 1000 | b1235 | 30/11/18 |
Let's say there are 12 packs in a box, and 27 boxes on a pallet, so you have 2 pallets of the first batch and one pallet of the second batch. You can only put one pallet in each location, so the first row will be split into two.
Enter the details into the first row as above.
1. If you are entering details for an item which has its “Expiry date required on receive” preference set (see here for details) and you do not enter an expiry date for any of the item's batches then, when you click on the OK or OK & Next buttons, you will be shown a warning message and you will not be able to close the window without entering an expiry date for each batch or deleting all the item's batches.
2. If you receive more than was ordered on the purchase order, when you click on the OK or OK & Next buttons an alert message will appear asking you to confirm the receipt.
Location management when receiving goods
If the items you are receiving have had a location and volume entered when the Purchase Order was created, these will be transferred to the goods receipt. If you want to edit these details you can do so by double-clicking a line and either changing the volume or the location.
You can then choose a different location by entering it in the location field, or enter the start of a location code and press tab to get a list of matching locations.
When you get to the location column, we type m then press tab. you are shown the location choosing window with locations that match “m”

Note we have then clicked the Show empty radio button, as we are putting away a whole pallet, and pallets only go in empty locations. The Show available radio button shows locations that have enough spare capacity to take the volume of the line we are receiving. We then double-click on the location to choose.
If the item you are receiving has a default location set for it, this will have already been filled in when the line was added to the purchase order. Default locations should be set if the same item is always put in the same place, otherwise leave it blank. In the current example we've assumed it has not been set for each item.
Now we have entered all details for the line, we can click on the row to highlight it, then click the Duplicate line button to create another row the same without entering all the details again - you then only need to click on the location column on the newly duplicated row, and you can edit the location to find another empty location for the second pallet.
Once done, you can duplicate the row again, and this time you have to change the batch (to b1235), expiry (to 30/11/18) and location.
Then your window should look like this:

Note that the bottom row of the table shows you the total number of packs and total quantity being received.
If all the details are correct click OK (or OK & Next if you selected more items to be added from the purchase order) or click Cancel if you want to abandon this entry. You will be taken back to the window showing the overall goods receipt, this time including the lines you've just entered:
Review overall goods receipt

All the items you've selected have been added to the goods receipt. The quantity is set to the total remaining to be received for that item.
Double click on each item in turn and the window allowing you to enter quantities, pack, batch numbers, expiry dates.
Red line in the Goods Receipt?
If you see lines show up in red on the Goods Receipt that means that you have set a note that must be actioned for that line on the Purchase Order (see Notes section of Editing Purchase Order lines for details).
Once you have actioned the note, the lines will return to their 'normal' black colour.
The right hand side of the window shows you the shelf location, total capacity and available space for a particular item in a particular shelf location. You are also shown the volume or space required for a particular item. The small “refresh” icon the right inserts the default location for the items.
 The volume of the shelf location is now reduced to reflect the space consumed by our newly added stock item.
After entering the details for each item, you can click on OK & next to proceed to editing the next item.
Finalising goods received
The next step in receiving your goods into mSupply is to create a supplier invoice (that is where you will enter pricing information if you need to). This is done automatically for you when you finalise the goods receipt.
When you have entered all the goods you have received onto the Goods Receipt note, you finalise it by checking the Finalise box in the bottom left hand corner of the window and clicking on the OK button. Only do this when you are sure the Goods receipt note is an accurate record of what you have received and contains all the information you want in it because finalised means finalised and you won't be able to change it afterwards (just like everywhere else in mSupply!).
Finalising a Goods Receipt will update the received (and outstanding) quantities in the Purchase Order for any goods receipt lines which came from a Purchase Order.
Your goods are not yet entered into stock in mSupply - that only happens when the supplier invoice is confirmed. The initial status of this automatically created supplier invoice is controlled by the “When finalising a Goods Receipt” store preference - see here for details.
If you have the store preferences set to force supplier invoice authorisation, you will not be able to confirm supplier invoices (and therefore bring items into stock) until they have been authorised. See here for details.
If the Items received on a purchase order must be within a minimum expiry date preference is turned on (see the 6.01. Ordering stock from suppliers page for details) then, when finalising a goods received note, a check is made to see whether any of the lines have an expiry date that is before the date set on the purchase order. If they do then you will be shown a message telling you which lines have too short an expiry date and you will not be able to finalise the goods received note until the expiry date is changed or the line is removed from the goods received note.
Authorising items on goods received notes
When you have goods received note authorisation turned on in Store Preferences you will see an extra “Authorised” column on your goods received note:

The column will contain a checkbox for each batch you add to the goods received note. If a batch is authorised then check its box in the Authorised column (only users with the Can authorise goods received permission can check these boxes). You can enter any notes on batches which fail authorisation in the Authorisation comment box at the bottom. When you finalise your goods received note only the batches which have been authorised will be put on the automatically created supplier invoice. In this way you have a complete record of what was received, what was satisfactory and what was sub-standard.
Viewing existing goods receipts
Choose Supplier > Show goods received…
A standard mSupply find window is shown:

Click the OK button to view the last 15 goods receipts, or enter a value to find in the lower field, and choose the field you are searching for in the left-hand drop-down list (if you enter something in the lower text box this filter only will be used and the top one - number of recent goods received notes - will be ignored). This window then opens to show the goods received notes that match your filter selections:

New button: Creates a new goods received note
Find button: Opens the search filter window again, allowing you to make a new search for goods received notes.
Viewing a related purchase order or supplier invoice
Accessing the related Purchase Order when the Edit goods received window is open is achieved by clicking on the blue “Purchase Order” on the right side.

Similarly, if you want to see the linked Supplier Invoice then click on the blue “Supplier Invoice”.

If you have turned on any of the custom stock fields in store preferences they will be displayed as columns (between the Batch and Expiry columns) in the list of items and the information you entered for these fields when the stock was received will be shown in the appropriate cells. If you double-click on one of the supplier invoice lines to edit it (assuming they are editable!), you will see the custom fields and be able to enter information into them.
Outstanding purchase order lines
Outstanding PO lines are those which you are still waiting to be delivered from the supplier (also known as your pipeline stock). These will only be updated when a Goods Receipt is finalised. You can view them by either:
- Clicking on Show outstanding PO lines on the Navigator's Supplier tab or
- From the Supplier > Show outstanding PO lines menu item
Other tabs on a goods received note
All the functionality described above has been on the General tab. There are others!
Documents tab
The Documents tab on a requisition enables you to save documents and other files relating to the goods received note. The tab looks like this:

The table shows you all the files currently uploaded to this goods received note.
- Upload document button: Click this to upload a document to the goods received note. This will open a window enabling you to search for and select the file on your computer. After you've selected it, click on the Open button to upload it. If you upload a file with the same name as one already uploaded, mSupply will upload it as a new version of the already uploaded file.
- Delete document button: Select a file in the table by clicking on it and click this button to remove it from the goods received note.
- Download document button: When you click on this button you are presented with two options:
- Download: this will download the file to a location you select on your computer.
- Download and open: this will download the file to a location you select on your computer and then attempt to open it using the default application on your computer for that file type. If there is no application associated with the file type on your computer then mSupply will tell you that the file could not be opened.
Log tab
The log tab displays all the log entries that have been made regarding this goods received note. All log entries are stored in the mSupply log (see the 25.19. The system log page for details) and this tab will display all the log entries in there which were made for this goods received note.
Viewing and editing supplier invoices created via goods receipts
A supplier invoice will be created automatically once the Goods Received note is finalised.

Supplier invoices created via goods receipts differ slightly from standard supplier invoices.
Price tab
Here, you can add in any extra currency related charges
- in the supplier's currency in the Extra Foreign Currency charge field , and
- in your local currency in the Local charges field and mSupply will automatically calculate the updated invoice price.
Here's an example of how mSupply will do this with a currency “YXB” whose rate is YXB 7 = USD 1
| Item | Foreign Price | Quantity | Foreign Currency Price Extension | Local Price | Local price Extension |
|---|---|---|---|---|---|
| Amoxycillin 250mg tabs | 50 | 10 | 500 | 350 | 3,500 |
| Paracetamol 500mg tabs | 300 | 5 | 1,500 | 2,100 | 10,500 |
Now we add USD300 of freight charges and YXB1400 of import duties:
- The total USD value of the order is USD2000, so 15% must be added to each line to account for this
- The YXB1400 is equivalent to USD200 in local charges, so 10% must be added.
- Therefore a total of 25% is added.
| Item | Foreign Price | Quantity | Foreign Currency Price Extension | Local Price | Local price Extension |
|---|---|---|---|---|---|
| Amoxycillin 250mg tabs | 50 | 10 | 500 | 437.5 | 4,375 |
| Paracetamol 500mg tabs | 300 | 5 | 1500 | 2,625 | 13,125 |
Currency and currency rate
Select the supplier currency from this drop-down box, and enter the current exchange rate in the Currency rate field . Note that currencies must first be entered using the menu item Special>Currencies. See Currencies...
Extra foreign currency charges
In the supplier's currency, enter any extra charges from the supplier.
Local charges
Enter any local charges, in your local currency.
Application of charges
mSupply distributes any extra charges proportionally according to the invoice value of each item on the invoice; this is done automatically
MoneyWorks tab
If you are using the MoneyWorks accounting software (which is highly recommended), clicking on this tab allows you to export the invoice details to MoneyWorks. Elsewhere in this guide instructions on setting up mSupply to work with Moneyworks are to be found. See Moneyworks.
| Previous: 7.01. Receiving goods (supplier invoices) | | Next: 7.03. Editing pack sizes |
7.04. Managing outstanding purchase order lines (pipeline stock)
Stock that you have ordered and waiting to be delivered is called your pipeline stock. Sometimes it's helpful and important to monitor this stock so mSupply has functions to help you do that.
Pipeline stock is represented by all the outstanding purchase order lines i.e. purchase order lines on confirmed purchase orders which haven't been fully received into mSupply yet.
To see all your pipeline stock simply choose Supplier > Show outstanding PO lines… from the menus or click on the Outstanding icon in the Purchase orders section of the Suppliers tab on the navigator. This window will open:

All lines in black are those where the expected delivery date (EDD) is after the current date i.e. where the Days to EDD column (which contains the difference between the EDD for a line and the current date) has a number greater than 0. These are items which are not yet overdue but, if the Days to EDD column contains a small number, you might want to call the supplier to check on the delivery.
All lines in red are those where the expected delivery date is on or before the current date i.e. where the Days to EDD column contains 0. These items are overdue and it probably means that the supplier could do with a call to find out what's happening with your delivery.
The Adjusted quantity column shows the actual number of items you ordered (number of packs x the packsize).
The Qty received column shows the number of items (number of packs x the packsize) yo have already received into mSupply.
The Qty Outstanding column shows the remaining number of items on the order waiting to be received (Adjusted quantity - Qty received).
Double clicking on any line will open the Purchase Order with that line highlighted.
You can print the list of purchase order lines currently displayed in this window at any time by clicking on the Print button - as usual, you will be given the option of printing or exporting to Excel.
Update EDD button
If you speak with the supplier about a delivery or receive information from elsewhere about when goods are going to be delivered you can update the expected delivery date for those lines.
To do this, simply select the lines in the table that are affected then click on the Update EDD button. In the window that opens, enter the new EDD for the lines and click on the Update button. The EDD is immediately updated for the chosen lines and, if the lines were red, they will turn black.
You can select multiple lines to update using the usual Shift+click to select/deselect a range of lines and Ctrl+click (Cmd+click on Mac) to add/remove a line to/from what is currently selected.
Filtering the list
Sometimes the list of outstanding purchase order lines can be very long (just after running your annual tender for example, or when you have placed several large orders) and it can be hard to find a specific item or items expected from a particular supplier. To help in this situation, mSupply allows you to filter the displayed list.
To do this, select the type of filter you would like to apply by clicking on the filter icon (![]() ) just to the left of the textbox and select one of:
) just to the left of the textbox and select one of:
- Search by supplier or code - will show only those outstanding purchase order lines on purchase orders whose supplier name or code begins with what you type in the textbox
- Item name or code - will show only those outstanding purchase order lines whose item name or code begins with what you type in the textbox
- Days to expected delivery is less than… - will show only those outstanding purchase order lines with an expected delivery date less than the number of days you enter in the text box from the current date.
Then enter the value you wish to filter by in the textbox and click on the Find button. The list will then be changed to show only those purchase order lines matching the filter you have selected.
Finalising purchase orders
Any outstanding goods on finalised purchase orders will NOT be included in this window. So, if there are goods that you have ordered but will never receive from a supplier (maybe a substitute item has been shipped or you cancelled part of an order because a supplier said they couldn't deliver it), when everything else on the purchase order has been received you should finalise it. The goods on the purchase order that you have not received will then no longer be shown as outstanding in this window.
It is good practice to finalise purchase orders for which you have received everything because it also removes the purchase order from the list you can create a goods received note from (see Receiving goods (goods receipt function)), making it easier to find a purchase order you're wanting to create a goods received note for, and means that no changes can be made to the purchase order in the future.
But beware: don't finalise a purchase order before you have received everything the supplier is going to send because you won't be able to make any changes to it or receive goods against it using the Receiving goods (goods receipt function).
Why can't we just un-finalise this PO ourselves?
Purchase orders are a legal contract between you and your supplier, and are often the subject of particular attention by auditors. As such they must be protected from misuse.
When a PO is finalised, somebody with authority is saying “we are not receiving anything more on this PO”. This will be because either:
- all ordered stock has been delivered
- the supplier has failed to supply in accordance with the PO contract and so is in breach of the contract. The decision to finalise the PO is then a decision to terminate the supply contract. It is most irregular for an organisation to turn around and say, “wait, we'll continue to deal with the supplier on this order even though the contract is in breach”. Auditors will likely want to see good documented evidence to support why this was done. A new purchase order, needing new approval by management is normally the more appropriate way to proceed.
For this reason, mSupply does not have the facility for users to unfinalise a PO. However, mistakes can happen…
If you do accidentally finalise a purchase order and you need to receive more stock against it, then POs can be unfinalised. The following will be needed:
- Sustainable Solutions will need remote access to your database,
- An officer with authority must provide approval for the unfinalisation.
Sustainable Solutions keeps records of all communications and will be able to provide a copy of this approval to your auditor on request.
| Previous: 7.03. Editing pack sizes | | Next: 7.05. Custom stock fields |
7.01. Supplier invoices
Introduction
All received goods should be recorded in mSupply either by:
- Working with a supplier invoice that has been created automatically as a result of a stock transfer from another store in your mSupply system.
- Using the purchase order system, which leads to the automatic creation of a supplier invoice when you finalise a goods receipt associated with that purchase order (PO).
In some countries a supplier invoice is called a “bill”, a “creditor invoice” or a “purchase invoice”
Goods are only entered into stock once a supplier invoice is confirmed
Confirming the supplier invoice also calculates the selling price based on the margin you have chosen for that supplier or for that item, depending on how you have set your mSupply preferences.
You will notice there is a Prices tab in the supplier invoice window - this is for use with invoices received in foreign currencies, which will usually be done via the goods receipt system.
Each line received on a supplier invoice will be treated as a separate line in your stock. You can manually consolidate these later, or set a preference to automatically consolidate items with the same batch, expiry date, pack size, location, donor, cost and sell price.
Creating a new supplier invoice
STOP! Don't proceed with creation of a new supplier invoice if the stock came as a result of:
- Your store created a Purchase order to a supplier, in which case you should be following the procedures described under Ordering items from suppliers
- Your store created an internal order to an 'internal' supplier (a virtual store in mSupply), in which case they should have followed the procedure for handling Response requisitions. Provided that they have finalised their customer invoice, a new supplier invoice will be created automatically in your store, populated with the stock lines that they are sending to you.
- A stock transfer to your store from another store in mSupply (and they are not responding to a purchase order or internal order from your store), in which case they should have followed the procedure for transferring goods to another store. Provided that they have finalised their customer invoice, a new supplier invoice will be created automatically in your store, populated with the stock lines that they are sending to you.
In these cases, you should NOT create a new Supplier invoice, and can skip most of the following section.
Search for these automatically created invoice using Suppliers>Show invoices…
Depending on the store preferences, the supplier invoice may be finalised. If not, you will be able to add, edit or delete lines on the supplier invoice if what you actually received is different to what the supplier invoice states…
To create a new supplier invoice, navigate to the Suppliers tab and click the New Supplier Invoice button.

The supplier invoice entry window will open:

If you have turned on any of the custom stock fields in store preferences they will be displayed as columns (between the Batch and Expiry columns) in the list of invoice lines and the information you entered for these fields will be shown in the appropriate cells.
Information to enter in the main window
Name: The first thing to do is enter the Supplier's name in the Name field. Type the first few characters of the supplier's name or code, and then press the Tab key. If only one supplier name matches the entry, the supplier's name will be filled in. Otherwise, a list will be displayed:

Double-click the appropriate entry, or click Cancel to try again. You can also use the up and down arrow keys or the “u” and “d” keys on the keyboard to move the highlighted item up or down, then click the Use button or use the Enter key to choose the highlighted item.
At this point the supplier's name will normally just appear in the Name field (and their code will appear at the end of the Their ref field) and you can continue as below. However, if the Can manually link requisition to supplier invoice preference is turned on for this store (see Store preferences), a list of requisitions the store previously made to that supplier will appear. Select a requisition to associate with this supplier invoice, then click OK:

The supplier invoice window will appear with the name of the supplier you have chosen in the Name field:

The arrow next to the Name field takes you directly to the Edit Customer/Supplier window, giving access to all the information relating to the supplier entered.
Their ref: Enter the serial number or delivery note number on the bill the supplier gave you.
Comment: Enter anything that needs to be remembered about this invoice. If you need more room, click on the arrow next to the Comment field to give a large area for entering the comment.
Category: Categories created for supplier invoices in File > Preferences > Invoices 1 are listed here.
Colour: Clicking the colour box presents you with a selection of eight colours. When the list of supplier invoices is displayed, the text of this particular supplier invoice will appear in your chosen colour. The colour does not appear on the supplier invoice itself.
Confirm date: This is normally read only but will be editable if the Allow entry of dates on invoices preference is turned on (see the Invoice preferences page for details).
Read-only information at the top of the invoice
There is some information at the top of the invoice that is read-only and cannot be edited:

Invoice number: This is the invoice number. The number is automatically incremented and assigned when the invoice is first saved (which actually occurs when the first line is added to it) and is unique within a store. Note that supplier invoices in different stores could have the same invoice number.
Entry date: The date the invoice was created.
Confirm date: The date the invoice was confirmed. Will be “00/00/00” if the invoice has not been confirmed.
Status: The current status of the supplier invoice:
- nw = new (just created, can still be edited, stock not yet added to mSupply)
- cn = confirmed (stock has been added to mSupply but invoice is still editable)
- fn = finalised (stock has been added to mSupply and the invoice is no longer editable)
Goods received ID: If the supplier invoice was created automatically when a goods received note was finalised then the goods received note's ID will appear here in blue, indicating that it is a link and, if clicked, will open the goods received note. A 0 here indicates there is no linked goods received note.
Purchase order ID: Again, if the supplier invoice was created automatically when a goods received note was finalised then the ID of the purchase order which the goods were ordered on will appear here in blue, indicating that it is a link and, if clicked, will open the purchase order. A 0 here indicates there is no linked purchase order.
Requisition ID: If the supplier invoice was linked to a requisition, the requisition number appears here. You can click on it to be taken directly to the requisition. A 0 here indicates there is no linked requisition.
Entered by: The user name of the user who created the invoice.
Store: The name of the store the invoice belongs to.
Buttons in the supplier invoice window

New line: Add an item to the invoice. See Adding lines to an invoice below for more details. To edit a line, double-click on it.
Add items from requisition: Only visible if the supplier invoice is linked to a requisition. Displays a list of items from the linked requisition, which you can add to the supplier invoice. You can add one or more items by highlighting them and clicking OK. To edit a line, double-click on it.
Delete line: Delete item(s) from an invoice. Highlight the line(s), then click this button. Multiple lines can be deleted simultaneously.
Duplicate lines: Select one or more lines on the invoice and click this button to add duplicates of those lines. Great time saver when receiving large quantities of the same item with similar batches into different shelf locations, for example.
Hold checkbox: If checked, the invoice status cannot be changed.
Items on a supplier invoice with new (nw) status have not been entered into the system yet. Putting a new invoice on hold allows you to enter the supplier invoice, but not allow the stock to be available for issuing until all the details have been checked.
Finalise check box: If checked, clicking the OK button will finalise the supplier invoice. Once finalised, the invoice can no longer be edited so be sure first that all the details are correct. Only users with the Can finalise individual invoices permission can check this box. Other users will be warned if they try to turn it on, and the check box will automatically uncheck.
When the OK button is clicked, you will be asked to Confirm invoice and enter into stock now?
- If you click Later the invoice will still have a new (nw) status
- If you click Confirm and the Finalise box was not checked, the invoice will be confirmed (cn)
- If you click Confirm and the Finalise box was checked, the invoice will be confirmed (cn) and finalised (fn)
A finalised invoice cannot be edited.
Should a finalised invoice need to be changed, the entire invoice may be cancelled, and the correct data may be entered as a replacement.
In order to maintain the accuracy of any subsequent audit trail, mSupply creates a transaction which reverses all the stock movements on the invoice being cancelled, having due regard to all appropriate details, such as batch numbers, etc. See Cancelling finalised invoices
If Confirm supplier invoices without asking is checked in the “Invoices 1” tab of the Preferences window, then all invoices will be finalised automatically.
If you have the store preferences set to force supplier invoice authorisation, you will not be able to confirm supplier invoices until they have been authorised. See here for details.
Copy: Copies the invoice details to the clipboard, allowing you to paste them into a spreadsheet or email message.
Delete: Deletes the entire invoice. When deleted, there will be no trace of your entry and the invoice number assigned will be reused.
Unless the invoice has a new (nw) status, if you have added lines to an invoice, you must manually delete each line using the Delete line button before deleting the invoice. This is intentional, to save the “Oops, I just deleted my invoice with 100 lines on it” feeling.
| Invoice status | Description |
|---|---|
| nw | The invoice has just been created - clicking Delete will automatically delete each line and the entire invoice |
| sg | The Delete button will only delete the invoice if you have first deleted all lines using the Delete line button |
| cn | Same as for suggested (sg) status |
| fn | No changes or deletions can be made and the Delete button will be disabled |
Print checkbox: If checked, the supplier invoice or packing slip will be printed when the OK button is clicked. If the supplier invoice has a suggested (sg) status, a packing slip will be printed; otherwise an invoice will be printed.
OK: Saves the changes you have made and exits the window.
OK and Next: Saves the changes you have made and opens a new supplier invoice.
Tabs in the supplier invoice window
General tab
This shows a detailed view of each line on the invoice. This is the tab you see when you first open or create a supplier invoice.
Summary by item tab
Displays a summary of each item's requested quantity, sent quantity and received quantity. Different batch numbers of the same item are consolidated into a single line.

Summary by batch tab
This tab shows each batch but grouped by item and showing summary price information for each batch.

Price tab
There can be a lot of information on this tab! It is all detailed in the Price tab section below.
Unsupplied items tab
This tab is only shown if this supplier invoice is the result of a stock transfer from another mSupply store and the supplying store has the Use EDD placeholder lines in supplier invoices from this store store preference turned on (see the 26.08. Virtual stores page for details).

The table on this tab shows all placeholder lines that were present on the customer invoice in the supplying store (they represent the quantities of items that could not be supplied). If the item is also present on a purchase order in the supplying store then the Notes column contains the Expected Delivery Date of the item and the purchase order this date is taken from. Note: this is the expected date the item will be delivered to the supplying store, not your store.
Documents tab
The Documents tab on a supplier invoice enables you to save documents and other files relating to the invoice. The tab looks like this:

The table shows you all the files currently uploaded to this invoice.
- Upload document button: Click this to upload a document to the invoice. This will open a window enabling you to search for and select the file on your computer. After you've selected it, click on the Open button to upload it. If you upload a file with the same name as one already uploaded, mSupply will upload it as a new version of the already uploaded file.
- Delete document button: Select a file in the table by clicking on it and click this button to remove it from the invoice.
- Download document button: When you click on this button you are presented with two options:
- Download: this will download the file to a location you select on your computer.
- Download and open: this will download the file to a location you select on your computer and then attempt to open it using the default application on your computer for that file type. If there is no application associated with the file type on your computer then mSupply will tell you that the file could not be opened.
Log tab
The log tab displays all the log entries that have been made regarding this invoice. All log entries are stored in the mSupply log and this tab will display all the log entries in there which were made for this invoice.
Custom data tab
This tab shows the custom fields that have been set up for supplier invoices.
All custom data will be saved with the invoice (i.e. when you click the OK or OK & Next button).
Adding new lines to a supplier invoice
Click the New line button to add a line to the invoice. This window appears:
 The cursor will be in the field ready for you to enter the item name.
Item: Enter as much of the item name (or code) as you know, then press the Tab key. As usual, if only one entry matches, it will be filled in. More than one matching entry will present you with a list from you should double-clicking on the required item. The text you type will be matched against both the item name and the code. A match for either will display the item.
To query for an item name or code that contains, rather than starts with, a string of text, use the asperand (@) wild character. So, for example, to search for “250mg” within an item, enter @250mg in the search field.
Hint: you can use the “up” and “down” arrow keys to change the highlighted item (You can also press u to move up and d to move down!) . Pressing the enter key will choose the highlighted item.

If you did wish to apply a different margin to the whole invoice, click the cancel button, and edit the margin for that supplier by choosing Supplier >Edit supplier and change the margin. If you wish to apply a different margin to just some lines, you can do this as you enter the lines, as long as Editing margins is enabled in the Preferences.
If the the item you are entering is not listed, you can click New item to add it.
Note: it is a good idea to agree upon a standard form for entering items. For example, will you enter an “infant feeding tube” as:
- “infant feeding tube”
- “feeding tube, infant”
- “tube, infant feeding”
Duplicated items can later be merged, but it is better to get it right first time!
If you need to see the full details of the item itself after selecting it, click on the down arrow icon (![]() ) to the right of the item name field and you will be taken to the item's details window.
) to the right of the item name field and you will be taken to the item's details window.
Now there are a series of fields to enter to fill in the basic information for the line
Received quantity: How many packs did you receive?
Pack size: How many units are in each pack? Once the item has been selected the item's unit will be displayed after this field. If you also want to enter the number of packs in a carton (the “inner” pack size) and the number of cartons on a pallet (the “outer” pack size) then you can turn on a preference, as described on the 16.03. Invoice preferences page.
Total quantity: mSupply will automatically calculate the total quantity of individual units (received quantity x pack size).
Say you receive 50 boxes of amoxycillin caps, each box containing 10 strips of 10 caps. You would normally enter 50 in the received quantity field and 100 in the pack size field. However, if you normally issue the capsules in strips of 10 to customers (e.g. you allow them to order 20 or 30 capsules), then it will be more convenient to enter a quantity of 500 and a pack size 10.
Pack to one: Clicking this button will automatically change the pack size to 1 and update the Received quantity to match. If the Convert pack to one when receiving option is turned on for this item (see the 4.01.01. Items - General tab page for details) then this button will not be present but will be replaced with a warning that the pack size will automatically be changed to 1 (and the Received quantity updated accordingly) when the OK button is clicked or a cost price is entered. If you are using barcoding then the barcode for this batch will automatically be updated to a barcode matching the pack size (1) and manufacturer (if selected). If there is no matching barcode then the barcode selection will be changed to Remove barcode and, when the OK button is clicked, the barcode will be removed from the batch (you can of course use the Add one option to add an appropriate barcode before clicking on the OK button).
Invoice quantity: How many packs did the supplier claim to have sent? (Sometimes this is different to the quantity received!)
Invoice pack size: What is the pack size stated on the supplier invoice? It should match the received pack size, but if Pack-to-one has been applied to the received quantity (see above), this value will show the original pack size on the supplier invoice.
Invoice total quantity: mSupply will automatically calculate the total quantity of individual units stated on the supplier invoice (Invoice quantity x Invoice pack size).
Batch: The batch number or other identifying information. The batch appears on the invoice, so you can use this field to differentiate between brands if you need to (eg you operate using generic names, but occasionally want to give a specific brand- you can put an abbreviation for the brand name here as well as the batch).
Expiry: You can use “/” or “.” to separate the day/month/year.
Use whichever date format you have set in your computer (dd/mm/yy or mm/dd/yy or yy/mm/dd). You can enter the year as 2 digits, which will be understood as a date between 1961 and 2060. This should cover the expiry date on most things you receive in the next 52 years!
Location: The location of the item should be entered in this field. Type the first few characters of the location's code and press the Tab key on the keyboard to select the correct location. If there is only one location that matches what you typed mSupply will select it for you, otherwise this window will open to allow you to select the right location:

Double-click on the location in the table to select it. You can refine the list by selecting the Show available or Show empty radio buttons:
- Show available: If this is selected the list will only show those locations that have enough volume left in them to accepot the volume in this line. For this to be useful, the locations must have a volume entered and the stock you are receiving must have a volume per pack value.
- Show empty: If this is selected the list will only show those locations that have nothing in them at all (this does not use volume, it uses the presence of stock in that location).
Volume per pack: How much space the pack occupies in metres cubed (m3).
Weight per pack: The weight of the pack in kilograms (kg).
Invoice line unit cost: Enter your cost price for one pack of the pack size you entered above. If your supplier's currency is different to that of mSupply the cost price will appears in the supplier's currency.
If you have set a default selling price for this item, if you set the Invoice line unit cost to zero after setting it to some value, you will be asked to confirm whether you want to zero the cost price. If you confirm the change, the Sell price and Price extension will be set to zero.
Adjusted local cost: Displays the cost of a single unit of the item in local currency.
% Margin and sell price: If you have allowed editing of these fields in Preferences, you can adjust the margin (and the sell price will adjust automatically), or you can adjust the sell price (and the margin will adjust automatically).
If you do not set it to something else, the sell price will be set to the item's default sell price.
Manufacturer: This field displays the name of the manufacturer of the item. It will only be shown if you have turned the Able to specify manufacturer when receiving, ordering or quoting for items preference on in the store preferences.
Entering a manufacturer follows the same pattern as entering an item or supplier - type the first few letters of the manufacturer's name or code, and press the Tab key. Choose the required manufacturer from the list if more than one is displayed.
You can add a new manufacturer by clicking on the New button.
Donor: The donor of the item can be entered to this field. A valid donor should be entered, type the wildcard character '@' and press the TAB button to view your list of donors.
Price extension: This information field provides the cost price in local currency for the total quantity of the item you have entered.
Custom fields 1-8: The appearance of these fields is controlled by the Custom stock field preferences. Any information you enter in these fields will be displayed wherever stock information is displayed (e.g. when issuing stock on a customer invoice or when viewing the stock of an item on the stock tab of the item details window). The fields can also be reported on so they are an important and powerful way of tracking different categories of stock. For full details please see Custom stock fields.
Click OK if you are finished, or OK & next to add another line. (The invoice lines added will be displayed in Items Display Field.)Click Cancel to exit to the main screen without saving any of the details.
mSupply provides the feature of receiving service items into stock. Service items are items that are not normally held in stock and are called non-stock items in mSupply. See here for more information on those. You might be tempted to use service items to manage assets - if you are you might find the mSupply asset management functionality better. See the 21.02. Asset management page for details.
If the Convert pack to 1 when receiving preference is turned on for the item (see the 4.01.01. Items - General tab page for details), the Pack size field will be changed to 1 and the Cost price, Volume per pack and Weight per pack field values will all be re-calculated when you enter the Cost price field value or click on the OK button. A warning in red text will be displayed on the window if the preference is turned on so that you don't get any nasty surprises when the values suddenly change!
PLEASE NOTE: There is a preference to prevent the adding of expired stock to supplier invoices. See the 26.07. Virtual stores page for details.
Editing lines on a supplier invoice
Supplier invoice lines can be edited at any time until the invoice is finalised.
If the SI has been finalised, it needs to be un-finalised in order to edit lines. Contact support on support@msupply.org.nz
To edit a line, simply double-click on the line you wish to edit.
Editing lines if stock has been issued
If you have already issued stock of this line to a customer, you will be warned with a window like this:

Clicking View issued invoices will show you a list of customer invoices containing stock entered on this particular line:

Clicking OK will take you to the item issue window:

The item and pack size fields will not be editable and you may not reduce the received quantity to a figure lower than the quantity already issued. However, if you have the Update pack size, cost and sell price preference turned on (see the 24.15 Managing users page for details) you will also be able to edit the pack size field. There is a caveat; if the stock has been involved in a repack or a split, the pack size field will always remain uneditable.
In the screenshot above you will notice the “units issued: 10” text in blue to the right of the Quantity field. This will only be present if stock has already be issued to customers. You can click on that text to display a list of issued invoices as described above with the View issued invoices button.
Note that the OK & Next button is very useful for editing a whole invoice. Simply double-click the first line of the invoice, then use the OK & Next button to go from line to line.
Vaccines
There is extra functionality for vaccines to enable you to record the VVM status. To turn it on, you must turn on the Able to specify VVM status when receiving items store preference; see the 26.07. Virtual stores page for details.
When this preference is turned on, the field appears on the supplier invoice line entry/edit window here:

The VVM status field is populated with the statuses set up in the system. See the 20.01. Vaccine Vial Monitoring (VVM) page for details on how to do that.
If you are editing an existing line on the supplier invoice then the VVM status field will display the status selected for the invoice line or Please select… if it doesn't have one set already.
Working with the list of invoice lines
Resizing columns: These columns are resizable. If any of the column data is cut-off or remains hidden, the column width can be increased or decreased by positioning the mouse at the borders of the column. The cursor changes to a cross with arrowheads on the horizontal bar. Click and drag the cursor to the left or right.

Sorting columns: Columns may be sorted either in ascending or descending order by clicking on the header.


The order of the columns can be re-arranged by clicking on the header and dragging it to the new position.
Deleting a line on a supplier invoice
To delete a line, do one of the following:
- Click on the line you wish to delete, then click on the Delete line
 button
 - Double-click the line to edit it (see above) and set its quantity to zero.
Click the OK button. You will be asked for confirmation. Click OK to proceed.
You cannot delete a line from a supplier invoice that has been finalised.
Selling price calculations in mSupply
mSupply uses a number of items of information to calculate the selling price of an item. This enables you to have the price calculated just the way you like it.
Here's the logic mSupply uses:
- Does the item have a selling price specified? If it does, this price will be used regardless of any other information. Note that the price entered for the item is for one unit. The price will be multiplied by the pack size to get the selling price for the line.
- If either the supplier margin or the item margin is specified as zero, then the other (non-zero) value will be used?
- If a margin is specified for both the supplier and the item, the Preference Item margin overrides supplier margin will be examined to see if it is on or off. If it is set, the item margin will be used, if not the supplier margin will be used.
For example: <HTML>
</HTML>
| Cost price | Pack size | Supplier margin | Item margin | Preference set for Item margin overriding Supplier margin | Item price | Price used |
|---|---|---|---|---|---|---|
| 100 | 100 | 6 | 10 | yes | 1.15 | 115 |
| 100 | 100 | 6 | 10 | no | 1.15 | 115 |
| 100 | 100 | 6 | 10 | yes | 0 | 110 |
| 100 | 100 | 6 | 10 | no | 0 | 106 |
| 100 | 100 | 0 | 10 | no | 0 | 110 |
| 100 | 100 | 6 | 0 | yes | 0 | 106 |
<HTML>
</HTML>
Note that if you have turned on “allow editing margins and sell prices on supplier invoices” in the Preferences you will be able to over-ride the prices mSupply calculates.
Price tab
This tab provides functions for applying discounts and apportioning different charges to items.
Applying a discount to the whole invoice
If a supplier gives a discount at the bottom of the invoice rather than adjusting the price of each invoice line, you can use the discount button.

This window will be shown:

If you enter “5” the cost price of each line will be reduced by 5%, and the invoice total will be recalculated. It should then match the amount the supplier is actually charging you.
If you want the sell price calculated based on the new cost price, check the “Recalculate sell price” checkbox. The selling price rules as described above will still apply.
When a discount is applied to the invoice, a log entry containing the discount percentage is also made. The log entry can be seen on the Log tab (see the Log tab section above).
Applying local charges
Local charges are any charges you want to add to the cost of individual items on this invoice in your data file's local currency (i.e. the default currency used in your data file - this might not be the same as the currency you use when you visit a local shop!). These could be administration charges, local freight charges, handling charges etc.
You can either enter the amount of local charge to apply to each invoice line or the total amount of charges to apply to the invoice.
Entering local charge amounts on each invoice line
You do this by directly entering the amounts to apply to each line in the cells of the Local charge column in the table. As you do this, mSupply will automatically increase the sell price per pack by the amount you have entered divided by the number of packs for the line and will add the amount you entered to the current value in the Local charges field above the table.
Entering the total amount to apply to the whole invoice
To do this, you simply enter the total amount in the Local charges field above the table. When you do that, mSupply will automatically apply a portion of the local charges to each invoice line's sell price, according to the ratio of that line's Price extension to the sum of all the Price extensions of all lines on the invoice. You can see how much mSupply added to each line in the Local charge column. If you wish, you can edit the local charges applied to each line after this by simply clicking on the appropriate Local charge cell in the table and typing in the cost to apply. As you do that, mSupply will keep track of the total local charges applied to all lines in the Local charges field.
Applying foreign currency charges
These charges are applied in the currency selected in the currency selected in the Currency drop down list, following the rate displayed in the Currency rate field (which you can manually adjust if the default shown by mSupply is not what you require). The charges could be, for example, international freight charges or administration charges.
Simply type the amount of foreign currency charges to apply to the whole invoice in the Extra foreign currency charges field and mSupply will apply a portion of the whole amount to each line, according to the ratio of the line's Price extension to the sum of the Price extensions of all lines. mSupply will automatically update the sell price value for each item.
Applying other charges
These charges will NOT be added to the sell or cost prices of the items on the invoice. You enter them in the Other charges section below the table of items:
- Item(s) field: Enter what the charges are for in this field.
- Amount field: Enter the total amount of the other charges in here. When you do this, you will see the amount added directly to the Subtotal and Total amounts and none of it will be added to the sell or cost prices of the individual items in the table.
Applying tax to the invoice
Tax, like other charges, will not be added to the sell or cost prices of the individual items. To add tax, click on the % tax rate below the Subtotal field on the right hand side below the table of items and enter the rate you wish to use. mSupply will calculate the amount of tax (the % you entered of the Subtotal value) and automatically add it to the Subtotal value to give you the new Total.
If you have set a default tax rate in the preferences (see General preferences) you will see it applied as soon as you open the invoice. Also, you will only be able to edit the tax rate if the Allow editing tax rate and amount on invoices preference is turned on (see Invoices preferences).
Viewing supplier invoices
To view or edit any supplier invoice, choose Supplier>Show invoices. The details of how this works is virtually identical to that of viewing customer invoices.
Rapid access to Goods Received note from Supplier invoice, and vice versa
If the Supplier Invoice came from a Goods Receipt, (which in turn came from a Purchase Order), Supplier invoices show the Goods Received transaction number in the upper right area of the window. By clicking on that, the Goods received transaction will be displayed. Similarly, the Edit goods received list has a link Click here to open Supplier inv ……. which will display the required invoice.
Processing supplier invoices
In order to bring the stock on a supplier invoice in to your store, you will need to confirm it.
If the supplier invoice was created by mSupply, then depending on the store preferences, the supplier invoice may or may not be on Hold or Finalised:

- If the supplier invoice is On hold, then the supplier invoice can not be processed (moved from one status to another). You will need to take the supplier invoice off Hold in order to process it.
- To toggle the supplier invoice between on and off Hold, click on the Hold checkbox.
- You can print the supplier invoice even if it is on Hold.
- If the supplier invoice was finalised when you first opened it, then the stock has already been (logically) brought in to your store, and you don't need to do any processing! (In fact, you can't do any processing of it, even if you wanted to.)
- If the supplier invoice status is
nw, then the stock as described on the supplier invoice has not been brought in to your store yet. - To close the supplier invoice, click on the OK button. If the supplier invoice is not on Hold, then you should be prompted with the pop-up message below.

- If you click Later, the supplier invoice will close, the supplier invoice status will stay at
nw, and the stock will not be brought in to your store. - :Once you are happy with the details of the stock as described on the supplier invoice (taking special notice of the Cost Prices), and you are ready to bring the stock in to your store, click on the OK button, and then click Confirm. The supplier invoice will close, the stock will be brought in to your store, and the supplier invoice status will change to
cn. - Depending on your user permissions, you may be able to edit details of the stock even after it has been brought in to your store - provided that the status remains at
cn - If you click on the Finalise tick-box, then the status will change to
fnand you will no longer be able to edit any details on the supplier invoice.
Printing supplier invoices
There are 2 ways to print a supplier invoice but both require it to be open. The first way is to check the print checkbox in the bottom right hand corner of the supplier invoice window:

When the checkbox is checked and you click on the OK button, the printing options window is displayed. The invoice will be closed after printing.
The second way is to hold down the Shift key on the keyboard and click on the printer icon in the bottom right hand corner instead of checking it. This will also open the printing options window but the invoice will stay open after printing.
This is the printing options window:

- Form to use drop down list: Select the form you want to use to print the invoice. There may be several in the list. There is also a None option if you don't want to print the invoice but just want to print pallet labels.
- Remember this choice checkbox: The form you choose in the Form to use drop down list will be selected (and everyone else!) next time the supplier invoice printing options window is opened if this checkbox is checked.
- Print pallet labels checkbox: Check this if you want 100x150mm pallet labels in a specific format to be printed out from a label printer. A label will be printed for each line on the supplier invoice. Note: the label printer has to be installed and configured in mSupply before this option will work - see Label printer installation and Printing preferences (setup) for details.
- Destination radio buttons:
- Printer: the invoice will be printed out straight away.
- Preview: a preview of what the invoice will look like when it is printed will be displayed in your installed PDF file reader. You might be able to print the invoice from the PDF reader, depending on its features.
- PDF file on disk: the invoice will be saved to disk in PDF format.
- Email PDF: the invoice will be created as a PDF file and attached to an email for you to send. You can double-click the email attachment to see a preview of the invoice. The email preferences in File > Preferences should be setup correctly before using this feature.
- Export to Excel: the invoice will be exported as a spreadsheet file and opened for you (provided you have a spreadsheet application installed).
When you click on the OK button the invoice will be printed in the form you have chosen.
| Previous: 7. Receiving Goods | | Next: 7.02. Goods receipt |