Table of Contents
16.07. Synchronisation preferences
- The preferences described here (accessed through File > Preferences…) apply to all stores on an mSupply server.
- In a synced system there will be multiple 'sync satellites' and these settings can be different on each sync satellite.
- There are some settings that are 'per store' - refer Store preferences, and store preferences can be different for each store on an mSupply server.
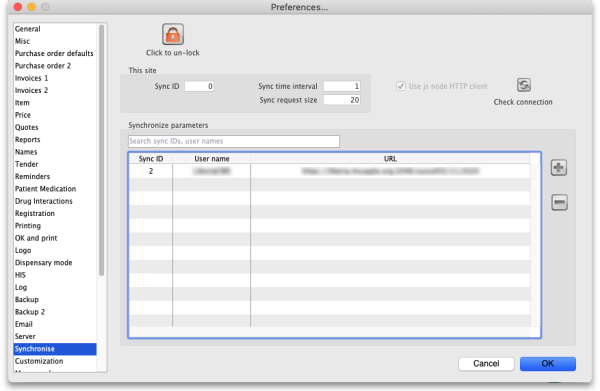
To view the synchronisation settings choose File > Preferences from the menus and click on the Synchronise tab on the left hand side. This is the window you will see:
When you first arrive at this window, all fields will normally be disabled. If this is a datafile for a correctly configured sync site then all the settings and fields except the Sync time interval field and the Test connection button will be disabled and cannot be edited.
Unlocking the settings for editing
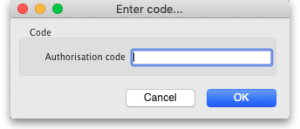
Click on the Click to un-lock button and this window will open:
Enter your unlocking code in the Authorisation code field and click on the OK button. If the code you enter is valid, the various fields and buttons will be unlocked for editing and using, otherwise you will be told that the code is invalid and everything will remain read-only.
The preferences
- This site: these fields contain the settings for the sync site this datafile belongs to
- Sync ID: An integer that is greater than 0, the unique ID of this sync site. This is the ID the site is identified with to all other sync sites in the system.
- Sync time interval: the number of minutes between attempts to synchronise with the primary server. Setting this to 0 pauses sync. Editable without clicking on the Click to unlock button but only if sync is enabled on this site (i.e. if Sync ID is greater than 0).
- Sync request size: the number of requests to lump together when communicating with the primary server. If the internet connection is stable it is more efficient to have a larger number here. If the connection is less stable then it is better to have a smaller number.
- Use js node HTTP client checkbox: This preference is not recommended and will be disabled in future versions of mSupply (v7.11 and above). Node JS was used in special circumstances where 4D HTTP handlers were not working well on cellular connections for certain regions. This has been improved and Node JS is no longer needed.
- Check connection button: click on this to check the connection to the primary server. The button is available even if the settings have not been unlocked and will send a test request to the primary server (but only if sync is enabled on this site i.e. if Sync ID is greater than 0). The result of the request will be displayed in a message and will tell you whether this site can reach the primary server.
Synchronise parameters section
This list contains the names of all the sites to synchronise with. If this is the primary server all the satellite servers will be identified in this table. If this is a satellite server then the primary server only will be identified in here.
Sometimes there can be hundreds of sites in this list. To find the one you're interested in, you can click on the column headers to order the list by them (click again to reverse the sort order - same as with most columns throughout mSupply) or enter a site sync ID or user name in the field just above the list to reduce the list to those with an ID or user name starting with what you have entered.
Editing an existing row
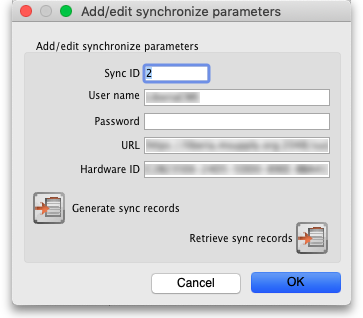
Double-click on a row to edit its details. This window will open:
- Sync ID: The ID of the site in the synchronisation system. You choose this; it MUST be unique to each site to be synchronised. ID 1 is reserved for the primary server (so, if this is the primary server put 1 in here).
- User name: Communication between the primary and satellite servers is authenticated. This user name and the Password field must match what the primary server is expecting for communication to be successful. So, you can enter any valid username and password in these fields but they must all be the same for the primary and satellite servers.
- Password: as above.
- URL: On a remote site, this should be the central server's URL or IP address, including the port if the default is not used. On the central server, if any sites have this field populated it'll disable sync.
- Hardware ID: This is a unique hardware identifier of the remote machine. The primary server has a copy of this information and, if the value here differs from that on the central server, sync will be diabled for this site. If the remote machine hardware has actually changed (e.g. a new computer) then clearing this value on the primary server will allow the new value to be saved and sync will resume.
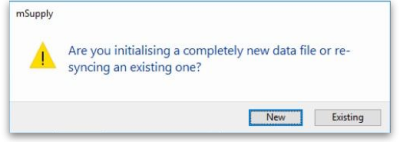
- Generate sync records button: If this is the central server, this button will generate all the sync records to initialise a new data file; if you're on a remote site, it will generate the sync records for stores active on this site (e.g. if you need to refresh the central server copy). After clicking on the button you will see this message:

- New button: Clicking this will create sync out records for system and transactional data (users, preferences, customer invoices, supplier invoices etc.).
- Existing button: Clicking this will create sync out records for store data only.
- Retrieve sync records button: Does a manual pull of sync records waiting for this site on the primary server.
Adding a site
To add a new site to sync with, click on the ![]() button to the right of the list. That will open the same window as editing a row but it will be empty, ready for you to enter the appropriate values.
button to the right of the list. That will open the same window as editing a row but it will be empty, ready for you to enter the appropriate values.
Deleting a site
To delete a site from the list, simply click on it to select it and click on the ![]() button to the right of the list.
button to the right of the list.
| Previous: 16.06. Entering a new logo | | Next: 16.08. FrontlineSMS |


