25.02. mSupply client / server installation part 2
These steps need to be carried out after completing the steps described in:
25.01. mSupply client / server installation part 1
Install associated server application software
It can be useful to Install Dropbox first so that you can use the Dropbox folder to transfer software and files to the server. But if the internet connection is fast enough, it is easier to start with Installing the remote support software, and then letting the Dropbox be configured remotely by mSupply Support.
Install remote support software
Installing the TeamViewer Host customised for mSupply
- Uninstall - If TeamViewer is already installed on the machine, it is safest to uninstall it.
- Recommended - Change the Computer Name to something meaningful before installing TeamViewer. Using a name that reflects the site and / or user will help mSupply support identify the device e.g.
Auckland - Grafton Pharmacy- This is what the machine will show up as on our internal directory. If you do not rename the computer, we will probably request the user send us their TeamViewer credentials for remote access every time support is required.
The TeamViewer Host module appears to only use the first 15 characters of the name. If you are connecting several computers, make sure that the first 15 characters are unique for each computer.
To change the computer name in Windows go to: Control Panel > System and Security > System > Advanced system settings > Computer Name > Change…
Computer description is NOT the Computer Name
- Download and save the zip file at the following link https://www.msupply.org.nz/files/Teamviewer/TeamViewer%20Deployment%20December%202025.zip
- Extract the files from the TeamViewer Deployment .zip file onto the host computer.

- Open the folder you extracted
- Run as administrator - right click on the file
Install TeamViewer.batand select Run as administrator. The script will check to see if it is running as an Administrator, if it isn't running as an Administrator, the installation will stop. If TeamViewer is already installed, you can try and useAssign TeamViewer.batinstead.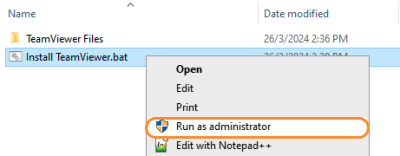
The Teamviewer Customised Host window should appear on your screen: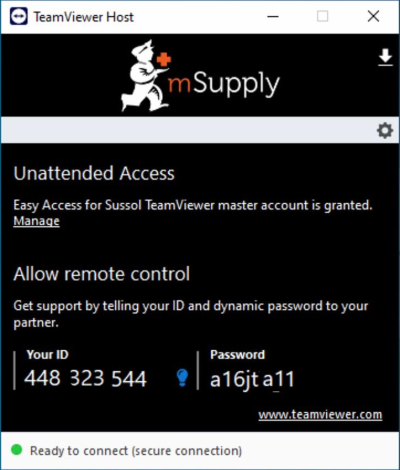
If the above window does not appear, the full installation has not completed. It definitely helps to run the batch (Install TeamViewer.bat) file with a reasonable internet connection. If the internet connection is not good enough, then some or all of the actions in the batch file will not be complete. If that happens, please uninstall TeamViewer and re-run the batch file (as Admin) when the internet connection is better.
- Notify mSupply Support by message or email (on support@msupply.org.nz) and give us the computer name of your computer (If using our custom TeamViewer installer). Otherwise, the TeamViewer ID should also work (a screenshot is fine). We will then be able to confirm for you that the remote access is operational and ready for us to provide you remote support.


Install Dropbox
Sustainable Solutions recommends using Dropbox to assist with transferring installation files to the server, and as a means of moving mSupply secondary backups off site.
- Contact Sustainable Solutions to organise a DropBox account for the server and for instructions on setting it up on the server.
Install UPS hardware and software if required
If it's not already done, install the UPS hardware and software, refer to the UPS requirements here.
Install anti-virus software
Anti-virus can be a hotly contended issue. This web page is pretty convincing: What’s the Best Antivirus for Windows 10? (Is Windows Defender Good Enough?)
Conclusion:
- If the OS is Win8 or later, Windows Defender is probably good enough for anti-virus, and better than much of the competition.
- Once configured, the server should not be vulnerable to exploit programs as these are usually downloaded and triggered by human activity! However, to be safe, it is recommended to install an Anti-exploit program such as Malwarebytes. The website suggests that Malwarebytes is not free, but as at the time of writing this (May 2018), Malwarebytes successfully reverts to a free version after the 14 days trial. The main 'cost' of the free version is means that it has to be manually executed rather than running automatically in the background.
Install another web browser
Install another browser:
Good options include:
- Microsoft Edge This comes as default with Windows machines.
Pin the browser to the taskbar
Install OpenOffice, Microsoft Excel or LibreOffice
mSupply can produce reports in Microsoft Excel format. Client machines will need to have software to open these reports. Occasionally there will be need to run and open these reports while logged in to the Server. If you do not have Microsoft Excel installed on the server, LibreOffice is a good alternative.
Install TurnedOnTimesView
As part of troubleshooting, it is valuable to be able to analyse when the server has shut down ungracefully.
- TurnedOnTimesView is a simple tool that analyses the event log of Windows operating system, and detects the time ranges that your computer was turned on and whether the last shutdown was graceful or not.
- Installation instructions are on the TurnedOnTimesView website, but is very straightforward:
- Download this zip file TurnedOnTimesView.zip from the mSupply website https://docs.msupply.org.nz/_media/admin:turnedontimesview.zip
- Unzip the Zip file
- Copy the TurnedOnTimesView.exe file to the Desktop
- Double click to icon on the Windows desktop to open

- If you get a security warning pop-up untick “Always ask before opening this file” and click Run

- Right click on the icon on the Windows Taskbar & select to Pin to Taskbar.


Install Logoff and Lock utilities
It is too easy for support workers accessing the server remotely to accidentally shutdown the server. Therefore, two Windows shortcuts have been created to allow support workers to easily logoff or lock their windows session without having to go through the usual Windows procedure:
- Lock computer
- Logoff computer
It's a good idea to stick this in to the following folder in Dropbox:
Lock Logout Shortcuts
The Yellow Lock computer utility needs to be copied to the Admin desktop and then pinned to the task bar.

The Green Logoff computer utility needs to be copied to the C:\Users\Public\Desktop folder. This will place the shortcut on the desktop of each normal user. Users of each normal user account will need to pin this shortcut from the desktop to the taskbar. Don't pin it to the taskbar of the Admin user account. We try to keep the Admin account open (but locked) so as to keep Dropbox working.
The C:\Users\Public\Desktop folder is normally a hidden folder. You will likely need to make it visible).
These steps need to be followed by the steps in 25.03. mSupply client / server installation part 3