4.18. Phased stocktakes
General
Phased stocktakes are commonly carried out in larger warehouses. In this type of stocktake, stocktakes are created for each aisle and level combination in the warehouse. When a stocktake is finalised then a new stocktake is created from it containing only the lines with discrepancies. When the third count is finalised then adjustments are made to make the stock in mSupply match any discrepancies. Thus, there is a maximum of 3 phases for each stocktake.
Setup
Store preferences
Before using phased stocktakes you must tell mSupply which parts of your shelf location codes (see the 4.06. Stock locations and location types page for details) represent the aisle, level and position of the location (aisle = rack, level = horizontal level within the rack, position = vertical 'column' within the rack).
See the 26.07. Virtual stores page (the section on the Location code pattern field) for details on how this is set.
Confirm Customer Invoices
mSupply will not allow stock that is on a Customer Invoice with status of new (nw) or suggested (sg) to be taken out of stock by any other transaction process, including an inventory adjustment flowing from a stocktake - refer Creating inventory adjustments.
It is HIGHLY RECOMMENDED to process (take the stock off the shelves) and confirm any customer invoices with a status of new (nw) or suggested (sg) before doing a stocktake - please see Issuing Goods to a Customer (Customer Invoices), Confirming an invoice for details on how to do that.
This is so important that mSupply will show you a warning message when you try to create a new stocktake if it detects any customer invoices with suggested status. Please read the warning and take suitable action.
Creating a phased stocktake
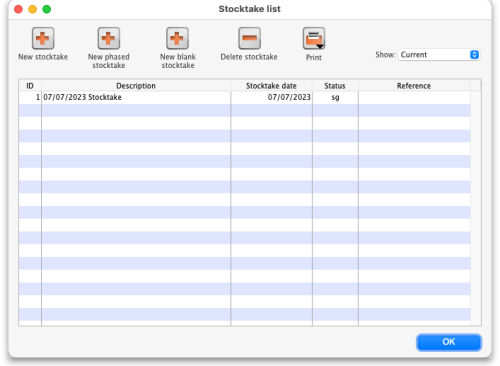
Choose Items > Show Stocktakes… from the menus or click on the Stocktakes button on the Item tab of the Navigator. This window will open, showing a list of the current stocktakes:
Note that only phased stocktakes will have a value in the Reference column.
The Show: filter allows you to choose which stocktakes are displayed in the list. Options are:
- All: shows all stocktakes in the current store with any status for all time. Could be many of them!
- Current: selected by default when the window is displayed and shows all 'suggested' stocktakes (status = sg). These are stocktakes which have not yet been processed into inventory adjustments (finalised; status = fn)
- This year: shows all stocktakes of any status that have been created in the current year.
- Last year: shows all stocktakes of any status that were created in the year before the current one.
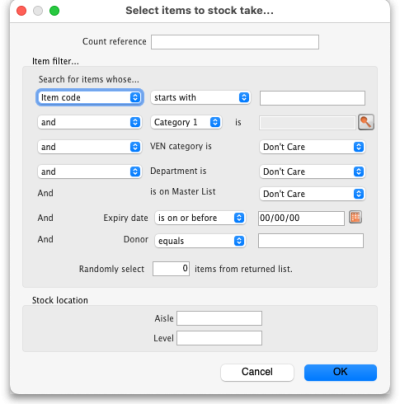
To create a phased stocktake click on the New phased stocktake button. The options window opens:
- Count reference: This is mandatory and is the unique reference for this phased stocktake (that is, the collection of all the individual stocktakes that makeup this one). It must be unique so you will be shown an alert if it isn't.
- Item filter: Make settings here to select the stock that is included in the stocktake. The filters work the same as for standard stocktakes as described on the 4.17. Stocktakes page.
- Stock location: Here you can select a particular aisle or level of the warehouse to include in the stocktake. Enter the identifier of an aisle in the Aisle textbox or the identifer of a level in the Level textbox:
- If you enter an Aisle value only, then a stocktake will be created for each level in that aisle.
- If you enter a Level value only, then a stocktake will be created for that level in each aisle in the warehouse.
- If you enter an Aisle and Level value then a single stocktake will be created for the level in the aisle specified.
- If you enter neither value then a stocktake will be created for every level in every aisle in the warehouse.
When you click on the OK button mSupply will create a stocktake for each level in each aisle you have selected to be included in the phased stocktake. Each stocktake will contain one line for each line of stock found in a location that beloings to the aisle/level combination that the stocktake is for.
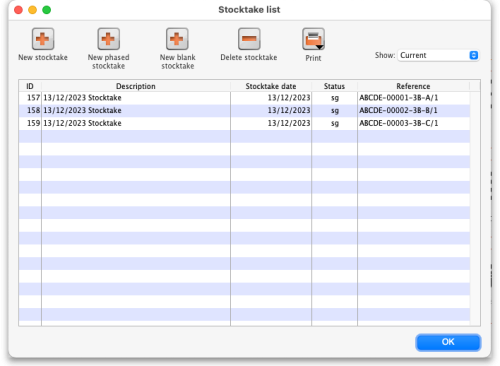
When the stocktake creation is complete you will be told how many stocktakes were created in an alert message. When you close the message, the stocktakes will be displayed in the table like this:
The reference in the Reference column is constructed as Count reference-Number-Aisle-Level/Phase where:
Count referenceis the Count reference value entered in the stocktake optionsNumberis an incrementing number starting at 1 and padded to 5 digits with leading zeroesAisleis the aisle this stocktake is forLevelis the level this stocktake is forPhaseis the phase of this stocktake, a number from 1 to 3
Carrying out a phased stocktake
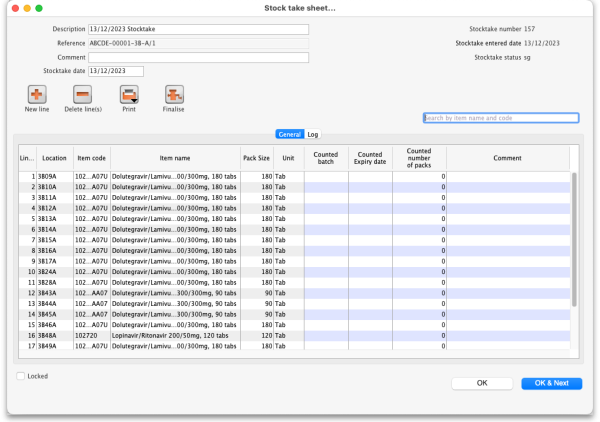
To open a phased stocktake, double click on it in the list. The stocktake detail window is opened:
- Description: An editable description of the stocktake. Set to the date the stocktake was created followed by “Stocktake” by default
- Reference: The count reference, read only
- Comment: Enter anything you need to remember about this stocktake
- Stocktake date: the date the stocktake count was started, set to the creation date by default
The table in the above screenshot shows the default columns. If any of the custom stock fields in File>Preferences>Stock tab or Adjustment reasons are enabled then columns will also be included for them.
Print the count sheets
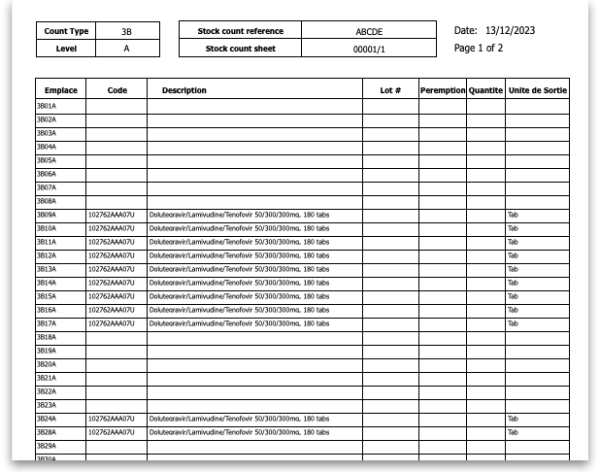
The next thing to do is to print out the count sheets so that the warehouse operatives can take them into the warehouse to carry out the count. At this stage, when the stocktake is at sg (suggested) status, this is the only thing you can print and it looks like this:
NOTE: When the Reference value ends in /1 the count sheets contain a line for every location in the aisle/level combination this stocktake is for. These are the blank lines with a value only in the Location (Emplace) column. When the Reference value ends in /2 or /3 then only lines in the stocktake are printed.
Using the count sheets, the warehouse operatives count the stock in the warehouse.
After counting the stock
After counting the stock, the count sheets are brought back to mSupply and the information is entered into the stocktake.
The stocktake is completely blind so the batch, expiry date and number of packs of each line entered on the count sheets should be entered in the Counted batch, Counted Expiry date and Counted number of packs columns. Optionally, you can enter a value in the Comment column if there is something you need to remember about this line.
To enter something in one of the columns, simply click into it and type what you want to enter. If you need to enter more than the batch, expiry date, number of packs or comment then double-click on the line to make more fields available for entry:
- Counted number of packs: The number of packs counted on the shelf
- Pack size: The number of units that are in a pack
- Batch: The batch of the stock
- Expiry date: The expiry date of the stock. Enter is manually or select it by clicking on the calendar button
- Location: The location the stock was found in. Type the first few characters of the location and press the Tab key to select the location from a list of locations that begin with what you typed (if there is only one that matches then it will be selected and filled in for you)
- Donor: The donor of this stock (only shown if the option to track donor is turned on - see the 16.03. Invoice preferences page for details). Type the first few characters of the donor's name and press the Tab key to select the location from a list of locations that begin with what you typed (if there is only one that matches then it will be selected and filled in for you)
- Adjustment reason: Only displayed if adjustment reasons are turned on (see the 16.10. Options (standard reasons) page for details). Required if it is turned on. Click on the drop down list to select the reason for the difference between the snapshot and counted number of packs.
- Cost price: The cost price of one pack
- 12 month average checkbox: Check this to replace the cost price with an average of the cost prices for stock of the same item received in the last 12 months
- Sell price: The sell price of one pack
- Hold: do not issue: If checked then the stock line is on hold and cannot be issued. WARNING: if you turn this checkbox on and save the line then it is put on hold immediately, it does not wait until the stocktake is finalised.
- Custom stock fields 1-4: Fields for these will be displayed at the bottom if they are turned on in File>Preferences>Stock tab. Enter text values as required.
If a new line of stock was found which isn't in mSupply then add it using the New line button (see the Add a new line to a stocktake section below for details).
When all the count sheet details have been entered into the stocktake and checked, it is time to finalise the stocktake. To do this, click on the Finalise button. After confirming that you want to finalise the stocktake, this will do two things:
- The stocktake will be made read-only and no further changes can be made to it.
- If there are any differencies between the the batch, expiry date or number of packs that were entered for a line and the actual batch, expiry date or number of packs of the stock line in mSupply then:
- if the Reference value of the stocktake ends in
/1or/2, a new stocktake containing only the lines that showed a discrepancy is created. This sticktake will have the same reference value as this stocktake except that its phase number will be incremented by 1. So, if the Reference ended in/1, the new stocktake's reference will end in/2, if it ended in/2then the new stocktake's reference will end in/3. - if the Reference value of the stocktake ends in
/3then inventory adjustments are created to make the stock of the lines with discrepancies match what was counted in the stocktake. Note: any lines that only have a discrepancy in the batch or expiry date will not appear in an inventory adjustment but the changes will be made and logged.
If there are no differences between the batch, expiry date or number of packs that were entered for all lines and the actual batch, expiry date or number of packs of the matching stock lines in mSupply then nothing further is done and the user is shown an alert message to say that the count for this aisle/level combination is complete.
Note that a line that has had nothing entered for it in the stocktake is counted as having a discrepancy and will appear in a further stocktake or an inventory adjustment after a stocktake has been finalised.
Add a new line to the stocktake
To add a new line to the stocktake (for stock that you find during the stocktake that is not in mSupply already), click on the New line button. This window will open:
Enter the first few characters of the item the stock is for in the Item text box and press the Tab key on the keyboard to select the right item from a list of items beginning with what you typed (if there is only one item that matched it will be selected for you and entered in the Item text box).
Now enter the details of the stock in the New stock line section:
- Counted number of packs: The number of packs counted on the shelf
- Pack size: The number of units that are in a pack
- Batch: The batch of the stock
- Expiry date: The expiry date of the stock. Enter is manually or select it by clicking on the calendar button
- Location: The location the stock was found in. Type the first few characters of the location and press the Tab key to select the location from a list of locations that begin with what you typed (if there is only one that matches then it will be selected and filled in for you)
- Donor: The donor of this stock (only shown if the option to track donor is turned on - see the 16.03. Invoice preferences page for details). Type the first few characters of the donor's name and press the Tab key to select the location from a list of locations that begin with what you typed (if there is only one that matches then it will be selected and filled in for you).
- Adjustment reason: Only displayed if adjustment reasons are turned on (see the 16.10. Options (standard reasons) page for details). Required if it is turned on. Click on the drop down list to select the reason for the difference between the snapshot and counted number of packs.
- Cost price: The cost price of one pack
- 12 month average checkbox: Check this to replace the cost price with an average of the cost prices for stock of the same item received in the last 12 months
- Sell price: The sell price of one pack
- Hold: do not issue: If checked then the stock line is on hold and cannot be issued. WARNING: if you turn this checkbox on and save the line then it is put on hold immediately, it does not wait until the stocktake is finalised.
- Custom stock fields 1-4: Fields for these will be displayed at the bottom if they are turned on in File>Preferences>Stock tab. Enter text values as required.
When you've added all the details click on the Add new button to add the line to the stocktake. It will appear at the bottom of the table of stocktake lines.
Delete a line from the stocktake
To delete one or more lines from the stocktake, select them in the table and click on the Delete line(s) button. After confirmation the selected lines will be deleted.
Please note, you can only delete lines from the stocktake that you manually added to it uysing the New line button.
After finalising a stocktake
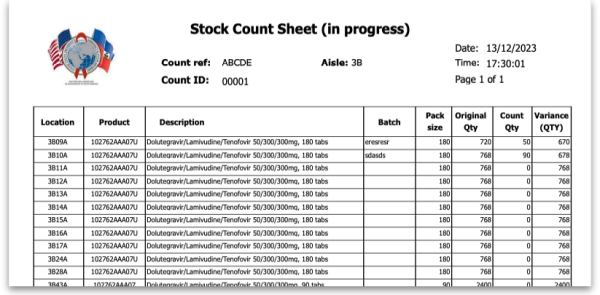
After finalising a stocktake the stocktake becomes read-only but you can now print out an In progress stock count sheet from the Print button. This is what it looks like:
When you finalise the last stocktake with the same Count reference (as entered in the options window when creating the phased stocktake) then you will be asked if you want to print out the Stock comparison report, which will show you all the discrepancies recorded in all the stocktakes with the same count reference.
| Previous: 4.17. Stocktakes | | Next: 4.19. Inventory adjustments |
