This is an old revision of the document!
11.03. Prescription payments and credits
Prescription payment preferences
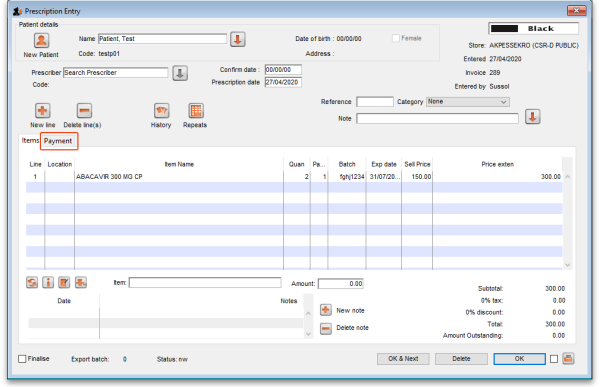
To receive payments for prescriptions in a dispensary, go to Dispensary Mode Preferences and check the Receive payments from prescription window box.
Once activated, a Payment tab will appear in the Prescription Entry window:
Entering the payment
To enter a payment from the Prescription Entry window:
1. Click on the Payment tab.
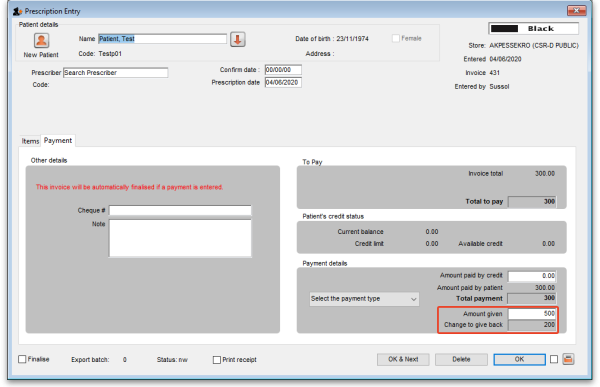
2. Enter the amount to be paid for this invoice today in the Amount paid by patient field, then press the Tab key on the keyboard:
In this example, the invoice is $300 and the patient will pay the full cost today in cash.
3. A confirmation window will open:
Enter the actual amount given by the patient in the Cash given field and press the Tab key on the keyboard. mSupply will calculate the change that must be given back to the patient and show it in the Change required field.
In this example, the invoice is $300 and the patient is paying with a $500 note. mSupply calculates the change to be returned is $200.
If you have setup other payment types in the preferences (see 16.10. Options (standard reasons)) then you can select the type of payment being made in the Payment type drop down list.
Please note: You cannot overpay a prescription. If you edit the Amount paid by patient field to be more than the invoice total you will be shown a message and the Amount paid by patient will be reduced back down to the invoice total.
4. Click OK to finalise the prescription and payment and close the window (if a payment is entered the prescription will be automatically finalised, you have no choice). If the Print receipt checkbox is checked then a payment receipt will print at this point.
Once you click OK, the prescription and payment are finalised and can no longer be edited. Check carefully before pressing OK!
Paying with credit
Patients can be given a credit limit (see 10.03. Patients) and can use some or all of that credit at any time to pay off some or all of a prescription. Patient credits (see below) will add to the amount of credit a patient can use. Credit will also be added to a patient when they return goods using a patient credit (see below).
The process of using credit in a payment is exactly the same as a the payment process described above. The only difference is that, if the patient has some credit available, mSupply will automatically use as much as it can to pay for the patient's prescription. You can see the amount of credit the patient has available (made up of their credit limit and patient credits applied to them) in the Available credit field and the amount of credit used to pay for the prescription in the Amount paid by credit field:
In this example, the patient has 100 credit available (made up of their credit limit only, which is 100) and all 58 of their prescription charge has been paid with the credit.
If you or the patient does not wish to use their credit, or wishes to reduce the amount of their credit used to pay the prescription, simply change the amount actually paid by the patient in the Amount paid by patient field and press the Tab key on the keyboard so that mSupply re-calculates the amount paid by credit. Here is a screenshot if the patient in the example above decides to pay 10 towards their prescription and only use 48 of their credit:
If the Amount paid by patient field is not zero when you click on the OK button, the change calculation window appears as normal. If Amount paid by patient field is zero when you click on the OK button, the prescription is simply closed as there is nothing more to be done - the prescription cost is taken off the patient's available credit as appropriate.
Patient credits
You can allocate funds in a patient's favour by giving them a Patient Credit. You might need to do this if, for example, a patient returns faulty medicines they already paid for. Patient credits will be subtracted from future invoices until all credits are used.
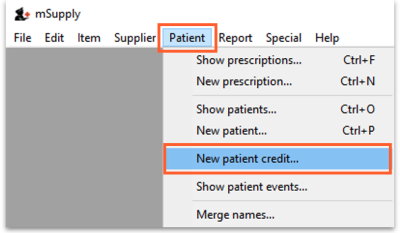
1. In the menus, choose Patient > New patient credit…:
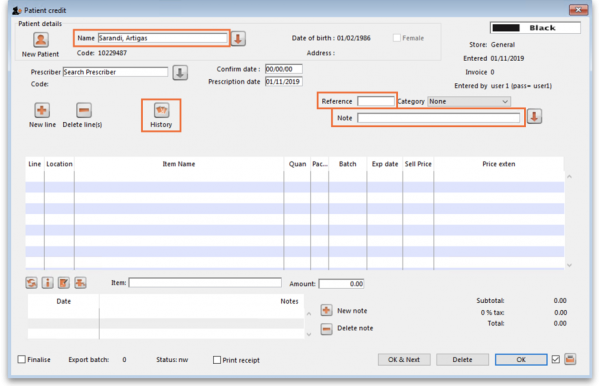
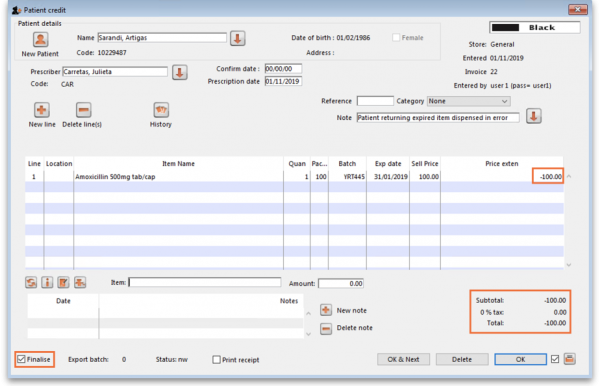
2. Enter the patient in the Name field just as you would for a prescription. You can also enter other details such as a Reference (e.g. the prescription number this patient credit is related to) and a Note explaining why a patient credit is being issued.
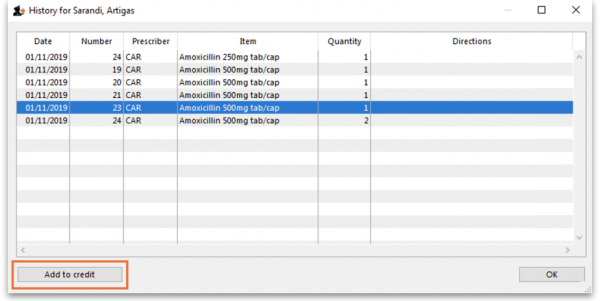
3. Click the History button to view the items previously dispensed to this patient:
4. Select the item(s) to be returned from the patient's dispensing history, then click Add to credit. Multiple items may be added at once:
5. Review the patient credit. Note that the price appears as a negative value in the patient credit window since it is a credit to the patient, not a charge.
You can also add items not linked to a patient's history by clicking the New line button and entering item details just like you would for a prescription.
If you only want to allow users to issue patient credits for items linked to a patient's history, turn on the Limit patient credits to previously prescribed items preference in the Invoices 2 tab of File > Preferences (see Invoices 2 Preferences). This will disable the New line button, and all items must be selected from the History button.
6. Once you are sure the patient credit is correct, check the Finalise box and click OK.
Remember you have also just returned items to your mSupply inventory! If you are going to destroy returned items, you now need to remove them from your mSupply inventory in a separate transaction (either a Reduce stock Inventory Adjustment or a Stocktake).
When the patient pays for their next prescription, their credit will be automatically applied in the Payment window.
In this example, the patient's current prescription is $300 but they had a $100 credit which is automatically applied to the invoice. Now, they only need to pay $200.
| Previous: 11.02. Receiving payment from customers | | Next: 11.04. Cash register |
