7.06. Managing donors
What / who is a donor?
In mSupply, we have the idea of a 'name'. A name can be a customer, a supplier, a patient, … or a donor.
A donor is normally the name of the organisation that has paid for, or somehow managed, the supply of certain stocklines.
A donor can also be a supplier and / or a manufacturer or they can be just a donor. mSupply allows for any combination of that.
mSupply allows you to specify the donor for each incoming stock line independently of the supplier.
For example, GlobalFund might agree to supply certain malaria medicines, and then contract a supplier to deliver them to you. mSupply allows you to record this accurately, and to track and report on all the stock and transactions relating to those medicines donated by GlobalFund.
The Donor feature was designed for the purposes of tracking and reporting on stock that has been funded by a donor. However, the feature can be used for more than just tracking donors. For example, In many countries that use mSupply, most medical supplies are supplied free-of-charge to the health facility by a government agency. But if the government agency has not supplied stock, the facility might decide to procure the stock 'privately'. The facility management will often want to keep track and report on this privately procured stock. The donor feature can be used for this purpose. The 'donor' name for this purpose might be called Privately procured.
Using the donor module
To use the donor module, you must first turn it on:
- Click drop down menu File>Preferences…
- Click the Invoice 1 tab in the left-hand list
- Check the box Allow tracking of received stock by donor
![]()
Once you have done this you can add donors and track stock by donor.
Adding or editing donors
To add or edit a donor you should first bring up the list of donors. Do this from the Navigator:
- Go to the Suppliers tab > Show Suppliers and check the box beside Donors so that the list shows donors rather than suppliers.
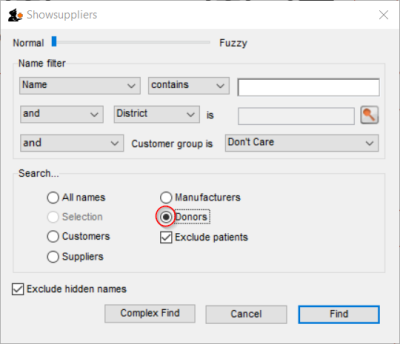
- Click Find. This will bring up a new window showing any donors that have been added to mSupply in your system
- You can edit a donor by double-clicking on it.
- You can add donors using the New tool bar at the top of the window. This will bring up a window like this:


- Now add your donor details and click OK.
Track a donor in mSupply
Donors and the purchase order
- Create a Purchase Order in one of the usual ways - refer Ordering Items From Suppliers.
- With donor tracking turned on, the Donor field will appear in the window - see below. The value you enter here will be tracked from this point on through to receipt, stock transfers and dispatch.

- In the Donor field type the first few characters of the donor name or code (or enter the wildcard character '@' in field) and press the Tab key on the keyboard. This opens the window below, showing the donor that match what you typed:

- If your donor does not exist, you can add it at this point by clicking on the New button - see Adding or Editing Donors above.
- Once you have selected your donor, click on the OK button and the donor's name will appear in the Donor field:

- Add your Item line(s), check your order is correct and click the Confirm button to make the order available for Goods Receipt in the normal way - see Ordering Items From Suppliers for more details.
Donors and the goods receipt function
Receive goods in the usual way - see Receiving goods (Goods Receipt function). The only difference is that the Donor's name is now present in the Donor field:

Donors and the supplier invoice
- Clicking Finalise on the Goods Receipt generates the Supplier Invoice in the usual way (see Receiving Goods - a Supplier Invoice). Note that you can see the donor identified in the Purchase Order in the Default donor field:

Default donor for each stock line
- Each stock line on a Supplier Invoice will inherit the Default donor from the Supplier Invoice.
- The Default donor can be edited.

Changing the donor for a particular supplier invoice line
- There may be circumstances when delivered stock may be from a mix of donated and non-donated, or from different donors. You can change the donor for any stock line on a supplier invoice when editing the details of the stock line (double-click on the stock line).

If you change the Default donor, you will be presented with the following options:

- “Do nothing”: The change will have no effect on existing invoice line(s).
- “Update existing donor lines with this donor”: existing donor lines will be updated to match the newly selected donor.
- “Assign this donor to the lines with no donor”: lines with no donor selected will be updated with the newly selected donor.
- “Assign this donor to all lines”: all lines will be updated with the newly selected donor.
Donors and the customer invoice
Customer invoices, including stock transfers for donated goods are created in the usual way - refer Issuing Goods to a Customer (Customer Invoices).
- They key thing to note is that when selecting from the stock lines to add to the Customer Invoice, the donated stock lines can be distinguished from the other stock lines by the donor name in the Donor column - see below:

mSupply will always suggest stock lines according to selection criteria (primarily, FEFO). If you want to overide this:
- If a donated stock line is not the first expiring and you do want to issue it, you will need to manually select it.
- If a donated stock line is the first expiring and you don't want to issue it, you will need to manually de-select it.
Reporting
Obviously, one of the points of entering all this donor information is to be able to report on it. When the donor tracking preference has been turned on, many of the stock based report filters in mSupply will have an additional donor filter added to them. Simply enter the donor filter settings you need, as appropriate, to filter the reports accordingly.
| Previous: 7.05. Custom stock fields | | Next: 8. Issuing Goods |