7.02. Goods receipts
Entering goods received
If the receiving store is receiving goods from another virtual store in your mSupply system, in response to an Internal Requisition (Purchase Order) from that store, the Goods Receipt will be created automatically - refer Receiving the goods (requesting store). Open this automatically created Goods Receipt. Do not create a new Goods Receipt!
Choose Supplier > New goods received and this window appears:

There is some read-only information at the top of the goods received note that cannot be edited:
- Store: The name of the store the goods received note belongs to.
- Goods received ID: This goods received note's number. The number is automatically incremented and assigned when the goods received note is first created and is unique within a store. Note that goods received notes in different stores could have the same number.
- Created by: The name of the user who created the goods received note.
- Modified by: The name of the user who last modified the goods received note.
- Entry date: The date the goods received note was created.
- Purchase order: The number of the purchase order the goods on this goods received note were ordered on. It is a link and clicking on it will open the purchase order.
- Supplier invoice: The number of the supplier invoice produced from this goods received note. The number is filled in after the goods received note is finalised. Again, it is a link and clicking on it will open the supplier invoice.
- Status: The status of the goods received note:
- nw = new, the goods received note is not complete yet and is still editable
- fn = finalised, the goods received note is complete and is no longer editable
If you have goods receipt authorisation set up in Store Preferences there will be an extra Authorised column - see the Authorising items on goods received notes section below for more details.
Selecting the Purchase Order
In the Supplier field (which displays Search Purchase Order when it first opens), enter the first few characters of the name of the supplier from whom the order has been received. To display all Purchase Orders awaited, enter @ in the Supplier field. (This has been done in the example shown below):

- Supplier column: The name of the supplier the purchase order was sent to.
- PO reference column: The value entered in the Reference field on the purchase order.
- Tender reference column: The reference to the tender this purchase order came from. Will only have a value if this purchase order came from a tender.
- Our PO ID column: The number of the purchase order in mSupply.
- Comment column: The value entered in the Comment field on the purchase order.
If there are a lot of purchase orders in the list you can shorten it by typing something in the Type here to search field. The list will then only show purchase orders for suppliers that have a name which contains what you typed.
From this screen select the entry which matches the purchase order for which you have received stock, either by double clicking on the entry, or by highlighting the entry and clicking on the Ok button.
The New Goods Receipt window reappears with the supplier field and some other details completed.
Filling in general details
At this point you should fill in the:
- Supplier reference field with, for example, the delivery note number
- Comment field with any extra information you need to record about the delivery
Adding items from the purchase order
Next, you should click on the Add from Purchase Order button to add the items which have arrived to the goods received note. Clicking the button brings up the Choose order lines… window:

This window displays the goods on the Purchase Order, and you may either select each item separately (click on a single item), the entire order (click on an item then press Ctrl+A on the keyboard, or Cmd+A on a Mac) or something in between (use Ctrl+click to select individual items and add/remove them to/from the selection and/or Shift+click to select a range of items) to enter the details of the items received!
If you're trying to find a particular item in a long list you can also type the start of the item's name or code into the search box at the top and the list will be filtered to show items which have a name or code starting with what you have typed.
mSupply does allow you to create a Goods Receipt for stock for which you have already received all of the ordered stock, that is, Remaining (outstanding) quantity = 0).
In any case, when you have selected the items to receive, click on the Use button.
Adding un-ordered items
Occasionally goods may be received which were not ordered; when this occurs, click on the Add an un-ordered item button and select the item before proceeding. There is a user permission that can be set to prevent users being able to use this button (see the 25.25. Managing users page for details)
Goods receipt line entry
The lines you have selected are added to the goods received note and you will see them in the table but with no batch, expiry date, location or quantities:

No information about the batches or number of packs that have been delivered has yet been entered. You can set the Quan column (number of packs) to the number remaining to be delivered by selecting the appropriate lines (Click with Shift and Control and Ctrl+a all work as usual) and clicking on the Apply suggested remaining quantity button.
To enter the batch and quantity information for each line, double-click on the first line in the table and the Edit goods received line window will open, populated with the first item:

Let's have a look around the window and see what information is being displayed:
- Item: the name of the item we're entering the information about. At the end of the field is the item's code.
- Remaining quantity to receive: the number of packs we're still waiting to receive from the supplier on the purchase order this goods receipt note is for. This is 0 on the screenshot because, by default, mSupply creates a line in the table which contains all the outstanding stock.
- packs of: the pack size (number of items in the packs) we're waiting to receive. So, the total number of individual pieces of this item we're waiting to receive is Remaining quantity to receive x packs of.
- table: contains all the lines of the item that we're receiving from the supplier. Click on any of the cells to edit them (they are all editable except the Total quan column because this is a calculated column and equal to Quantity x Pack Size). There will be a separate line in this table for each batch or location (and manufacturer if the preference to record manufacturer is turned on - entering a manufacturer is the same as entering a location i.e. enter the first few characters of the manufacturer's name and press the Tab key on the keyboard and select the manufacturer you want from the list displayed or click on the New button to create a new manufacturer). If there are any of the first 4 custom fields described on the 16.01. General preferences page turned on then columns for them will be displayed after the expiry date picker column and you can enter values for each one there.
- Expiry date picker: this is in the column just to the right of the Expiry column. Click on it to select the expiry date from a date picker:
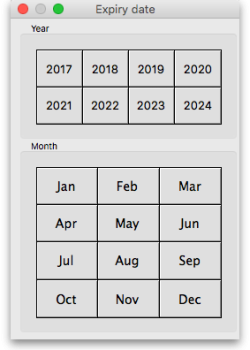 Click on a month and year in either order and mSupply enters the last day of that month in the expiry date column. You can manually edit the date (or manually enter it without using the picker) if you don't want the last day of the month.
 - Volume per pack: the volume per pack for the line currently selected in the table. Will be set to the item's default volume per pack if it has one, otherwise 0.
- Weight per pack: the weight per pack for the line currently selected in the table. Will be set to the item's default weight per pack if it has one, otherwise 0.
- Total line weight: the total weight of this line in the table (= Weight per pack x Quantity column figure for the line)
- Total capacity: the total volume the location for the selected line in the table has. 0 if the location is not set for the line or has no volume set.
- Available space: the available space in the location before putting this line in it.
- Space required: the volume this line requires (= Volume per pack x Quantity column figure for the line). So compare this with the Available space figure to see whether the line will fit in the location selected.
- Comment: Anything you want recorded for this line. Anything typed in here will appear in the Comment column in the table.

If you have set a note for this item on the purchase order (see Notes section in Editing Purchase Order Lines) then an extra Note section will appear at the bottom of the window:

Until the Note has been actioned checkbox is checked, lines for this item will appear in red on the overall goods receipt window (see below).
To add lines for new batches or locations, click on the Add line or Duplicate line line button - they both add a line, Add line adds a blank one, Duplicate copies the line currently selected in the table. No surprises but, to delete a selected line, you click on the Delete line button!
You can edit a row in the table by clicking on the various cells. It is best to click on the left-hand Quantity cell and adjust that one first. Then you can use the tab key to advance to the next cell in the row.
Let's take the following example for amoxycillin 500mg caps.
| quantity | pack | batch | expiry |
|---|---|---|---|
| 648 | 1000 | b1234 | 30/06/18 |
| 324 | 1000 | b1235 | 30/11/18 |
Let's say there are 12 packs in a box, and 27 boxes on a pallet, so you have 2 pallets of the first batch and one pallet of the second batch. You can only put one pallet in each location, so the first row will be split into two.
Enter the details into the first row as above.
1. If you are entering details for an item which has its “Expiry date required on receive” preference set (see here for details) and you do not enter an expiry date for any of the item's batches then, when you click on the OK or OK & Next buttons, you will be shown a warning message and you will not be able to close the window without entering an expiry date for each batch or deleting all the item's batches.
2. If you receive more than was ordered on the purchase order, when you click on the OK or OK & Next buttons an alert message will appear asking you to confirm the receipt.
Location management when receiving goods
If the items you are receiving have had a location and volume entered when the Purchase Order was created, these will be transferred to the goods receipt. If you want to edit these details you can do so by double-clicking a line and either changing the volume or the location.
You can then choose a different location by entering it in the location field, or enter the start of a location code and press tab to get a list of matching locations.
When you get to the location column, we type m then press tab. you are shown the location choosing window with locations that match “m”

Note we have then clicked the Show empty radio button, as we are putting away a whole pallet, and pallets only go in empty locations. The Show available radio button shows locations that have enough spare capacity to take the volume of the line we are receiving. We then double-click on the location to choose.
If the item you are receiving has a default location set for it, this will have already been filled in when the line was added to the purchase order. Default locations should be set if the same item is always put in the same place, otherwise leave it blank. In the current example we've assumed it has not been set for each item.
Now we have entered all details for the line, we can click on the row to highlight it, then click the Duplicate line button to create another row the same without entering all the details again - you then only need to click on the location column on the newly duplicated row, and you can edit the location to find another empty location for the second pallet.
Once done, you can duplicate the row again, and this time you have to change the batch (to b1235), expiry (to 30/11/18) and location.
Then your window should look like this:

Note that the bottom row of the table shows you the total number of packs and total quantity being received.
If all the details are correct click OK (or OK & Next if you selected more items to be added from the purchase order) or click Cancel if you want to abandon this entry. You will be taken back to the window showing the overall goods receipt, this time including the lines you've just entered:
Review overall goods receipt

All the items you've selected have been added to the goods receipt. The quantity is set to the total remaining to be received for that item.
Double click on each item in turn and the window allowing you to enter quantities, pack, batch numbers, expiry dates.
Red line in the Goods Receipt?
If you see lines show up in red on the Goods Receipt that means that you have set a note that must be actioned for that line on the Purchase Order (see Notes section of Editing Purchase Order lines for details).
Once you have actioned the note, the lines will return to their 'normal' black colour.
The right hand side of the window shows you the shelf location, total capacity and available space for a particular item in a particular shelf location. You are also shown the volume or space required for a particular item. The small “refresh” icon the right inserts the default location for the items.
 The volume of the shelf location is now reduced to reflect the space consumed by our newly added stock item.
After entering the details for each item, you can click on OK & next to proceed to editing the next item.
Finalising goods received
The next step in receiving your goods into mSupply is to create a supplier invoice (that is where you will enter pricing information if you need to). This is done automatically for you when you finalise the goods receipt.
When you have entered all the goods you have received onto the Goods Receipt note, you finalise it by checking the Finalise box in the bottom left hand corner of the window and clicking on the OK button. Only do this when you are sure the Goods receipt note is an accurate record of what you have received and contains all the information you want in it because finalised means finalised and you won't be able to change it afterwards (just like everywhere else in mSupply!).
Finalising a Goods Receipt will update the received (and outstanding) quantities in the Purchase Order for any goods receipt lines which came from a Purchase Order.
Your goods are not yet entered into stock in mSupply - that only happens when the supplier invoice is confirmed. The initial status of this automatically created supplier invoice is controlled by the “When finalising a Goods Receipt” store preference - see here for details.
If you have the store preferences set to force supplier invoice authorisation, you will not be able to confirm supplier invoices (and therefore bring items into stock) until they have been authorised. See here for details.
If the Items received on a purchase order must be within a minimum expiry date preference is turned on (see the 6.01. Ordering stock from suppliers page for details) then, when finalising a goods received note, a check is made to see whether any of the lines have an expiry date that is before the date set on the purchase order. If they do then you will be shown a message telling you which lines have too short an expiry date and you will not be able to finalise the goods received note until the expiry date is changed or the line is removed from the goods received note.
Authorising items on goods received notes
When you have goods received note authorisation turned on in Store Preferences you will see an extra “Authorised” column on your goods received note:

The column will contain a checkbox for each batch you add to the goods received note. If a batch is authorised then check its box in the Authorised column (only users with the Can authorise goods received permission can check these boxes). You can enter any notes on batches which fail authorisation in the Authorisation comment box at the bottom. When you finalise your goods received note only the batches which have been authorised will be put on the automatically created supplier invoice. In this way you have a complete record of what was received, what was satisfactory and what was sub-standard.
Viewing existing goods receipts
Choose Supplier > Show goods received…
A standard mSupply find window is shown:

Click the OK button to view the last 15 goods receipts, or enter a value to find in the lower field, and choose the field you are searching for in the left-hand drop-down list (if you enter something in the lower text box this filter only will be used and the top one - number of recent goods received notes - will be ignored). This window then opens to show the goods received notes that match your filter selections:

New button: Creates a new goods received note
Find button: Opens the search filter window again, allowing you to make a new search for goods received notes.
Viewing a related purchase order or supplier invoice
Accessing the related Purchase Order when the Edit goods received window is open is achieved by clicking on the blue “Purchase Order” on the right side.

Similarly, if you want to see the linked Supplier Invoice then click on the blue “Supplier Invoice”.

If you have turned on any of the custom stock fields in store preferences they will be displayed as columns (between the Batch and Expiry columns) in the list of items and the information you entered for these fields when the stock was received will be shown in the appropriate cells. If you double-click on one of the supplier invoice lines to edit it (assuming they are editable!), you will see the custom fields and be able to enter information into them.
Outstanding purchase order lines
Outstanding PO lines are those which you are still waiting to be delivered from the supplier (also known as your pipeline stock). These will only be updated when a Goods Receipt is finalised. You can view them by either:
- Clicking on Show outstanding PO lines on the Navigator's Supplier tab or
- From the Supplier > Show outstanding PO lines menu item
Other tabs on a goods received note
All the functionality described above has been on the General tab. There are others!
Documents tab
The Documents tab on a requisition enables you to save documents and other files relating to the goods received note. The tab looks like this:

The table shows you all the files currently uploaded to this goods received note.
- Upload document button: Click this to upload a document to the goods received note. This will open a window enabling you to search for and select the file on your computer. After you've selected it, click on the Open button to upload it. If you upload a file with the same name as one already uploaded, mSupply will upload it as a new version of the already uploaded file.
- Delete document button: Select a file in the table by clicking on it and click this button to remove it from the goods received note.
- Download document button: When you click on this button you are presented with two options:
- Download: this will download the file to a location you select on your computer.
- Download and open: this will download the file to a location you select on your computer and then attempt to open it using the default application on your computer for that file type. If there is no application associated with the file type on your computer then mSupply will tell you that the file could not be opened.
Log tab
The log tab displays all the log entries that have been made regarding this goods received note. All log entries are stored in the mSupply log (see the 25.19. The system log page for details) and this tab will display all the log entries in there which were made for this goods received note.
Viewing and editing supplier invoices created via goods receipts
A supplier invoice will be created automatically once the Goods Received note is finalised.

Supplier invoices created via goods receipts differ slightly from standard supplier invoices.
Price tab
Here, you can add in any extra currency related charges
- in the supplier's currency in the Extra Foreign Currency charge field , and
- in your local currency in the Local charges field and mSupply will automatically calculate the updated invoice price.
Here's an example of how mSupply will do this with a currency “YXB” whose rate is YXB 7 = USD 1
| Item | Foreign Price | Quantity | Foreign Currency Price Extension | Local Price | Local price Extension |
|---|---|---|---|---|---|
| Amoxycillin 250mg tabs | 50 | 10 | 500 | 350 | 3,500 |
| Paracetamol 500mg tabs | 300 | 5 | 1,500 | 2,100 | 10,500 |
Now we add USD300 of freight charges and YXB1400 of import duties:
- The total USD value of the order is USD2000, so 15% must be added to each line to account for this
- The YXB1400 is equivalent to USD200 in local charges, so 10% must be added.
- Therefore a total of 25% is added.
| Item | Foreign Price | Quantity | Foreign Currency Price Extension | Local Price | Local price Extension |
|---|---|---|---|---|---|
| Amoxycillin 250mg tabs | 50 | 10 | 500 | 437.5 | 4,375 |
| Paracetamol 500mg tabs | 300 | 5 | 1500 | 2,625 | 13,125 |
Currency and currency rate
Select the supplier currency from this drop-down box, and enter the current exchange rate in the Currency rate field . Note that currencies must first be entered using the menu item Special>Currencies. See Currencies...
Extra foreign currency charges
In the supplier's currency, enter any extra charges from the supplier.
Local charges
Enter any local charges, in your local currency.
Application of charges
mSupply distributes any extra charges proportionally according to the invoice value of each item on the invoice; this is done automatically
MoneyWorks tab
If you are using the MoneyWorks accounting software (which is highly recommended), clicking on this tab allows you to export the invoice details to MoneyWorks. Elsewhere in this guide instructions on setting up mSupply to work with Moneyworks are to be found. See Moneyworks.
| Previous: 7.01. Receiving goods (supplier invoices) | | Next: 7.03. Editing pack sizes |