This is an old revision of the document!
10.06. Abbreviations for dispensing
Abbreviations are the short codes you can use to quickly enter the patient directions for a medicines when you dispense it to them.
When you are issuing an item you can mix abbreviations and your own text to add common directions quickly.
It is worth mentioning that abbreviations may also be used in other situations e.g. if a significant number of customers live in the same locality, an abbreviated form of their address could be employed. All abbreviations are created in the same way as described below.
To access the functionality, click on the Special > Abbreviations menu option. The following window opens, showing a lost of all the current abbreviations that have been entered:

As usual, you can sort the list by clicking on the column headers.
Add an abbreviation
If you change an abbreviation or add a new one, you will see the change immediately (v317 or later), but in a multi-user environment other users will have to log out and log in (use Switch user to do this quickly) to see the edited or added abbreviations.
To add an abbreviation, click on the Add button and the following window opens:

Enter the abbreviation that you will type in the Abbreviation field and the text that it will be expanded to in the Expansion field. When you're done click on the OK button.
Do not use actual words in your abbreviation, or else attempting to type the word will result in the expanded text appearing on your label!
Note: your abbreviations cannot contain the underscore (_), period (.) or comma (,) characters.
Any non-printable characters entered before or after the abbreviation will be removed. Any entered in the abbreviation will be replaced with an underscore (_).
Edit an abbreviation
To edit an abbreviation, double-click it in the list. A similar window to the add abbreviation window will open, pre-populated with the abbreviation's details:

Edit the abbreviation and expansion as required then click on the OK button to save it.
Delete an abbreviation
Select a single abbreviation in the list by clicking on it then click on the Delete button. You will be asked to confirm the deletion - if you do, it is deleted from the list.
Print a list of abbreviations
Click the Report button to construct a simple report listing all abbreviations. This report can be previewed or printed.
After clicking on the button, you will be shown the report editor window. In older versions of mSupply it looks like this:

- Double-click on Abbreviation
- Double-click on Expansion
- Right-click on Detail and set font size to 8 or 9
- You can use the lines on the column headers to adjust column width
- Choose File > Generate to print the list
In newer versions of mSupply, the report editor will look like this:

Click on the Fields button and then double-click on abbreviation then expansion in the left hand Available fields section to move them to the Report columns section like this:
Click on the OK button then click on the Execute button to run the report and print it out.
Importing abbreviations
The procedure for importing a file containing your abbreviations is found here.
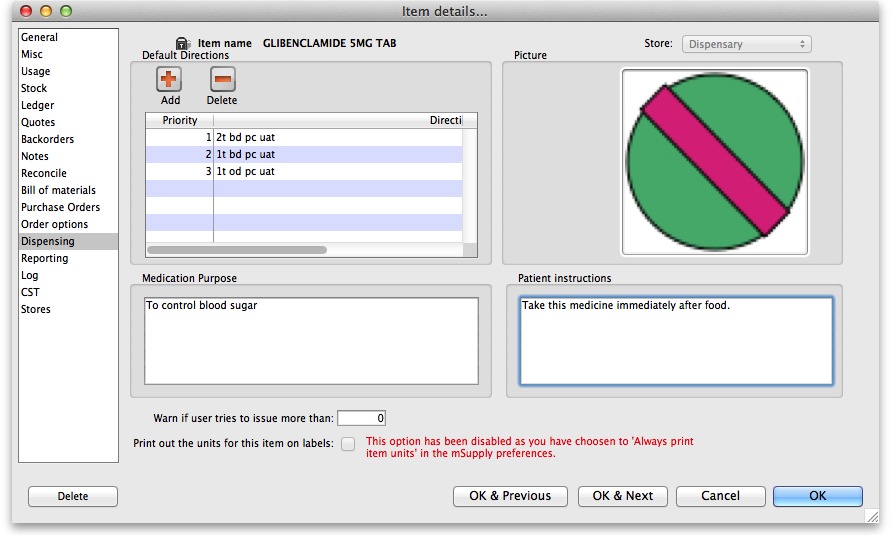
Item default directions
Once you have entered abbreviations, don't forget to enter the default directions for all common items - the default directions are the abbreviations that are used by default for an item when it is added to a prescription. Instructions are here.
| Previous: 10.05. Prescribers | | Next: 10.07. Diagnoses |
10.07. Diagnoses
The Diagnoses functionality allows you to quickly save a diagnosis on a patient’s prescription.
Viewing and Adding Diagnoses
Select the Diagnoses icon from the Special tab on the mSupply navigator window.

This will open the Show diagnoses window with a list of all diagnoses.
- The list will initially be ordered by date created. However, the list can be sorted by the ICD code or ICD description by clicking on the respective column header.
- You can use the search box to search for a diagnoses using either an ICD code or the ICD description.
Standard mSupply search functionality applies when searching for diagnoses.

The list can be filtered using the Show drop-down box on the top right of the window:
- All: active and inactive diagnoses.
- Active: diagnoses that have not yet reached their specified valid till date.
- Inactive: diagnoses that have passed their specified valid till date. Inactive diagnoses will not appear in other windows, and cannot be saved to a patient prescription.
Click on the New diagnosis button on the top-left of the window to add a new diagnosis. This window will open:

Enter the ICD Code and Description. Please note:
- Both code and description boxes are mandatory.
- mSupply does not check the data entry in these boxes. Please double-check that you have entered the information correctly.
Enter the Valid till date. You can use the date selection tool by clicking on the calendar to the right of the box.
- The date entered determines how long the diagnosis will remain active. After this date the diagnsis will be automatically made inactive.
- The valid till field is non-mandatory. Leaving this field blank results in the code remaining permanently active.
Diagnoses on Prescriptions
You must first turn on the Allow users to choose diagnoses on prescriptions store preference to allow diagnosis selection on prescriptions. See the 25.08. Virtual stores page for details.
When this preference is turned on, when you create a new prescription you will be able to select a diagnosis using a drop-down list. The drop-down list will display and allow selection of any active diagnosis:

The diagnosis selected will be saved against the prescription together with all other information provided in the Prescription entry window.
| Previous: 10.06. Abbreviations for dispensing | | Next: 10.08. Label printing preferences |
10.01. Dispensary mode
Dispensary mode allows you to issue medicines to individual patients. It is ideally suited for pharmacies, clinics, hospital dispensaries, and facilities where medicines are supplied to individual patients.
In dispensary mode:
- Prescription data can be entered into mSupply including:
- Item directions which can be quickly selected from standard abbreviations, and edited as necessary. Item directions can be printed in languages other than English.
- Labels can be printed with:
- Item description and quantity issued
- Patient name
- Prescriber name
- Directions
- Institution name
- More…
- Patient histories are recorded, allowing repeat prescriptions to be:
- Prescription payments can be recorded
- Use of Dispensary mode depends on your mSupply registration type. Contact Sustainable Solutions if you wish to upgrade your registration.
- Regardless of mode, each user can only use those functions for which they have permission.
- In client-server versions of mSupply, different users can be logged in in different modes at the same time, allowing you to dispense to patients and supply wards, stores, clients or cost centres simultaneously.
- Users whose permissions allow them to operate in either Store mode or Dispensary mode may change from one to the other by pressing Ctrl+2 on the keyboard. Re-entry of the user's password is not necessary.
Activating dispensary mode
Prior to version 3.5 you controlled dispensary mode for each user, and had to choose File > Edit users…
Now it's a setting for a store.
- Choose Special > Show stores… from the menus.
- Double-click on the store you want to set to dispensary mode.
- Select Dispensary in the drop down list next to the store's code field.
- Log out of the store and log in again to activate dispensary mode.
Setting dispensary mode preferences
Choose File > Preferences > Dispensary mode tab to set preferences. See the 16.01. General preferences page for details about all the preferences but here are some important preferences to consider:
- Ensure the Show direction entry in dispensary box is ticked. This allows users to enter patient directions for dispensed items.
- Specify what information will be printed on dispensing labels.
- Specify if you want a receipt to automatically print on labels.
- Specify if you want mSupply to auto-generate patient codes (alternatively, the user must enter a unique code for each patient).
- Specify if a prescriber must be entered for each prescription.
- Specify if you want to be able to receive payments from the prescription window.

What changes in dispensary mode?
Most of the things you can do in store mode are also available in dispensary mode. The main differences are:
- The Customer menu becomes the Patient menu; and
- The Customers tab on the navigator becomes the Patients tab, which has a slightly different selection of icons
- The windows displayed are appropriate for dispensing medicines to individual patients. For example, a patient's dispensing history is maintained and you can also record patient notes (e.g. allergies).
Note that a facility using dispensary mode can distribute stock to both patients and customers (e.g. hospital wards, outreach programs), and can still handle customer requisitions.


| Previous: 10. Dispensing Goods | | Next: 10.02. Prescription entry |
10.03. Patients
Updated version 5.01
In mSupply, patients are a type of name. They are a special form of customer that can have first names, last names, genders and dates of birth. You dispense stock to a patient on a prescription, rather than distributing it to a customer on a customer invoice.
Entering a new patient
You can enter a new patient by clicking on the Patient > New patient… menu item to by clicking on the New patient icon on the Patient tab of the navigator.
If you are already creating a prescription and discover the patient is missing you can click on the New patient button on the prescription (Shortcut: Ctl-Shift-P):

Either way, the same window will open:

- Code and Last are the only required fields but all applicable fields should be completed so that it is easier to recognise the patient next time. Please note that if there are non-printable characters before or after the First, Last or Code they will be removed. Any non-printable characters in the First, Last or Code (and spaces in the Code) will be replaced with an underscore (
_).
- The patient code will be filled in automatically for you if the Auto-generated patient code preference is turned on (see Setting dispensary mode preferences for details).
If the new patient's date of birth is known, it should be entered, otherwise an entry should be made in the Age field; for a patient aged 18 months, valid entries in the Age field may be in one of 3 formats, namely 18m, 1.5, or 18/12.
- When a patient's code is known, that patient's record can be rapidly displayed. Note also that the Male radio button is checked; if you are entering details of a female patient, remember to check the Female radio button!
- Custom fields are available for storing extra information relevant to your situation.
Viewing and editing patient details
You can view a patient's details from a prescription; just click on the patient details button next to their name when they have been selected on a prescription (Note that this button is not enabled until a patient has been selected on the prescription):

If you are not entering a prescription then you can select the Show patients icon on the Patients tab of the navigator or click on the Patients > Show patients menu item:

Enter the details you want to search for the right patient (or leave everything empty to show a list of all patients) and click the Find button.
You will be shown a list of matching entries (double-click on the one you want to view or edit), or taken directly to the detail view if only one patient matches the values you entered:

Whichever way you access the patient's details, the same window opens:

Home store
Updated version 4.10 Updated version 4.12
As of version 4.10, you'll notice that at the top of the details window is the Home store. For new patients, the home store is the store the patient was created in; for previously existing patients the version upgrade will assign the home store to be the store where the patient was most recently issued a prescription.
- A patient's details can only be edited in any dispensary store which is active on the same site as the home store (i.e. on their Home site). This ensures that a patient can only be edited in one location at a time.
- In version 4.10 and 4.11, a patient's home store cannot be changed. However, from version 4.12 it will be possible to edit the home store (if you're logged into the primary server). Doing this will make the patient's records (repeats, patient medication records and insurance policies) available to the new home site. If the patient has previous prescriptions from stores which are visible in the new home store, these will also be made available to the new home site, but will only show up in the patient's history if the Share patient prescriptions over stores preference is turned on (see setting_dispensary_mode_preferences). Note that you will not be able to edit a patient's details if their record is currently waiting in the sync queue to be transferred to another home store. A “Not editable pending transfer to XX” (where XX is the new home store) message will show at the bottom of the screen and all fields will be disabled if this is the case.
- You can create prescriptions for a patient in any store they are visible in, not just their home store, but repeats can only be processed in any dispensary store on the home site.
- If you're on the primary server, you can make a patient visible in other stores (just like any other type of name) - doing this will make the patient's records (repeats, patient medication records and insurance policies, but not their prescription history) available to the store.
The patient detail window tabs
General tab
The date of birth field for a patient uses the same date format as your computer's operating system. If you enter an age, the date of birth is guessed and a patient comment is added to mention that the date was guessed so you know it's not accurate.
Hold do not issue: If this is checked then no stock can be dispensed to the patient
Credit limit: This is the maximum debt that a patient's account can have when the payments module is activated. Enter as a number greater than zero. They will not be able to be dispensed a prescription without paying for it when they reach this limit.'
If the payments module is not activated, the value in this field has no effect.
Prescriptions tab
Here each prescription created for the patient in this store is shown. Double-clicking a row in the list will open that prescription.
Notes tab
Any notes/events you enter in the notes tab will display each time you enter the patient name in the Prescription entry window. These notes can be used to remind you of patient Preferences for certain dosage forms, or drug sensitivities.

Before you add an event for a patient, you need to make sure that patient events have been set up.
Patient events
This is the term mSupply uses to denote any item of information relating to a particular patient; for example, you may want to record the patient's weight, the patient's blood pressure, any allergies from which the patient suffers, vaccination records, etc. - a wide range of information relating to a particular patient may be recorded here.
First, some definitions of patient events need to be made;choose Patient > Show Patient events , then click the New button.

One patient event is already defined, the code is `NT', the description is `Note', and the type is Text; you can also have events of type Numeric or Boolean . For example, to create a patient event recording a patient's weight, the completed Add patient event window would look like this:

A further example, this time using the Boolean type - i.e. where the options are limited to two, `Yes' or `No' - could be to identify patients who have insurance cover to meet the cost of their prescriptions; for this event, the Add patient event window, once completed, would appear like this:

Once a number of patient events have been defined, choosing Patient > Show Patient events, will produce a window like this:

Now it is possible , using the Notes tab of the patient details window, to add individual items of information to the profile of any patient.

View the record of the patient in the normal way (from Patient > Show Patients, enter the patient's name & double click the appropriate patient from the 'names output' ) , and select the Notes tab. Click on the Add event button to bring up the window shown above.
In the Event field, Search event type appears by default. To display all the events you have defined so that you may choose the one you require, enter the character “@” (without the quote marks), press the TAB key, and make your required selection from the list.
Alternatively, you may enter a word from the description of the event - e.g. if you have defined Patient's body weight as an event, you may enter the start of the event name or code (e.g. pat ), and that event will appear in the Event field. If more than one event matches what you have entered, a list will displayed for your to choose the event you want to enter.
Should you wish to add any note or comment, you may do so by moving the cursor into the Note area, clicking, then typing your entry. You can customise the note in terms of when it will be displayed on screen etc. as described in the Items chapter of this guide. Here's the link - The Notes tab.
After a period of time, a patient's notes may look like this:

The default view shows all patient events, but you have the ability to vew single events by selecting the event code from the drop down menu Patient events under Show
A new event may be added by clicking on the Add event button, and an event which is no longer of any relevance may be deleted by clicking on the Delete event button.
Events may be edited by selecting the specific event, double clicking on it, when the Edit patient event window appears.
History tab
This tab shows a list of all the items dispensed ot this patient. Double-clicking an item will open the prescription it was dispensed on.
PMR (Patient Medication Record) tab
See the separate section on this here Patient Medication Records
Backorders tab
If you are using a backorder system and you have any backorders for this patient, they will show here.
Store Visibility tab
The tab shows which stores the patient is visible in. Only when the visibility checkbox is checked will the patient be visible to that store. The patient must be visible in a store to be able to create prescriptions for them in that store.

Visibility for patients created on a synced system
Remember that in a synced system, patients can be created in any dispensary on any sync site. This is unlike ‘normal’ Names (customers, suppliers, etc.) that can only be created on the primary server.
When a patient is created on any site, it will be made visible in:
- Its home store (i.e. the current store), and
- All other stores of type “Dispensary” which have their store preference Patients created in other stores not visible in this store switched OFF.
Data that syncs with a patient:
- Their insurance policies
- Their repeats (Note, other sites won't be able to see and use them)
- Their PMR records
Data that does NOT sync:
- Transactional/prescription history
- Patient events
While it can be used to make all patients visible across all dispensary stores across all sync sites, use caution with the store pref Patients created in other stores not visible in this store. Doing so does not scale well on large systems if it is turned OFF for many stores as it causes exponential data growth and sync traffic:
- (50 stores) x (100,000 patients) = 5 million visibility records
- Initialising a site with 3 dispensaries with the pref off will require syncing 100k patients, and 300k visibility records.
- It does not include prescription data. If it did it'd only add to the above.
Once a patient has been created in a dispensary, its store visibility can then be amended in this tab.
Merging patients while dispensing
Updated version 4.12
While dispensing, you may observe that a patient has been inadvertently entered twice. For example:

When the Choose patient window appears, you can highlight the two patients to be merged, then clicking on the Merge button displays this window:

Here you need to decide which record should be kept, and which one should be merged, and check the appropriate radio buttons. This combines the information in the record to be merged with the information in the record to be kept.
Note that, from version 4.12, merging patients will be restricted to only those having the same home site - see home_store.
| Previous: 10.02. Prescription entry | | Next: 10.04. Prescribers |
10.04. Patient insurance
Updated version 4.10
Insurance policies are used by patients to pay part or all of the cost of a prescription.
Insurance policy details for a patient are set up on the Insurance tab of the patient details window. These policies are then available for selection when receiving payments from the prescription entry window (see the 11.03. Prescription payments and credits page for details).
At the moment, this functionality is only available in Côte d'Ivoire (see Insurance for a description of how it is used). Please contact us if you need to use this functionality.
Insurance providers
Insurance providers are the institutions which provide the insurance policies for patients. They are recorded by selecting them from a drop down list when adding an insurance policy to a patient. This functionality is for managing the contents of that drop down list.
To see a list of all the current insurance providers, choose the Special > Insurance providers… menu item. This window opens:

To add a new provider click on the ![]() button. This will add a new entry top the end of the list in the table with the Name “new provider”. Edit the values for this entry in the fields at the top:
button. This will add a new entry top the end of the list in the table with the Name “new provider”. Edit the values for this entry in the fields at the top:
- Name: the name of the insurance provider. This will appear in the drop down list for the user to select when adding an insurance policy to a patient
- Prescription Validity Expiry (days): The maximum number of days that can elapse between a prescription being created by the prescriber and being presented to the mSupply dispenser and the provider's insurance policy can still be used against a prescription's cost. 0 days means no expiry. mSupply will not allow an insurance policy to be used to pay for a prescription if this number of days has been exceeded.
- Comment: Anything you wish to remember about this provider. Will not be displayed anywhere else.
- Is active: Check this if the insurance provider can be used for assigning to new insurance policies for patients. If this is unchecked, the insurance provider will not appear in the drop down list when recording new insurance policies.
To remove a provider click on the ![]() button. This will delete the currently selected provider, but only if you have not saved it before. If a provider has been saved, edit it and uncheck the Active checkbox to remove it from future selections.
button. This will delete the currently selected provider, but only if you have not saved it before. If a provider has been saved, edit it and uncheck the Active checkbox to remove it from future selections.
To edit a provider select it in the list by clicking on it and then edit the details shown in the Name, Prescription Validity Expiry (days), Comment and Is active fields.
The Save button will save any new providers you have entered and will also close the window.
The Cancel button will close the window without saving any new providsers or unsaved edits.
| Previous: 10.03. Patients | | Next: 10.05. Prescribers / Clinicians |
10.10. Patient medication records
Added: Version 3.11
Introduction
A Patient Medication Record (PMR) is a way of recording all the medications a person is using, whether or not they were dispensed by you. The record contains useful information for the patient such as
- The dosage in a clear easy-to-understand format.
- An (optional) picture of the dose form (tablet, capsule, etc)
- The medication's purpose.
- Common instructions for taking/using the medicine, which may be customised for each patient
Setting up items
Before adding items it is good to set up the standard purpose, instructions and item photo for common items at least. Once set up, you can add these to a particular patient's PMR with just the click of a button.
- Find the item you are interested in and go to the dispensing tab
- Enter purpose and instructions. Both these fields can take as much text as you wish to enter.
- Add a photo by either dragging a photo from another application or pasting a photo from the clipboard.

mSupply will automatically resize large photos when you add them- there is no need to resize photos yourself first.
Default direction
On the default direction list, you can add a combination of abbreviation which can be used to fill in the direction while issuing drugs to patients.
To set up abbreviation, view 10.05. Abbreviations for dispensing

Add This is to add default directions. You may combine multiple abbreviation code to make up a sentence. You may even add a full sentence.
Delete This is to delete direction.
Direction for items that were added above will be available when dispensing to patients.

Note the Drop down list will now be populated by the default directions. Once a direction is chosen, mSupply will expand valid abbreviation to sentences. It is possible to have more than one set of direction as options.
Adding items to a PMR
There are 2 ways of adding items to a PMR
- From the patient history tab:
- Highlight the items from the patient's history you wish to add, then click the Add to PMR button.
- The record will be shown on the “PMR” tab if you switch to it.
- Note that on the PMR tab you still have to double-click on the added record and fill in the dose, instructions etc.
- From the Patient details PMR tab
- Here you can add any item that is in the mSupply catalogue.
- For example, a patient might be regularly taking paracetamol or aspirin that they buy themselves. You can add such items here.

- To add an item, click the Add item button. You will be shown a new window:
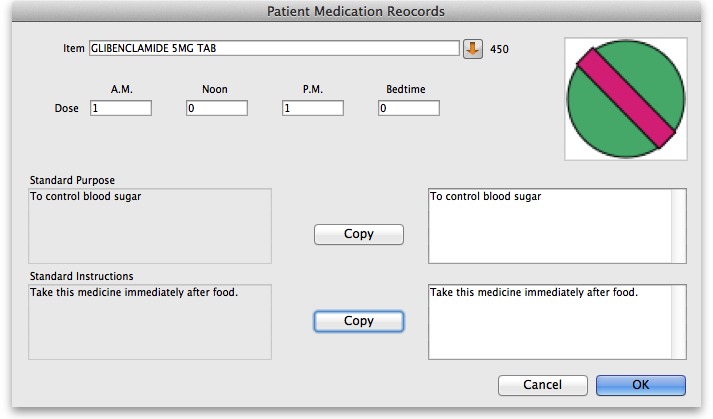
- Item name: type the start of the item name and press <tab>, then select from the list
- Dosage: Enter the number of tablets/drops/whatever to be taken/administered morning, noon, evening and bedtime.
- Purpose: If the item has a purpose entered, click the copy button to copy it to the right-hand box. Here you can edit the details if you want to.
- Instructions: If the item has instructions entered, click the copy button to copy them to the right-hand box. Again, you can edit the details if you want to.
- Click OK when you're done, or cancel if you decide not to add a record.


Editing a PMR entry
To edit a PMR, double-click the entry you wish to edit, change details, and click OK to save the changes and close the window.
Deleting a PMR entry
To delete a PMR entry, highlight the record(s) you wish to delete, then click the delete button. (Do be careful- it's not reversible!)
Printing a PMR
Setting up printing preferences
When a PMR is printed, it has a header and footer. These are set up by choosing File > Preferences and then clicking the Patient Medication tab.

Note that you can style the text in these boxes by selecting text and right-clicking on your highlighted text to get a contextual menu to apply font styles, colour and size.
Printing a PMR
Simply click the Print button. Note that you do not have to highlight records- all records will be printed.
Currently we have included a single PMR printing form in mSupply. We are happy to include others- send us your designs.
| Previous: 10.09. Warnings | | Next: 10.11. Printer setup for Remote Desktop Client |
10.12. Patient type and Ward setup
Patient types and Wards are two fields that are enterable on a prescription. But before they will appear on a prescription for display, you must set them up. Have no fear, the instructions are here 
Patient types
Patient types are actually transaction categories. To set them up, choose Special > Transaction categories… from the menus or click on the Transaction categories icon on the Patient, Customer or Special tab of the Navigator:

On the Transaction categories window that opens, click on the Transaction type drop down list and select Prescriptions (2):

Click on the New button to add one or double-click one already in the list to edit it. This window opens (populated with the current details of the category if you're editing one, empty if you're creating a new one):

- Master category: You can ignore this, it isn't used for patient types.
- Category code: Enter a short code for each patient type. If you are wanting to enter wards for patients then you need to add an Inpatient category with a code of IP and a Discharge category with code DI.
- Description: The name of the category as it will be seen throughout mSupply (if you are using wards then two of these will be Inpatient and Discharge).
Click on the OK button to save your changes.
Wards
If you want to select the patient's ward on a prescription you must first turn on the Allow users to select ward on prescriptions preference. See the 16.01. General preferences page for details on that.
In mSupply, wards are names that have been assigned a tag of Ward:
- For details on creating names, see the 5.01. Names: using, adding and editing page
- For details creating and editing name tags, see the 5.05. Name tags page.
- For details on assigning the Ward tag you created to the ward names see the Tags tab section of the 5.01. Names: using, adding and editing page.
| Previous: 10.11. Printer setup for Remote Desktop Client | | Next: 11. Payments and Receipts |
10.05. Prescribers / Clinicians
Updated version 4.10 Updated version 4.12 Updated version 5.01
From the Special menu choose Prescribers
When you are in dispensary mode, issuing items to a patient allows you to add a prescriber. This menu item allows you to set up your list of prescribers.

To add a new prescriber, click the “New” button.

Add a code for the presciber. You can use the code quickly to look up the prescriber when dispensing. Any non-printable characters before or after the code will be removed and any spaces or non-printable characters in the code will be replaced with an underscore (_).
Other fields are fairly self-explanatory. Note that the code, first name and last name can all be used for looking up prescribers when dispensing. Also note that any non-printable characters before or after the Last name or First name values will be removed and any non-printable chanracters in either of the values will be replaced with an underscore (_) - this will make sure that your searches work as they should!
From version 4.10, prescribers will have a home store like patients (see the 10.03. Patients page for details), which will be the current store for new prescribers or the store with the most recent prescription (assigned during the version upgrade):
- A prescriber can only be edited in any dispensary store which is active on the same site as the home store (i.e. on their Home site). This ensures that it can only be edited in one location at a time
- From version 4.12 it is possible to edit the home store (if you're logged into the primary server). Doing this will make the prescriber available to the new home site. If the prescriber has previous prescriptions from stores which are visible in the new home store, these will also be made available to the new home site, but will only show up in a patient's history if the Share patient prescriptions over stores preference is turned on (see Setting dispensary mode preferences)
Initials
The text you put in the “Initials” field will print on dispensary labels.
Active status
If you have a prescriber that is no longer used, you can change their status to “inactive” and the prescriber will not show in the choice list when dispensing. Inactive prescribers will still show when you choose Special > Show Prescibers…
We suggest you might want to add a “Miscellanous Prescribers” item to the list, and use this if you have a lot of prescribers whose prescriptions you only dispense infrequently.
Category
This field can be used to group prescribers together, and can then be used to filter prescribers when producing a transaction report.
Merge prescribers
Updated version 4.12
This item from the Special menu is used to merge two prescribers, where the same prescriber has inadvertently been entered twice. You are shown a window like this:

Enter the two prescriber names by entering the start of their surname or their code, and then pressing Tab . The top prescriber is the one who will be kept. The lower prescriber will be deleted.
Once you have entered the two names, check the details are correct, and then click OK. You will be warned one last time, and then the operation will be completed.
All transactions that recorded the deleted prescriber will now show the name of the prescriber that was kept.
Note that, from version 4.12, merging prescribers will be restricted to only those having the same home site.
Import prescribers
For information on the procedure for importing a file containing your prescribers see Importing prescribers
| Previous: 10.04. Patients | | Next: 10.06. Abbreviations for dispensing |
10.02. Prescription entry
In dispensary mode, supply of items is made using a patient's prescription (rather than a customer invoice for a standard customer in store mode). Choose Patient > New prescription from the menus or the new prescription icon on the Navigator:

This will show the prescription entry window:

Selecting the patient
Type something in the Name field in the prescription entry window shown above and press the Tab key on the keyboard to see a list of patients matching what you typed.
Anything you type before a comma is treated as the start of a last name, anything typed after a comma is treated as the start of a first name.
- For example, to find John Smith, you could enter “Smi,J” or “smith,joh”
If you know the patient's code, enter the start of it prefixed with an asterisk (*)
- For example, to find the patient with code 5829854 you could enter “*58298”
If your patient has already been created in the system, then these entries should bring up the patient in question, or a small enough list of patients for you to choose from.
Always search for your patient in this way first, before entering a new patient, to avoid entering the same patient multiple times.
If only one patient matches what you have typed, after pressing the Tab key on the keyboard their last and first name will be put in the Name field separated by a comma and their other details will be filled in on the rescription entry window e.g. patient code, date of birth, gender, address.
If more than one patient matches what you have typed, after pressing the Tab key on the keyboard you are shown a list of the patients that matched:

- Find the correct patient in the list and double-click on them or single-click on them and click the Use button to select them.
- If you can't see the correct patient, click on the Cancel button to try the search again or to add them as a new patient as described on the Patients page.
- When you select a patient a few of their details will be displayed in the Patient details section of the window and any Notes they have will be displayed (see here for details on how to update their notes).
The Remote search button is only visible if you are on a remote site in a synchronisation system. If the patient you want is not shown then you can click on the button to include all patients that are not visible in your store to be included in the search. If you select one of those patients they are made visible in your store and their details are downloaded for you.
Please note that if you are on a remote site in a synchronisation system then this window will appear, regardless of whether 0, 1 or more patients match what you typed in the Patient field - this is to ensure you always have the option of doing a remote search for the patient.
Editing patient details
Once you have chosen a patient, you can click the small down-arrow to the right of the patient name to display a window where the patient details can be viewed and edited (see below):

Clicking the Print icon at this point will give you access to reports showing all prescription history.
Entering the prescriber
Once you've chosen a patient, the cursor will automatically advance to the prescriber entry field.

To enter a prescriber, you can type either their code, their last or first name in full or abbreviated, or “last comma first”. For example for the prescriber Dr Felix Brown (whose code is 123) any of the following are acceptable:
- 123
- bro
- fel
- bro,fe
Press the Tab key on the keyboard after making the entry to show a list of matching prescribers. If only one prescriber matches, the name will be entered directly without the list being shown. This is the window that appears to allow you to select the prescriber:

Double-click the prescriber you want or single click it and click on the OK button.
The Remote search button will only be displayed if you are on a remote site in a sync system. Click it to include prescribers that are not visible in your store in the search. Note that if you are on a remote site in a sync system, this window will always be shown when you search for a prescriber, regardless of whether there are 0, 1 or more prescribers that match what you have typed in the Prescriber field so that you always have the chance to do a remote search for a prescriber.
Patient type and ward entry

The Patient type and Ward fields only appear if their contents have been setup in mSupply first. See the 10.12. Patient type and Ward setup page for details on setting them up.
When the prescription window first opens, the Ward field will be disabled. It will only be enabled when a Patient type of Inpatient or Discharge is selected. So a ward can only be selected for a patient of Discharge or Inpatient type.
Other fields

- Confirm date: this is read only and is automatically set for you when the prescription is confirmed.
- Prescription date: Enter the date the prescription was written for the patient here.
- Reference: Enter any reference, such as a prescription number, that you need to record in here.
- Category: Choose a category in this drop down list. The list will show all the Prescription type transaction categories set up in your system. See the 26.06. Transaction categories page for details on setting up transaction categories.
- Note: Enter any notes, comments or other things that need to be remembered for this prescription. You can enter a lot of text in this field. If you need to see more than the single line shown, click on the
 button next to it to show a larger window containing all the text. You can enter text in that window too.
Entering prescribed items
On the Prescription entry window click on the New line button and the Add item window appears:

Type the first few characters of the item's name or code in the Item field and press the Tab key on the keyboard to select the right item from a matching list. Tip: if you enter the complete code mSupply will be able to identify the item and will select it straight away, saving you time and mouse-clicks. Another tip is that if the Show item unit column when issuing store preference is turned on (see the 25.08. Virtual stores page for details) then an Item unit column will also be included in the table used to select the items from.
When you have selected the item, the details of the stock available for that item are filled out:

After you have selected the item, if you have told mSupply to inform you of interactions (see the 15.01. General preferences page for details) then an additional Interacting items button will be displayed on this window. Click on it if you wish to see interactions that this item has with other items. If there are any interactions between this item and any dispensed to the patient within the set length of time, you will be shown a warning message.
The first line of stock in the table is selected by default (the first expiring one). If you want to dispense from another, double-click it in the list. Enter the amount you want to give the patient of the selected stock line in the Quan field and click on the OK button if you've finished adding lines or the OK & Next button if you want to add another line.
Note that if the store preference Edit prescribed quantity on prescription is turned on (see Store preferences for details), an additional Prescribed quantity field is present for you to enter the appropriate quantity:

If the Show direction entry in dispensary mode preference in File > Preferences (Dispensary mode tab) is turned on then you can now enter the directions telling the patient how to take the medicine.
Entering directions
For many commonly prescribed items, default direction abbreviations can be defined - refer to the section on Item Default Directions. In the example below, the item being dispensed is FRUSEMIDE 40mg tablets, and the default directions are “Take ONE tablet in the morning”. Alternative directions present may be displayed by clicking on the down arrow to the right of the abbreviated direction field; directions not already present may be typed in using either the Abbrev entry area, or the Expanded entry area.
Note that you can mix abbreviations and text like this.

The drop-down list shows any default abbreviations you have entered for the chosen item. If one or more default abbreviations exists, the highest priority default abbreviation will be 'suggested' when you choose the item. If there is more than one standard abbreviation available, you can choose another one by choosing it from the drop-down list.
mSupply stores the expanded text for each line, not the abbreviation. This means that there is a full audit trail of what was printed on the label (unless you edit the directions after printing!).
Default directions
The set up of default directions is done on the dispensing tab when editing an item. You will find it described here.
View history
In the new prescription entry window, once you have entered a patient name you can click the “history” button to view a patient's history of what you have dispensed.

Duplicating a prescription
Once you have a history window open you can click to select a single entry or control-click to select multiple entries, then click the “duplicate” button to create new prescription line(s) with exactly the same details. Stock will be issued for these lines automatically.
Repeats
mSupply allows for the recording of repeat prescriptions. This is achieved when the prescription is first dispensed; in the Add item window, click on Total field in Repeats box in the top right corner of the window, and enter the number of repeats that the prescriber has authorised. The Repeat Dispensing procedure is described below.

Repeat dispensing
The Repeats panel (upper right of the window shown below) allows details of repeat prescriptions to be recorded. Take the example of a patient presenting a precription for Frusemide 40mg tabs x 30 on 1st January 2007, with the prescriber requesting “Repeat monthly x5”; in the Total field you should enter “5”, and in the Expiry Date field you have the option of entering (a) the actual date on which the final repeat may be issued - in this example, “1 July 2007” (allowing the patient one month's grace) - or (b) “6m” for 6 months. Note that the characters “D”,“W” & “M” in upper or lower case are interpreted in this particular field as the specified number of days, weeks or months before the repeat instruction expires. mSupply defaults to an expiry date two months later than the current date, but this may be edited as appropriate. The system automatically updates the number of repeats remaining as the patient makes further visits to have the repeats dispensed. The window below is displayed when you click on the New line in “ Prescription window ”

The number of repeats is assigned in Total field in Repeats box, and as the repeats are dispensed, the number remaining is displayed in the Left field.
When you click on the blue arrows on the upper right side ,the total repeat number and total quantity for each repeat is shown. Clicking on the small arrow displays the window below.

This window allows the user to alter the quantity of a particular repeat - e.g. if there is insufficient stock on a particular visit of the patient; the quantity can be edited by clicking on the quantity line, and again clicking on the quantity, which may now be edited. The arrow on the left bottom corner enables you to restore the default quantity setting.
Once you have filled repeat and other details on the Add item window properly, click on OK button to save details.
The Repeats icon is contained in Prescription entry.

When the Repeat function is used, and there are future repeats to be issued, the icon appears on a red background:
 The red background disappears when either:
- expiry date is reached
- all repeats have been dispensed
You can issue the repeat to a particular patient. Clicking on the Repeats icon displays this window:

The repeat window shows items to be dispensed, quantity, total repeats, repeats remaining and expiry date for a particular repeat.
- Process repeats button: This button is used to issue the repeat for a particular patient and for a particular item line. For issuing the repeat, first select a desired item line and then click on the Process repeats button. Now the system automatically manages the repeats internally.
- OK button: Click the OK button to exit from the Repeats window.
There is an Alert if repeat is dispensed before the defined interval of X days preference you can set to ask the user to donfirm if they wish to proceded if a repeat is issued within a selected number of days of confirmation of the original prescription. See the 15.01. General preferences page for details.
Printing labels
Dispensing labels are printed when the Print labels box is checked in the Prescription Entry window. You can specify what information gets printed on dispensing labels in Dispensary Mode Preferences.

Sample labels, produced by the Zebra TLP2844 printer are reproduced below:

mSupply currently is designed to work with the Zebra label printers. Zebra printers can use either thermal labels or a thermal ribbon which gives non-fading results.
We currently support plain 90 x 40mm label stock as this is cheap and readily available. The Zebra printer is auto-sensing of the ending of a label, so you can most likely used labels longer than 40mm with no problems.
- Label specifications:
- 90mm x 40mm high
- White Matt Thermal Transfer Paper
- Wide Edge Leading
- 1 Across on a roll
- Perforation between each label
- Produced on 1“ core to suit TLP2844
We are happy to support other printers if you use a different brand.
Reprinting labels
If you need to print the labels for an item again, choose Patient > Show Prescriptions to locate the prescription entry.
In the list of items dispensed, click on the line you wish to reprint, and then click OK (with the printing checkbox checked)
If you wish to reprint labels for all the items on the prescription, first click in the list of items below the last item so that now one item is highlighted. Then all labels will be preprinted when you click OK
Printing multiple labels
If you want to print more that one label for an item, hold down the Alt key ( Option on Mac) as you click the OK button. You will be asked for the number of labels required as the label is about to print.
What if there is not sufficient stock of one batch?
As the quantity of a particular batch of an item gets used up, you will need to issue stock from more than one batch to a patient. mSupply handles this when printing labels, and combines the totals for any item on a prescription so that only one label is printed for the total quantity.
The directions for the item with the first line number will be used, so enter directions for the first batch you dispense, and leave the directions empty for subsequent batches.
Note: if you have the rare situation where you need to issue the same item to one patient with different directions you should either combine the directions onto the one label, or enter two prescriptions with the directions entered differently on each prescription (That is enter the line, then print the label(s), then choose Patient > New prescription and issue the item again with the second set of directions).
Receiving payments
You can receive payments for prescriptions directly from the prescription window if you wish (an alternative is to receive them using the customer receipts module. Both result in the same transactions being created in mSupply but will suit different physical workflows).
See the special page on receiving payments from the prescription window here 11.03. Prescription payments and credits.
Printing receipts
You can print a receipt for a patient's payment of a prescription if you have the Receive payments from prescription window preference turned on (see Dispensary preferences for details) .
Receipts are printed (from the same printer as the labels) when the Print receipt box is checked on the Payment tab of the prescription entry window:

Receipts may also be reprinted later by opening the prescription and checking the Print receipt box again - in which case they will have the text “COPY” printed at the bottom.
After printing the medicine labels, a patient receipt will be printed as shown below.

If you don't have a printer setup in Special > Printing preferences you will be prompted to select one or set one up. If that is not possible, receipt printing will be cancelled.
Prescriptions and barcode scanners
It is possible to print barcodes on prescription labels and use barcode scanners to open the prescription quickly. For details, please see the 15.07. Barcode scanning and prescriptions page.
| Previous: 10.01. Dispensary mode | | Next: 10.03. Patients |
10.08. Label printing preferences
In mSupply the settings for label printer are set in the “Choose label printing preferences window”, which you open via the mSupply menu bar: Special > Printing preferences

This window will show you ALL mSupply printers that have been set up for your whole organisation.
Your mSupply printer descriptions must include your site name and make sure that you do not delete printers for other sites!!!
Changing your mSupply default printer
To change the mSupply default printer in the “Choose label printing preferences window” simply click the checkbox in the right-hand Default Printer column for the printer you wish to use.
Note this is different from your Windows default printer. You are setting the default printer for mSupply to use (the default printer you have set for Windows can be another printer altogether).
The mSupply printing preferences are stored for the computer you're setting it from (not the mSupply user or the mSupply site you're logged in to). When you change the mSupply default printer you are changing it for everyone who uses the computer.
Editing a printer
In the “Choose label printing preferences” window double-click the printer entry in the list. This will open the “Add label printing preferences” window - see below for info on each setting.
Adding a printer
If you are setting up up your label printer hardware for the first time, you will first need to follow the instructions here: 25.18. Label printer hardware setup.
When your printer hardware is connected and ready to be set up in mSupply open the “Choose label printing preferences” window and click the New Printer button. This will open the “Add label printing preferences” window - see below for info on each setting.
The printer preference settings
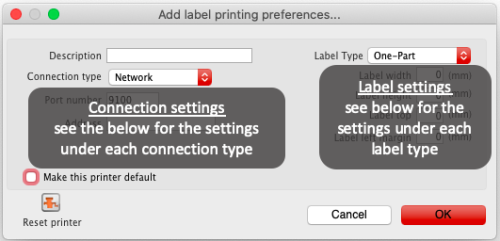 Description
Since the mSupply printing preferences window lists ALL the mSupply printers for your organisation it is vital that the Description includes the site name to avoid confusion.
e.g. Busby Pharmacy GK420t
Connection Type
If printer connected with a network cable (recommended) choose network
If printer connected with USB choose USB
If printer connected with a serial cable choose serial
See below for the printer connection settings for each type of connection
Label Type
One-Part
Three-Part
See below for the printer connection settings for each type of connection
Make this printer default
Checking this box means that mSupply on this computer will always print to this printer. Refer to the Changing your mSupply default printer section above to find out what setting a default mSupply printer does.
Reset printer
You can use this button to send a command to the printer to reset it. Occasionally a printer may misbehave if it's memory is corrupted by an electricity spike or the like, and this button may help. If your printer is not behaving we recommend you contact Sustainable Solutions support@msupply.org.nz rather than charging ahead on your own.
Printer connection settings
Network  Port number Port number For network connections this will usually be 9100 Address The IP address of the printer e.g. 10.1.1.253 For info on creating a static IP address for the printer refer to label_printer_hardware_setup |
USB  Address Address Enter the Windows name of the printer. It must be entered exactly. There is no need for the Windows printer name to match the mSupply printer description. To confirm the Windows printer name go to the Windows Control Panel > Printers and Scanners. Right click on the printer and select properties. The Windows printer name is recorded on the General tab.  |
Serial  Port number Port number Enter the Windows serial port number for the printer. To confirm the port number go to the Windows Control Panel > Printers and Scanners. Right click on the printer and select properties. The Windows port number is recorded on the Ports tab. |
Printer label settings
One-Part label  Label width: the physical width of the full label Label width: the physical width of the full labelLabel height: the physical height of the full label Label top: the height of margin wanted from the top of the label Label left margin: the width of margin wanted from the left of the label |
Three-Part label  Label width: the physical width of the full label Label width: the physical width of the full labelLabel height: the physical height of the full label Label top: the height of margin wanted from the top of the label Label left margin: the width of margin wanted from the left of the label Label bottom margin: the margin between the top label and lower labels. Bottom left label width: the width of the bottom left label.  |
Other settings
There are other general preferences that can affect the way your labels are printed. See the 15.01. General preferences page for details.
| Previous: 10.07. Diagnoses | | Next: 10.09. Warnings |
10.11. Printer setup for Remote Desktop Client
In low bandwidth situations the mSupply client can become laggy and unstable, in these cases it may be recommended to use RDP through the Windows Server Remote Desktop Client application. If the site is dispensing and using a printer, this introduces some complicated steps.
Requirements
At dispensary: - A computer with serial/com port and with RDP access to server - A Zebra printer with serial/com port
Server/machine that is remoted to: - mSupply Client installed and can connect to mSupply server - Windows server installed that has Remote Desktop Client
Setup the Remote Windows Server Machine
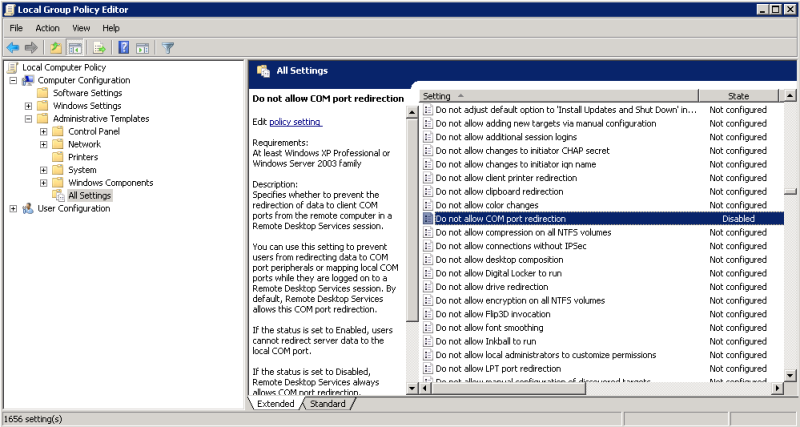
Use Windows Run (i.e. command prompt/powershell) to run tsconfig.msc and gpedit.msc.
- In the tsconfig window, right click on “RDP-Tcp” and click “properties”. Go to client settings and make sure that the COM port is unchecked in “Redirection - disable the following” list.
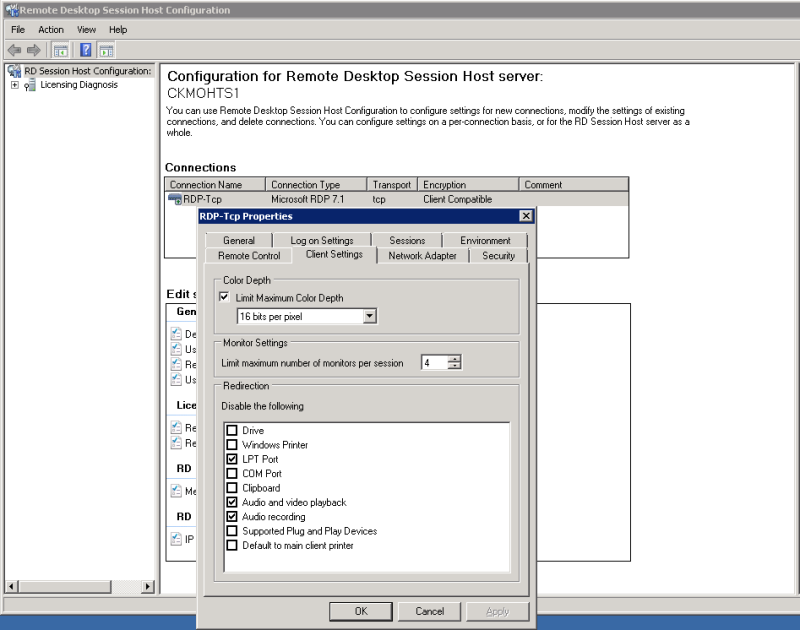 - In the gpedit window, follow the hierarchy shown below and make sure “Do not allow COM port redirection” is disabled (not configured probably fine).
Setup the Local Machine
- The machine that you will be dispensing from needs to have the appropriate Zebra printer.
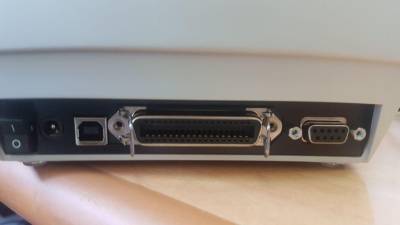
- Check that your printer has a 9 pin serial/com port on the rear
- Check your Computer also has a 9 pin serial/com port (right most port below).
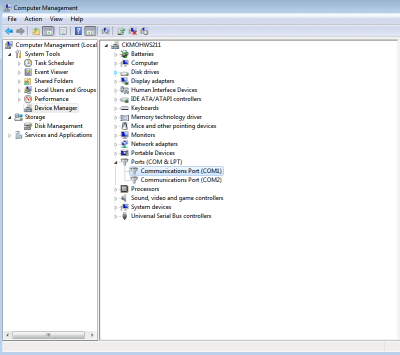
- You can verify that the computer has detected its external ports via device manager
- Using a RS232 serial cable, plug the printer into the computer.
Caution: If you have a cable that has the female plug at both ends, it is likely a Null Modem cable. This cable will not work (even with adapter).
- If you have mSupply available locally on the machine, you can try testing printing a label to confirm your local setup is correct using misc. labels in the special menu.
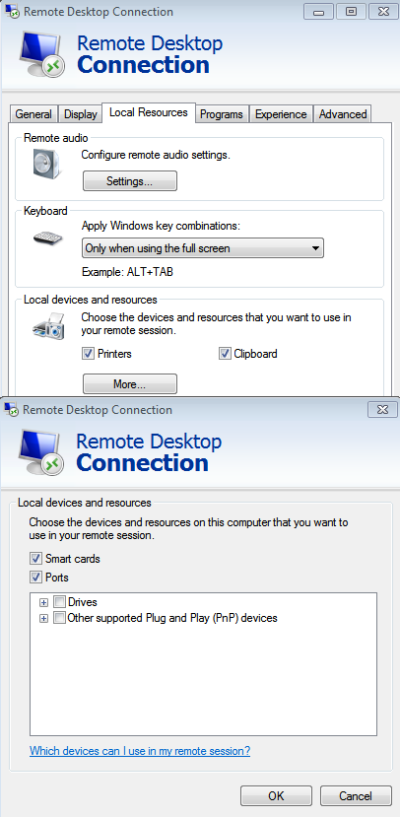
Remote Desktop Connection Settings
You must enable port sharing on the remote machine (at dispensary) in Remote Desktop Client for the machine you are going to remote into.
- Enter the connection details for the machine you are going to RDC into
- Show connection options
- Select “Local Resources” tab
- In the section “Local devices and resources” click the “More…” button
- Ensure that the “Ports” checkbox is ticked
- OK!
Open mSupply Client in the rdc window and test printing, hopefully it works!
| Previous: 10.10. Patient medication records | | Next: 11. Payments and Receipts |
10.09. Warnings
From the Special menu this command allows you to view and edit the standard list of warnings.
Once this list is created, you can apply one or more warnings to each item, and choose which warning will be automatically printed on labels.
To apply a warning to an item, see Adding a New item

Double-click a warning in the list to edit its details.

Click the “New” button to add a new warning.

We suggest you use the standard set of warnings as specified by the pharmaceutical authorities in your country.
| Previous: 10.08. Label printing preferences | | Next: 10.10. Patient medication records |