20.01. Vaccine Vial Monitoring (VVM)
- There used to be a comprehensive description of VVM on the WHO website, but, alas, no longer
. We can resort to the Wikipedia article on VVM
- As of August 2023, WHO has published a VVM infographic. In case that is also removed from the WHO web site, we have stored it here: VVM infographic
Configuration
There are a few configuration steps needed to use VVM (Vaccine Vial Monitoring) in your mSupply system.
Set up vaccine vial monitor (VVM) statuses
To configure VVM status options, you need to have permission in the system to edit vaccine vial monitoring statuses. See the 23.15. Managing users page for details on how to set user permissions. You need to turn on the View and edit vaccine vial monitor status permission on the Permissions (3) tab.
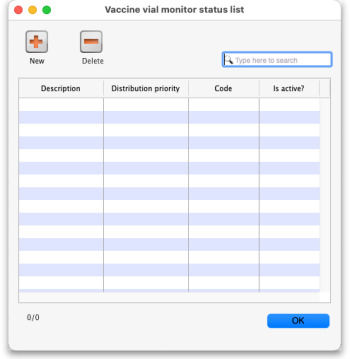
You can access the vaccine vial monitor (VVM) status configuration window by choosing Item > Vaccines > Show vaccine vial monitor status… from the menus. This will open the VVM status window:
The window will show you a list of all the current vaccine vial monitor statuses that have been setup. To edit one, simply double-click on it in the list. This will open the same window as when adding a new status (see below) but populated with the status's current settings, ready for you to edit them.
The columns in the table contain the following:
- Description: The name of the status. This is what will be displayed for this status throughout mSupply
- Distribution priority: The order in which is will be displayed and selected by mSupply for distribution. Lowest number is distributed first. This priority overrides expiry date for vaccines. Typically, users give stage 2 priority 1, stage 1 priority 2 and stage 3 and above are given priority 3 and higher. In this way stage 2 is distributed before stage 1.
- Code: The code of the status. A short name by which is can be remembered, not visible elsewhere in mSupply.
- Is active?: If checked the status is active. If a status is active it can be assigned to new vaccine stock. Inactive statuses cannot be assigned to new stock but they will be visible where they have been assigned to existing stock or other existing records.
Adding a VVM status
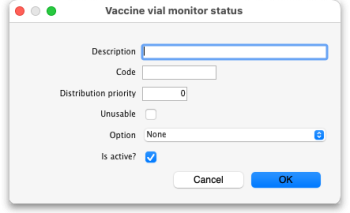
Click the New button. This window opens:
- Description: the name of the status and how it will be referred to throughout mSupply.
- Code: a short code used to refer to the status.
- Distribution priority: the priority given to this status when distributing vaccine stock. Stock with a lower number will be distributed first. This priority overrides expiry date priority (FEFO) for vaccines (see the Distribution priority of VVM Statuses section below for a full description).
- Unusable: If checked then this stock with this status is counted asd unusable and cannot be distributed.
- Option: Select the closed vial wastage option that you want to be assigned to this status. This drop-down list is populated with options set in the preferences. See the 16.10. Options (standard reasons) page for details on how to do that.
- Is active?: checked by default. If this is checked then the status will be available for selection when applying VVM statuses to new or existing stock.
Click on the OK button to save your changes or the Cancel button to cancel them.
Deleting a VVM status
You can only delete a status that you have just created. Once this list of VVM statuses has been closed, you cannot delete the status any more. If there is one that you wish to delete but can't then edit it and uncheck its Is active checkbox (as described above). That will effectively delete it because it will no longer be selectable in any mSupply mobile functionality (but it will mean the status is still available for historical records).
If the status you want to delete is newly created:
- Select the status you want to delete by clicking on it in the list
- Click on the Delete button
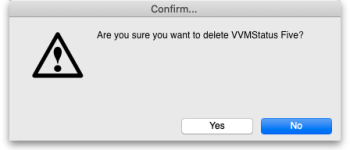
- The window below will appear asking you to confirm the deletion. Click Yes to confirm.
Tell mSupply which items are vaccines
Tell mSupply which items are vaccines by checking the Is a vaccine checkbox and entering the number of doses per vial in the Doses field on the General tab of the item's details window. See the 4.01.01. Items - General tab page for details.
Turn on preferences
Finally, you need to turn on some preferences so that VVM status is exposed in the mSupply interface:
- The Able to specify VVM status when receiving items store preference to be able to enter the VVM status for a vaccine when it is received. See the 26.07. Virtual stores page for details.
- The Sort available batches by VVM status rather than Expiry store preference if you want the VVM status of the stock to be included when deciding what order to offer stock for selection. See the 26.07. Virtual stores page for details.
Using VVM status
Enter the VVM status of vaccines when they are received
When the Able to specify VVM status when receiving items store preference is turned on (see above) you can enter the VVM status of vaccines when they are received into a store on a supplier invoice. See the 7.01. Supplier invoices page for details.
Update the VVM status of vaccines when you check them
When you check the status of the VVM labels for a batch, you can enter the details of the current VVM status into the stock line details window.
You can get to this window two ways:
- On the Item tab of the Navigator, click on the Stock icon then double-click on the line of stock you are interested in.
- Search for items, double click on an item to open its details window, click on the Stock tab to show the item's current stock and then double-clikc on the stock line you are interested in.
Whichever way you choose, this window will open:
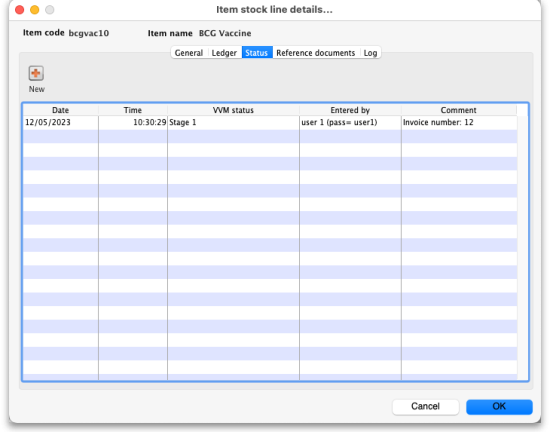
Click on the Status tab:
The table shows you the history of VVM status measurements for this stock line.
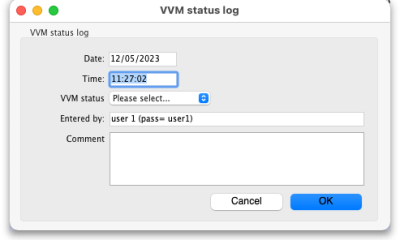
To add a new entry, click on the New button and this window will open:
- Date: The date of the entry. This is set to the current date and is read only - you can only enter logs on the current day.
- Time: The time of the log entry. Edit as required in 24 hour format.
- VVM status: Select one of the active VVM statuses you have setup.
- Entered by: The name of the user making the entry. Read only, set to the currently logged in user.
- Comment: Enter anything that you want to remember about this reading (who took it, how it was done, anything unusual etc.).
Click on the OK button to save the entry and it will be displayed in the table. If the VVM status of the stock line has changed then its current VVM status will be automatically updated to match what has been entered.
If you enter a VVM status that means the stock is unusable, we recommend that you also check the Hold checkbox on the General tab (shown above) so that the stock is not issued.
Check the VVM status of stock when issuing
When the Able to specify VVM status when receiving items store preference is turned on (see the Turn on preferences section above) you will be able to see the current VVM status of vaccine stock and issue in packs or doses when issuing a vaccine item. See the 8.01. Issuing goods to a customer (customer invoices) page for details.
| Previous: 20. Cold Chain Equipment | | Next: 20.02. Configure VVM for a Mobile store |
