This is an old revision of the document!
28.07. How to correct wrong pack sizes
Introduction
In a warehouse or dispensary, stock may be received in 'bulk' (larger pack sizes) which then need to be physically and logically broken down in to smaller, 'issue size', packs before the stock is issued. It often makes sense to keep last-expiring stock in bulk quantities until closer to the time it will be issued:
- It makes for easier stock-taking; just counting the number of cartons, rather than working out how many inner packs are in the cartons, and then multiplying that by the number of cartons.
- If you will be splitting a stock line to move a carton(s) to a more accessible location for issue, then keeping the 'carton' pack size makes it easier to identify how much stock needs to be to split off.
In any case, whenever it is done, you will need to change the pack size of your stock.
It is important that changing pack size does NOT change the total amount of stock that you have. mSupply is carefully designed to ensure this.
However, if you have accidentally told mSupply that you have issued more stock than you actually have, then mSupply does allow for these to be corrected through the process described in Changing pack size for stock already issued, below.
Changing pack size for stock on hand
The pack size for Stock on hand is changed through either of two methods:
Changing pack size for stock already issued
If your staff have forgotten to tell mSupply about the new pack size through a Repack or Split, then stock may be issued without noticing the large pack sizes. This will result in mSupply being told that much more stock has been issued than actually has been.
In an pharmacy environment, the same could also be true if the 'Pack to one' preference has not been set. Most users tend to rely on the stock being introduced to the system in the correct pack sizes (suitable for patient consumption) and when this is not done, the dispenser doesn't pay attention to the pack sizes and accidentally tells mSupply that they are issuing stock with large pack sizes.
In both cases the customer or patient receives drug quantities that are generally much less than what mSupply has been told.
It is much better to take measures to ensure that these errors do not occur frequently, but if you find that you haven't, mSupply does have the facility to correct the pack size for stock that has already been issued. As you can imagine, this is a powerful and potentially harmful feature and so there is a special user permission to allow this. Only high level users should have the user permissions to carry out the task below.
User permissions
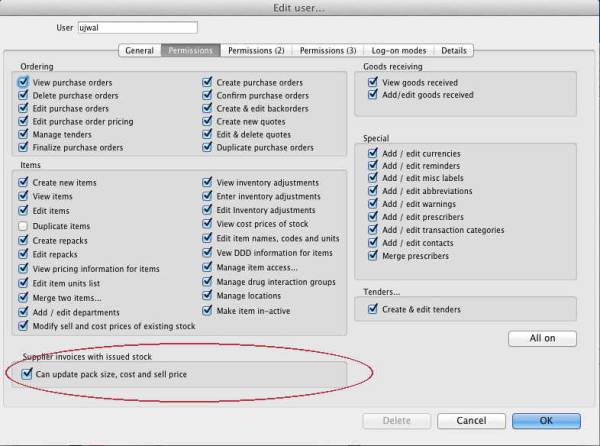
Firstly to correct pack sizes you need to have the following user permission :
- Can update pack size, cost and sell price
Do the following :
- View File > Edit Users…
- Double click on the user that requires the right to correct pack size mistakes.
- View the “Permissions” tab
- Make sure the permission “Can update pack size, cost and sell price” is ticked (see image below)
Locating the item
For this tutorial let's assume that we are inside a pharmacy where Amoxicillin 250mg tab/cap should have been introduced as single tablets rather than boxes of 100 tablets. The pharmacy never has to dispense the whole bottle (100 tablets) to one patient.
View the item where the pack size needs to be adjusted :
- Item > Show items… from the mSupply menu. Use the search filter
- Navigate to the item in the list and double click.
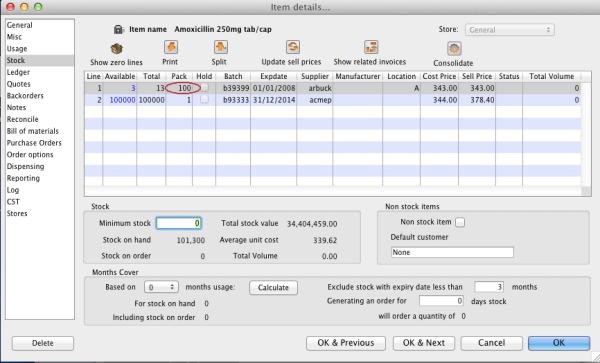
- Go to the “stock” section. View the image below:
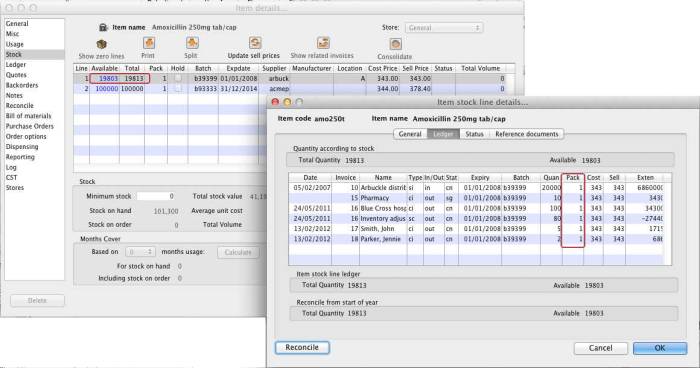
The image above shows that a batch of Amoxicillin 250mg tab/cap has been received in packs of “100”.
Double click on this stock line and view the ledger associated with this batch:
 The image above shows that two patients (John Smith and Jennie Parker) were issued in total 500 and 200 tablets when the correct amount should have been 5 and 2 tablets. Let's assume that the pack size on all should in fact be “1”
Now close the item stock line details window and view the item again.
Getting to the source
To correct the pack size from “100” to “1”, we now need to locate the invoice that initially introduced this batch (b39399) of Amoxicillin 250mg tab/cap to our stock.
Do the following :
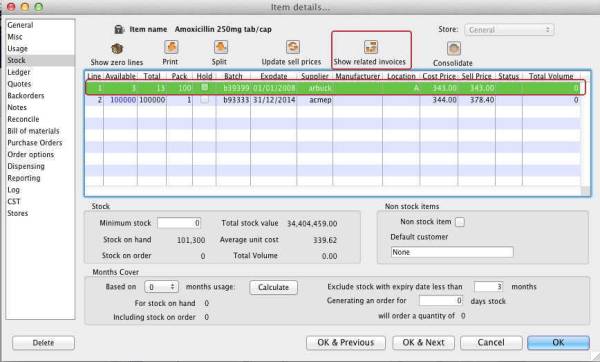
- Get back to the item detail window showing the batch lines.
- Select the batch line.
- Then click on the “Show related invoices” icon
- You will now be presented with a list of invoices connected to this particular batch of stock.
Locating the stock introducing invoice
From the list of invoices we now need to view the invoice that initially introduced the stock.
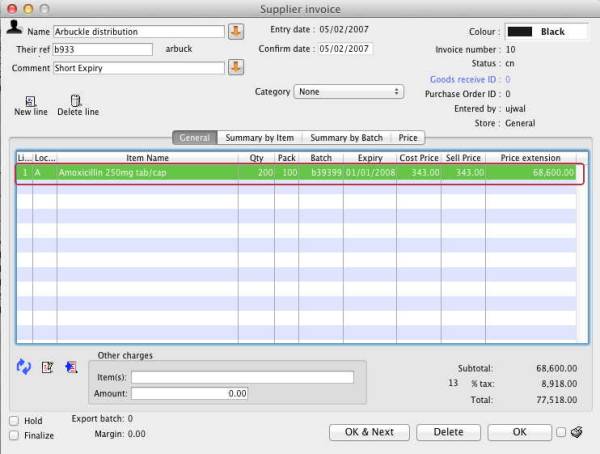
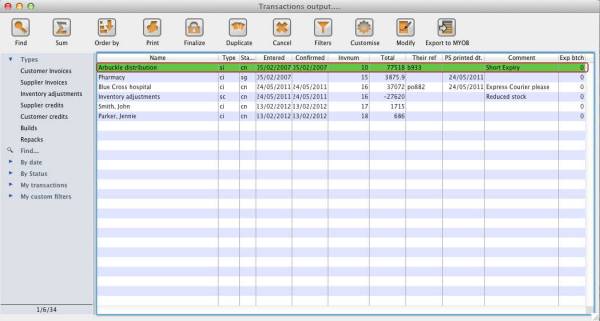
The image below contains customer and patient invoices (“ci” type), an inventory adjustment (“sc” type) and a supplier invoice (“si” type). The supplier invoice has been highlighted.
Double click on the line for the supplier invoice to open it.
Viewing the invoice
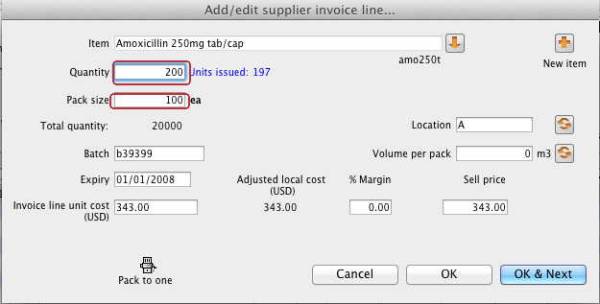
View the invoice and you will see one or more lines showing items that have been introduced to stock. Among them will be one containing the item you're interested in - make sure you identify the right one because there could be more than one batch of that particular item. For this example the invoice only contains one line. This invoice line was responsible for introducing an unsuitable pack size for dispensing purposes.
Double click on the line to open up the supplier invoice line:
Correcting pack size
You should now see a window similar to the image below :
For this example lets assume that the total quantities are correct. Here we did indeed receive 20,000 tablets. So we are going to make the following adjustments.
The step below is only possible if you have the user permission “Can update pack size, cost and sell price” set as described above. If this permission is not set, the pack size is disabled but still viewable.
Starting with mSupply v4.12.06 the pack size field is only enabled if there are no pending repacks connected to the stock. If suggested repacks are encountered, they either need to be deleted or finalised.
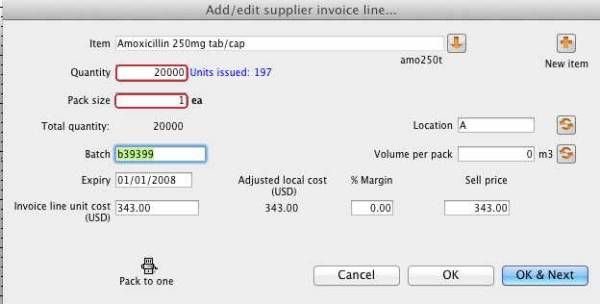
Below we have changed the packsize to “1” and pushed the quantity to 20,000
So, as before, the total tablets we have received is : 20,000 X 1 = 20,000
Click “OK” to save the changes.
We are done. Close the invoice.
Review of the changes
Now, to see the result of the pack size adjustment, view the item and its ledger associated with batch “b39399”:
From the image above we see that the available and total stock figures have changed.
We can also see that pack sizes on past ledgers have been converted from “100” to “1”.
| Previous: 28.06. Why is my stock on hold? | | Next: 28.08. How to report by invoice category |
28.08. How to report by invoice category
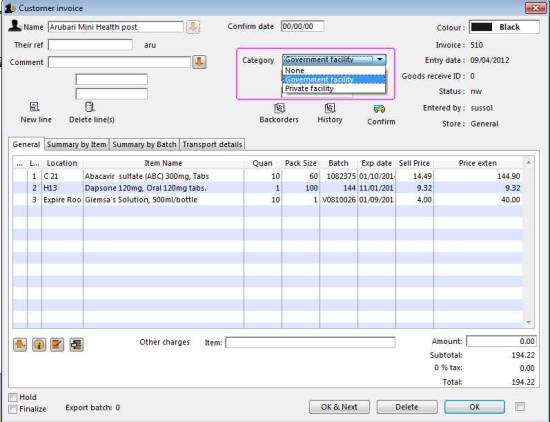
Within mSupply if you have categorised invoices (or transactions) in a particular manner then you will be able to run reports based on this category. In dispensary mode Prescriptions can also be categorised. For example you may be required to tag your customer invoices as “Government” or “Private” facilities.
Follow these steps to generate a report by invoice category :-
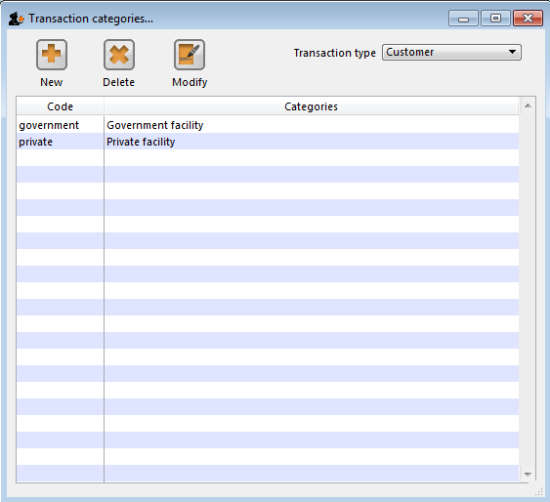
- Make sure there is at least one transaction category available in your data file. If not, then follow the instructions at 26.06. Transaction categories to create a transaction category.
For this example the image above shows the addition of two categories for customer invoices.
- On your Invoices window, all of your categories will be displayed under the “Category” drop-down list.
- Choose the category from the list and click on the OK button. For reporting purposes, the invoice will need to be confirmed.
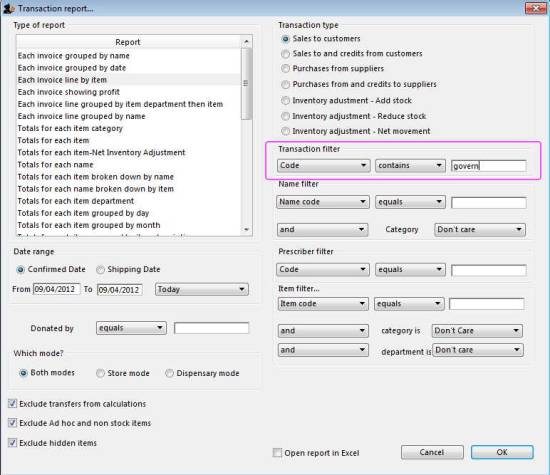
- For reporting, from mSupply menu or Navigator , View Report → Transactions.
- On the right hand side of that window, you will see the section “Transaction filter”. Here we have chosen to search for “Code” contains “govern”, which produces the same results as searching for “Code” equals “Government”.
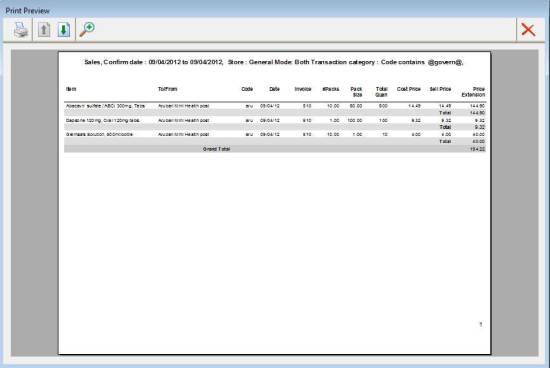
- Click on the OK button and you will now have the opportunity to view items issued to government facilities.
| Previous: 28.07. How to correct wrong pack sizes | | Next: 28.09. Imprest work flow |
28.09. Imprest work flow
Version : v3.11 or v3.12 or later
The imprest module allows a pharmacy or warehouse to decide on quantities of drugs its receiver facilities (customers or Virtual stores) should receive. Periodically a stock take is carried out at the customer's site and drugs are replenished to meet the predefined (imprest) level.
The tutorial below suggest how an imprest should now be carried out.
We will assume that the facility or customer has been assigned with a suitable imprest list. If this is not the case then please do the following:
- Select Item > Show Item master list… from the menus to create a master list (see here for details).
- Assign the master list to the customer. See Item Lists > Assigning a list to a customer for instructions.
Create an imprest
Click on ‘Requisitions’ in the ‘Customer’ (or Patients) tab.. Click on the New customer imprest icon in he window which appears.
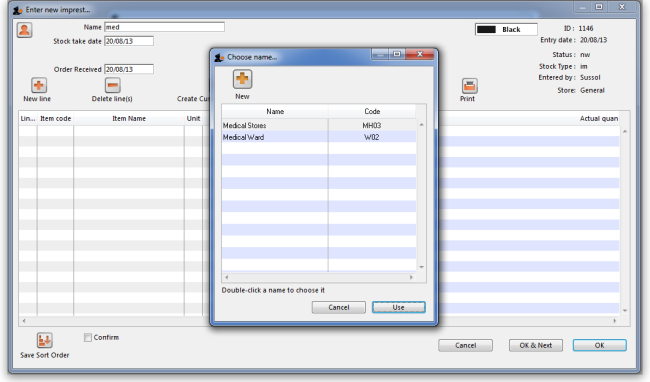
Type the first few few characters of the customer name in the Name field and press tab. A List of matching customers is displayed (unless only one customer name matches what you entered). Choose the intended customer and click the Use button.
At this point the master list of items associated with the customer is displayed in its default sort order.
Print the imprest
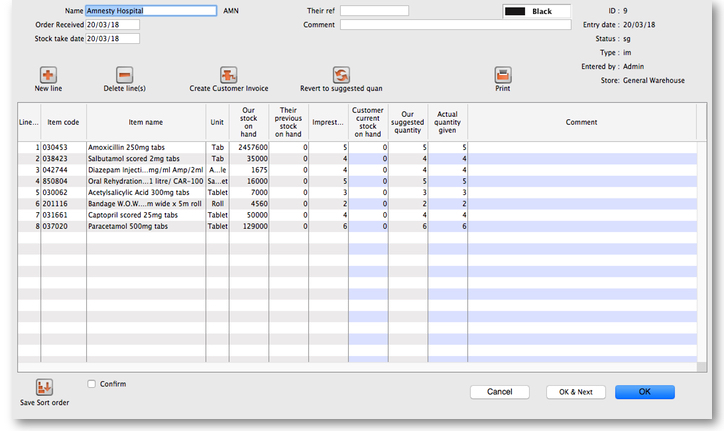
The image below shows an example of what you now see: a list of items with their required imprest quantities. The next task is to print the list and carry out a physical stock take at the customer site.
First of all, make sure the list is in the correct order. If it is, fine. If not, re-order it as appropriate (by clicking on the column headers or dragging items up or down the list) and click on the Save Sort Order button.
Now print the list by clicking on the Print button  and selecting the “Customer stock takes” option.
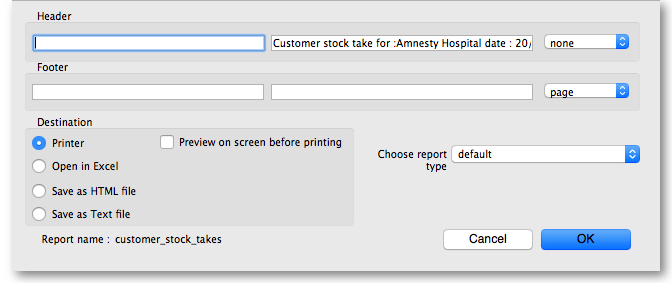
The print dialogue opens. Here you can add header and footer information for your printouts. Press OK when ready and print the list.
Please note that after printing the list you should not re-order it - it will be confusing later when you come to enter the counted quantities for each item.
Now, using the printout, carry out the actual stock take.
Updating the stock quantities
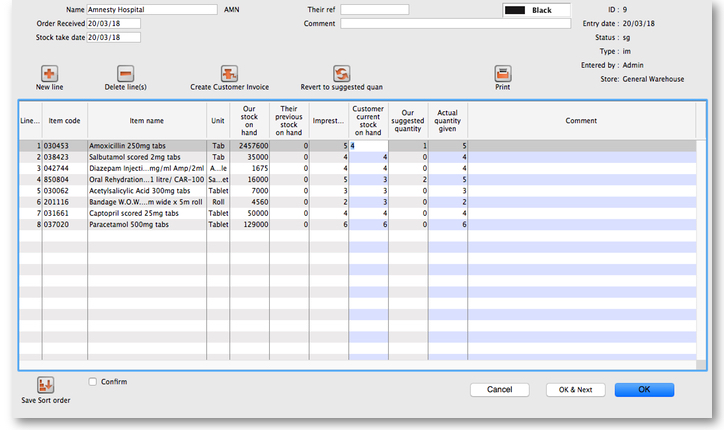
After carrying out actual stock take at the customer's site it's time to enter the actual stock quantities. In the window displayed below, edit the value in the Customer current stock on hand column with the stock take quantities you've written on the print out for each item.
mSupply automatically completes other two columns (Our suggested quantity and Actual quantity given).
Imprest formula:
- Our suggested quantity = Maximum of
- 0, and
- Imprest quantity - Customer current stock on hand
Assigning stock
Once the updating of stock quantities is done and you are satisfied, you can click the Create customer invoice button to assign stock to the customer. Clicking the button will open the following window:
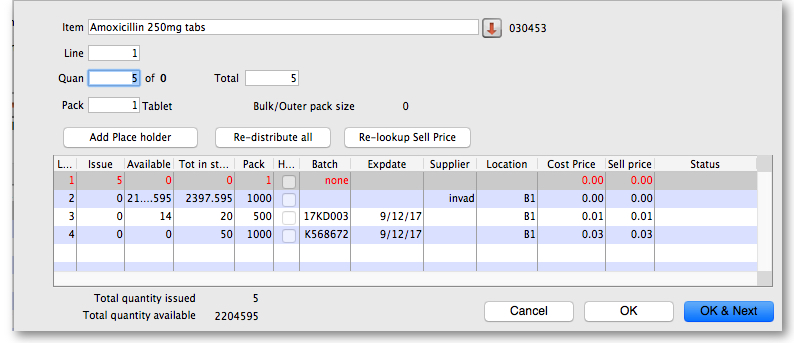
All the entries appear in red - they are placeholder lines which have the correct quantity but have no batch chosen (notice 'none' in the batch column for each line). You have to double-click each line in turn and select which batches you wish to assign to the customer.
As an example, you will see the window below when you double click an item line:
Normally you would click on the Re-distribute all button to have mSupply make the appropriate selection for you (it chooses batches with shortest expiry first). Having done that, the window now appears like this:
Clicking on OK & Next displays the next item on the invoice. When the final item has been processed, clicking on OK or OK & Next will display the complete invoice (all red lines replaced with black lines with the chosen batch displayed). The image below shows the invoice part way through this process:
When you've selected batches for every line, make sure the Hold checkbox is not checked then confirm the invoice to assign the stock to the customer. Now all you have to do is print off the pick list, physically pick the stock off the shelves and send it to the customer. Congratulations - job done!
| Previous: 28.08. How to report by invoice category | | Next: 28.10. Tips and tricks |
