28.10. Tips and tricks
mSupply Client: Connecting to a different server
It is unusual, but you may be in a situation where your mSupply client application needs to switch between more than one mSupply Server.
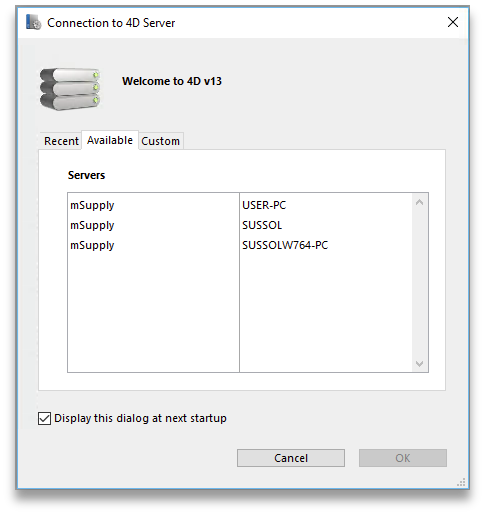
Launch the mSupply client application by double-clicking on the mSupply client icon, then immediately hold down the Alt key until the mSupply Server connection dialog box appears:
If you tick the Display this dialog at next startup tick-box, this dialog box will automatically be displayed on startup of the mSupply client application, and you will not need to do the double-click, Alt routine described above.
There are three ways of selecting the mSupply server to connect to. These are accessed via the tabs: Recent, Available and Custom:
Recent tab
The Recent tab retains a list of all mSupply servers recently used. The list is sorted by alphabetical order. To connect to a server from this list, double-click on its name or select it and click the OK button.
Available tab
The mSupply Server includes a built-in TCP/IP broadcasting system that publishes by default the name of the mSupply Server databases available over the network. These names are listed on the Available tab of the connection dialog box.
This list is sorted by order of appearance and is updated dynamically. To connect to a server from this list, double-click on its name or select it and click the OK button.
Computer networks can be configured to stop dynamic publication of the database name on the network. In this case, you will need to manually configure the the connection on the Custom tab.
Custom tab
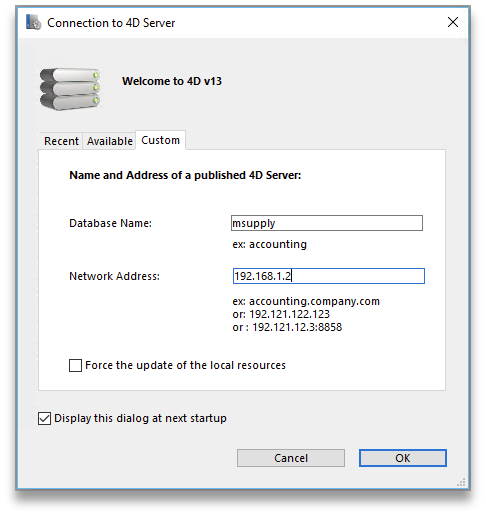
The Custom tab allows assigning a published server on the network using its IP address and database name.
Database name: allows defining the name of the mSupply Server database.
Network address: allows entering the IP address of the machine where the mSupply Server was launched. If two servers are operating simultaneously on the same machine, the IP address must be followed a colon and port number, for example: 192.168.92.104:19814.
By default, the publishing port of a mSupply Server is 19813. This number can be modified in the Database Settings… under Client-server tab of mSupply server.
If a database was selected in the Recent or Available tabs when you clicked on the Custom tab, these two fields display the corresponding information from that tab.
Once the server details have been entered, clicking the OK button will connect you to the server.
If you tick the Force the update of the local resources tick-box, it allows you systematic updating of the local resources on the client machine when it connects. As a rule, updating of the local resources is automatic on the remote machine each time it connects, when the structure of the database has been modified between two connections. Most of the time, this option is unnecessary. Nevertheless, in certain specific cases, it may be necessary to force the update.
Emptying out a store and starting again...
Sometimes, the actual stock situation in a store becomes so out of step with mSupply's records that you want to start again from scratch with a brand new stocktake.
Be warned: Following the procedure below will result in the stock lines losing all Cost price data. Cost price data can be added back to the stock lines, but that is ordinarily a slow process that will not necessarily get back the correct Cost prices. But, you are only doing this because the mSupply record is so desperately inaccurate anyway… 
To do this, you will need to:
- Confirm or delete all customer invoices with status =
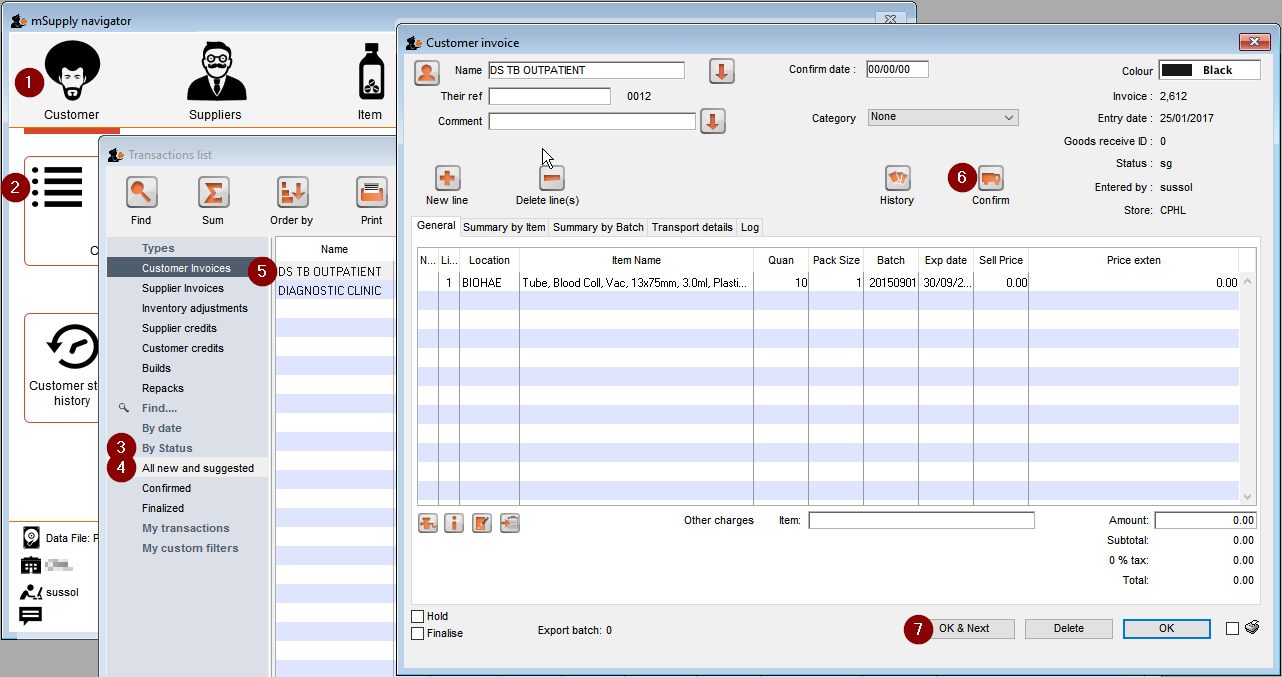
nw(New) orsg(Suggested). This should remove from stock all lines that have been made unavailable, but are still showing as in stock - see figure below.- Click on Customer
- Click on Show Customer Invoices
- Click on By Status
- Click on All new and suggested
- Double-click on the first displayed invoice
- Click on Confirm (or, if you want to delete the CI, delete each of the lines, and then Click on Delete)
- Click on OK & Next
- Empty the mSupply store of all stock by means of an Inventory Adjustment based on an mSupply stocktake of all stock in the store
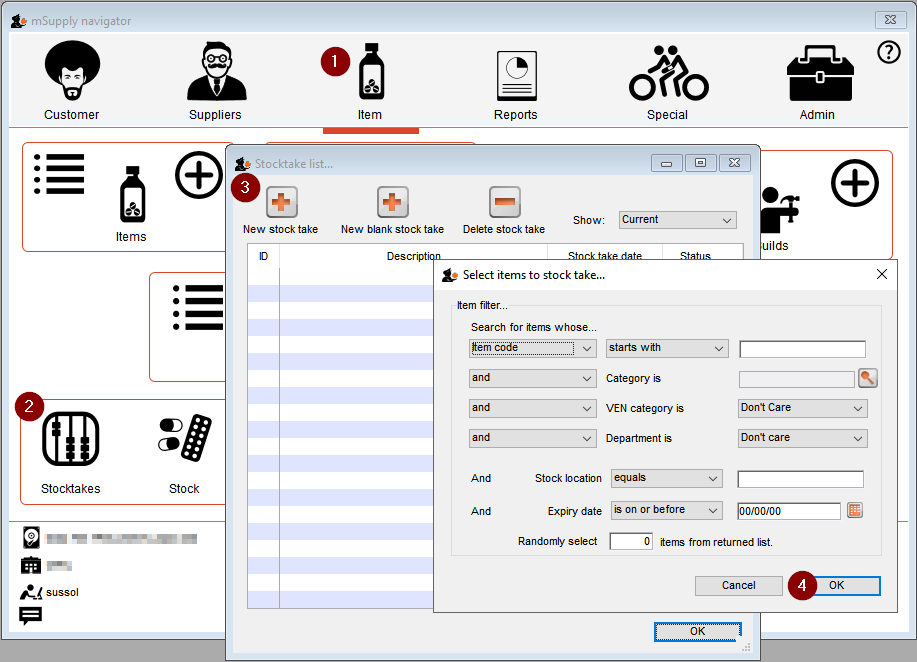
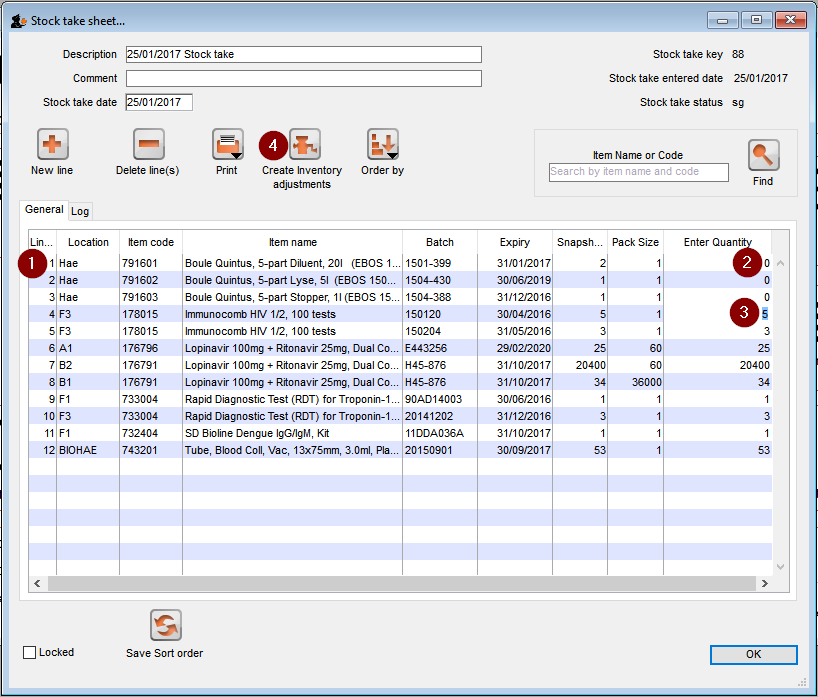
- Create the stocktake - see figure below.
- Click on Item
- Click on Stocktakes
- Click on New stocktake
- Set all actual quantities to zero (
0) - see figure below.- Click once on the first stock line. The whole line will become highlighted.
- Click once on the value in the 'Enter Quantity' column. The Enter Quantity value will become highlighted
- Type
0, then press Tab Tab. Repeat this for each line of the whole stocktake. You should be able to be faster than 2 stock lines per second, maybe a lot faster. At 2 stock lines per second, you can get through 1000 stock lines in less than 10 minutes…
- Import new stock as described in Importing items & stock
Creating customers that are not visible to all the stores
In a multi-store system, you will often be wanting to create new customers that are visible in only one store. By default, when new customers are created, they will be made visible to all stores in the system. If you actually want these new customers to be visible to only one store, you will need to edit the store visibility for that customer, and un-tick the visibility for all the other stores - a tedious exercise in a system with scores or hundreds of stores!
For this reason, there is a solution: There is a store preference called Names created in this store not visible in other stores. To use it:
- Edit the store preferences for the store that needs to be able to see the new customers and turn on the Names created in this store not visible in other stores store preference.
- Make sure that you have user permission to create customers in this store.
- Log in to the store
- Create the new customers
… or import the customers - refer Importing Names
Changing an item's name and pack size
There may come a time when you decide that you need to change the name and pack size of an item.
For example, Malaria RDTs (Rapid Diagnostic Tests) are commonly packed in packets with 25 tests in each pack. The packs can not really be broken down further in the supply chain, and it will only be opened at the last mile service delivery point. Therefore you made a decision to define this item as:
Rapid Diagnostic Test (RDT) for Malaria, Pack/25 with a default pack size of 1.
This works fine until your Malaria Programme team have advised you that they prefer to count the individual test in such a way that it matches the number of patients that need to be tested. If they need enough tests for 750 people, they want to order 750 of this item, not 30 (750/25). Therefore, you decide that you need to change the name and pack size of this item to:
Rapid Diagnostic Test (RDT) for Malaria with a default pack size of 25.
- Changing the Item name and pack size is the easy bit. The challenge is that all existing stocks need to be recounted with resulting inventory adjustments.
- If your system is of any substantial size, you will want to consult with stakeholders to plan a smooth transition.
- After a change such as this, all historic issuance / AMC records will be 'incorrect'. In the case above, they will be 25 time less than future issuance AMC records
Changing the item
If the item is currently described as:
… with a pack size of 1.
In this example, the Item code = 732401. The code is often an easier way to select the item.
Edit the item (you will need user permissions to do this) to:
On the Storage tab, replace the Preferred pack size of 1 with 25
Click OK
Carry out stock takes and inventory adjustments
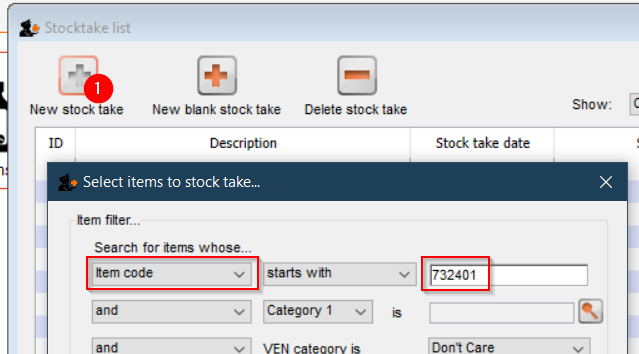
Create a New stock take for Item code starts with 732401:
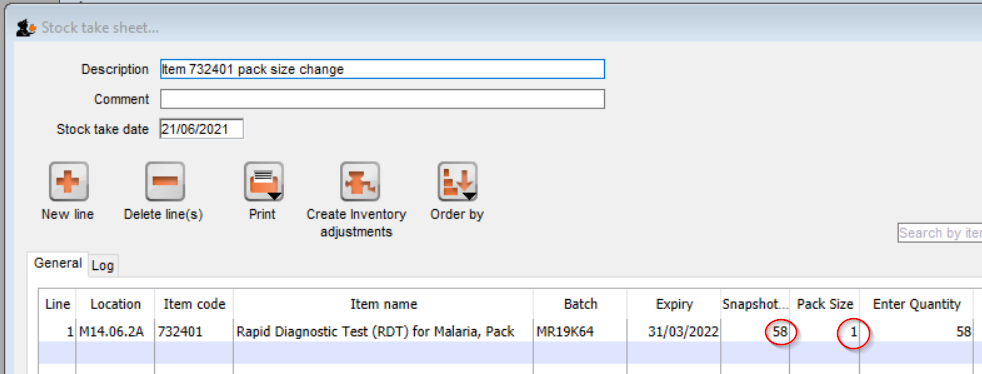
This reveals that there are 58 packs in the store with pack size = 1:
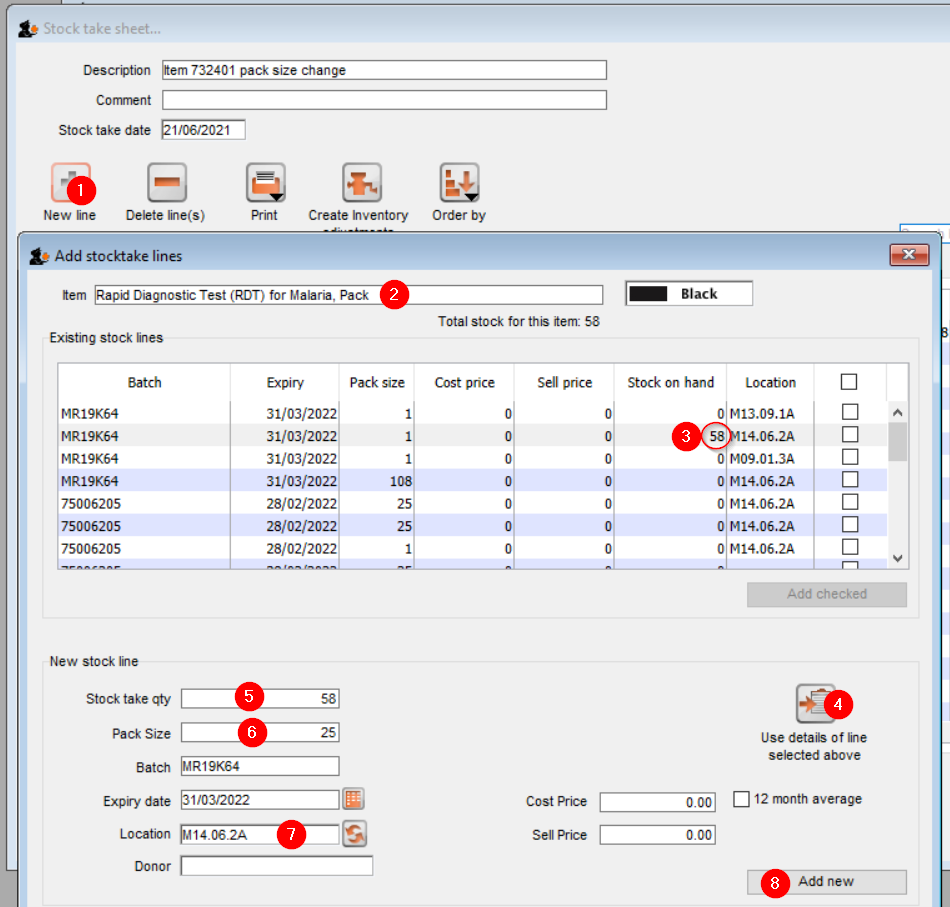
To correct this, we need to:
- Add a New line
- 732401 <Tab>
- Select the line of the existing stock line (see that the Stock on hand = 58)
- Click on the button to use details of this existing stock line
- Set stock take qty = 58
- Set Pack size = 25
- Set Stock stock location to the same as the existing stock line
- Click Add new
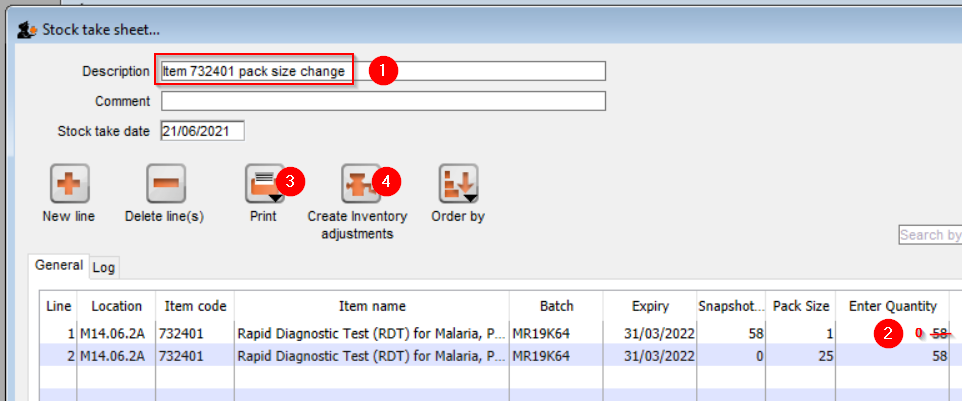
With the resulting stock take:
- We give the stock take a useful title
- We update the Enter Quantity details of the the original stock line to
0 - Carry out a stock count to ensure that the stock on the shelves matches the newly added line and make any necessary adjustments in the Enter Quantity column.
- Click the Create Inventory adjustments button to finalise the stock take.
| Previous: 28.09. Imprest work flow | | Next: 28.11. Benefits of a multi-store system |
