25.03. mSupply client / server installation part 3
These steps need to be carried out after completing the steps described in:
20.01 mSupply client/server installation part 1
20.02 mSupply client/server installation part 2
Obtaining a data file
If you are setting up a sync site for a synced system, then you will need to:
- Generate the XML file for the sync site from the central server - refer 29.04. Sync Site Export
- If creating a single-user sync site:
- Transfer the XML file to the sync site. The Dropbox that you configured in Install Dropbox is handy for this purpose.
- Create the datafile from this XML file through 29.05. Sync Site Import.
- If creating a server sync site:
- Create the datafile from this XML file through 29.05. Sync Site Import. This could be done on the server, but is normally easier to do 'locally'. Make sure you are NOT using a version of mSupply more recent than that being installed on the server. Contact support@msupply.foundation to confirm which version to install.
- Transfer the datafile to the sync site. The Dropbox that you configured in Install Dropbox is handy for this purpose.
Installing mSupply Server software
If you are upgrading from a previous version...
If you are upgrading from a previous version of mSupply, first perform a data backup:
- With mSupply server open as an application click on File> Backup…. This will generate a backup file of your current data with file extension .4bk.
- Copy this file to at least one safe place, e.g. USB drive, a cloud service such as Dropbox.
- Continue only when the .4bk file has completed transfer to the remote location.
Moving from pre v3.50?
There was a major upgrade of mSupply's internal structure in v3.50. If you are upgrading from a pre v3.50 installation of mSupply, Sustainable Solutions will need to convert your data so that it can be read by mSupply versions after v3.50. This conversion process is provided free of charge.
Obtain and run the mSupply Server installer
The client/server version of mSupply has two installers:
- One installer, with the word
Serverin the title, is used to install the mSupply Server software on a single server computer. - The other installer, with the word
Clientin the title, is used to install the mSupply Client software on as many computers as you wish including on the server computer. You will be limited in how many clients can connect at any one time by the server licence you have purchased.
You must be logged on as Administrator to install mSupply Server with the correct permissions. Please consult your IT support staff if you require assistance to achieve this.
Once you have obtained the mSupply Server installer file, double click it to install. Here is what the mSupply server installation window should look like:

- You may be asked by the operating system whether 'you want to allow this app to make changes to your device?'. Click Yes
- At the mSupply Server Setup Welcome screen, click Next
- To proceed with the installation, you will need to click on the 'I agree to the terms of this license agreement' radio button and click Next
- Unless you have good reason to do otherwise, don't change the installation folder, and click Next
- Unless you have good reason to do otherwise, don't change the Shortcut folder, and click Next
- At the Ready to Install window, click Next
- After some time (minutes!) you will be shown the Installation Successful window. Click Finish
What is installed where:
We strongly recommend you do not change the default installation directories, which are as follows:
- mSupply Server:
C:\Program files\mSupply\mSupply Server - mSupply Client (see Installing mSupply Client below):
C:\mSupply Client
mSupply Server installer also installs the following files and folders:

Starting the Server for the first time
- There is no point in carrying out the following steps unless you are ready to create a new mSupply data file, or you have one to load.
- If this is a satellite site on a synced system, you should have one to load - refer Obtaining a data file.
Run mSupply Server
We need to run mSupply Server as an application until all configuration is completed. Don't run as a Service now as some configuration functionality is not enabled when run as Service.
Sometime it has been useful to allow the mSupply.exe to run as Administrator by default. This gives the application the right to modify data in folders that may have been unknowingly restricted by operating system.
View the mSupply.exe file inside the mSupply installation folder. View properties then Compatibility tab and set the file to always Run this program as an administrator. View the image below for better guidance.

We need to run the mSupply Server software as Administrator.
Find the mSupply Server executable (C:\Program files\mSupply\mSupply Server\mSupply.exe), right-click on it and select Run as administrator

You will then be presented with the following dialogue box:

Click Create to create a new data file or Open to choose an existing data file. The below image shows an existing data file.

Since Windows version 1803 and following, there can be issues with permissions to access folders located in individual user folders such as under My Documents. Therefore, it is now highly recommended to save your data file in the folder: C:\ServerName_mSupply_data replacing ServerName with the mSupply server (site) name, eg. C:\Hagen_AMS_mSupply_data.
You may get a question from the Windows Firewall requesting permission for mSupply to communicate through the Firewall.

Allow mSupply to communicate on both private and public networks.
If the above steps have succeeded, you should see the 4D Server Administration window:

Configure backups
- Edit > Settings > User settings for Data file > Backup tab
- Scheduler: Set Automatic Backup: to
Every day, at20:00or later, as long as it is a time when work is likely to be finished. It will have to be set earlier, say16:00if the server is switched off of an evening. - Configuration:
- Content:
tickData FileuntickStructure FileuntickUser Structure File- Delete all 'Attachments' except the
.4DIndxfile. - Add the journal (
journal) files to the backup. The Journal file cannot be selected until you have configured it under Log Management below, and run the backup once, which you can do once the backup settings have been configured. Once these have been configured, the backup contents should look something like this: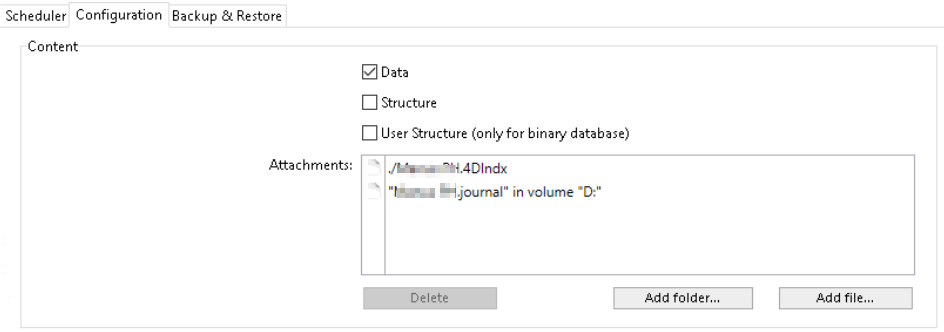
- If this server uses the Dashboard, then add the dashboard configuration files (normally
C:\Progran Files\mSupply Dashboard\data\grafana.dbandC:\Program Files\mSupply Dashboard\conf\custom.ini) to the backup - see here (noting that the journal file hasn't been added yet!):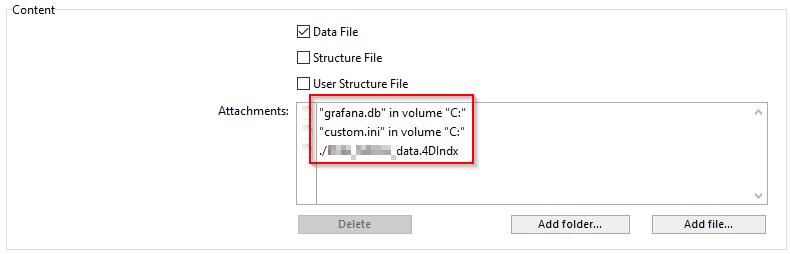


- Backup File Destination Folder
- If on physical hardware, this should be a separate physical disk (e.g.
D:\mSupply_backups). - If on a virtual machine it is preferable to store the backups on a separate virtual disk.
- Log Management: Set .journal to the same parent folder as the backups.
If a location of the log file is already specified, and you want to change it, you need to untick the “Use Log” tick-box and then when you re-tick it you will be prompted for a new location.
- Backup & Restore
- General settings
tickKeep only last30backup files (dependent on disk storage space).tickBackup only if the data file has been modified- Delete oldest backup file
after backup - If backup fails:
selectRetry after30Seconds tickCancel the operation after5attempts.
- Archive
- Segment Size (Mb):
None - Compression Rate:
Compact - Interlacing Rate:
None - Redundancy Rate:
None
- Automatic Restore
tickRestore last backup if database is damagedtickIntegrate last log if database is incomplete
- Click OK
You may see the following dialogue box:

- Click OK to create the first backup.
Configure cache
Edit > Settings > User settings for Data file

Select Database and then set up the cache memory.
TickCalculation of adaptive cache- Memory to be reserved for other applications and for the system: =
512MB (default?) - Percentage of the available memory used for cache =
100%. According to the 4D v16.5 Database/Memory page, 'Percentage of the available memory used for the cache = 100% since there is only one 4D Server application.' If other applications running on the server need additional RAM, it should be added to the figure above. - Minimum size =
1,000MB (default?) - Maximum size = can be set to any number, including greater than available RAM. If this number is greater than the available RAM, 4D will adapt the size of the cache according to the actual available RAM.
- Flush Cache every:
2 Minutes

- Click OK
- Exit 4D Server Administration window.
- Check that the
settings.4DSettingsfile has been created in the<DataFolder>/Settingsfolder
Setting the server software to run as a service
The server should now be set to start automatically when the machine is turned on. This can be accomplished by setting the server to run as a service. Choose File > Register Current Database as Service.
If the Register Current Database as Service option is greyed out, you are probably not running the mSupply Server as Administrator. You need to quit the server and run as Administrator.

Once you have registered the Current Database as Service, Quit the 4D by clicking the close box on the top right (or choose File > Quit from the menus). You will then be shown a disconnect window something like this (you can select Disconnect all clients and quit if no users are currently active):

Pin Services to the taskbar
It is important to be able to quickly observe the status of the 4D / mSupply Service. Therefore, we pin Services to the taskbar:
- Click Windows icon
- Type
Services - Right-click the Services Desktop App
- Select Pin to taskbar
Configure mSupply Service settings
Click on Services in the task bar. You will be shown a window like this.

Double-click on 4DServer: mSupply - fortunately it is usually the first item in the list!
You will be shown the 4DServer: mSupply service properties window. Change the Startup type in the drop-down list to automatic (Delayed start).

Log on as administrator account
With mSupply 3.85+ on Windows Server 2012+ and Windows 10 1803+ the service has had to be assigned to “Log On” to an administrator account for mSupply service to start:

Manually starting the Service
Despite being configured so, the mSupply Service sometimes will not start when the server hardware starts. The service can be started through the Services:

Manually stopping the mSupply Server Service
- To manually stop the mSupply Server Service, first make sure clients are not connected, then double-click the “Services” shortcut you made on the desktop, highlight the 4D Server service, and click the square “stop” button (looks like a “Stop” button on a media player)
Creating a new data file or choosing a different data file
From this point there should be no need to revisit any of the above procedures to operate mSupply. However, if you are testing, or starting a data file for a second organisation, you may wish either to change the data file mSupply is using or to create a new file.
The mSupply program (the files named “mSupply.4DC” and “mSupply.RSR”) store the path to the last data file used, and the next time mSupply is started, the previous data file that was open is opened again unless there is user intervention or the “old” data file has been moved to a new location.
To intervene, hold down the “alt” key as the 4D server starts up.
You will be shown the standard open/save window:

To create a new data file, click the “New” button.
To select an existing data file, navigate to the file's location then click the “Open” button.
SSL Certificate
The mSupply server also has a webserver as mentioned here.
It is recommended that a public facing web server should have an SSL certificate installed. For the mSupply server a 'cert.pem' and 'key.pem' need to be generated using the SSL certificate that has been purchased from a SSL vendor.
Theses files needs to be stored inside the folder C:\Program Files\mSupply\mSupply Server\Server Database as shown in the image below.

The cert.pem file contains the certificate in the following format and can have the root as well as the intermediate certificate.
-----BEGIN CERTIFICATE-----
MIIGUzCCBTugAwIBAgIRAP9nsdfsfdsdfYH0oEZgg3k28WUoYQgQwDQYJKoZIhvc
gY8xCzAJBgNVBAYTAkdCMRswGQYDVQQIExJHcmVhdGVyIE1hbmNoZXN0ZXIxEDAO
BgNVBAcTB1NhbGZvcassdsdmQxGDAWBgNVBAoTsdfsD1NlY3RpZ28gTGltaXRlZD
AxMuU2VjdGlnbyBSU0EgRG9tYWluIFZhbGlkYXRpb24gU2VjdXJlIFNlcnZlciBD
QTAeFw0yMzA2MTYwMDAwMdsadsdDBaFw0yNDA2MTUyMzU5NTlaMCExHzAdBgNVB
Junk
-----END CERTIFICATE-----

-----BEGIN CERTIFICATE-----
MIIGEzdddhuyuyuyuCCA/ugAwIBAasdasdgIQfVtRJrR2uhHbdBYLvFMNpzANBg
iDELMAkGA1UEBhMCVVMxEzARBgNVBAgTCk5ldyBKZXJzZXkxFDASBgNVBAcTC0pl
cnNleSBDaXR5MR4wHAYDVQQKExVUaGUgVVNFUlRSVVNUIE5ldHdvcmsxLjAsBgNV
BAMTJVVTRVJUcnVzdCBSU0EgQsdsd2VydGlmaWNhdGlvbiBBdXRob3JpdHkwHhc
MTAyMDAwMDAwWhcNMzAxMjMxMjM1OTU5WjCBjzELMAkGA1UEBhMCR0IxGzAZBgNV
Junk
-----END CERTIFICATE-----
The the key.pem file contains
-----BEGIN PRIVATE KEY-----
MIIEvAIBADANBgkasasdfqhkiG9w0BhgghAQEFAASCBKYwggSiAgEAAoIBAQCqPA
TZB5GnFAODhHMTU+pqGD8eS6NOzWwhoyb2dvZv1w2Gh6fcprPUpATltvcMe8q+fe
+ITiYylKfcs2nNYyirr2sdfsdfSPGMKR277MW6G7etFCGjBH/Ae9gRcFk4z8Arnj
e9oRf/UChO21bHjN9itHGIT/7ssp068EufJ+thAdDxzp3xNw70lkAXMxzsZhSJ8k
CTvUxUF6Niul/1ZReUURCZp6coIweewerRhoLe6KXpgfuuIqtpvyOs2AcGRI6qfx
iC20nTBKweefzPg4Uo9d6DdhQD7xdklD1SXlcTgEXpa0Cc/iUGthXWvyWyff5uB
junk==
-----END PRIVATE KEY-----
More recently we have moved towards using Caddy server software which setup a reverse proxy server which use Let's Encrypt to automatically update SSL certificates. This will avoid the need to manually watch and update expiring SSL
Installing mSupply Client
Needed: mSupply Client software of the same version (or relatively recent) as the mSupply Server.
- The mSupply server should run as a service on the server computer - see above. If any user needs to use mSupply on the server (not recommended, but possible, and sometimes necessary) then they should not be running the mSupply Server software. They should run the mSupply Client software, which should be made available to all user accounts.
Obtain and run mSupply Client installer
You must be logged on as Administrator to install mSupply Client with the correct permissions. Please consult your IT support staff if you require assistance to achieve this.
- Once you have obtained the mSupply Client installer file, double click it to install.
The mSupply client will be installed in the folder C:\mSupply\mSupply client on your computer.
mSupply client installer also installs the following files and folders:
- A shortcut on the Desktop called
mSupply client. - A folder called “\4D\Network” in the Windows folder on the startup volume, which contains network component files that need to be present for 4D to communicate over a TCP (and other types of) network(s).
- No reports are installed on 4D client. Each time 4D client connects to the Server, reports that have been added or modified on the server are automatically copied to the client.
- Installers have been set up to overwrite existing files, so reinstalling the software will restore any potentially corrupted files to their original state. The installer will not overwrite your data files, unless you have been unwise enough to name your data file “example data” and put it in the “example data” folder
 .
.
For convenience, pin the mSupply client desktop shortcut to the taskbar.
If any other Windows users will use this computer to access mSupply, it is worth copying the mSupply client desktop shortcut to the C:\Users\Public\Desktop folder. This will place the shortcut on the desktop of each user. Each user will need to pin this shortcut from their desktop to the taskbar.
The C:\Users\Public\Desktop folder is normally a hidden folder. You will likely need to make it visible).
Additionally, if this computer is primarily used for running mSupply, then it is worth copying the mSupply client desktop shortcut to the Startup folder. The actual folder name changes with Windows version  so here are instructions: How to Add Programs, Files, and Folders to System Startup in Windows.
Starting the mSupply Client
Once the installation is completed, double-click the “start mSupply Client” shortcut on your desktop. A window something like this should appear:

The window lists available mSupply servers on your network (there should be only one!) Click on the server you wish to connect to.
- Once you have connected successfully, the mSupply Client 'remembers' which Server you last connected to and stores this in the Recent tab. Whenever you run the mSupply Client, it will automatically connect to that server.
- If, mSupply Client cannot connect to the mSupply Server, this window will pop up showing the Recent tab. You can try choosing the server there.
- If, for some reason, network settings have been changed and you cannot connect from the Recent tab, remember to look at the TCP/IP tab as well.
Clicking the “OK” button will take you to the mSupply password entry window. For new data files, the password is user1 for the first user in the list. Click on the first user, then enter the password and click OK
Forcing mSupply Client to re-sync files from the server
Occasionally the mSupply client may fail to connect with the server for un-known reasons. Errors such as the “This database has not been compiled for 64-bit processors” has been encountered and can be fixed in the following manner. Please read on.

Sometimes simply forcing the mSupply client to retrieves all setup files from the server may just fix things.
To do this Double click on the mSupply Client icon and hold the “Alt” (option on MAC) key. You should see such a window open.

On the above window select the server and click the custom tab.

On the above window check the Force update of local resources checkbox and click the OK button.
This will force the mSupply client to get the resources from the server and past issue may now be resolved.
Close mSupply and restart normally without the “Alt” key and mSupply client should be able to connect to the server without errors.
mSupply Client software cannot see the mSupply Server?
Server is not visible?
- To make it easy for you to connect, mSupply Server publishes details about available servers on a specific port. It is quite possible that products such as “Zone Alarm” and “Norton Personal Firewall” will block access to this port and stop discovery of the servers. Contact your system administrator if the list of available servers is blank.
- Of course, it may be possible that the mSupply Server service is not running. Check Services to establish that.
- Lastly, the Windows firewall may be blocking the Server publishing it's presence - see below.
Configuring Windows firewall on server
The Windows firewall may need to be adjusted to allow the Client to receive Server identification.
To locate an mSupply server on a network mSupply client broadcasts over the subnet on random UDP ports from 49157 and above. As such inbound UDP ports from 49157 upwards should be opened on the server firewall. If these UDP ports are not open on the server then the clients cannot automatically find the server. However clients can still be manually directed to the server IP address by holding alt when client is opening, and entering the IP address in the network address field of the custom tab.
The default ports for client/server communication in mSupply server are TCP 19812, 19813 & 19814. The server firewall will require inbound TCP ports 19812, 19813 and 19814 to be opened (however these ports can be changed in mSupply server if required).
The firewall on the Client machines could also block access to the server machine. Testing with the firewalls on the server / client machines temporarily turned off in various combinations will help to establish whether firewalls are blocking communications.
Manually configuring the mSupply client
Due to firewall or if you connect to mSupply server via a router, then you may need to enter in the IP address on the mSupply Client custom setting window.

The data base name is always : mSupply
If mSupply server is serving via the default port (19813) then simply enter in the IP address. Otherwise, see more details on the Custom Tab.
As part of the installation, a batch file with the name Reset client temp folder is installed on the desktop. This is for use if the client begins to behave incorrectly in the future, as described on the 28.01. How to re-set the mSupply client page. It is not for use during installation so you can safely ignore it until it is needed in the future. It is safe to move the batch file to somewhere other than the desktop if needed.
Forcing mSupply client to connect to a specific mSupply Server
Within an organisation it is possible to have multiple mSupply server running like in the image shown below.

Now you as a administrator may require a particular mSupply client to connect to one of the server and to ignore the others. To reduce confusion to the user you may require the user to connect to a particular mSupply client.
It is possible to direct a mSupply client application to look out for a particular mSupply server only. Let us assume that you want a certain computer to access the mSupply server with a IP address of : 192.168.3.200
- Install the mSupply Client.
- Navigate to `C:\mSupply client\Database`
- You will see the `EnginedServer.4DLink` file, use Notepad to open it.
- For the server path `server_path=“:19813”` Enter a valid msupply server IP like `server_path=“192.168.3.200:19813”`
- save the `EnginedServer.4DLink` file
- Now when you start the mSupply client, it will know where the mSupply server is and will look for the IP : 192.168.3.200

mSupply Server configuration
Register mSupply
The procedure is described earlier in “Preferences” chapter of the mSupply manual. See The Register button
You will either have to phone or email the information to Sustainable Solutions to obtain a registration code.
The registration code is keyed to your Organisation name and the MAC address of the server. Changing either of these will require a new code, which we shall willingly provide. So, take care when setting the Organisation Name!
Configure mSupply preferences
Once registered, you may want to systematically to go through the mSupply Preferences and choose appropriate settings, and particularly setting up the Secondary backups! Start here: Preferences > General
Turn off web dashboard
If the web dashboard has been set up on the Primary Server, then the dashboard preferences will be copied to the Satellite site datafile. In most cases, the web dashboard is not being used on the Satellite site and it is an unnecessary interaction with the scheduler, so may as well be turned off:
Before v4.04:
- File > Preferences… > Dashboard
- Untick the 'We use the web dashboard'
- Click OK
After v4.04, the dashboard is managed through the Admin page of the navigator:
- Admin > Dashboard > Export Settings
- Clear the Postgres Server entries
- Click OK

Configure secondary backups
You should have already configured the primary backup. We recommend setting up a secondary backup which will send a backup off-site using a service such as Dropbox. The frequency of this depends largely on what bandwidth your site can afford. Each backup can easily get to GB sizes…:
- File > Preferences… > Backup 2
- Configure secondary backups
Turn on Synchronisation
When you are finally ready to turn on synchronisation:
- File > Preferences… > Synchronise > Click to un-lock, enter code to edit.
- Set the Sync time interval to
1 - Click OK
Your installation of mSupply may have customisations made specifically for your work scenario. Please contact our support staff on support@msupply.org.nz to manage these customisations.
Configure label printer
If you are dispensing, you will need to set up label printer preferences
Graceful shutdown in the event of a power failure
Your mSupply server should be attached to a UPS. The UPS should be fitted with a control cable (serial, USB or network cable) that allows control software to detect a low power situation and shut down the server.
In the UPS control software set the shutdown to start at least two minutes before the power will fail.
Set it to run a batch file at that point. The file should contain the single line “net stop Service name” where the service name is the name displayed in the properties when you double-click the service name in the services window. In the example below the service name is “4DS mSupply.4DC” (not to be confused with the display name)

You may wish to test your typing skills by opening a command prompt:

Accessing mSupply client on a cloud server
If the mSupply client software is running on a PC, there are a range of applications that can be used for accessing the cloud hosted mSupply server including Microsoft's own Remote Desktop Connection software that comes included with Microsoft Windows.
We recommend TS-Plus, which allows users to access client on the server via their web browser.
Troubleshooting
Permission for backup setting file
Since v17 of 4D (the database engine underlying mSupply), when running mSupply as a Service, logging on as the Local System Account (LSA, as described below), mSupply MAY no longer have sufficient permissions to access the folder: C:\Program Files\mSupply\mSupply Server\Server Database\Preferences\Backup
If this is the case, it will result in the following error:

If this happens, it needs to be fixed. The Solution is to edit permission of Users to allow Full control/Modify/Write to the Backup.XML file as shown here:

| Previous: 25.02. mSupply client / server installation part 2 | | Next: 25.04. Schedules and periods |