Training Handout: System Administration
19.03. mSupply customer web interface
What is it?
The mSupply Customer Web Interface allows the staff of Customers in your mSupply system to order stock from a store in your mSupply system. It runs on a browser on any device: tablet, smartphone, net-book, desktop computer etc.
While the Customer Interface will run on smaller devices like smartphones, it is generally impractical to use with screens smaller than 5 inches across the diagonal.
Features and limitations
The Customer Interface is designed to be used by staff of Customers in your mSupply system i.e. people working in places you supply. They could be people outside of your organisation.
The Customer Interface's features are:
- Show Orders: Display a list of the user's orders that are waiting to be processed by the supplying store. These orders can be opened to display further info.
- Create Orders: Orders for stock from the supplying store can be created, deleted and edited.
- Search Items: Search a list of Items available in the supplying store.
Limitations:
- As of 2025-07-21, this feature only works if the supplying store is active on the mSupply Central server. Web orders are not synchronised to stores that are Active on remote sites.
Obviously, this interface is for ordering stock only so there is no place for batch number or expiry date to be displayed or selected in the Customer Interface. mSupply does keep a record of the batch and expiry date of all stock issued to the Customer from the supplying store.
Turn on the customer web interface
To do this you simply need to turn on the mSupply web server. You can find details of how to do this on the mSupply Web Server page.
Setup each customer
There are 2 simple setup steps you need to carry out for each customer.
1. Set the supplying store for each customer
Go to the customer's detail page (Select Customer > Show customers… from the menus, click on the Find button, find the customer in the list and double-click on them):
In the Customer details section, select the customer's supplying store from the drop down list. This is the store the customer's orders will be sent to and therefore the store that will send them goods in response to the orders.
2. Add logins for each customer
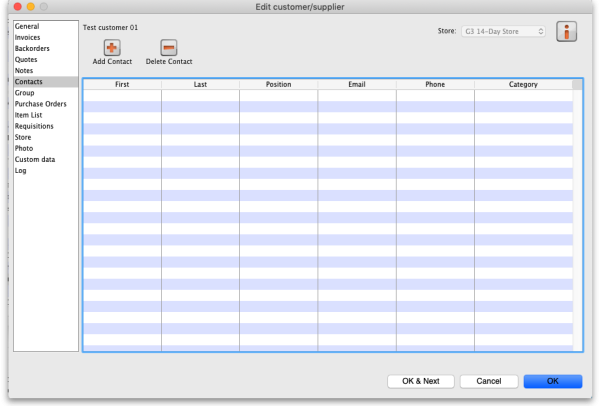
The logins for each customer are setup as contacts of the customer in mSupply. To set them up, go to the customer's detail page and go to the Contacts tab (Select Customer > Show customers… from the menus, click on the Find button, find the customer in the list and double-click on them. Finally, click on Contacts in the tab list on the left hand side.). This window is displayed:
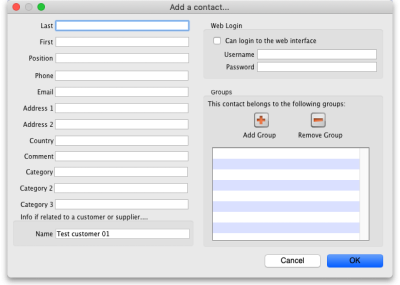
To add a new login (contact), click on the Add contact button to open this window:
Enter the contact's name last and first names in the Last and First fields
In the Web login section check the Can login to the web interface checkbox then enter the contact's username and password in the Username and Password fields - these are the details they will login with.
Click the OK button to save the details. You can add as many contacts for a customer as you like, and they will all be able to login to the customer interface and create orders for that customer.
You can edit a contact's details by double-clicking them in the customer's list of contacts shown in the screenshot above.
To stop a contact from accessing the customer interface you can either delete them or you can uncheck the Can login to the web interface checkbox on their details page.
Repeat these 2 steps for all the customers who need to login to the interface.
Connecting to the customer web interface
Once the mSupply web server is running, your customers can access it by opening an internet browser on any device and navigating to URL:PORT/customer/ where URL is the internet address of your mSupply server and PORT is the figure you entered into the Run the webserver on port field in the preferences mentioned in the section above
With URL re-directing, you can create a web link like : https://demo.msupply.org/customer/
The hyperlink above links to a demonstration site. Send us an email at info@msupply.org.nz if you would like a temporary username and password to try it out.
Once it has been setup correctly, get your customers to bookmark the customer interface web page to save them typing it in every time.
Your customer can then use the following guide to login and order stock on-line. mSupply customer web interface: guide for customers
| Previous: 19.02. mSupply web server | | Next: 19.04. mSupply customer web interface: guide for customers |


