This is an old revision of the document!
1.01. Introduction
Thank you for choosing mSupply. mSupply is now a family of software products, a team of trainers and consultants. Before you launch in (if you haven't already!), we suggest you plan to take the following steps.
- Get a feel for mSupply mobile too. If you're running a vertically integrated supply chain, mSupply mobile will likely work well for you in smaller facilities. It is free and open source, and its documentation and download links are https://docs.msupply.foundation}here
- Read the rest of this introduction.
- Read the setup, tutorial and licence chapters in this manual.
Please note that installation requires basic computer skills:
- You need to be able to locate a file using the “open” and “save” windows.
- If you are not sure, why not try, and email us if you get stuck.
mSupply is designed to handle the following tasks:
- Recording quotations received from various suppliers in a way that makes for easy comparison of true cost prices.
- Create tenders for suppliers to respond to.
- Ordering (Purchasing) of items from a particular supplier, using actual usage figures to calculate the required quantities.
- Entering of incoming goods into inventory.
- Manufacturing items. That is, building new items from raw materials in your stock.
- Tracking Accounts Payable and Accounts Receivable
- Issuing of invoices for customers, and recording the transaction against inventory.
- Customers are able to order on-line via the internet, and can view stock status and the status of their orders.
- Exporting purchase and invoice data for import into an accounting program.
- Reporting on transactions and other data in almost any manner you want!
- If you need help with installing mSupply please feel free to email us at support@msupply.org.nz
About this user guide
The latest and most authoritative version of this User Guide is located on-line at http://docs.msupply.org.nz/. You can export the chapter you're viewing in PDF format by clicking the export:pdf tab to the right. It may then be viewed off-line within Acrobat Reader or other PDF viewer. To obtain the whole user guide in PDF format, visit mSupply site
If you are reading a PDF version, it is likely that a more up-to-date version is available on-line.
The software is under constant development as new features and facilities are added. We strive to ensure that the user guide and the graphics that it contains reflect these developments, but occasionally you may find that there are differences between the program itself and the guide or its graphics, where the updating of the guide has not quite kept pace with the development of the software. These are usually of a minor nature, but should you have any difficulties, do please send us an e-mail with details of your problem.
It should also be noted that with the considerable range of preferences and user permissions, a particular user's window may have features included or omitted (according to their preferences and their permissions) when compared with the screenshots appearing in the guide.
As mSupply is compatible with both Windows OS and Apple Mac OS, there is a mix of screenshots in the manual taken from each operating system.
About us
Sustainable Solutions was established in 2001 with the primary aim of supplying and supporting mSupply software in developing countries. We are committed to producing software that enables excellence in health care delivery. We take pride in looking after people who choose to use our services.
We have offices in:
- Kathmandu, Nepal
- Auckland, New Zealand
- Dundee, United Kingdom
- Belfast, United Kingdom
- Melbourne, Australia
We can be contacted at:
- email:info@msupply.org.nz
- phone: +977 1 5548021 (Nepal) or +64 225 190 499 (New Zealand)
Please feel free to request more information.
Thanks
- This software grew out of necessity at the Medical Supply Department, Kathmandu, Nepal. We learnt a lot from Jaap Zijp's software “Bhandari”, and from the staff at MSD where mSupply was originally developed and tested.
- Ujwal Khatry has stuck with Sustainable Solutions for twenty years, including the startup period where our company name could well have been a misnomer.
- Jim Staples of 4D inc. http://www.4D.com kindly arranged an initial donation of the 4D development environment we use.
- Thanks to those people in the 4D tech mailing list who have helped for no benefit to themselves.
- John Ross, Pharmacist of Patan Hospital, Kathmandu, believed in the quality of mSupply enough to use it long before it was fully ready
- David Adams kindly donated his superb texts on 4D.
- The moderators of the E-Drug mailing list have been gracious in letting us use that list for occasional announcements.
- Juliet has always been supporting and more through the ups and downs of starting a new organisation.
Copyright
mSupply software is copyright Sustainable Solutions, 2006, UMN/INF/Interserve 1996 to 1999. You may only use the software in accordance with the accompanying licence agreement.
Licence Agreement and Costs
Commercial users or any user wanting multi-user functionality enabled must obtain a licence from Sustainable Solutions.
Please view our web site http://www.msupply.org.nz for up-to-date pricing.
A free version of mSupply is available for Non-commercial use
- You may use mSupply software in single user mode for free as long as it is used:
- in an approved not-for-profit organisation
- in a developing country.
- Sustainable Solutions shall be the sole arbiter of those qualifying for free use.
- All users (free and paid) must register with Sustainable Solutions to obtain a registration code. Information supplied will not be used for any purpose other than generation of registration code.
- Users who have obtained a free licence number are not eligible for free support.
Please contact us for quotes regarding customised versions and installation and training packages.
Changes in recent versions
The mSupply version history is available here: http://msupply.org.nz/history
| Previous: 1. About mSupply | | Next: 1.02. Why mSupply? |
1.05. Terms, definitions and conventions used in this user guide
If you aren't familiar with using a computer, you should read this chapter. We also recommend you work through the 3. Tutorial section of this user guide.
General terms
Menus: choose New item from the Item menu (sometimes also written as choose Item>New item) means click on the word Item in the menu bar, then choose New item from the menu that drops down.
Keyboard keys: a handful of keys on the keyboard are used extensively and are indicated in italics. The most common are: Tab, Shift, Ctrl, Alt, Enter and Backspace.
Field: an area on the screen (usually a white box) where you can make an entry, either text or numbers. In many places, you can use your mouse to hover over a field for a description of what is required.
Typed data: anything that must be typed into a field is shown in monospace font. For example: Type 100 and press Enter.
Checkbox: a box that changes from having an “X” in it to being blank each time you click in it. To “check” a checkbox means to click it so that an “X” appears (if there is not one already present). Checkboxes have text beside them explaining what the box is for.
Tab & Shift: you can generally move from field to field in a window using the Tab key. Holding down the Shift key while pressing the Tab key will move from field to field in the reverse order to normal. Note that on Windows, some buttons are “tab-able”. That is, pressing the Tab key moves the “focus” to a button. Pressing the Return or Enter key will then activate that button.
Highlight button: pressing the Enter key will operate the highlighted button in a window. This is is usually the OK button.
Double-click: in lists (e.g. of suppliers, customers or items), double-click using the left button of the mouse on a line to edit or view more details.
Insertion point: the blinking line in a field that indicates which field is currently accepting typed input.
OK button: can be operated by pressing the Enter key.
Cancel button: can be operated by holding down Ctrl key (cmd on Macs), and pressing the period key (full stop).
Path to a file (or document): a way of describing where a document is stored on your hard disk. It is written as hard disk:folder 1:folder 2:document, which is the same as C:\folder 1\folder 2\document.
Modifier keys: are different for Windows and Macs. We've tried to list both in the manual, but sometimes one might slip through.
- The Windows Ctrl (control) key does the same as the cmd (command) key on Macs
- The Windows Alt (alternate) key does the same as the opt (option) key on Macs.
Column headings: can be clicked to sort the list by that column.
Negative values: are generally not required in mSupply. Even when you are entering returned goods from customers, or returned goods to suppliers, you enter positive values. mSupply automatically converts the invoice total to a negative amount when it is a credit to a supplier or from a customer.
mSupply terms
Basics
Items: Items are the products we manage in mSupply, including medicines, consumables, equipment, laboratory and radiology items or even larger assets such as vehicles and furniture. An item may or may not have stock lines at any given time. For example: In the example data file provided with mSupply, “Amoxycillin 250mg tab/cap” is an item. When you first start to use the example data file it has 2 stock lines. (You can view them under the “stock” tab of the Item details window (more on that later!).
Item Lines (or “Stock Lines”): Represent different batches of the same item.
Stock: Represents the physical stock (inventory) in your store.
Stores: Stores are facilities using mSupply (desktop or mobile). Some facilities can run multiple stores. For example, there may be a pharmacy in the emergency department that manages stock completely separately to the main pharmacy – this can be a separate store (if they are using mSupply).
Locations: Locations are places within stores where items are kept. Locations can only exist within a store. A large store like a central warehouse may have several thousand highly specific locations (e.g. A.02.04, B.01.03), while a small store may only have a few locations (e.g. Room 1, Room 2). Items may also be stored without assigning a location: this is common in very small facilities, where items are just stored alphabetically.
People
Suppliers: Suppliers are facilities that a store orders or receives stock from. Suppliers may be external (e.g. private drug companies or wholesalers) or internal (e.g. central medical store, provincial warehouses).
Donors: Donors are external entities who pay for donated stock (e.g. UNICEF, USAID). No donor is entered when the government or medical store is paying in a normal financial transaction. When the donor is recorded, you can track donated items through the supply chain and run donor transaction reports and stocktakes.
Customers: Customers are recipients of items, excluding patients (usually). This includes health centres, hospitals, wards, private clinics and pharmacies, touring medical teams, outreach services and any other entity that an mSupply store issues stock to.
Patients: Patients are individual people who receive items from a prescription. When a store uses mSupply in dispensary mode, patients receive unique ID numbers and we can track their prescription history, allergies, payment history, insurers and notes.
Prescribers: Prescribers are authorised medical professionals who provide prescriptions to patients, which we can dispense in mSupply. Prescribers may include doctors, nurses and other authorised individuals.
Users: Users are the people using mSupply (you!). Each user has their own password and set of permissions (which can vary from store to store). System logs track everything that users do in mSupply.
Transactions and Features
Builds: Builds are transactions that record the manufacturing of an item by turning raw materials into a finished product.
Stocktakes: Stocktakes are physical counts of the stock in your store including all item details, such as the item name, quantity, batch and expiry date.
Purchase Orders: Purchase Orders are used to order stock from an external supplier i.e. a supplier who does not use mSupply (e.g. private drug companies, wholesalers, private pharmacies).
Goods Receiving: Goods Receiving is used to receive stock from an external supplier who we previously ordered stock from via a purchase order. We can then create a Supplier Invoice directly from the goods receipt to add received stock to our inventory.
Supplier Invoices: Supplier Invoices are used to add received stock to our inventory. They are also known as “bills”.
Internal Orders: Internal Orders are used to order stock from an internal supplier i.e. a supplier who does use mSupply (e.g. central medical store, provincial warehouses).
Requisitions: Requisitions show internal orders placed to our store from customers using mSupply. Examples of customers using mSupply include provincial warehouses, public hospitals and health centres. We can create a Customer Invoice directly from the requisition to issue stock to a customer.
Customer Invoices: Customer Invoices are used to issue stock to a customer from our inventory.
Prescriptions: Prescriptions are instructions written by a prescriber authorising a patient to be provided a medicine or medical device. mSupply can record dispensed prescriptions and maintain patient dispensing histories.
Patient Credits: Patient Credits are used to return items from patients and record credits in their favour. mSupply tracks patient credits and applies them to outstanding prescription payments.
Payments: Payments are used to record payments made to suppliers. mSupply tracks outstanding payments from supplier invoices.
Cash Receipts: Cash Receipts are used to record payments received from customers for customer invoices. They can also be used to record patient payments for dispensed items. mSupply tracks outstanding payments owed by customers and patients.
Supplier Credits: Supplier Credits are used to return items to suppliers and record credits in your favour. mSupply tracks supplier credits and applies them to outstanding supplier payments.
Customer Credits: Customer Credits are used to return items from customers and record credits in their favour. mSupply tracks customer credits and applies them to outstanding customer payments.
Cash Register: The Cash Register records incoming and outgoing cash transactions and displays a current balance. mSupply tracks all cash movements and records them here.
Configuration
Visibility: Visibility allows us to control what stores, customers, suppliers and items a user can see when logged into a specific store.
Preferences: Preferences are system-wide settings that apply to all stores and users.
Store Preferences: Store Preferences are settings that apply to specific stores.
Permissions: Permissions are settings that apply to specific users as either individuals or groups.
1.04. Which combination of mSupply products best suits your organisation?
Since its creation in 1998, mSupply has grown and multiplied as it has been applied to different challenges. The original Free-user (Windows or Mac based) application continues to be downloaded and used regularly. In fact, it comes packed with (almost) all the bells and whistles of some of our most sophisticated installations, but is only suitable for a small, 'single concurrent user' facility.
Comparison of the mSupply products
So which are the right mSupply products for your organisation?
Free-user
- PC or Mac application - Download here. The database resides on the computer that the application has been installed on. It can be used by only one user at any one time.
- Free! You still need to register mSupply with Sustainable Solutions, but we don't charge you for it - and we don't sell your contact details either!
Single-user
- A software license needs to be procured, generally for about 1/3 of the price of a multi-user client, and then Support and UTD on top of that.
Multi-user (Server / client)
- For situations where more than one user needs to access the database at one time. The database is hosted on a file server and mSupply server software is installed on that hardware. Users have access to this data through mSupply client software installed on client PCs that communicate to the server through a Local Access Network (LAN). Remote users can access the server through Remote Desktop Protocol (RDP) or similar.
- A software license needs to be procured for each concurrent client. Support and UTD is optional, but highly recommended. Most of our customers are very happy to pay for these services.
Synchronised Multi-user
- If the internet connection to remote users in a Multi-user configuration is inadequate, then synchronisation allows a Primary - Satellite configuration to be deployed. 'Satellite' multi-user servers are installed at remote sites where users operate mSupply on their local store without worrying about the internet connection. In the background, these 'satellite' servers will synchronise their local store data with a 'Primary' server when the internet connection becomes adequate.
- A software license needs to be procured for each concurrent client for each server. The Synchronisation server Module and Web Server Module are required on the central server.
Synchronised Single-user (Single-user sync)
- There are situations where the remote sites (with poor internet access) are just single-operator stores needing to manage and report their stock using the fully featured mSupply client. Procuring the minimum multi-user satellite server configuration for each of these sites would be expensive. A solution has been developed that entails installing single-user client machines (normally laptops) at these remote locations and then synchronising them to the primary server much like the Synchronised Multi-user configuration.
- Lower cost than conventional synchronised multi-user as the single-user client license is less costly than multi-user client licenses. The Synchronisation server Module and Web Server Module are required on the central server.
mSupply Mobile (Android)
- mSupply Mobile is similar to Synchronised Single-user (Single-user sync), but the users operate with mSupply Mobile (client) software on Android tablets. This app has a reduced feature set, but is more than adequate for most Last-Mile needs. Local stock details are synchronised back to the Central server, and can be monitored and reported on there.
- Being Open Source software, mSupply Mobile has zero license fees. The Synchronisation server Module and Web Server Module are required on the central server.
Open mSupply
- Open mSupply is the multi-platform mSupply software that has been under development by the mSupply Foundation since 2020. Open mSupply has all of the flexibility of all of the other versions of mSupply with the benefit of being Open source.
- Being Open Source software, mSupply Mobile has zero license fees. The Synchronisation server Module and Web Server Module are required on the central server.
Comparison table
The key differences between the configurations basically comes down to how the user(s) interact with the database. We hope this table helps in making that decision.
| Product / configuration | Description | Software price implications - refer Pricing |
|---|---|---|
| Free-user | PC or Mac application - Download here. The database resides on the computer that the application has been installed on. It can be used by only one user at any one time. | Free! You still need to register mSupply with Sustainable Solutions, but we don't charge you for it - and we don't sell your contact details either! |
| Single-user | Same as Free-user, but for users who wish to make use of Support3) and Up-to-Date (UTD)4) | A software license needs to be procured, generally for about 1/3 of the price of a multi-user client, and then Support and UTD on top of that. |
| Multi-user (Server / client) | For situations where more than one user needs to access the database at one time. The database is hosted on a file server and mSupply server software is installed on that hardware. Users have access to this data through mSupply client software installed on client PCs that communicate to the server through a Local Access Network (LAN). Remote users can access the server through Remote Desktop Protocol (RDP) or similar. | A software license needs to be procured for each concurrent client. Support and UTD is optional, but highly recommended. Most of our customers are very happy to pay for these services. |
| Synchronised Multi-user | If the internet connection to remote users in a Multi-user configuration is inadequate, then synchronisation allows a Primary - Satellite configuration to be deployed. 'Satellite' multi-user servers are installed at remote sites where users operate mSupply on their local store without worrying about the internet connection. In the background, these 'satellite' servers will synchronise their local store data with a 'Primary' server when the internet connection becomes adequate. | A software license needs to be procured for each concurrent client for each server. The Synchronisation server Module and Web Server Module are required on the central server. |
| Synchronised Single-user\\ (Single-user sync) | There are situations where the remote sites (with poor internet access) are just single-operator stores needing to manage and report their stock using the fully featured mSupply client. Procuring the minimum multi-user satellite server configuration for each of these sites would be expensive. A solution has been developed that entails installing single-user clients machines (normally laptops) at these remote locations and then synchronising them to the primary server much like the Synchronised Multi-user configuration. | Lower cost than conventional synchronised multi-user as the single-user client license is less costly than multi-user client licenses. The Synchronisation server Module and Web Server Module are required on the central server. |
| mSupply Mobile | mSupply Mobile is Open Source software that is similar to the synchronised Single-user configuration, but the users operates the software app on an Android tablets. This app has a reduced feature set, but is more than adequate for most Last-Mile needs. Local stock details are synchronised back to the Central server, and can be monitored and reported on there. | Pricing is even lower than for Synchronised Single-User. This was the way forward for the medical supply chain in small and remote facilities - until Open mSupply (see below) took that honour! The Synchronisation server Module and Web Server Module are required on the central server. |
| Open mSupply | Open mSupply is the Open Source software multi-platform mSupply software that has been under development by the mSupply Foundation since 2020. Open mSupply has all of the flexibility of all of the other versions of mSupply with the benefit of being Open source. Local stock details are synchronised back to the Central server, and can be monitored and reported on there. | Pricing for smaller facilities (single-user stores) is the same as mSupply Mobile. We see this as the way forward for the medical supply chain in both small and remote facilities and in large multi-user facilities. The Synchronisation server Module and Web Server Module are required on the central server. |
| mSupply Customer Web Interface | Allows staff of Customers in your mSupply system order stock on-line. It runs on a browser on any device: tablet, smartphone, net-book, desktop computer etc. It's a little hard to see why this should be chosen over Open mSupply, as the costs are very similar, without the benefit of being able to operate a store… | Depends on your situation - contact us. The Web Server Module is required on the central server. |
| FrontlineSMS integration | mSupply has the ability to integrate with a FrontlineSMS installation. This allows a customer to send their current stock levels to mSupply using an SMS (text) message from any mobile phone. This is particularly useful if, for example, you are a mobile or remote health post or dispensary which doesn't have internet access and only needs to send in information about a few items at a time. | SMS module is required on the central server. |
Other modules
Other modules are available for addition to the basic mSupply application:
| Module | Comments | Software price implications - refer Pricing |
|---|---|---|
| FrontlineSMS | Allows users to send their current stock levels to mSupply using an SMS (text) message from any mobile phone - even with only 2G reception!. This can then be used by mSupply to determine how much stock to send to the facility. | Equal to the price of 1 client license. |
| Product (drug) Registration | Allows integration of product registration (control of what products can be supplied by authorising particular suppliers and products) by recording and tracking the status of supplier's registrations and storing the documentation for easy retrieval. | Equal to the price of 2 client licenses. |
| Web Server Module | Allows you to access mSupply data on the server from any networked computer that has internet access. This module is a prerequisite for several other modules. | Equal to the price of 2 client licenses. |
| Synchronisation server Module | Maintains data integrity between a central mSupply server and 'satellite' mSupply servers. It therefore only applies to situations where there is a multi-mSupply server setup. Requires the Web Server. | Equal to the price of 2 client licenses. |
| Tender Management | Allows execution of a full tender process including publishing of the tender through a web site, and so allowing tenderers to submit tenders on-line. Requires the Web Server. | Equal to the price of 1 client license. |
A note about costs...
Software costs
When procuring software, an obvious question is what does it cost. We try to be as up-front as possible about what mSupply software costs. Even so, it's complicated. As you can see above, the mSupply ecosystem is complex and each component has different costs. For a start, we've tried to document the software costs on our pricing page. The amounts that you might pay for mSupply software can be divided into three components:
- License costs Thanks to the generous support of many donor agencies over the decades of mSupply's existence, only the mSupply products built on the (very good!) 4D database engine incur a license fee, up-front, lasting forever - refer Pricing. Not all of the 4D based mSupply products have a license fee; Free-user is … free
 .
.
mSupply Mobile and Open mSupply are both Open Source software, and so are FREE of licence fees. - Installation costs mSupply systems need to be configured to the needs of the supply chain system. In principle, software and hardware configuration can be done by system administrators in the host organisation. However, in most cases, the mSupply Foundation is engaged to assist with software and hardware configuration. This is often done initially by one or more consultants travelling to the country for a number of weeks. The costs of this will normally be in the tens of thousands of dollars. Once a country has an mSupply system up and running, additional stores and sites can normally be added at much lower costs, with indicative prices below. For large implementations, local configuration capacity needs to be developed, and the mSupply Foundation is very keen to train local system administrative configuration capacity.
- Configure a store, not including storage locations and complex user profiles: USD 100
- Configure hardware:
- Tablet: USD 25
- Single-user PC: USD 100
- Server: USD 200
- Maintenance costs As with any technology systems, there are ongoing maintenance costs including keeping software up-to-date5) and providing support. This support could be provided by system administrators in the host organisation. However, in most cases, it has been found to be more effective to engage the mSupply Foundation to provide support, at least in part. For large implementations, local support capacity needs to be developed, and the mSupply Foundation is very keen to train local system administrative support capacity.
And all the other costs
Software is never the largest component of deployment and operational costs. Local circumstances can vary dramatically, but in one a typical developing country with in excess of 500 mSuppy stores, the experience has been that after the expensive initial deployment, deployment and operational costs have been:
| Cost type | Deployment | Annual operation |
|---|---|---|
| License | 0% (Open source) | 0% (Open source) |
| Configuration / Support | 5.6% | 7.6% |
| Hardware | 37.3% | 9.1% |
| Internet | 0% | 36.6% |
| Training | 57.1% | 46.6% |

Note that in this particular country, the annual costs of a the cheapest commercially available cellular internet connection exceeded the capital cost of the 10“ Android tablets.
Key conclusions:
- Training is the highest cost (rightly so!)
- Provision should be made for hardware depreciation (devices do break, get stolen, etc.)
- Software costs are normally < 10% of the costs (capital and operational)
Referring to the server machine vs. server software
We need two servers!!!???
The ICT industry is plagued by the practice of using the same term to refer to software, hardware or both combined! As it relates to mSupply in multi-user environments, there is often confusion over two of these:
- The term 'Server' can refer to:
- The mSupply server computer software which runs the mSupply database,
- The hardware which the mSupply server software is installed on, and;
- Both the hardware and the software acting together. This is possibly the most common usage. When we say something like “send to the server” we mean send data to the server software operating on the server hardware.
The server hardware can actually be a cloud hosted 'service' rather than physical hardware that you own and try to manage. Sometimes the server hardware is referred to as a 'file server', and this can help to avoid confusion. In any case, for any multi-user mSupply installation, including mSupply mobile, both server software and server hardware are needed, and both of them cost money.
- Similarly, the term 'Client' can refer to:
- The mSupply client computer software which accesses the mSupply server (software) database on the server (hardware),
- The hardware which this client software operates on, and;
- Both the hardware and the software acting together.
Sometimes the client hardware is referred to as a 'client PC' (Mac or Windows) and this can help to avoid confusion. Again, for any multi-user mSupply installation, including mSupply mobile, both client software and client hardware are needed. For mSupply mobile, the client hardware is an Android Tablet - refer Mobile (Android) user guide v2.0 - featuring offline operation.
We are a software company, so when we use these terms, we will almost certainly be referring to our software, but sometimes not. The context normally helps, but please forgive us if we fail to distinguish between these meanings!
1.03. Who uses mSupply?
This list isn't exhaustive.
All sites are multi-user with the number of sites x number of concurrent users at each site in brackets unless denoted by SU (=“Single User”) after the name.
Our 3 largest users are:
| Country | Total Sites | Desktop Sites | Mobile Sites |
|---|---|---|---|
| Myanmar | 639 | 559 | 80 |
| Côte d'Ivoire | 1215 | 419 | 796 |
| Papua New Guinea | 447 | 42 | 405 |
Africa
Angola
- Went live at CECOMA (their CMS) in September 2023)
Côte d'Ivoire
- Designated national system
- Type of system: WMS & ELMIS
- As of December 2021: over 700 sites- mixture of desktop and mobile
- 30 sites with World Bank funding from 2021
Djibouti
- Went live at 14 sites May 2023
Democratic Republic of Congo
- Cordaid (3)
Gambia
- Gambia Central Medical Stores (14)
Ghana
- Central Medical Stores (5)
- Status 2015: CMS was destroyed in a fire in 2014, and the project has been on hold since then.
Niger
- 2 regional warehouses managed by Chemonics (SU) - 2020
Nigeria
- Six Government state stores (6 x 3)
- Ten Government stores managed by Axios (10 x 2)
- Axios HQ, Abuja (4)
- Axios uses mSupply synchronisation to connect sites that don't have full time internet access. This system has been in use since 2010, and continues to function well.
- FCMS Store, Lagos (5)
- Jigawa CMS
- From March 2016: 20 new users spread over 6 states (Kaduna, Katsina, Zamfara, Kano, Jigawa, Yobe)
- Private non-pharmaceutical supplier, Lagos (STIL)(SU)
- UNFPA warehouse, Lagos (5 users) - 2021
Liberia
- Axios: 1 site synchronising to a central server
- Liberia MoH: 11 sites being consolidated to a single mSupply installation Dec 2016
- using EPI module: yes
Malawi
- Orant Charities (SU). From 2017.
- Nkhoma Hospital Pharmacy Department. From 2015
Sāo Tomé and Principe
- Designated national system
- Type of system: WMS & ELMIS
- National supply chain system (10 users 2021, expanding to 40 users in 2022)
Sierra Leone
- Designated national system
- Type of system: WMS & ELMIS
- MRC (SU)
- Crown Agents Ebola Response and Free Health care distribution (20) - several stores around Freetown running from a single cloud server.
- National Pharmaceutical procurement unit (2017). Central server with 18 users, 13 regional sites, et al.
- LSHTM Ebovac (2017). Server with 5 users.
South Sudan
- Designated national system
- Type of system: WMS & ELMIS (expanding to ELMIS H2 2022)
- MoH Central Medical Stores (5 users)
- Expanding to whole country in 2022
- UNDP Juba (5 users)
Zambia
- Churches Health Association (4 users)
Zanzibar
- ZILS (5 users)
- this system employs an EDI interface to pick up orders sent to a dropbox folder from the Zanzibar LMIS system and incorporates it into mSupply
- expanding to Pemba in 2022
Pacific
Cook Islands
- Desktop Sites (5) - 2018
- Mobile Sites (10) - 2018
- using EPI module: yes
Federated States of Micronesia (FSM)
- 7 users at CMS/main hospital - 2012
Kingdom of Tonga
- Central Pharmacy Medical Stores (3)
- Vaiola Hospital (4)
- Haapai Hospital (SU)
- Vava'u Hosptial (SU)
- 'Eua Hospital (SU)
- Mobile (11)
- National Covid 19 vaccination program run using mSupply mobile - 2021
- using EPI module: yes
Kiribati
- Designated national system
- Type of system: WMS & ELMIS & Covid Vaccination Record
- Tungaru Hospital (9)
334 sites using mSupply mobile- National Covid 19 vaccination program run using mSupply mobile
- using EPI module: yes
Marshall Islands
- Ministry of Health/Majuro Hospital (2)
Nauru
- Central Hospital and Stores (6 users)
Palau
- 3 sites including CMS- went live in 2022.
Papua New Guinea
National Department of Health
- Designated national system
- Type of system: WMS & ELMIS
- Central server (cloud hosted) with 12 client users
- 28 Sync server sites (Area medical stores (AMS), provincial hospitals) with 118 client users
- 13 Single-User desktop sync sites (district hospitals)
- 105 Mobile sites (Health centres)
- 300 Mobile sites (UNICEF) 2022
- using EPI module: yes
Burnett Institute
- 8 mobile sites (Strive project)
Solomon Islands
- Designated national system
- Type of system: WMS & ELMIS
- National Medical Stores (14 users + Web server + Tender module)
- National Referral Hospital (4)
- mSupply mobile- 50 Second Level Medical Stores (phased installation from October 2016)
Tokelau
- 3 sites covering country - 2018
Tuvalu
- Princess Margaret Hospital (2)
Vanuatu
- Designated national system
- Type of system: WMS & ELMIS
- Central Medical Stores (2)
- Vila Central Hospital Pharmacy and Store (3)
- Lenekel Hospital (2)
- Norsup Hospital (2)
- Luganville Hospital (2)
- using EPI module: yes
Fiji
- Designated national system
- Type of system: WMS & ELMIS
- National deployment to over 180 sites started October 2020.
- Aspen Hospitals x 2
Samoa
- Nationwide deployment (approx 18 sites) started July 2020 - completed 2022
- Using mSupply Coldchain for monitoring fridges, including receiving Telegram alerts for breaches.
Niue
- Using mSupply for pharmacy store and all dispensing.
- Using mSupply Coldchain for monitoring fridges
Asia
India
- Meyer Free Clinic
Nepal
- INF (3 sites- SU)
- MSMT (SU)
- Patan Hospital (SU)
- Lal Gadh Hospital
- Gurkha Welfare scheme (26 sites, SU) Funders: DFID, GWT
Afghanistan
- Six NGOs responsible for medicine distribution in provinces synchronise data back to a management server in Kabul (July 2016). Includes automated generation of a multi-workbook Excel spreadsheet that includes macros that submit data to a Ministry of Health database.
- UNDP warehouse (2019- 5 users)
- CMS warehouse (2019- 5 users)
South-East Asia
Cambodia
- World Mate Emergency Hospital
- WMEH Warehouse
Laos
- Designated national system
- Type of system: WMS & ELMIS
- 186 sites (complete Nation implementation) using mSupply synchronisation
Myanmar
- Designated national system
- Type of system: WMS & ELMIS
31, no42150362639 sites using synchronisation to connect to a cloud server, with plans to extend to 3000 sites over the next few years.- Medical Action Myanmar (Dec 2017) - 25 mobile sites connecting to a cloud server running mSupply.
- UNICEF funded EPI program - approx 350 sites starting 2021
- using EPI module: yes
- Zenith TRI (2022 onwards): another ~40 sites on a separate system serving NGOs
Timor-Leste
Ministry of Health
- Designated national system
- Type of system: WMS & ELMIS
- Sites
- SAMES (10)
- Hospital Nacionale Guido Valedares (5)
- Dili Central Medical Services (Mobile)
- 100 mSupply mobile sites (expanding to over 300 in 2022)
- National Laboratory, Dili & 5 regional laboaratory sites
Menzies Health
- Central laboratory
- 8 remote laboratory sites
Americas
Haiti
- National warehouse run by Chemonics (2021)
- National Logistics System (2023/24)
USA
- SafeNetRx (was Iowa Prescription drug corporation)
- users: 2
- Web server: clients from all over Iowa place orders using the mSupply web interface
- SafeNetRx are the largest non-governmental supplier of free medicines in the USA.
Europe and the United Kingdom
United Kingdom
- UK Microbiological Products supplier (Private company). Since 2012
- Crown Agents
- Specialist system with 20 users. Was running emergency Ebola Response Programme for DFID, including management of a UK based warehouse with air freight deliveries to Africa. Now managing a distribution programme in South Sudan.
1.02. Why mSupply?
This section outlines the approach and ethos of Sustainable Solutions as well as the main areas of functionality that mSupply covers.
People
- Our aim is to serve developing countries with solutions that provide real benefit.
- We are driven by a desire to serve, rather than by profit.
- That said, we are a profitable company with no debt and a commitment to stay in business for as long as we are needed.
- We have a balanced mix of expatriate and Nepali staff who work on mSupply.
Experience
- We've been working on mSupply since 1998, and full-time as Sustainable Solutions since 2001. In that time we've done hundreds of days of training, converted hundreds of thousands of records from other systems to mSupply, and installed mSupply in hundreds of locations.
- Our experience in Nepal, and in many other developing countries, gives us a unique perspective and understanding of the challenges and opportunities involved in working in similar environments.
- We know that a decision to install mSupply is a big one. We're committed for the long term. We're planning to be here decades from now.
Ease-of-use
- mSupply is very easy to install- 10 minutes and a whole department is up and running.
- mSupply uses an easy-to-use graphical interface that makes it a breeze to add purchase orders, patient prescriptions, tenders, etc.
- The system is also made with high-usage warehouses and busy pharmacy departments in mind. he system automates item purchases, receipts and sales for the warehouse administrator, and also provides features such as abbreviated directions entry for quick prescribing of medicines.
- There is always a balance between features and usability. While we know we don’t always get it right, we try to make sure we don’t add features that aren’t really needed. Also, we make sure that features only needed by one client don’t clutter up the interface for everyone.
Stability and reliability
- The initial mSupply server installations in 2002 have run since then without ever crashing.
- We have more than ten years of experience in keeping mSupply installations running in developing countries, so we know what it takes to make a reliable system. All multi-user mSupply systems we have installed are still running.
- mSupply includes an automated internet backup system, so backups are automatically transferred to a remote secure site.
- Server backups are automatic with configurable frequency.
- mSupply keeps a log of every action you make, and if there is a power failure then the log can be used to restore all unsaved data on the server.
Security
- We do not know of any instances of a security breach of an mSupply server
- There is a full password protected login and permissions system, allowing each user’s access to functions to be controlled and recorded.
- A user log records all significant user interactions, allowing an audit of which user performed which actions.
Local or Cloud or both!
- mSupply can run in many different ways, depending on whether you want to run a local or cloud-based service:
- Local server with client connecting over your local network
- Cloud based server with clients connecting via a special application or a web browser (e.g. Citrix)
- If you have several sites and want to manage them centrally, but the internet does not support a cloud-based service, then mSupply also supports running individual servers at mulitple locations that then synchronise their data back to a central server when communications are available.
mSupply mobile
- On Sept 2nd 2013 we officially released mSupply mobile. It allows you to run a small medical store using a tablet computer (iPad or Android or Windows). An internet connection is required, but users in developing countries are successfully using mSupply mobile over an EDGE (2g) mobile network.
As of mid 2016, the internet connection does not need to be there all the time! See Mobile (Android) user guide
- mSupply mobile can give stock visibility and automated replenishment for hundreds or thousands of stores connected to a single server, which may be hosted on your premises or be cloud-based.
Scalable
- The same data file can grow from being used in a single-user system to having hundreds of concurrent users with millions of transactions.
Customisation
- Many mSupply users have unique needs requiring some customisation of the standard mSupply software. mSupply allows customised versions that can still be easily upgraded as new releases are made. Often customisation is done at no extra cost if the client has a current up-to-date contract.
Specially designed for pharmaceuticals
- mSupply is built from the ground up to handle batches and expiry dates.
- There are multiple ways of classifying medicines, and mSupply supports ATC coding, WHO’s EDL6) categories and the user’s own custom categories.
- Many of the reports are specific to the needs of pharmaceutical distribution
Reporting
- The in-built reports have been developed since the beginning in response to user requests.
- Users can easily create their own custom reports and save them for use again. Saved reports are available from a menu in the custom report window.
- Items, Names, and transactions all have lots of spare fields that users can use to store custom data, and then use those fields in reports.
- mSupply dashboard allows managers in remote locations to log on with a web browser and view reports.
Mistake tolerance
- mSupply provides easy merging of duplicate items.
- Easy adjustment of inventory errors (but with a full audit trail!)
- Most fields allow entry by name or code, and allow partial entry of as much of the name or code as the user knows.
- Easily find transactions you've entered, by number, by customer/supplier name, by a list of recent transactions or by a custom search.
- If the user’s hardware is powerful enough, fuzzy find searches allow finding data even if the search terms are incorrectly entered.
Backorders
- Items that you are unable to supply to customers are put onto backorder. A report of all backordered items is easily generated. When the stock for the backorder becomes available a customer invoice is automatically created awaiting your confirmation.
Web interface for customers
- mSupply allows customers to remotely log in via a web browser and place orders, view order status, stock status and transaction history. This system is in daily use.
Customer stock history / indent ordering
- mSupply supports a unique system of centralised supply where the distribution point submits current stock on hand figures, and mSupply calculate a rational quantity to supply, knowing the historic stock on hand, the ordering cycle, and the amount supplied during the previous cycle.
- mSupply also supports the simpler imprest system where the amount given to customers is based on a fixed level of stock, as is commonly done when supplying wards in hospitals.
Quantification
- mSupply uses a powerful ordering system that allows accurate real-time analysis of how much stock should be ordered, based on historic consumption, order lead time, the ordering frequency, desired “buffer” stock levels and current stock levels. Unmet demand from customers, backorders, and stock on order are also taken into account.
- This system has proven reliable, and requires little user intervention, unlike systems that require you to set minimum and maximum stock levels. mSupply still allows minimum stock to be set if really needed.
Procurement
- mSupply handles purchase orders in multiple currencies, and allows split deliveries.
- The goods receipt module allows full or partial receipt of each purchase order plus addition of stock not ordered.
- Ad hoc quotes from suppliers can also be handled.
- The quantification, tender management and purchase order systems all tie together so data flows from one to the other without requiring re-entry.
Tender management
- The Tender Management module provides detailed production and management of tenders including using mSupply data to determine quantification, printing invitation letters, comparing tender submissions and automatically producing Purchase Orders for the winning tender supplier.
- The Remote Tender Management Module provides posting of tenders by suppliers to https://tenders.msupply.org.nz secure web site. You download and automatically import completed tenders to mSupply for easy comparison of supplier responses, choosing the winning supplier and creation of purchase orders.
- Supplier Registration functionality is planned to be developed as part of the Tender management module.
Dispensing
- mSupply integrates well into hospital pharmacies, providing easy breakdown of bulk packs for dispensing.
- Prescribers are recorded, and prescriber reports allow analysis of prescribing trends and costs.
- Drug interactions are handled, as is repeat dispensing.
- Patient history is recorded and easily accessible.
- Customisable abbreviations allow rapid entry of patient instructions on to printed labels.
- Medicine labels are produced using specialist label printers. Busy sites using mSupply produce hundreds of thousands of labels per year.
Multiple sites from one server
- mSupply is able to handle multiple virtual stores within a single data file. A common use for this is a hospital, where several stores may be present, but each needs to run independently.
- Stores can run in either dispensary or store mode, so one server can handle both a hospital pharmacy and a warehouse store simultaneously.
- Using Citrix and a DSL internet connection you can run a whole country's medical distribution system from a single server, greatly reducing infrastructure requirements while dramatically improving availability and reliability.
Stock control
- Because mSupply tracks each batch separately, full FEFO 7) can be maintained for every item.
- There is a full audit trail for each stock line.
- Each stock line has a record of warehouse location, enabling easy warehouse management
- If stock lines have the same batch number, expiry and pack size, they can be split and combined.
- Stock lines can be re-packed to different pack sizes for convenience. Warehouses will find it easier to handle cartons with a pack size of, say, 12,000 tablets while dispensaries will be dispensing individual tablets, and so will want a pack size of 1.
Warehouse management
- Full Location management
- mSupply allows volume based calculations of available storage, that is especially critical for cold chain items.
- Volume information is used to provide either reports or a graphical depiction of how full each section of the warehouse is.
- Alerts are given when placing purchase orders if there will not be enough space to hold the incoming goods.
- Basic bar-coding functionality is planned to be developed soon.
Vaccines monitoring
- mSupply allows recording of VVM8) status for batches, and allows sorting available stock by VVM status rather than by expiry.
Mobile communications
- mSupply integrates with Frontline SMS to provide an interface for using SMS messaging to submit information such as stock levels and goods receipt confirmations to mSupply.
Hospital information system
- A simple hospital information system has been developed as part of mSupply. It is designed to provide a basic service to record critical data:
- Recording a hospital's wards and beds.
- Recording inpatient admissions (admitting a patient, assigning them to a ward and bed).
- Recording ICD9) 10 disease codes for each patient admission. You can assign multiple disease codes, and prioritise them (primary, secondary, etc..).
- Moving patients to different wards/beds.
- Recording discharge data (patient status at time of discharge)
- Reporting on bed occupancy rates as a whole and by ward, and other useful statistics e.g. average length of stay, ICD10 statistics.
- The mSupply HIS is a cost effective alternative to large commercial installations.
Product / medicine registration
- mSupply's Registration module allows mSupply to manage registration of suppliers and their products on a per brand, dose, and form basis.
- mSupply will record and track the status of supplier's registrations and stores the documentation for easy retrieval.
No data lock-in
- All data in mSupply can be exported as industry-standard XML or as an SQL dump, allowing use by other systems as needed.
- A public API has been developed, allowing any system to retrieve and submit information from/to mSupply.
Cross-platform
- mSupply is available for Windows and Macintosh.
- We recommend Windows servers, but client computers can be either Windows or Macintosh.
Interaction with other systems
- mSupply can either query other systems or provide data in real time via XML web services and other industry standard connectors.
- mSupply provides automated seamless integration with Moneyworks accounting software and general export files which can be easily customisable for import to other systems.
All of these features combine to make a very powerful medical inventory supply chain management system which has been tried and tested in dozens of locations around the world. We believe it has a unique set of features that no other product offers for managing medical supplies in developing countries
For full information, visit http://www.msupply.org.nz A demo version is available here
The home page for the documentation wiki is here
| Previous: 1.01. Introduction | | Next: 1.03. Who uses mSupply? |
4.02. Adding a new item
There are different types of item in mSupply but this is the function you use to add them all. The different types are:
- Normal: This is the one you will nearly always use and is something which you can receive, distribute and hold stock of.
- Cross reference: This type of item is a pointer to a normal item. Whenever you select a cross reference it will be replaced with the normal item that it points to. In this way, you can use cross reference items to represent brand names (e.g. Panadol) or familiar names (e.g. “Cetamol” is used to refer to “Paracetamol” in Nepal) that actually refer to generic items.
- Service: These are items which do not have physical stock such as consultancy fees or other charges.
To add any type of item choose Item > New item from the menus (Note: this is not for adding actual stock, just details of the items themselves - to add stock see 7.01. Supplier invoices or 7.02. Goods receipts.
Don't be put off by the number of fields appearing on these windows! mSupply will operate satisfactorily after entries have been made in just the Item code and Item name fields for any item type. All the other fields can be regarded as optional extras, some or all of which you may use at some later date, or never. mSupply is very versatile!
Normal items

Type: Select the type of item you want to add here. The field always defaults to normal.
Item code: This field is mandatory and is a short way of referring to and finding the item throughout mSupply. Any non-printable characters entered before or after the code (including spaces) will be removed. Any entered in the code (except spaces - spaces are allowed in item codes) will be replaced with an underscore (_). Item codes should be unique; mSupply will warn you if you try to enter an item code already in use by another item.
Item name: This field is also mandatory and is the name that the item will be known by throughout mSupply. It will appear in reports and displays, wherever the item is referred to. Any non-printable characters entered before or after the name will be removed. Any entered in the name will be replaced with an underscore (_).
These 3 fields are available to be filled in for every type of item.
You should decide on a clear scheme for item names and codes. This can be a tricky process but is worth persevering with. You can change your mind later but changing the codes of all the items and names in your datafile could be a time-consuming business.
We would recommend that the item code is systematic and can be worked out from the item's details e.g. first 3 letters of the item's name, 3 figures for the strength, a letter for the formulation then a letter or number for disambiguation if necessary. e.g. the code for Amoxycillin 500mg capsules could be amo500c.
For item names we would recommend again that you use generic names (no brands or familiar names - use cross reference items for those), be systematic and start with the broadest part of the name. For example, “Brody forceps” would be entered as “Forceps, brody”, “Aqueous iodine” would be entered as “Iodine, aqueous”. For pharmaceuticals we would recommend the name followed by the strength then the formulation e.g. Amoxycillin 500mg capsules.
You are, of course, free to choose your own schemes, these are just our recommendations and one way of doing it. There are many reasons for adopting other schemes and it is not necessary to know or remember item codes while using mSupply!
General tab
Units: The drop down list allows you to choose the appropriate units for the new item ; mSupply comes with a limited list of pre-defined units, but it is recommended that users define their own list. You will find more information in section 4.20. Units.
Category 1: Click on the magnifying glass to select the category 1 this item belongs to. Category 1 is hierarchical and needs to be setup before you can select them here. See Item categories for details on setting them up.
Category 2 and 3: Select the category 2 and 3 that this item belongs to. You must setup these categories before you can select them here - see Item categories for details on doing that.
Department: Select the department the item belongs to. Departments are not a way of categorising items (use the other categories for that) but are for restricting access to items for different customers and are described in detail in section 4.12. Managing item access with Departments.
Default shelf location: This is the location in the store that the item is normally stored. It will be offered by default when the item is received into stock. Type as much of the location code or description (e.g. the first few characters) as you know, then press the Tab key. If only one location code matches your entry it will be filled in automatically, otherwise you will be shown a standard choice list like this:

Select the location you want by double-clicking its line or by clicking once on the line and then clicking OK.
Default pack size: This is the standard pack size that you use for comparing quotes from suppliers.
Default weight: The weight of the preferred pack size in kg.
Price list: If this box is checked, this item will be included when you produce price lists. If checked the item will also be included in the online catalogue. Refer Price list.
Non stock item: If the item is something you do not normally keep in stock, but is passed straight to a customer, this box should be checked.
Default customer: This is the customer the item is sent to by default - used for non-stock items only. Type the first few characters of the customer's name and press the Tab key on the keyboard to select the customer you want.
VEN category: Select which WHO VEN category the item belongs to (one only) - used for reporting.
Stock category: Check each one of these that apply to your item (used for reporting):
- Normal stock: For practically all new entries this box should be checked; at a later date, should the item be removed from your formulary for instance, you would remove the check from this box.
- Critical stock: Should it be a requirement that you must never be out of stock of this item, this box should be checked.
- Essential drug: Check this box if the item is on your Essential Drugs List.
Doses: Enter the number of doses a single unit of this item provides. Used for vaccines and is only enterable if the Is a vaccine checkbox is checked.
Is a vaccine: Check this if this item is a vaccine and you want mSupply to include it in the vaccine functionality (see the mobile vaccine dispensing page for details). When checked, a default value of 1 is entered in the Doses field.
Restricted to: The location type that this item must be restricted to. You can pick from a list of all active Location types. When something is selected here, all stock of this item that is received must be put in a location which is of the same location type. For example, all cool store locations could have been given a type of “cool” and then if the item you are editing should be kept in a cool store, choose that type here, and you will only be able to receive that item into a cool store location.
When you have added all the details for your new item, click on the OK button or, if you want to add another new item, the OK & Next button.
If you have clicked OK & Next but don't want to add more items, press Cancel. Items previously added are still saved - just the details showing on the screen are not saved.
Stores tab
On this tab, you select which stores the item will be visible in:

Simply check the Visible in store checkbox against each store in the list you wish the item to be visible in (if an item is visible in a store then it can be used in that store). You can use the All/None checkbox to toggle selection of all stores or no stores.
If the preference Automatically update item visibility to match the master lists used by each store preference (see General preferences) is turned on then the table in this tab will be replaced with some text telling you that visibility is controlled by master lists and not selecting store visibility directly. Use the Master lists tab (details below) in that case.
Master lists tab
On this tab, you select which master lists the item should be added to:

Master lists can be used for many things in mSupply (e.g. controlling visibility of items in stores or determining which items appear on requisitions). See Item master lists for details of how to set them up and use them.
To add the new item to a master list simply check the Add to list checkbox against the particular master list in the table. Note that any master lists that have the Automatically add new items to this master list option checked will have their Add to list checkbox checked and you will not be able to uncheck it.
Barcodes tab
On this tab, you can add barcodes of the item that contain manufacturer and pack size information:

This information is used when using barcode scanners to help manage your pharmaceuticals. See Adding barcodes for details on setting them up.
Cross reference items
Cross reference items point to another item, they do not have stock themselves. Whenever the cross reference item is entered, it will be immediately replaced with the normal item it points to. This is useful for handling branded items or items with a common name that is more recognisable than its generic name. An example would be Aspirin for Acetysalycilic acid or Panadol for Paracetamol.
To create a cross reference item select cross reference in the Type drop down list. The window changes slightly:

The Item code and Item name fields are the same as for a normal item (described above) but remember you're entering the details of the brand or familiar name in here!
Cross reference item tab
When this item is chosen in a list, use: Type the first few characters of the normal item you always want to replace the brand/familiar name with in this field. Then press the Tab key on the keyboard and select the item you want. When you've selected the matching item then it's code will be appear in the read only Item code field.
That's it, all done. After clicking the OK or OK & Next buttons, every time a user chooses the item you entered in the Item name / Item code fields it will be replaced with the item you entered in the When this item is chosen in a list, use field.
Note: Item custom field 5 is also settable, as shown in the screenshot. It is a number field. This is the user_field_5 for the cross reference item (brand/familiar name), not the normal item. The user_field_5 label shown in the screenshot will be replaced with the name assigned to the field in the preferences (see the 16.01. General preferences page for details) if it has been set. Making this field settable here might seem strange but it is used in some customisations!
The visibility of cross reference items in different stores matches the visibility of the normal item it is linked to. So there is no functionality for manually setting the visibility of cross reference items.
Service items
Service items are those which have a price but no stock. You can use them to represent service or other charges that need to be handled.
To create a service item select service in the Type drop down list. PLEASE NOTE: the service option will not be available in this drop down list if the preference to allow service items has not been set. Please see General preferences for details.
The window changes slightly:

The Item code and Item name fields are the same as for a normal item (described above).
Service item tab
Cost price: Enter the cost you buy this service (e.g. getting an oxygen cylinder refilled) for.
Sell price: Enter the price you charge when selling the service.
Neither of these fields is compulsory.
Stores tab
You select the stores the service item will be visible in on this tab. It operates exactly the same as the Stores tab described above for normal items.
Note: service items cannot be added to master lists so there is no Master lists tab. Their visibility cannot therefore be controlled by master lists but only by directly selecting the stores they are visible in on this stores tab.
| Previous: 4.01. About items | | Next: 4.03. Item categories |
4.09. Ad hoc items
From the Item menu, choose Ad Hoc items…
This feature requires activation in Preferences > Invoices 1
mSupply® defines Ad Hoc items as items that you don't keep in stock, and that you never will keep in stock. An example of an Ad Hoc item is a specialised item of diagnostic equipment which you would purchase on one occasion only. When a customer orders an item that you decide will be a “one-off” purchase, you can enter it as an Ad Hoc item.
Ad Hoc items differ from non-stock items in only one respect; they are purchased once. Non-stock items are items which, although they do not feature in your stock list, may be purchased with some degree of regularity.
The following diagram outlines the work flow for Ad Hoc items:

When you choose Items > Ad Hoc items, the following window is displayed:

From this window you can view Ad Hoc items, add new items, delete items and edit existing items.
Show drop-down list
This drop-down list allows you to view Ad Hoc items by their status. Ad Hoc items can have the following status codes: <HTML>
</HTML>
| Status code | Meaning |
|---|---|
| == un == | The item has not yet been assigned to a supplier- think of this as your “to-do” list |
| == as == | The item has been assigned to a supplier, but has not been placed on a Purchase Order. These items also need action. |
| == po == | The item has been added to a Purchase Order, but the goods have not arrived. |
| == fn == | The item has arrived from a supplier and been invoiced to the customer |
<HTML>
</HTML>
Name field
Enter part of a customer or supplier name in this field and press Tab to show a list of matching names. Choosing a supplier will show items assigned to that supplier. Choosing a customer will show items supplied or to be supplied to that customer.
Once you have chosen a name you can fine-tune the list displayed for that name.
New button
Clicking the “new” button displays this window:

From this window you can add an item name, the name of the customer, then name of the supplier, the quantity to order, and add a comment.
When the customer orders an item, you may not know who the supplier is. You can just leave the supplier name blank.
Editing an ad hoc item
To edit an item, double-click it in the list to display the item details, and a window Edit Ad hoc item, almost identical to the Add Ad hoc item :, appears where you can edit the required details.

Adding ad hoc items to a purchase order
When you are making a Purchase Order for a particular supplier, you can click on the Ad Hoc items Tab to view a list of Ad Hoc items you have assigned to that supplier, allowing you to add them to the Purchase Order. More information is available here - ad hoc items tab.
| Previous: 4.08. Merging two items | | Next: 4.10. Non-stock items |
4.12. Managing item access with Departments
Introduction
Item departments are a mechanism by which you can restrict item availability to certain customers only.
Item departments are a bit complicated. Here's what you need to remember:
- Each customer can be a member of only one group.
- Each item can be a 'direct' member of only one department. However, a department can be a member of another department, so an item can, in effect, be a member of more than one department
- Each group can have access to items from multiple departments.
The Activate restricted item access by customer group option must be turned on in Preferences>Invoices2 before this option to work.
- Here is a summary of how department groups affect whether or not an item can be issued.

- When you attempt to issue stock to a customer whose group does not have access to the department of the item you are issuing, either a warning will be displayed or mSupply® will not allow you to issue the stock - depending on how your preferences are set.
- Items that are not in any department can be issued to any customer
- Items that are members of a department can not be issued to any Customers that are not members of a group.
Creating and editing item departments
Choose Show departments from the Item menu displays the Edit departments… window. This is where you are able to create and edit item departments. Once you have created departments the window might appear something like this, and you are now ready to assign items to a department:

View item departments
Taking as an example the department Anti anaemic tablets, the items in the department are shown by clicking Show item departments on the Item menu, and then double clicking on the Anti anaemic tablets department:

- Each department can have any number and combination of items and departments in it.
Setting up access from customer groups to item departments
- From the Item menu, choose Manage item access…, and this window is displayed:

- The left hand list shows the available departments
- The right hand list shows the customer groups that presently have access to the department which is highlighted on the left hand side.
- The example shown identifies the four customer groups which are linked to the Anti-anaemic item department:

- The icons on the right side allow you to add and/or remove groups that have access to the highlighted department.
- Clicking the Add a new relationship button shows a list of groups you can add:

- Double-click (or click and then click OK) to add a group to the current department. You will be given a warning if you try to add the same group twice.
Show groups
Customer groups can be used to group customers (or suppliers) together for reporting purposes, and also to set up an item restrictions scheme, allowing some items to be issued only to certain customers.
An explanation of how to set up a restriction scheme is in Managing Item access.
The groups window allows you to set up group names:

- Click the New group button to add a new group.
- Double-click an entry to edit its name:

- You can enter or edit the group name in the top field.
- The list displays all names which are members of this group.
- Click the Delete button to delete a group. You can only delete groups that have no names as members. You can remove group members from the Groups tab of the name viewing window (From the Customer menu, choose Show Customers and find the required customer in the usual way.)

- The drop down list displays the group to which this customer belongs, and to remove the customer, make sure none is selected from the drop down list; to assign the customer to a different group, highlight the new group in the drop down list.
- Click OK to leave the window.
Departments
Overview: A manufacturer might create departments for raw materials, packing materials, and quality control reagents. A drug store or hospital might create departments according to dose form or according to pharmacological classification, etc.
From the Item menu, choose Show departments …; you are shown a list of departments:
By default the list displays in alphabetic order; clicking on Departments toggles between alphabetic order and reverse alphabetic order; you may also drag and drop individual departments to any position in the list to suit your own requirements, and on clicking OK you will be asked whether or not you wish to save the list in the order you have specified.
To add a new department, click the New dept button.
To edit a department, double-click the department you want to edit. You are shown a window allowing you to edit the department name:

The radio buttons allow you to choose what will happen when you attempt to issue an item to a customer who is not a member of a linked group. Either the user can be warned or the issue can be disallowed. This only applies if you have Activate restricted item access by customer group turned on in the Preferences - otherwise you can ignore this setting.
The Items tab displays a list of items that are members of the group you are viewing:

To delete a department
Double-click it to display the entry window, then click the Delete button. Note that you can not delete a department that has item members. You will be warned if you try to do this. To delete a department with Items, click the items tab and note the items that are members, then edit those items (using the Items > Show items … menu command) and set their departments to either none or a different department. You will then be able to delete the department.
| Previous: 4.11. Managing drug interaction groups | | Next: 4.13. Prices in mSupply |
4.11. Managing drug interaction groups
This feature is chosen from the Item menu
The examples given in this section are included only for the purpose of familiarising the user with the interactions feature of mSupply and how to use it. Use of this feature is the responsibility of the user, and Sustainable Solutions bears no liability whatsoever for any consequence of inappropriate or incorrect use.
Drug interaction groups allow you to specify groups of items that interact with each other, and then prepare a warning message to be displayed if these items from interacting groups are issued to the same patient.
You can set up interactions in store mode, but warnings will only appear in dispensary mode.
To use this feature, it must be set up, and these are the steps:
- Choose a way of defining interaction groups. A number of systems are in use or are under development, and the internet is a useful resource for further investigation.
- Define which items are in which groups.
- Add interactions between groups.
Let's look at each of those steps in turn
Defining interaction groups
Choose Items> Drug interaction groups … Until you have set up some groups, the list will be blank; a number of groups have been set up for the purposes of this guide, shown below right:

Click the New Group button to add a new group, or double-click an entry to edit it.
Double clicking on NSAID displays this window:

The window has two tabs.
The Items tab shows a list of items that have been assigned to the group.
Define which items are in which groups
You assign an item to a group by viewing the item details (Choose Items > Show items ), and setting interaction group from a drop-down list.
Add interactions between groups
The Interactions tab shows a list of groups that the current group interacts with.

This tab has two buttons allowing you to add or delete a drug interaction. (To delete an interaction click on the line you wish to delete before clicking the Delete interaction button).
To edit an interaction double-click on the one to be edited. This window appears::

You choose the group that affects the current group, and then enter details about the interaction by choosing from the drop-down lists.
The choices available are:
- Type of interaction
- Inhibits (I)
- Augments (A)
- No effect (N)
- Conflicting evidence (C)
- Clinical Significance
- Minor (1)
- Moderate (2)
- Major (3)
- Unknown (?)
- Quality of evidence
- Poor (P)
- Fair (F)
- Good (G)
- Unknown (?)
You can enter a message to be displayed when an interaction occurs, and any notes you may want to record. These fields are optional.
When you are issuing items in dispensary mode, in order to display a warning:
- the Alert when there are drug interactions checkbox must be checked in File > Preferences > Drug Interactions. The warning as shown will be displayed if the patient is being issued with interacting items:
- Number of days of patient history.. must be set. We recommend setting it to 180, so that any items dispensed in the last six months that interact with the item you are currently dispensing are found.

| Previous: 4.10. Non-stock items | | Next: 4.12. Managing item access with Departments |
4.21. Forecasting
In mSupply, 'consumption' is defined as stock that is issued. Stock lost due to damage, expiry, etc. is managed through Inventory Adjustments and is not included in 'consumption'. During the later quantification calculation, there are options to include or exclude Stock Transfers and Builds in the consumption calculation.
By default, mSupply uses the assumption that future consumption will continue at the same level as consumption over a given historic period. Our experience is that in almost all situations, this method, combined with a conservative provision for buffer stock, yields very good to excellent results. However, in certain situations you will want to provide your own forecasts. Reasons for this could include factors such as:
- Excessive, sudden population increase
- An epidemic causing increased demand
- Historical usage being inaccurate due to operator error or out of stocks.
- A change to Standard Treatment Guidelines meaning a new treatment is being introduced, and there is no historical data
- Morbidity and mortality data has been obtained and used to calculate requirements.
Item Usage tab
In the mSupply Item Usage tab, you can choose to use from a range of forecasting methods on a per item, per store basis. These methods are detailed below.
BEWARE! Once set, these options will continue to govern for every forecast generated by mSupply for this item in this store until you change it!
If a user has the View items permission but not the Edit items permission, they are still able to use the functionality described here to set forecasts for items in 'this' store (that they are logged in to) since this makes no changes to the properties of the item itself.

In the Forecasting section of the window shown above there are four options:
Use historic AMC
This is the default option, and is the recommended method. During the later quantification stage (creating a new tender, creating a new purchase order or the suggested order report), there is an opportunity to provide the number of months of historical data to use to calculate the forecast.
For our worked example, we will use the Historic AMC method, based on 12 months of historic data.
Use historic AMC increased by a factor of X %
Using this option, mSupply will still calculate requirements based on historical AMC, but increased by the percentage you have entered. For example, you may know that the population increases by 2% per year, and so you can use this percentage to account for that increase in demand.
Use a fixed, estimated AMC
This option allows you to specify a particular amount that will be applied to all future months. For example, you might have caluclated a target consumption for an oral contraceptive based on fixed population and coverage targets.
Use projection (A or B)
With this option, mSupply allows you to maintain an A and a B projection, and easily swap between them. Of course you must enter projections for this to be of any use!
Entering projections
You can enter projections in a number of ways
Manually entering projections
If you click once on a cell that contains a projection (as opposed to a cell containing historical data), then you can click again to edit the cell's value.
Don't double-click: you need to click once, wait for a second or two, then click again
Copying a projection
You might want to copy historical data as a starting point for your projection. You can do this by choosing a column for from column and to column in the Projections section, then clicking Copy values.
Modifying a projection
You can use the Modify selected cell button to increase or decrease a column or some cells in a column by a certain percentage.
For example, you might have entered values for 2016, and then decide your 2017 values should by the 2016 values plus 8%. To do this
- Fill in your 2016 column values
- Add a column for 2017 if one doesn't already exist
- Use the Copy values button to copy 2016 to 2017
- Drag to highlight all rows in the 2017 column
- Enter
8in the percentage field, then use the Modify selected cell button to increase the 2017 values by 8%.
If you are using projections for a particular order, you only need to fill in future values for the period to be covered by your ordering. BUT leaving future projections at zero could have serious consequences when you come to ordering later… 
Where does mSupply use forecasts?
Any time mSupply produces a suggested order quantity, it will consider each item and use the forecast options for that item to produce a forecast. This includes:
| Previous: 4.20. Units | | Next: 4.22. Pickfaces and Replenishments setup |
4.19. Inventory adjustments
Inventory adjustments allow you to increase or decrease the stock of an item that is recorded in mSupply®. You will need to adjust the inventory if:
- Stock is discarded (due to damage or expiry)
- Stock has been stolen.
- You find some stock on the shelf that is not in mSupply and you don't know where it came from.
DO NOT use inventory adjustments for distributing stock to customers or patients or receiving stock from suppliers. Use customer invoices or prescriptions and supplier invoices for that. Otherwise, you will lose your audit trail and reporting on transactions will be difficult.
Inventory adjustments are used to deal with a problem or fix a mistake, not in the general process of entering stock transactions into mSupply. Ideally, you'll never have to use them but we know we don't live in an ideal world!
If you are doing a stocktake, it's better to use the stocktake module described here as it will create the needed inventory adjustments automatically.
Viewing inventory adjustments
Choose Items > Show inventory adjustments or click on the Show inventory adjustment icon on the Item tab of the Navigator:

This will open the usual transaction filter window for you to choose which inventory adjustments you want to see. Make your filter selections (or leave them alone to see the 15 most recent inventory adjustments by default) and click on the OK button to see the list of matching inventory adjustments:

You can double-click on any inventory adjustment in the list to view or edit it.
Note that si type inventory adjustments add stock and sc types reduce stock (si means “supplier invoice” and sc means “supplier credit”).
Add stock
Choose Item > Inventory adjust- add stock to create an inventory adjustment to add some stock into mSupply or click on the Inventory adjustment (add stock) icon on the Item tab of the Navigator:

The Inventory adjustment (add stock) window will open:

This transaction is almost exactly the same as a supplier invoice and you enter data in exactly the same way (see 7.01. Supplier invoices for details), except:
- The name (Inventory adjust- add stock) is filled in automatically for you and cannot be changed.
- There is an additional Adjustment reason column (see below for details).
Because an inventory adjustment represents a correction for some problem or other incident, we strongly recommend that you enter a comment in the Comment field of each inventory adjustment you create, whether to add or reduce stock, so that the reason for the correction is not forgotten.
Use the New line button to add a line to the transaction (and the Delete line button to remove them), just as you would on a supplier invoice.
When you have finished adding lines to the inventory adjustment, click on the OK button. You will be asked to confirm what you want to do:

If you've finished with the inventory adjustment and want to enter the lines into stock now, click on the Confirm button. If you don't want to enter it into stock now (because you want to add more lines later, for example) then click on the Later button.
Adjustment reasons
If you have added any active Positive inventory adjustment reasons on the Options tab of File > Preferences (see 16.10. Options (standard reasons)) then, when adding a line to the inventory adjustment (by clicking on the New line button), an Adjustment reason drop down list is displayed and you must select one of the reasons in the list before you can save the line:

Note that existing lines that do not have a reason selected can be left with no reason seleted if you click the Cancel button on this window.
Vaccines
If the Able to specify VVM status when receiving items store preference is turned on (see the 26.07. Virtual stores page for details) then an additional VVM status field will be displayed on the supplier invoice line entry/edit window as shown here:

The VVM status field is populated with the statuses set up in the system. See the 20.01. Vaccine Vial Monitoring (VVM) page for details on how to do that.
If you are editing an existing line on the inventory adjustment then the VVM status field will display the status selected for the invoice line or Please select… if it doesn't have one set already.
Reduce stock
Choose Item > Inventory adjust- reduce stock to create an inventory adjustment to remove some stock into mSupply or click on the Inventory adjustment (reduce stock) icon on the Item tab of the Navigator:

The Inventory adjustment (reduce stock) window will open:

This transaction is almost exactly the same as a customer invoice and you enter data in exactly the same way (see 8.01. Issuing goods to a customer (customer invoices) for details), except:
- The name (Inventory adjust- reduce stock) is filled in automatically for you and cannot be changed.
- There is an additional Adjustment reason column (see below for details).
Use the New line button to add a line to the transaction (and the Delete line button to remove them), just as you would on a customer invoice.
When you have finished adding lines to the inventory adjustment, click on the OK button. You will not be asked to confirm what you want to do, the inventory adjustment will be confirmed and the lines will immediately be removed from stock.
Adjustment reasons
If you have added any active Negative inventory adjustment reasons on the Options tab of File > Preferences (see 16.10. Options (standard reasons)) then, when adding a line to the inventory adjustment (by clicking on the New line button), an Adjustment reason drop down list is displayed and you must select one of the reasons in the list before you can save the line:

Note that existing lines that do not have a reason selected can be left with no reason seleted if you click the Cancel button on this window.
| Previous: 4.17. Stocktakes | | Next: 4.20. Units |
4.01. About items
An item in mSupply is usually a product that you purchase from a supplier, hold in stock and supply to a customer. However, there are also other types of items:
- A service item has no stock, but can still be added to customer invoices and charged for. Service item examples are a freight charge, a consultation fee, an express delivery fee, etc.
- A cross reference item points to another item, so that when it is chosen in a list, it is substituted with the item to which it refers. This allows you to have items in your system that are referred to by trade name, but are only issued according to their generic name.
Managing items is mostly done from the Item menu or Item tab on the Navigator. The item menu also contains commands for managing lists related to items such as accounts, drug interactions and units.
For how to add a new item, see 4.02. Adding a new item.
Item menu

Show items
Use this command for viewing or editing just about any information about an item.
First you are presented with a window asking you to enter search criteria to find the items you are interested in:

If you click on the Find button (or press the Enter key on the keyboard) without changing anything you will be shown a list of all the visible items in your store. But you can refine the search by entering and selecting different values in the different filter lines shown in the window. If you enter no value for a filter then that filter is ignored.
is on Master list drop down list: the drop down list will contain a selection of master lists defined in the system for you to choose:
- If you are in supervisor mode (25.01. Miscellaneous topics) all master lists will be in the drop down list.
- If the Automatically update item visibility in all stores to match master lists used by each store preference (15.01. General preferences) is turned on, you will only see master lists that are set to be used by the store you are logged into (25.08. Virtual stores).
- If the Automatically update item visibility in all stores to match master lists used by each store preference is turned off then all master lists will be in the drop down list.
Randomly select x items from returned list text box: If you enter a number in here mSupply will randomly select that number of items from the items which match the search criteria you have entered in the filters above. Beware: if there are less items returned from the search than the number you enter in here mSupply will return all the items it found with no random selection.
Exclude hidden items checkbox: This is checked by default and means that only items that are visible in the store you are logged into are included in the search. If you uncheck this box then all items in all stores in your datafile will be included in the search.
If only one item is found by your search then its details are displayed, otherwise you will be shown a list of matching items.
The Complex find button gives you access to a more powerful query editor where you can find a very specific set of items. A tutorial on using the query editor is to be found in section 13.12. Custom reports.
To do a “contains” search, use the wildcard character '@'; e.g. entering “@250” will find all items with “250” anywhere in their name.
Here's an example of a list of items displayed after clicking the Find button:

Double-click the item in the list to view its details.
Buttons on the Items list view
New item
Click the New item button to enter the details of a new item you are adding to your inventory. You can find out how to do this here
Set values
Click the Set values button to do either (or both) of the following for all the highlighted items:
- Set the flag
- Set forecasting options

You can highlight multiple items at the same time by holding down the control key (command key on Mac) and click on the lines you wish to flag. They will become highlighted.
We recommend you use a single character (or two) as the flag.
If you choose Append to existing flags, any items with existing flags will have the new flag added to the end of the flag. If you choose Replace existing flags, then the selected items will have their flags cleared.
You can clear all flags for all items by selecting all items (control - A) then leaving the Set flag to field blank, clicking “Replace existing flags”, and then clicking the OK button.
Find
Clicking the Find button displays the Find window, the same as if you had chosen Items > Show items.
Order by
Clicking the Order by button will bring up the standard Order by window, where you can choose fields by which to sort the displayed items
Click the Print button to print the items currently displayed in a list.
Modify
Click the Modify button to show details for the first record that is highlighted. Clicking the OK and Next button in the item details window will jump to the next highlighted record. To select multiple records, hold down the control key (command on Mac) while you click on the records you wish to select.
Duplicate
Click the Duplicate button to create a new item with the same details as the selected item. A message box like the one below will appear. Click on button Duplicate to confirm creating the duplicate. Note that the only difference you will see between the existing item and the newly created item is the name of the new item ends with the text '(copy)'. The new item will be added to the end of the currently displayed list of items.

Note that for recording and audit purposes a Log event is created when an item is duplicated. For more information on log events see section 25.19. The system log.
Customise
Clicking the Customise button will show a window where you can choose which fields from the items table are shown in the list view. See Working with lists.
Merge
Click on the Merge button to merge two highlighted items.
Item details window

Buttons in the item details window
Delete: Provided that an item has no transactions, quotes, order lines or backorder lines, it can be deleted, and this button performs that action.
Once you have received stock for an item, it cannot be deleted. You can delete an item immediately after you have created it or imported it. Note that if you have imported an item and stock, you can delete it, and it's associated stock will be deleted too (but not once it has been used in a transaction such as an invoice or build).
OK & Next: Saves changes, exits the window, then brings up the next item in the item list. If you did not have an item list open, or if you have reached the last item in the list, you will be returned to the list or the initial menus, depending on your starting point.
Cancel: Exits the window without saving changes.
Changes you have made to quotes, notes and backorders will be saved, even if you click Cancel .
OK: Saves changes then exits the window.
Tabs on the item details window
The item details window displays a vertical list of 'tabs' down the left side. Click on the appropriate item to view a 'tab' displaying particular information about an item. The Item Details Window normally opens at the General tab.
| Previous: 4. Items | | Next: 4.01.01. Items - General tab |
4.03. Item categories
Item categories are a great way of grouping your items. This enables you, for example, to report on specific groups of products by filtering by item category. This can be extremely helpful.
mSupply provides 4 different categories (called category 1, category 2, category 3 and VEN) for you to use. Category 2 and 3 are normal categories but 1 is a bit special - it's hierarchical and has 3 levels (level 1, 2 and 3. Level 1 is the top level, level 3 is the bottom). VEN refers to the WHO categories of Vital, Essential and Nonessential.
Be careful not to get mixed up between the levels of category 1 (1, 2, and 3) and the different categories (1, 2, 3 and VEN) themselves here!
Category 1 categories
Selecting Show Item Categories from the Item menu opens the window appearing below, showing all the category 1 categories in their 3 levels by default (Note that the 3 “None” categories are default categories and cannot be renamed or removed):
 In the screenshot you can see that “6.Antiinfectives” is a top level (level 1) category 3 category. It has 3 level 2 child categories: “6.1 Antiinfectives, anthelmintics”, “6.2 Antiinfectives, antiamoebic/antigiardics” and “6.3 Antiinfectives, antibacterials”. And level 2 category “6.2 Antiinfectives, antiamoebic/antigiardics” has a single level 3 category “Antileprosy medicines”.
Clicking on any of the categories will show you which items are assigned to that category in the panel on the right hand side of the screenshot.
Adding category 1 categories
To add a category at level 1, 2 or 3, click on another category at the same level you want the new one to be, click on the Add button (or the Add child button if you want the new category to be a child of the category you selected) shown in the screenshot and the new level will appear at the bottom of the categories pane called “Click to edit” and already selected. Click on it once and type the category's name. When you're done click outside the category and that's it!
Editing category 1 categories
Renaming a category is simple. Click once on the category you want to rename to select it then click on it again to edit the name: the category will become a text box and you can type the new name. When you've finished editing the name, simply click outside the textbox (but inside the category pane) and the new name will be saved.
Changing the parent of a category is almost as simple. You simply click on the category once to select it then click on it again, drag it onto its new parent (or a sibling of the new parent) and let go of the mouse button. Two things to note here:
- You can only move a category to a position at the same level. If it's a level 3 category then you can only drop it onto a level 2 category or another level 3 category. If you drag a level 3 category onto a level 1 category nothing will happen. For example: in the screenshot you could drag category “6.1 Antiinfectives, anthelmintics” onto category “1. Anaesthetics” or onto category “4.2 Antidotes, specific” and it would move (to become a child of category “1. Anaesthetics” or “4. Antidotes”). But if you dragged it onto category “6.2.3 Antileprosy medicines” it would not move (this is a level 3 category, 1 level below “6.1 Antiinfectives, anthelmintics” so the move is not allowed).
- If you move a category which has any child categories, all the child categories will be moved too. For example: in the screenshot you could drag category “6.1 Antiinfectives, anthelmintics” onto category “4.2 Antidotes, specific” and it would move to become a child of category “4. Antidotes”. It's child (“6.1.3 Antischistosomals…”) would remain its child and become a grandchild of “4.2 Antidotes, specific”.
Deleting category 1 categories
This is the simplest of all. Select the category you want to delete by clicking on it and then click on the Delete button. After confirming you want to delete the category it will be deleted. mSupply will not allow you to delete categories that have items assigned to them - it will warn you that you have to remove the items from the category first. See the Assigning items to categories section below for details on how to do this.
Category 2 and 3 categories
Category 2 and 3 categories are simpler - they are not hierarchical. To view the category 2 or 3 item categories select Show Item Categories from the Item menu and change the Show drop down list at the top of the window to “Category 2” or “Category 3” and the window will change to look like the screenshot below:

The window shows a list of the existing categories of this type.
Save sort order button: The sort order of the categories is the order they will appear in the list when you are assigning items to the categories (see the Assigning items to categories section below) or when you're selecting them in a filter e.g. for a report. You can drag the categories up and down the list to give them the order you want them to appear in. When you are happy with the order, click on the Save sort order button and the order will be saved.
New button: Clicking on this will take you to the edit category window shown below:

Simply type the name of the category shown in the Item category textbox and click on the OK button to create the new category
If you double click on a category in the list you will also be taken to the edit category window where you can edit the category's name, see which items have been assigned to the category, delete the category (click on the Delete button).
VEN category
Refer VEN category
Assigning items to categories
Once you have set up the categories, all items can be assigned to their appropriate category. This is performed on the Item details window under the General tab (get here from File > Show items, click on the Find button and double click on the item you want to add to a category):

To assign the item to a category 2 or category 3 category, select the correct category from the Category2 or Category 3 drop down lists.
To assign the item to a category 1 category click on the magnifying glass next to the Category box. The following window will open:
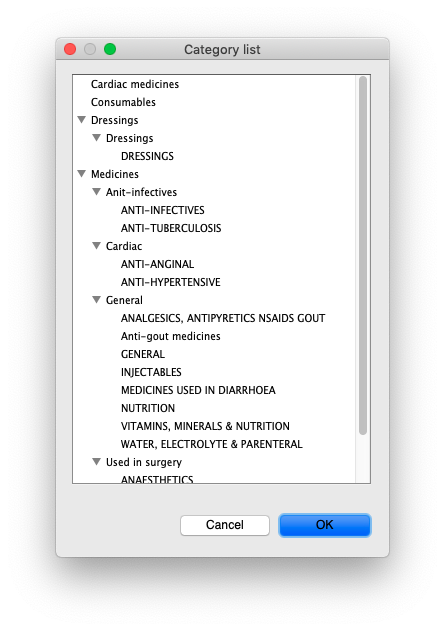
- If the item is already assigned to a category then that category is highlighted in the list
- If you want to change the item's category, simply select the level 3 (bottom level) category you want to assign the item to, and click on the OK button. (You will be alerted if you attempt to select a higher-level category.)
- If you want to remove the item from all category 1 categories, select the level 3 “None” category in the list.
You can assign an item to a category 1, 2 and 3 category at the same time.
| Previous: 4.02. Adding a new item | | Next: 4.04. Item master lists |
4.06. Stock locations and location types
Keeping track of where stock is in your store is an important part of good warehouse practice. You don't want to have to go hunting through your whole store for stock, wasting time and energy when mSupply can tell you exactly where it is!
Locations in mSupply are the places you store stock. Locations can have types (e.g. normal, cold, bulk…) to help you categorise them or to make sure that items are put away in the right type of location (e.g. cold or secure storage, or a particular section of the warehouse).
If you use location types it will help you if they are defined before the locations that belong to them otherwise they won't be available to select when defining a location - and you'll have to go back later and edit the locations. What a waste of time! So this section explains location types first and then goes on to explain about locations.
Location types
Location types give you the ability to categorise your locations.
They can be used for reporting on a group of locations, but also to restrict the locations that can be used for a particular item.
If you want to restrict items to being put away in locations with a certain type, you need to assign items the matching location type. For details on doing that see the 4.01.02. Items - Storage tab page.
Choose Item > Show location types to define or show a list of available location types.

The window that appears allows you to define the criteria for the various types of location in your store - e.g. the permitted temperature range, whether location must be dark, etc.
Adding a location type
Click on New , and the window that appears allows you to enter a name for the storage type, and the permitted conditions pertaining to that storage type.:

In the above example, a storage type “Refrigerator” has been defined, the permitted range of temperature being 2o C - 8o C.
Having defined your storage types, the Show location types window might look like this:

It is worth emphasising that the list does not show the actual store locations, but the types of locations.
Editing a location type
Should you wish to edit the details of any location type, double click on it in the list and change the details in the window which appears.
Locations
Viewing locations
To view the locations you have defined choose Item > Show locations and you will see a list of location codes and descriptions:

From this window you can view, edit and remove locations and their details - this is the 'location management' window. Here are the various functions of the window:
New location button: Click this to add a location (see 'Adding a location' below).
Print button: Click this to print the list of locations displayed in the window (see 'Printing the locations list' below).
Search location: Enter some text in the text field and the list is updated as you type to show only the locations whose code or description starts with the text you have entered.
view and edit a location's details: Double click on a location in the list - see 'Viewing and editing a location' below. All the details are editable. See the 'Adding a location' section below for the meaning of the individual details.
Adding a location
Before you can associate an item with a specific location (e.g. Shelf D4, Refrigerator 2, etc.) you must define the locations in mSupply. To add a new location, click on the New location icon in the View locations window shown above. You will be shown the following window, where you can enter the details of the new location:

Code: This is how you refer to the location in mSupply and, for example, what you will select when you set an item's location. Any non-printable characters entered before or after the code will be removed. Any entered in the code (including spaces) will be replaced with an underscore (_).
Description: This is a description of the location e.g. “Top shelf of refrigerator 3” or “3rd shelf up in rack E” to help you identify it or remember something important about it. You will only see this in the list of locations shown above. Any non-printable characters entered before or after the description will be removed. Any entered in the description will be replaced with an underscore (_).
General tab
Under this tab, you enter the location's main details:
Location Type
Select one from the location types you have already entered (see the Location types section above).
- Each item can have a Restricted to Location type set, and then you will only be able to store that item in a location with that type.
- See the details about allocating items to particular location types on the 4.01.02. Items - Storage tab page. When you do this is done, the item will only be allowed to be placed in locations that have the matching location type when they are received or moved in the warehouse.
In a synchronised system, this must be done on the Primary server and will restrict items to the same location type in all stores in the system. Introduction of this in an already established system therefore needs to be carefully managed.
Replenishment location type
If you are using the pickface replenishment functionality, this is where you tell mSupply if this shelf location is a Pickface or a Bulk location (or neither, if you neave it set at None).
For details about what these settings mean and how to use the replenishment functionality, please see the 4.22. Pickfaces and Replenishments setup and 4.23. Pickfaces and Replenishments pages.
Parent
Select one from the locations already entered in mSupply form the drop down list. This is the location to which the location you are adding belongs. You cannot set the current location's child location to be the parent (i.e. circular relationships cannot be created).
This is for descriptive purposes and does not have any functional effect in mSupply at the moment (it was used when viewing the warehouse layout but this is currently disabled awaiting upgraded functionality).
Summary
Checking this means that the location is a summary location only and cannot be used for storing items. This is normally checked for all locations that are parents of others.
Comment
You can note anything you need to remember or indicate to others in here. It is only visible if you view the location's details (Item > Show locations, double click on the item in the list) later.
Total volume
The total volume of goods that you can store at the location. Volumes are stored in cubic metres [m3] but other volumes e.g. litres (l) may also be entered, provided the appropriate unit is entered following the number e.g. 5l for 5 litres. See the entry Volume per pack in Item edit - General options. Note that whatever you enter will be converted to and displayed in m3.
Knowing the volume of a location is important if, for example, you are replenishing your stock of vaccines, and you need to know if there is enough space available in the refrigerator in which you store vaccines to accommodate a new order (obviously, you would also need to know the volume of the vaccines that you are ordering).
Priority
The Location priorities are used for two different purposes:
- When printing a picking slip:
- By default a picking slip is printed with the lines ordered according to the alphabetical order of shelf locations. This helps the pickers to progress systematically through the store rather than walking a random marathon! However, it is sometimes useful to get mSupply to put certain items, e.g. bulk fluids or fridge items first or last on the picking slip. This is achieved by setting a priority for a location. The priority will override the default alphabetical ordering.
- A location with a lower priority number will be printed before a location with a higher priority number.
- All locations with 0 priority are counted as having no priority and will be printed, in alphabetical order, after all locations with a priority.
- When suggesting stock lines for selection - when the expiry dates are the same:
- For an item with several stock lines having the same expiry date, mSupply will use location priority to decide which stock line should be suggested first (at the top of the stock line selection list).
- Locations with a lower priority number will be selected before a location with a higher priority number.
- If multiple locations have the same priority number, then mSupply will suggest them in alphabetical order of location name.
When locations are first set up, if you do not specify the priority, they have their priorities set to the default of 0
An example of using location priorities to direct selection of stock lines
Let's say we have 7 stock lines of the first expiring batch in the following locations:
| Line | Location | Location Priority |
|---|---|---|
| 1 | M02.04.3B | 1 |
| 2 | M04.02.2A | 1 |
| 3 | M02.06.1A | 2 |
| 4 | M02.04.4A | 3 |
| 5 | B01 | 4 |
- mSupply will suggest the stock lines in this order, sorted firstly by location priority number, and then by alphabetical order of location name.
- Line 1 is before Line 2 because, alphabetically, M02.04.3B sorts before M04.02.2A.
Hold
If this is checked then goods in this location cannot be selected for issue to customers. Goods can be moved in to, and out of, the location but they cannot be issued from that location.
Putting a location on hold can be useful if:
- The stock needs to be kept from being issued until some inspection / approval (e.g. quarantine or under bond).
- The stock is a bulk quantity with the same expiry date as another stock line in another location from which you want stock issued. You can use this feature to force mSupply to always suggest issuing stock of this item from the 'issue' location rather than this 'bulk' location. When you have finished issuing stock from the 'issue' location, and you want to issue the stock that is in the 'bulk' location, you will need to either take the 'bulk' location off hold, or, move all, or some of it (split), the stock from the 'bulk' location. Location priorities (above) is a more elegant way of managing issue of stock of an item with the same expiry date from multiple locations.
Asset this location is part of
If this location is part of an asset that is recorded in mSupply you can connect the location to that asset here. Type the first few characters of the asset's description in the field and press the Tab key on the keyboard to select the asset from a list of those that belong to the current store and have a description starting with what you typed.
When you have selected the asset by double-clicking on it, its description will appear in the field and its code (if it has one) will appear just underneath (Note: if only one asset matches what you typed, it will be selected for you and the fields appropriately populated):

This would be a very useful thing to do for cold chain equipment, for example, so that you can link temperature variations to maintenance schedules and repair requirements etc.
Layout tab
This tab is only of interest for those of you with older versions of mSupply! This tab has been removed in more recent versions because its functionality wasn't particularly helpful. Look out for Open mSupply coming soon, which is planned to have expanded functionality in this area.
Under this tab you can create a graphical plan view of the location in your store. This is useful for helping people to quickly locate any given location and presenting a graphical layout of your whole store. Locations are drawn as either rectangles (for which you enter the top left coordinate and the lengths of the 2 sides) or polygons (for which you enter a number of sequential coordinates which are connected with straight lines). Here's what the various input items mean for a rectangle, the rest we'll show you by the way of an example:

So, as an example, the coordinates are entered as above in the appropriate boxes, then the Draw button is clicked to produce the following display under the layout tab:

This has created a picture of location main1. This is the whole store or warehouse. You can't see the settings but this location will have no parent and will have its Summary checkbox checked (no items can be located here - it's just a summary location for descriptive purposes).
In our imaginary warehouse we have a set of open racking which is 'L'-shaped. We want to draw it in the warehouse so we create the location, call it 'sub1' and set its parent as Main1. If this set of shelves also has other locations in it we would also check its Summary checkbox.

To draw this location we click on the Layout tab and select Polygon as the object type. Click on the Add button to add a coordinate and then overwrite the zeros in the X and Y columns to give the correct coordinates. If you make a mistake, click on the set of coordinates in the list that is wrong and click on the Delete button to delete it. When all six co-ordinates have been entered, click on the Draw button to produce the layout displayed below:

You can do this same thing for all locations so that anyone can easily locate them in your store.
Viewing and editing a location
As you already know from above, to view all the locations you have defined select Item > Show locations. To view and edit the details of a particular location, double click on that location in this list. You will be shown the following window:

General tab
This is the same as the General tab for adding a location (see the 'Adding a location' section above) except that its details are filled in with the details of the location you selected. To edit the details simply overwrite the current value with a new value or select another option as appropriate.
Layout tab
This is the same as the Layout tab for adding a location (see the 'Adding a location' section above) except that the current graphical representation of the location is displayed (if you've already created one). You can edit the plan view of the location if required by changing, adding or deleting co-ordinates.
Stock tab
The Stock tab shows a list of existing stock lines stored in that particular location. A lot of information regarding the stock is displayed in the list and, as with most mSupply lists, it can be sorted on any column by clicking on the column heading:

If you want to know more information about any particular batch in the list, simply double click it and you'll be shown another window with lots of information about the batch, arranged in four tabs:

Deleting a location
To delete location you select Item > Show locations to view the list of locations, double click on the location you want to delete (as if you wanted to view all its details) and then click on the Delete button at the bottom of the window. If you confirm the deletion, the location is removed.
You can not delete a location that has had stock in it. You can achieve the desired result by merging the location that you want to delete with any other location - refer Merging two locations.
Merging two locations
If you want to remove a location from further use in mSupply (for example, you might have accidentally double-entered a location) this command can be used.
When you Choose Item > Merge two locations , this window is shown:

Use extreme caution! This operation will affect all historical records of the location you delete. They will be moved to the location you are keeping. The operation can only be undone by reverting to a backup copy of your data file.
In the window displayed enter the location to keep, and then the location to merge. When you have checked that the information is correct, click the OK button.
Managing stock in locations
mSupply allows stock in locations to be managed according to the volume of stock in those locations provided that:
- Volumes of locations have been defined
- All stock has volumes assigned to it. Volumes can be assigned:
- At any other time by editing the stock line
Whenever stock is being allocated to a location, mSupply allows the user to identify those locations that are either completely empty, or where there is volume available for the selected stock line:

The Show empty radio button is selected here. This is appropriate when trying to find a location for a whole pallet of stock, as pallets can only go in empty locations.
The Show available radio button shows locations that have enough spare capacity to take the volume of the line we are allocating.
| Previous: 4.05. Programs | | Next: 4.07. Building (manufacturing) items |
4.20. Units
Choose Show units from the Items menu. When you have defined your units, a list is displayed:

Click the New button to add a new unit.

Note that you will need to have sufficient user permissions to use this function.
Do not change the record for one unit into a different unit, as all items using that unit will be updated.
Click the Merge button to merge two units. Note that duplicated units can occur on import of units or a user may duplicate a unit being unaware of one existing already. The below window appears to merge the units. The green boxed unit is the one that will be kept, the red boxed unit will be deleted.

Accounts
Choose Show accounts from the Items menu. This window allows you to manage the range of accounts that can be assigned to items.

Account codes are used when exporting transaction data from mSupply® to external accounting software. Double-click a line to edit its details. Changing an account code or description will affect all items that are assigned to that account.
Click the New button to add a new account.

Fill in the code, description field and select the account type. The field Items that use this account code will display such items for each account code. Account types are Expense, Income and Asset .Click on OK button to add a new account, and Delete button to delete an account.
| Previous: 4.19. Inventory adjustments | | Next: 4.21. Forecasting |
4.07. Building (manufacturing) items
mSupply provides for a mechanism to manufacture (build) a new item from two or more existing items. A build is a way of recording items you have manufactured. That is, raw materials that are in your stock are used (taken out of stock), and a new stock item is created.
Show builds
From the Items page of the Navigator, click on the Show Builds button:

You will be shown the standard find window to enter either the number of recent builds to display, or a particular build number.

You will then be shown a list as shown below:
![]()
From this list you should select the required build by double-clicking on it.

New build
From the Items page of the Navigator, click on the New Builds button:

On choosing this menu item you are shown the build entry window:

If you have restricted access to builds, you will not be able to see cost prices or the profit summary window at the bottom.
The build window has two parts:
- The top part of the window records the details of the item to be built
- The lower part lists ingredients that are used in the manufacture of the product.
click the Item to build or to edit icon

and in the next window enter the name of the product you're manufacturing (Syrup in our example)

and this window is displayed where you should complete the appropriate fields:

Adding ingredients manually
Note that ingredients can be added automatically from the Bill of materials tab. If you regularly build the same item, we recommend that you enter a Bill of Materials for the item being built, and use the method outlined under the Using a Bill of Materials heading below.
First, if you are entering a projected build (one that you expect to perform in the future), check the This is a projected build check box. If checked, all items added will be placeholder lines rather than actual stock. Doing this allows you to enter your manufacturing schedule in advance of ordering raw materials. The schedule will be taken into account when ordering to ensure that you will have enough materials in stock when the time comes to manufacture.
- To add a new ingredient, click the New ingredient button. You will be shown the standard window for issuing goods from stock:

- Enter ingredients just as you would for entering a customer invoice.
- Once you have finished entering ingredient lines, click OK to return to the main window.
- If you wish to edit a line, double-click it, and change the details.
- To delete a line, double-click it, set it's quantity to zero, then click the OK button.
Adding the item to be built
- To add the item to build, click Item to build or edit button. You will be shown the Add/edit supplier invoice line window below for receiving goods.

- The cost price for the item is automatically calculated for you. You may enter the margin or the selling price as you prefer.
- Once you have entered the item to build, click OK to return to the main window.
- If you wish to edit the item, simply double-click inside the “item to build” rectangle.
- At the bottom right of the window in Summary section is a summary of the cost, margin and selling prices for the build.
- Once you are satisfied with the details, click OK to enter the build into the system. You will be asked if you want to enter the details into stock. If you say yes , the newly created item will immediately be available for issuing to customers. If you click later then the stock will not be available until you open the build window at a later date and enter it into stock.
- Note that the ingredients used in a build are considered to have been “sold” for re-ordering purposes, and will be counted in your usage.
Finishing build entry
- Understanding build status codes enables you to know what stage each build is at. The codes are the same as for other transactions.
Each build transaction has a status code:
| Code | Meaning |
|---|---|
| nw | A new build is being entered, but has not been saved. |
| sg | “Suggested”. A build has been entered, but has not yet been confirmed. If stock lines have been entered, raw material stock is reduced so that it is no longer available for other invoices, but the new item is not yet entered into stock. You should leave builds with this status while manufactured items are “in process” , or if it is a projected build for a future date. |
| cn | “Confirmed.” The item to build has been entered into stock. |
| fn | “finalised.” The build can no longer be edited |
- When you click the OK button you may be asked if you want to enter the build into stock. You should only do so once the manufacturing and Quality Assurance (QA) process is complete. You will not be asked this question if there are any placeholder lines (those with a batch of “none”) entered as an ingredient. Such builds are presumed to be for projected manufacturing, and are kept with status sg automatically.
- To finalize builds, choose File > Finalize builds when the splash screen is showing.
Converting projected builds into an actual build
- Once your manufacturing of a projected build is about to take place, choose Item > Show builds … to locate the build you want to edit.
- For each line whose batch is equal to “none” (a placeholder line) you will have to double-click it and choose an actual stock line from the item issue window (either by entering the line number or double-clicking the line you wish to use). Once you have done this, the stock you have chosen will be reserved, and manufacturing can take place.
- mSupply® calculates the number of items that will result from your build, and clicking on the Print labels icon prints the correct number of labels.
Using a bill of materials
A bill of materials can be thought of as a “recipe” or “formula” for building an item. It records the ingredients, and the quantity of each required to make the finished product. You should create a bill of materials for an item before you come to this screen. This is done in an item's Item details window: see here for details. Screenshots in this section are using Simple Syrup as an example, and for this product a Bill of Materials has already been created.
When you click the “Bill of materials” tab in the build window, this window appears:

First you need to choose the item to be manufactured:

in the next window you need to specify the quantity to be manufactured and other details:
When you click OK, you are returned to the New Build window, and when you click the Add Bill of Materials Button, a window appears where you can confirm or cancel the quantity to be manufactured:

Assuming the quantity is correct, click OK, and you are returned to the New Build window, where the open tab is the Bill of materials tab. Click the Add Bill of Materials button, and the details on the Bill of Materials according to the formula previously entered for Simple Syrup is displayed:

Now click the Ingredients tab, where the ingredients are listed, but no stock is attached to any item - they are placeholder items (displayed in red). This is done as mSupply® cannot take into account all the factors that go into choosing an appropriate batch to use for each manufacturing run (The expiry, amount on hand, etc). click each line in turn to select the quantity and batch number of available stock lines for each ingredient. Note that there is a button displayed Re-distribute all. Clicking this button will take the “total quantity issued” figure and re-distribute it over the available batches, making it easy to move from using a placeholder line to issuing actual stock. The ingredient is repeated in black with appropriate details displayed. At this time (or later) you can also adjust the amount issued to reflect actual issued quantities and the actual batches of raw materials used, as opposed to the theoretical quantities that are initially entered.

If you are manufacturing the product immediately, the status of the build transaction should be changed to Confirmed on completion of the manufacturing process.

Print options
It's possible to print either a Pick list, detailing the ingredients and quantities, or a summary of the manufactured product. To achieve this, check the print icon in the bottom right hand corner of the window and click the OK button. The printing options window will appear and you can choose which document to print:

Calculate Yields button: This button (on the Bill of materials tab) compares the actual quantities issued and the actual final quantity manufactured with the theoretical amounts that should have been used and made. This allows you to monitor production efficiency. Use the Print yield report button to print the yield information if required.
| Previous: 4.06. Stock locations and location types | | Next: 4.08. Merging two items |
4.04. Item master lists
Updated: Version 3.1
Master lists are standard lists of items you would supply to wards, clinics, etc. on a regular basis. Once set up, a master lists can be assigned to customers or Virtual stores, and then used to support Stock Control including imprest orders. Master Lists are useful to stores which have a number of customers or virtual stores that they supply whose lists of stock items are either identical or very similar.
Choosing the Item > Show item master lists… menu item or clicking on the Master lists button ![]() on the Item tab of the navigator displays a list of the current master lists in your datafile in this window:
on the Item tab of the navigator displays a list of the current master lists in your datafile in this window:

Master lists can only be managed (created, deleted, edited, applied to stores or customers) on the Central Server
Buttons on the Show master lists window
Add master list
Click on the Add Master List button and you are presented with this window:


Description
Enter the name of the master list here - this is the list name that everyone will see e.g. All items: General warehouse. Any non-printable characters entered before or after the description will be removed. Any entered in the description will be replaced with an underscore (_).
Note
Add any note or information here that will help you and others understand what the list is for.
Automatically add new items to this master list
If you check this, any new items created, whether manually or during import, will be added to the master list. This is a particularly helpful setting when you are using master lists to control the visibility of items in stores.
This master list is a patient list
If checked, this tells mSupply to use the prices on this master list for any of the items on this list on prescriptions (not customer invoices).
Buttons on the Master list window
Add item
You then populate the list with the required items by clicking the Add Item button:

- On entering the first few characters of the item to be ordered and pressing the Tab key, the (by now!) familiar list will appear from which the desired item is selected by double-clicking.
- If the imprest system is used in your organisation, the quantity is entered in the Imprest Quantity field. If the imprest system is not being used, you don't have to enter anything in this field.
- If you want this list to determine the price of this item for customers using it, the price is entered in the Price field. If not, no entry is required in this field.
Remove item(s)
To remove one or more items from the master list, select (click) the row(s) and then click on the Remove item(s) button.
Save sort order
- The order in which the items are ordered dictates the order in which they populate various transaction forms in mSupply.
- Clicking on any of the column headings allows you to sort the list according to that heading.
- You also have the ability to click on an item in the list, and drag it to a new position.
- Once you are happy with the sort order, click this button to save the order.
Copy to clipboard
The master list is copied to the clipboard when this button is clicked so that you can paste it into other applications on your computer e.g. a word processor or spreadsheet application.
Update prices to 12 month average
Also only visible if the Use program pricing preference is turned on (see the 15.03. Invoice preferences page for details). When you click this button, mSupply calculates a weighted average price for each item from all the cost prices on all supplier invoice lines that were confirmed in the 12 months previous to the current day for each item. That calculated price is then shown for each item in the Price column. When you click on the OK or OK & Next buttons these prices will be saved on the master list, if you click on the Cancel button the prices will revert to what they were before. mSupply will create logs when the function is run so that you have a record of the old and new prices - see the 25.19. The system log page for details on viewing the logs.
Import item list
You can import a list of items created elsewhere e.g. an accounting application or a spreadsheet. This can save you a lot of time when creating a master list!
The file to be imported must be tab delimited text file, which is most easily created in a spreadsheet. The file must contain columns in this order:
- Item code Must match an existing item code.
If you are not importing imprest quantity or price, then this is the only column needed. The following columns are not required.
- Item name For information purposes only and is not actually imported. You can leave this column blank if you like, however, if you are importing imprest and / or price data, then you must include the column, it's just that the entries can be blank.
- Imprest quantity Optional and can be left blank. You would leave the entries blank if the master list is not going to be used for an imprest.
- Price Optional and can be left blank. You would leave the entries blank if the master list is not going to be used for pricing
Records in the file are, of course, separated by the end of line character, which will be created by the spreadsheet when you save the file as a Text (Tab delimited) format.
For example:
| Item code | Item name | Imprest quantity | Price |
|---|---|---|---|
| amo250t | amoxycillin 250mg tab | 800 | 4.50 |
| amo500t | amoxycillin 500mg tab | 300 | 5.50 |
Clicking on the Import item list button takes you to a prompt:

after which you can select the file:

And then the import preview dialogue box is displayed:

On this screen you use the Next and Previous buttons to move through the records and see what details will be imported for each. The First line contains column headers tells mSupply whether to ignore the first record in the import file (checked = ignore first line of file). The first record in the import file often contains headers describing the fields in each record, not actual data.
The Remove quote characters on import checkbox, if checked, tells mSupply® to strip all “ characters from the data. This is recommended. In fact, this option can be selected anyway without detriment to the import.
- Any new items on in the import will be added to the end of the master list.
- If you import items that are already on the master list, they will not be added to the end of the list. The existing entries will have their Imprest Quantity and Price details updated with the imported values.
Clicking the Import now button executes the import with the settings you made and takes you back to the master list screen with the imported items now showing in your master list.
The Cancel button also takes you back to the master list screen but, obviously, does not execute the import.
Search field
If you need to find a specific item in the master list you can type something in the Search items field just below the buttons. Only the items in the list with a name or code that contains what you typed will be shown, all others will be hidden.
Tabs the Master list window
Items
Shows the list of items on the master list.
In use by
Shows which customers the master list has been assigned to (see below).
Delete master list
From the Item Master lists window, selecting the Delete Master List button allows you to delete a list which is no longer required.
- This action has significant consequences for any customers who are users of the list. So to prevent accidental deletion, this action cannot be completed until any customers who are users of it have their assignment with it removed.
- To find out which customers and stores the list is assigned to, open the master list and click on the In use by tab. If the list on this tab is empty, you will be able to remove the master list. Refer to the Assigning a list to a customer section below and the 25.08. Virtual stores page to remove the master lists from customers and stores respectively.
+
Duplicate master list
Should you wish to create a Master list which is very similar to an existing one, click on this icon, and a new Master list with the same name (description) but with ` (Copy)' appended to it is created; this can then be edited and renamed to suit your requirements.
Report
To create a custom master list report, click on the Report button on the Master list window. This will open the custom report editor and you can create your custom report there.
To generate a built-in report based on all the master lists in the list, click on the Print button on the Master list window. You will be given the following options:
- General: This report shows some of the simple settings for all the master lists (whether it is a program, whether it is a patient list, whether it will have new items automatically added to it etc.)
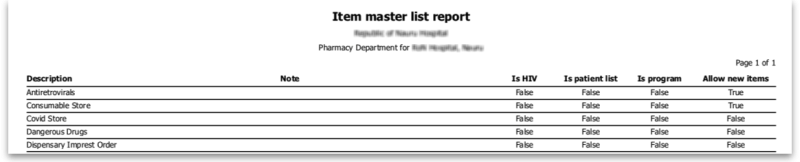
- Cross tab: Item vs Master list: Opens directly in Excel. The rows are all the items on master lists, the columns are all the master lists and the cells contain Yes if the item is on that master list.
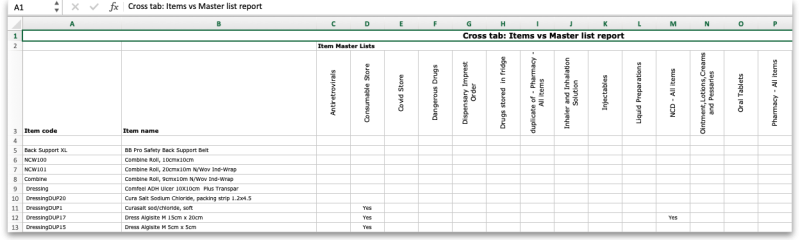
- Items without master list: This shows all the items in your datafile that are not included on any master list.
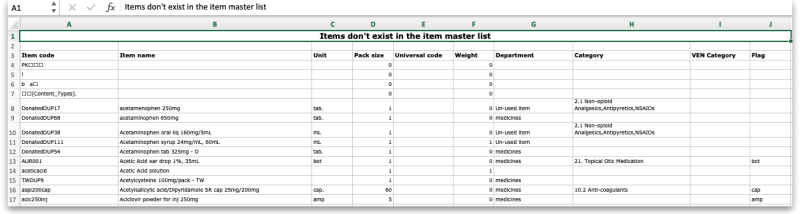


Assigning a list to a customer
To assign a list to a customer, the customer's details need to be on screen; Choose Customer > Show customers , or using the Navigator, select Show customers , fill in the appropriate details, and press Find, or just press Find, then double click the entry required on the Names list
Once the desired customer's Edit Customer/Supplier window appears click on the Item Lists tab.

Buttons in the Item Lists section:
- Add Master list: Click this to select a master list to add to the customer from a list of all master lists which have been created.

- Delete list: Select a master list and click on this button to un-assign it from this customer. The master list remains in mSupply, it is not deleted.
When operating multiple stores in mSupply, you can sometimes have difficulty with item visibility: an item might be on a master list for a particular customer but if the item is not visible in the store you are logged into when using the list, then the item will not appear.
A temporary fix can be achieved by setting the item visibility in a particular store to match an item list - refer the Visibility tab. This is only a temporary fix. If you add a new item to a master list, the visibility of that item in the stores using that list will not be updated.
To avoid this problem, you can set a preference (see here for details) to have the visibility of items on lists altered to match the visibility of the name for which the lists are made.
- Printing:
- Before printing, choose either Sort by Group or Sort by department
- Choose whether to send to Excel® or your printer.
- Click Generate
Information button
Edit list properties
The attributes of a list are set by double clicking on the name of the list. This window is displayed:

The options should be checked as appropriate:
- Imprest: If checked, this list will populate an imprest customer stock history created for the customer.
- Customer stock history: If checked, this list will populate a customer stock history created for the customer.
- Ordering list for web: Means that the list represents all items that the customer can order using the mSupply Customer interface. If a customer who uses the customer interface for ordering stock does not have a list with this option checked, they will not be able to order any items.
- Price list: Means that the prices on this list will be used for these items when they are being distributed to this customer on a customer invoice. The price on this list will override any sell prices that individual stock lines have. Only one list can have this option checked for each customer.
Using master lists to control item visibility in stores
You can use master lists to control item visibility in each store. This will make the items visible in each individual store match exactly the items included in the master list(s) selected for that store.
Control of item visibility by master list can have drastic unintended consequences!
It affects ALL stores in the system.
- Do not turn it on unless you know what you are doing!
One unintended consequence: An mSupply store can only order from another mSupply store those items that are on master lists which have been assigned to both stores.
For example:
Central store has the following master lists assigned:
- All items (includes all items in the system)
- HIV items
Kathmandu store has the following master lists assigned:
- HIV items
- TB items
Kathmandu store tries to place order from the Central store for:
- Items on the HIV items master list. This succeeds, because both stores have been assigned the HIV items master list.
- Items on the TB items master list. This fails because the TB items master list has not been assigned to the Central store, even though the TB items are all included in the All items master list .
Procedure - item visibility
For example, let's say there are 100 stores, and you want all of them to have the same item visibility:
- Create a master list and add some items
- Go to each store and make sure that the master list is selected
- Turn on the preference:
Automatically update item visibility in all stores to match master lists used by each storeA temporary list is created for each store containing items that cannot be removed from visibility when the master list preference is activated, normally because there is stock of the item in the store.
- Now whenever an item is added or removed from this master list, the preference will automatically update the visibility for all of the 100 stores, so that the items visible for each individual store matches the items included in the master list.
- Adding an item to a master list will automatically add that item to visibility for all stores using that master list
- Deleting an item from a master list will automatically remove that item from visibility for each store using that master list, given it is not included in another master list in use by each store respectively.
When deleting items from a master list, mSupply will first check all stores using the master list to make sure it is safe to remove that item. It is unsafe if the item has stock on hand and isn't included in another master list for any stores using master list you are editing.
If you've been running your mSupply for some time without controlling item visibility by master list and you now want to move to it, you will likely want to start by creating a master list containing ALL items and applying visibility to all existing stores according to that ALL items master list. Then, over time, different master lists can be created and applied to those existing stores.
To create a ALL items master list, you can export all items, and then import them to the master list, refer above.
Master list Tips
Creating a re-ordered master list
You may need to create a new master list which is similar to an existing one, but with significant changes, including, particularly, changing the sort order.
Small master list:
If this is a small list, this is relatively easily achievable by:
- Select 'source' master list
- Duplicate it to the new master list
- Add any new items to the temporary master list
- Re-organise the list to the desired sort order
Large master list:
However, if the list is a long one, then the re-organising can be extremely tedious, especially over a dodgy internet connection to the Central server (editing master lists must happen on the Central Server)! This is best achieved by:
- Select 'source' master list
- Duplicate it to a temporary master list
- Add any new items to the temporary master list
- Copy to clipboard (using button)
- Open a blank Excel sheet and Paste the clipboard in to cell A1
- Delete the first four lines in the spreadsheet
- Filter the table of data
- Do the necessary edits including any re-ordering
- Save as a tab separated values text file
- Back in mSupply, create your new master list from scratch (Add master list button).
- Import master list (using button)
- Once you've verified that it worked the way you wanted it to, Delete the temporary master list
Re-order existing master list
This method can even be used to effectively re-order an existing master list, but be careful; stop any syncing if in a synced system, and take a backup of your datafile before embarking on this:
Method 1:
- Stop syncing (if in a synced system) and make a backup.
- Create your new, correctly ordered master list as described above.
- Assign this list to all the same names as the original master list was assigned to.
- Unassign the original master list to all names
- Delete the original master list
- Rename new list
Method 2:
- Stop syncing (if in a synced system) and make a backup.
- Create the tab delimited text file for your new, correctly ordered master list as described above.
- Delete all but one of the items on the original master list. This one item is ideally the item that will be at the 'top' of the reordered list.
- Import the tab delimited text file to the original master list.
This is scarier (deleting items of master lists is a big deal), but avoids the need for steps 3 - 6 of Method 1.
Removing an item from a master list when it is currently in stock
There are a number of circumstances under which you will need to remove an item from a master list when it is currently in stock including:
- The item is being phased out and you don't want facilities to be able to order it
- The item should never have been on the master list and users have accidentally recorded stock of the item
In these cases, it is relatively straightforward to remove an item from a master list - except that if your system is using master lists to control item visibility in stores, then:
mSupply will not allow you to remove an item from a master list IF any store that is assigned to that master list has:
- The item currently in stock AND
- The item is not on any other master list assigned to that store.
There are two options open to you:
Wait for all stock to be removed
Wait for all stock to be removed from all the affected stores before you remove the item(s) from the master list. This is a particularly painful process if there are many affected stores. While you are waiting for the last store to remove the item, other stores can continue to receive and stock the item!
Use a temporary master list to assist with the process
- Create a temporary master list with the item(s) to be removed.
- Assign the temporary master list to all the affected stores that still hold stock of the item(s).
- Remove the item from the original master list. This should now be possible as the condition above should be met.
- As each store removes the stock of the item(s), un-assign the temporary master list from the store.
- Once all stores have removed stock of the item(s), the temporary master list can be deleted.
| Previous: 4.03. Item categories | | Next: 4.05. Programs |
4.08. Merging two items
If an item has inadvertently been added twice, with slightly different descriptions, here is your safety line! Choose Merge two items… from the Item menu. This window is displayed:

In the Item to keep box type the first few characters of the item you want to keep and press the Tab key. Then select the correct item from the list displayed (if only 1 item matches what you have typed it will be put in the box for you without the need for selection).
Now do the same in the Item to merge - will be deleted box. The item you select here will be completely replaced with the one in the Item to keep box.
Note that when selecting these items you are selecting from all of the items in your datafile, not just those visible in the store you are logged-in to.
When you are ready, click on the OK button. BUT BEWARE:
If you merge two items that are, in fact, different, you will really mess things up. There is no undo function for this operation, so you will be begging us to help you fix the mess, and we charge a special penal rate for people who do things after having been warned
Notes:
- Merging replaces all the instances of the item selected to delete with the item selected to keep throughout everywhere your datafile.
- Merging items affects all historical records except for item names on finalised transactions, which will retain the original name for safety reasons.
- Items that either have a bill of materials or are used in a bill of materials cannot be used for the item to delete/merge. If you try to do so, you will be warned.
- If the item you are merging/deleting has stocktake lines associated with it, these stocktake lines will be deleted, as you can't stocktake a non-existent item (except if you're Harry Potter).
| Previous: 4.07. Building (manufacturing) items | | Next: 4.09. Ad hoc items |
4.10. Non-stock items
There are occasions when you need to order an item that you wish to add to your stock list, but which you currently do not wish to keep in stock. mSupply® treats such an item as a Non-stock item. Although you do not hold any stock of a non-stock item, it is quite likely that you may place regular orders for it.
Note that ad hoc items are different to non-stock items in that:
- they do not display in your list of items
- it is likely that an ad hoc item will be ordered once and once only
The procedure for dealing with non-stock items is:
Step 1
The example used here to demonstrate this is for non-stock item Penicillamine 250mg tablets.
From the Item menu, select New item, and enter the particulars as you normally do, only this time check the Non-stock item box. In the box immediately below, select the customer from the list of customers held in mSupply®.

- To place an order for a non-stock item, a customer must be identified, and this customer becomes the default customer for the item.
- Should you need to order the same item for a different customer at a later date, the new customer is entered at the time the Purchase Order is being created.
Step 2
Create the Purchase Order which will include the non-stock item. (from the navigator - Suppliers/+Purchase Order/+new line)

Step 3
On receiving the order, proceed as usual to the New Goods receipt form.
In our example, we have ordered 2 items from IDA, one of which is our non-stock item, Penicillamine 250mg tablets, and it appears in blue.
The Goods Received must be finalised in order to create the Supplier invoice:

Uncheck the Hold box ( bottom left corner) then click on OK, and this Alert message is displayed:

advising you that 'Customer invoices have been created for non stock items……': From the main menu, choosing Customer > Show invoices allows us to select and process the invoice which has been created automatically for the non stock item for our customer, the Dispensary.

| Previous: 4.09. Ad hoc items | | Next: 4.11. Managing drug interaction groups |
4.18. Phased stocktakes
General
Phased stocktakes are commonly carried out in larger warehouses. In this type of stocktake, stocktakes are created for each aisle and level combination in the warehouse. When a stocktake is finalised then a new stocktake is created from it containing only the lines with discrepancies. When the third count is finalised then adjustments are made to make the stock in mSupply match any discrepancies. Thus, there is a maximum of 3 phases for each stocktake.
Setup
Store preferences
Before using phased stocktakes you must tell mSupply which parts of your shelf location codes (see the 4.06. Stock locations and location types page for details) represent the aisle, level and position of the location (aisle = rack, level = horizontal level within the rack, position = vertical 'column' within the rack).
See the 26.07. Virtual stores page for details on how this is set.
Confirm Customer Invoices
mSupply will not allow stock that is on a Customer Invoice with status of new (nw) or suggested (sg) to be taken out of stock by any other transaction process, including an inventory adjustment flowing from a stocktake - refer Creating inventory adjustments.
It is HIGHLY RECOMMENDED to process (take the stock off the shelves) and confirm any customer invoices with a status of new (nw) or suggested (sg) before doing a stocktake - please see Issuing Goods to a Customer (Customer Invoices), Confirming an invoice for details on how to do that.
This is so important that mSupply will show you a warning message when you try to create a new stocktake if it detects any customer invoices with suggested status. Please read the warning and take suitable action.
Creating a phased stocktake
Choose Items > Show Stocktakes… from the menus or click on the Stocktakes button on the Item tab of the Navigator. This window will open, showing a list of the current stocktakes:

Note that only phased stocktakes will have a value in the Reference column.
The Show: filter allows you to choose which stocktakes are displayed in the list. Options are:
- All: shows all stocktakes in the current store with any status for all time. Could be many of them!
- Current: selected by default when the window is displayed and shows all 'suggested' stocktakes (status = sg). These are stocktakes which have not yet been processed into inventory adjustments (finalised; status = fn)
- This year: shows all stocktakes of any status that have been created in the current year.
- Last year: shows all stocktakes of any status that were created in the year before the current one.
To create a phased stocktake click on the New phased stocktake button. The options window opens:

- Count reference: This is mandatory and is the unique reference for this phased stocktake (that is, the collection of all the individual stocktakes that makeup this one). It must be unique so you will be shown an alert if it isn't.
- Item filter: Make settings here to select the stock that is included in the stocktake. The filters work the same as for standard stocktakes as described on the 4.17. Stocktakes page.
- Stock location: Here you can select a particular aisle or level of the warehouse to include in the stocktake. Enter the identifier of an aisle in the Aisle textbox or the identifer of a level in the Level textbox:
- If you enter an Aisle value only, then a stocktake will be created for each level in that aisle.
- If you enter a Level value only, then a stocktake will be created for that level in each aisle in the warehouse.
- If you enter an Aisle and Level value then a single stocktake will be created for the level in the aisle specified.
- If you enter neither value then a stocktake will be created for every level in every aisle in the warehouse.
When you click on the OK button mSupply will create a stocktake for each level in each aisle you have selected to be included in the phased stocktake. Each stocktake will contain one line for each line of stock found in a location that beloings to the aisle/level combination that the stocktake is for.
When the stocktake creation is complete you will be told how many stocktakes were created in an alert message. When you close the message, the stocktakes will be displayed in the table like this:

The reference in the Reference column is constructed as Count reference-Number-Aisle-Level/Phase where:
Count referenceis the Count reference value entered in the stocktake optionsNumberis an incrementing number starting at 1 and padded to 5 digits with leading zeroesAisleis the aisle this stocktake is forLevelis the level this stocktake is forPhaseis the phase of this stocktake, a number from 1 to 3
Carrying out a phased stocktake
To open a phased stocktake, double click on it in the list. The stocktake detail window is opened:

- Description: An editable description of the stocktake. Set to the date the stocktake was created followed by “Stocktake” by default
- Reference: The count reference, read only
- Comment: Enter anything you need to remember about this stocktake
- Stocktake date: the date the stocktake count was started, set to the creation date by default
Print the count sheets
The next thing to do is to print out the count sheets so that the warehouse operatives can take them into the warehouse to carry out the count. At this stage, when the stocktake is at sg (suggested) status, this is the only thing you can print and it looks like this:

NOTE: When the Reference value ends in /1 the count sheets contain a line for every location in the aisle/level combination this stocktake is for. These are the blank lines with a value only in the Location (Emplace) column. When the Reference value ends in /2 or /3 then only lines in the stocktake are printed.
Using the count sheets, the warehouse operatives count the stock in the warehouse.
After counting the stock
After counting the stock, the count sheets are brought back to mSupply and the information is entered into the stocktake.
The stocktake is completely blind so the batch, expiry date and number of packs of each line entered on the count sheets should be entered in the Counted batch, Counted Expiry date and Counted number of packs columns. Optionally, you can enter a value in the Comment column if there is something you need to remember about this line.
To enter something in one of the columns, simply click into it and type what you want to enter. If you need to enter more than the batch, expiry date, number of packs or comment then double-click on the line to make more fields available for entry:

- Counted number of packs: The number of packs counted on the shelf
- Pack size: The number of units that are in a pack
- Batch: The batch of the stock
- Expiry date: The expiry date of the stock. Enter is manually or select it by clicking on the calendar button
- Location: The location the stock was found in. Type the first few characters of the location and press the Tab key to select the location from a list of locations that begin with what you typed (if there is only one that matches then it will be selected and filled in for you)
- Donor: The donor of this stock (only shown if the option to track donor is turned on - see the 16.03. Invoice preferences page for details). Type the first few characters of the donor's name and press the Tab key to select the location from a list of locations that begin with what you typed (if there is only one that matches then it will be selected and filled in for you)
- Cost price: The cost price of one pack
- 12 month average checkbox: Check this to replace the cost price with an average of the cost prices for stock of the same item received in the last 12 months
- Sell price: The sell price of one pack
If a new line of stock was found which isn't in mSupply then add it using the New line button (see the Add a new line to a stocktake section below for details).
When all the count sheet details have been entered into the stocktake and checked, it is time to finalise the stocktake. To do this, click on the Finalise button. After confirming that you want to finalise the stocktake, this will do two things:
- The stocktake will be made read-only and no further changes can be made to it.
- If there are any differencies between the the batch, expiry date or number of packs that were entered for a line and the actual batch, expiry date or number of packs of the stock line in mSupply then:
- if the Reference value of the stocktake ends in
/1or/2, a new stocktake containing only the lines that showed a discrepancy is created. This sticktake will have the same reference value as this stocktake except that its phase number will be incremented by 1. So, if the Reference ended in/1, the new stocktake's reference will end in/2, if it ended in/2then the new stocktake's reference will end in/3. - if the Reference value of the stocktake ends in
/3then inventory adjustments are created to make the stock of the lines with discrepancies match what was counted in the stocktake. Note: any lines that only have a discrepancy in the batch or expiry date will not appear in an inventory adjustment but the changes will be made and logged.
If there are no differences between the batch, expiry date or number of packs that were entered for all lines and the actual batch, expiry date or number of packs of the matching stock lines in mSupply then nothing further is done and the user is shown an alert message to say that the count for this aisle/level combination is complete.
Note that a line that has had nothing entered for it in the stocktake is counted as having a discrepancy and will appear in a further stocktake or an inventory adjustment after a stocktake has been finalised.
Add a new line to the stocktake
To add a new line to the stocktake (for stock that you find during the stocktake that is not in mSupply already), click on the New line button. This window will open:

Enter the first few characters of the item the stock is for in the Item text box and press the Tab key on the keyboard to select the right item from a list of items beginning with what you typed (if there is only one item that matched it will be selected for you and entered in the Item text box).
Now enter the details of the stock in the New stock line section:
- Counted number of packs: The number of packs counted on the shelf
- Pack size: The number of units that are in a pack
- Batch: The batch of the stock
- Expiry date: The expiry date of the stock. Enter is manually or select it by clicking on the calendar button
- Location: The location the stock was found in. Type the first few characters of the location and press the Tab key to select the location from a list of locations that begin with what you typed (if there is only one that matches then it will be selected and filled in for you)
- Donor: The donor of this stock (only shown if the option to track donor is turned on - see the 16.03. Invoice preferences page for details). Type the first few characters of the donor's name and press the Tab key to select the location from a list of locations that begin with what you typed (if there is only one that matches then it will be selected and filled in for you)
- Cost price: The cost price of one pack
- 12 month average checkbox: Check this to replace the cost price with an average of the cost prices for stock of the same item received in the last 12 months
- Sell price: The sell price of one pack
When you've added all the details click on the Add new button to add the line to the stocktake. It will appear at the bottom of the table of stocktake lines.
Delete a line from the stocktake
To delete one or more lines from the stocktake, select them in the table and click on the Delete line(s) button. After confirmation the selected lines will be deleted.
Please note, you can only delete lines from the stocktake that you manually added to it uysing the New line button.
After finalising a stocktake
After finalising a stocktake the stocktake becomes read-only but you can now print out an In progress stock count sheet from the Print button. This is what it looks like:

When you finalise the last stocktake with the same Count reference (as entered in the options window when creating the phased stocktake) then you will be asked if you want to print out the Stock comparison report, which will show you all the discrepancies recorded in all the stocktakes with the same count reference.
| Previous: 4.17. Stocktakes | | Next: 4.19. Inventory adjustments |
4.13. Prices in mSupply
The price you charge customers for your goods is, of course, very important. mSupply provides you with several different ways to set the selling price of your goods. Here they are:
- Each supplier has a margin field that determines how much to add on to the cost price when buying from that supplier
- Each item has a margin field that determines how much to add on to the cost price when buying that item
- There is a preference ( File > Preferences > Invoices 1 ) which controls how these 2 margins relate:

- If this preference is ticked then the item margin will be used instead of the supplier margin. If it is unchecked then the supplier margin will be used instead of the item margin.
- You can set custom margins for each customer group ( File > Preferences > Invoices 2 )
- You can fix the item price under the General tab in the Item details window.
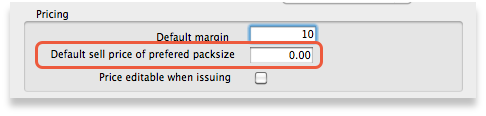
- Note that setting an item price here will set the price of new stock as you receive. It will not affect the price of existing stock- you can change existing prices if you have permission to do so by viewing an item and going to the “Stock” tab.
- You can set item prices when setting up a data file by importing an item list. (see below)

Per customer pricing
Updated: version 3.12
Alternatively, individual prices can be set for each customer. This can be done in the Edit Customer/Supplier window which you can find by:
- going to the Customer tab of the Navigator
- click on the Show Customers button
- find the customer you wish to customise prices for
- double click the customer line
- choose the Item Lists tab (see below)

To customise the pricing, add a list to the Favourite Lists column (either by clicking Add master list, Add local list or Copy from master list) or edit an existing list by double-clicking on it. Check the Price list checkbox from the window that comes up and any other checkboxes that you require.
- You only need the Price list check box marked to customise prices
- Only one list per customer can be price customised

Make sure the list is selected and then go to the Items section of the window. Enter the corresponding prices that you would like to assign to each item for that customer by clicking on the item and then clicking on the price (“0” by default). You can also add items to the list by clicking Add item and entering the item name and the price in the window that appears. The customer will now be charged the prices set in the list instead of any other price set.
| Previous: 4.12. Managing item access with Departments | | Next: 4.14. Repacking items |
4.05. Programs
There are a number of ways of modelling programs in mSupply:
- completely separate sets of virtual stores for each program (see section 22.08. Virtual stores)
- tag stock with different program labels in the same store (see section 7.06. Custom stock fields)
- use the donor field as the program label (see section 7.07. Managing donors)
- and probably a few more ways you can think of!
You can also manage requisitions by program. This involves using some special settings for master lists. In this method, a program is an extension to a master list. A program includes a standard list of items as well as:
- Order Types: defined categories setting the maximum number of orders and quantity of stock to be ordered per period.
- Period Schedules: defined time intervals when orders can be placed; schedules and periods must be set up before creating programs.
- Regimen Data: a defined list of additional information that may need to be provided by a customer when making a program requisition.
Examples of items commonly managed by programs include Malaria, HIV and TB medicines and medical supplies.
4.05.01. Creating a program
A program is defined by additional settings made to a master list:
1. Navigate to the Item tab and click the Master List icon:

2. Double-click on a master list to open it (or create a new master list):

3. The Master list details window opens. Click on the Program Settings tab:

4. This shows all the settings available for a program:

5. Tick the This master list is a program checkbox to enable the program based features for this master list.
- Create a Store tag for the program by clicking on the
 button just above the Store tag section.
 - The Tag field will be automatically populated with a new tag. Edit this new tag name and click on the
 button.
 - The field then becomes a drop down list which will contain any existing name tags for you to select. The tick button also becomes a modify button
 . If you click it you will be able to edit the tag name you just entered.
 - When you click on the OK button any new tags you have created will be saved and will appear in the name tags list (see the 5.05. Name tags page for details).
You can edit the tags entered here until you close this window. After that, you cannot edit existing ones, you can only delete them and add new ones.
Any customers or stores that have a name tag matching the tag you set here will be able to use this program and the schedule you have set for that tag.
You can define multiple tags for each program.
For each tag, you set up both a schedule and order types- so for one program, you can have different facilities on different schedules
6. Select the Period Schedule from the dropdown list (you must have set up the schedules and periods first):

7. For each period schedule, one or more Order Types can be created - these set the parameters for program requisitions. Add order types by clicking the plus icon.
8. Give each order type a unique name and set its parameters:
- Emergency: check this box if the order type is for emergencies.
- Max orders per period: maximum number of orders that can be placed in a given period.
- Max MOS: maximum number of months' stock to be kept for each item. Used in the calculation of the suggested amount to order.
- Threshold MOS: items with a number of months' stock less than this value will appear in the order by default.
- Max lines: maximum number of items allowed to be ordered for an emergency order (default = 5); an alert will appear if the user tries to exceed the maximum number of items allowed.

4.05.02. Adding indicators to a program
Indicators are used for reporting on the performance of programs, e.g. the number of patients treated. Each indicator value provides data on a metric for a particular store and regimen over a given period. Indicator values are recorded while creating a program requisition.
Indicators can record any relevant programme data, including that data that may be used to select a regimen (defined as a treatment plan that specifies the dosage, the schedule, and the duration of treatment.) The country that funded this feature uses the term Regimen data for all these indicators, and so that term has been used in this window.
Indicators allow an organisation to analyse regimen performance and determine what further data should be collected, stored and processed.
To add indicators to a program:
- Open the program via the Master List (Click on the Master list icon on the Item tab of the Navigator).
- Click on the Program Settings tab.
- In the Regimen Data table add fields for the data that should be provided to the supplier with each program requisition
- Check the HIV program checkbox if you want a fixed set of HIV-related indicators to be entered for this program.
- If the customer must provide this information for supply to occur, tick the Is required? box to make this a mandatory requirement.
4.05.03 Connecting a program to a store
To allow a store to place program requisitions:
1. Navigate to the Special tab and click on the Stores icon:

2. Double click on the store.
3. In the Tags field, type in the Store Tag you set for the program and schedule above then press Tab.

4. Click on the Master Lists tab, check the Use master list box next to the program master list to be used:

5. All done - the store is now connected to the program you have created so click on the OK button to save all the settings.
4.05.04. Creating a program requisition
Once a store has been connected to a program, it can then place program requisitions:
1. In the customer store, navigate to the Suppliers tab and click on the Internal Orders icon:

2. Click New Internal Order. When a store uses programs, they will have the option to create a Program order or General (regular) order:

Check the Program button to create a program requisition.
3. In the Order Details section, select the Program, Requisition Type and Period from the dropdown lists. Enter the Supplier by typing the first few letters, pressing Tab and selecting the supplier from the list of those starting with what you typed. These details need to be entered sequentially as the program uses them to determine the requisition type, which in turn determines the period.
The maximum number of program orders that can be requested within a given period is set when the program is created (Max. orders per period).
If you try to create another order for the same period which exceeds the maximum number, an error message will appear and you will not be able to proceed.
4. Click OK to generate an internal order with all the items listed in the program master list. The details relating to the program order are in the top left. Review the data in the table, then enter the quantity of stock to be ordered in the User requested quantity column:

5. Click the Indicators tab to enter the additional data defined for the program:

This data will be sent to the supplier with the requisition when the requisition is finalised.
6. To send the program requisition to the supplier, return to the Data Entry tab, check the Finalise box and click OK.

4.05.05. Creating a program stocktake
Creating a stocktake with items from a particular program is just the same as creating a normal stocktake. The only difference is that you select the program in the Master list (or Program) filter:
1. Navigate to the Item tab and click the Stocktakes icon:

2. The list of stocktakes window opens. Click the New Stocktake icon:

3. Select the program from the Program is (or Master list is) dropdown menu and click the OK button to pre-populate your stocktake with items from the program:

Note: To further refine the selection of stock appearing in the stocktake you can also select other filter items at the same time.
For detailed information on how to complete the stocktake, refer to the 4.17. Stocktakes section.
Tip: In your stocktakes list, you can easily identify program stocktakes by referring to the Program column:

| Previous: 4.04. Item master lists | | Next: 4.06. Stock locations and location types |
4.14. Repacking items
Creating a new repack
The command Items > New repack will display a window where you can repack a particular item into smaller or larger packs and/or move all or part of a batch to another location. It is a more complex version of the split functionality and will allow you to handle several batches at a time.

There are 4 steps for creating a repack. The window is numbered from top to bottom to help you follow the correct steps:
- Choose item to be repacked: At [1.] type the first characters or code of the item to be repacked, then press the Tab key. If only one item text or code matches your entry, it will be filled in automatically, otherwise you will be shown a standard choice list from where you can select the item.
- Choose a batch: At [2.] double click a line to choose the batch; for repacking, batches cannot be mixed, and a single batch must be used.
- Quantity to be repacked: At [3.] enter the quantity which is to be repacked; the pack size field is automatically completed.
- Details of new line(s) - i.e. the repacks: At [4.] click the New line icon to bring up this window calling for the details of the repacks, and enter the details as appropriate.

Note that repacks of different sizes may be created at this stage - e.g. 5,000 Paracetamol tablets may be repacked into 40×50 and 30×100. The Sell price, the Batch number and the New Location are automatically completed, but all these fields may be edited as required.
Not infrequently, because some tablets may be broken, for example, the total quantity of the item re-packed will be less than the quantity selected for re-packing at [2.]. To maintain the accuracy of your stock record, an inventory stock adjustment should be performed - see section 4.19. Inventory adjustments for this.
Printing a repack

While the status of the repacking transaction is suggested (sg), checking the box beside the print icon will produce a picking slip of the number and size of packs of the original item; once the status is finalised, the same operation will give you the choice to produce a detailed record of the re-packs or a stock movement report (for when you're moving stock - perfect for giving to the people physically moving the stock in the warehouse because it shows what is to be moved to which location).
On clicking the OK button, a transaction is created showing the original line taken out of stock, and the new line(s) put into stock. The total value of the transaction is always zero.
You cannot edit a repack transaction after you have clicked the OK button, so get it right the first time! Tip: You can always “re-repack” an item to adjust a mistake however!
Deleting a repack
If you click on the Delete button, then the repack will be deleted. Only repacks whose status is “sg” (suggested) or “nw” (new) can be deleted.
Viewing repacks
Repacked items can be viewed in the normal transaction list window - (Item > Show repacks) and select Repacks from the drop down list

Note that repacks created with versions of mSupply® prior to v1.4 will not show up using the “recent transactions” section of the window- you will have to enter the number directly.

| Previous: 4.13. Prices in mSupply | | Next: 4.15. Show items with stock |
4.23. Pickfaces and Replenishments
Before using pickfaces and replenishments there is some setup you need to carry out. To find out about that, see the previous 4.22. Pickfaces and Replenishments setup page. When you've gone through that, you're ready to start here.
Replenishment statuses
Replenishments have two statuses: suggested and finalised. We sometimes refer to suggested as “pending” or “waiting to be actioned” and finalised as “actioned” in the description below.
Like other transactions in mSupply, a suggested status replenishment is only a description of a change that will take place, it has not changed anything in the system yet. The changes (stock movement and repacking) all occur when a replenishment is finalised.
Viewing replenishments and accessing the rest of the functionality
To see replenishments that have been actioned or are waiting to be actioned, click on the Items tab of the Navigator and click on the Replenishments icon:

That will open this window:

By default the window will show all the replenishments that are waiting to be actioned (the Show drop down list is set to All to action). These are all the suggested status (sg) replenishments. You can change this to show all the replenishments (pending and finalised) or to show all the pending replenishments for a particular worker; just select the appropriate option in the Show drop down list and the list will update accordingly.
Automatically generating replenishments for all pickfaces
This is probably the most common way you will create replenishments. To do this, simply click on the Generate all replenishments button and mSupply will work out which locations need replenishing and how much stock should be moved into each one and create a line in the table for each replenishment. You are shown a warning message before the process begins:

This is telling you that if a new replenishment is generated by this function and there is an existing suggested status, unassigned replenishment for the same item in the same pickface location then the existing replenishment will be deleted. If you don't want any replenishments like this to be deleted then click the Cancel button and assign them to a worker (see the Assigning users to replenishments section below) temporarily before running this function.
If you click the Proceed button the replenishments are generated.
This is how mSupply generates the replenishments:
- Find all the pickface type locations that have less than the trigger level of stock in them.
- For each one of these locations work out how much stock needs to be moved into them to bring them up to their Replenish up to level.
- Find out what stock is available for this item in bulk type locations and move as much as is needed using these rules, in this order:
- If the item has a preferred bulk location then stock is taken from that location first (ignored if there is no preferred bulk location).
- After the preferred bulk location, stock is chosen from other Bulk type locations in FEFO order, smallest batch first.
- Full cartons (outer packs) only are moved if possible.
- When this process has been done for the pickface locations, the whole thing is repeated for the preferred bulk locations. If you haven't set preferred bulk locations then this part of the process is skipped.
- The final step in the process is to delete all suggested status replenishments that are not assigned to a worker, that are for the same pickface location and item as a replenishment just created and were created before this process was started.
After finishing creating all the replenishments, mSupply will tell you how many replenishments it has created and whether there were any errors. The errors you can get are:
- No bulk stock available: An item's pickface is depleted below the trigger level but there is no bulk stock available to replenish it. This could be because there is no stock of the item available or because none of it is in a location of Bulk replenishment type.
- Partial replenishment only: A pickface is depleted below the trigger level and there was some stock available to replenish it but not enough to fill it up. This could be because there is not enough bulk stock of the item or because there is not enough of it in locations with a Bulk replenishment type.
- Deletion failed: This is more a warning rather than an error. It means that a replenishment was created but an already existing, pending (suggested status) and unassigned replenishment for the same item could not be deleted. This will be because the replenishment is in use by being viewed or edited by another user.
Note about preferred bulk stock location replenishment (only applies if you're using them!): the pickfaces are replenished first from the preferred bulk locations as stated above. When the process moves onto replenishing the preferred bulk locations, the pickface replenishments haven't been finalised yet so the stock is still in the preferred bulk locations. This means that mSupply may well not generate many or any replenishments for the preferred bulk locations. So, when some or all of the pickface replenishments have been finalised simply click on the Generate all replenishments button again. mSupply will now see that the preferred bulk locations have less stock in them and replenishments will be generated as needed.
Also note that any stock that is on hold or in a locaiton that it on hold will be ignored and will not considered as being available for being used in a replenishment.
Manually creating a replenishment
If you need to add an extra replenishment manually for any reason you can do it by clicking on the Add replenishment button. This will open this window:

Start typing the name of the item you want to create the replenishment for in the Item field. A list of items with names starting with what you typed will appear below the field. You can keep typing or scroll the list to find the item you want; click on it to select it. Several things will happen:
- The item name will then be entered in the Item field
- The item code will be shown just below the Item field
- The table will be show all the batches available for that item
- The down arrow icon to the right of the Item field will be enabled. You can now click on it to go straight to the item's details window.
If you chose the wrong one, you can change the item by deleting the name in the Item field, typing again and re-selecting another item.
In the table the blue background columns are editable, the grey background columns are not.
When creating a replenishment you are describing what stock should be moved and where it should be moved to. So, the 'From' columns describe the bulk stock (where it is now), the 'To' describe what it will become in the pickface:
- From available packs: the total number of packs that are available to move to the pickface.
- From pack size: the pack size of the stock in its current location.
- From location: the current location of the stock.
- On hold: contains a checkbox for each row. If the stock is on hold or the location the stock is in is on hold then the checkbox will be ticked and the line will be disabled; it cannot take part in a replenishment.
- From number of packs: the number of packs (of From pack size) that you want to move from the From location to the pickface.
- Worker: the worker assigned to carry out the moving of the stock. Click the appropriate cell to select a user from all those who have the Can action replenishments permission for this store. This is the only column that can be left blank and a replenishment can still be created from the row.
- To location: the pickface location. Type and select one from all locations in the current store.
- To pack size: the pack size the stock will have in the pickface location.
- To number of packs: the number of packs of To pack size that will be present in the pickface after the move.
If the item has a pickface location set then the To location column is filled in with that location and the To pack size column is filled with the pickface pack size as soon as the item has been selected.
If you have entered two of the From number of packs, To pack size and To number of packs values, the third will be calculated and entered for you. If all three have been entered and you edit one of them, one of the others will be edited to maintain the relationship From pack size x From number of packs = To number of packs x To pack size.
When you have finished entering values, click on the OK button (or OK & Next) to save the replenishment. If there is a row of the table that has some values entered but not enough to create a replenishment then you are asked to confirm you wish to proceed because those partialy completed rows will be ignored.
When you have finished creating all the replsnishments, click on the OK button. This window will close and you will return to the main replenishment list window.
Editing a replenishment
Simply double-click on a replenishment in the list to open it for editing. It will be opened in a window like that for creating a new replenishment but only a single line will be shown in the table and the Item field will not be editable:

If you want to edit the item of a replenishment, you must delete the replenishment and re-create it with the correct item.
Edit any of the values in the blue-background columns and click the OK button to save your changes.
Deleting replenishments
To Delete replenishments shown in the main replenishment list window, simply highlight the ones you want to delete in the list (click to select, Ctrl(Cmd)+A, Shift+click and Ctrl(Cmd)+click all work to help you select the right ones) and click on the Delete button.
Finalised replenishments cannot be deleted and will be simply ignored if they are selected for deletion.
After deletion has been carried out you will be told how many replenishments were deleted and how many were ignored.
Selecting all the pending replenishments in the current list
Click on the Highlight pending button and all the suggested status replenishments in the current list will be highlighted (selected).
This is particularly useful if you want to print all the replenishments waiting to be actioned in the current list.
Assigning users to replenishments
Users are assigned to a replenishment to indicate that they are responsible for carrying out or verifying the replenishment. You might wish to select the appropriate forklift driver for example.
To do this, highlight one or more replenishments in the list and click on the Assign user to highlighted button. A list of users with the Can action replenishments permission in the current store will be displayd and you can select which one to assign by clicking on it. The name will then appear in the Worker column of the list for those replenishments that were selected. If you select the None option in the list of users, any worker assigned to the replenishment is removed.
Printing replenishments
To print replenishments, highlight the ones you want to print in the list and click on the Print highlighted button. The usual print options window will appear. After you have selected the appropriate options, click on the OK button and your printout will appear. The default printout looks like this:

The Worker field will show the name of the user assigned to all the replenishments or the word “Multiple” if more than one different user is assigned to the replenishments shown in the list.
The Done column will show the word “Yes” for finalised (actioned) replenishments or will be blank for those that have not been actioned yet. The user responsible for actioning or verifying the movement of the stock can sign or tick in this column when the move has been physically completed if desired.
If there were any problems or differences between what was done and what was shown on the printout, the worker should mark them on the sheet and give that to the responsible mSupply user. The replenishments can then be edited to match what was actually done before they are finalised.
Finalising (actioning) replenishments
Until they are finalised, replenishments do not affect the stock in mSupply.
They should be finalised at a point which suits your physical restocking process in the warehouse; this could be before the stock is physically moved to the pickface location.
to finalise replenishments, simply select (highlight in the table) the replenishments to finalise and click on the Finalise highlighted button. mSupply will then move and repack the stock as required to match the details given in the replenishments.
Please note: any stock that is in on hold or that is in a location that is on hold will be ignored and will not take part in a replenishment.
Authorising pickface replenishments
When authorisation of pickface replenishments is turned on (see the 4.21. Pickfaces and Replenishments setup page for details) the replenishments list has a new Authorised column:

The column contains a checkbox for each replenishment. Only users with the Authorise replenishments permission can edit those checkboxes. When the Finalise highlighted button is clicked, only replenishments that have a checked Authorised checkbox will be finalised, all unauthorised replenishments will be ignored and left unactioned.
| Previous: 4.22. Pickfaces and Replenishments setup | | Next: 5.01. Names: using, adding and editing |
4.22. Pickfaces and Replenishments setup
In a large, busy warehouse it is sometimes useful to designate some shelf locations as pickfaces. These locations are easily accessible for pickers, usually at floor level or the next level up in the racking. These pickfaces are then replenished from other, harder to reach locations somewhere in the warehouse.
Typically, these replenishments take place at a time when the activity does not get in the way of the busy pickers; at the beginning of the day or lunch time. A forklift driver will fetch the stock from the bulk location and place it in or near the pickface so that others can place it or open the cartons ready for picking.
Deciding which locations to replenish when can be hard to keep track of so mSupply has functionality to help and this is what is described here. There is quite a lot of setup involved so that's detailed on this page. The next page (4.23. Pickfaces and Replenishments) describes the actual functionality and how you use it.
Create pickface and bulk locations
The first thing you need to do is tell mSupply which locations can be used as pickfaces and which are used to store the bulk stock to replenish them with.
If the location doesn't exist in your system create it, if it does then open it for editing (see 4.06. Stock locations and location types for details). You will see this window:

Click on the Replenishment location type drop down list and select the type this location will be:
- None: The default for all locations and means that the location won't be selectable as a pickface and won't take part in replenishments.
- Pickface: means that this location can be selected as a pickface for an item and will be replenished.
- Bulk: means this location stores bulk stock that can be used to replenish pickfaces. Note that mSupply will only use stock in locations with a replenishment type of Bulk to replenish other locations. Any other stock in locations not set as Bulk type will be ignored in the automatic replenishment process. This means it is possible to protect stock that should not take part in the replenishment process by making sure its location has a replenishment type of None.
When you have finished assigning the replenishment type click on the OK or OK & Next button to save the changes. Repeat this process for all the locations that will be used as pickfaces or that will hold bulk stock that can be used to replenish the pickfaces.
Assign pickfaces to items
The next step is to assign pickfaces to items. To do this, find the item you want to set a pickface for and open its details window (see 4.01. About items for details). Then click on the storage tab:

On this tab, enter details in the Pickface and Bulk sections. See the 4.01.02. Items - Storage tab page for details on what the various values mean (Note: these settings are all store specific so have to be set for each store separately).
Define the users who can action replenishments
The final setup step is to tell mSupply which users can action replenishments. These are the users you can assign replenishments to.
Open a user for editing (see 25.15. Managing users for details) and go to the Permissions (3) tab on the user's details window:

Check the Can action replenishments checkbox and click on the OK button to save the changes.
Repeat this for every user who can be assigned to action replenishments.
This now completes the setup and you're ready to use the functionality. See the 4.23. Pickfaces and Replenishments page for details on that.
Authorisation of replenishments
If you want replenishments to be authorised before they can be finalised then follow these steps:
- Turn on Pickface replenishment authorisation: This is a store preference. See the 26.07. Virtual stores page for details on turning this preference on.
- Give the users who can authorise replenishments the permission to do so: See the 25.15. Managing users page for details on setting user permissions, including the Authorise replenishments permission.
| Previous: 4.21. Forecasting | | Next: 4.23. Pickfaces and Replenishments |
4.15. Show items with stock
Updated: version 3.12
This can be accessed by choosing Show items with stock from the Item menu or by clicking on the Stock icon ![]() on the Item tab of the Navigator. Either of these options will display this window:
on the Item tab of the Navigator. Either of these options will display this window:

By default all stock is listed, and where the stock of an item is present in different batch numbers, each one is displayed.
Just like nearly all the other tables of information in mSupply, you can order the information by any column by simply clicking on the column header. Reverse the sort order by clicking on the same column again.
Customising the list
You can choose the columns displayed by clicking on the Customise button to display this window:

Listed under Available are the columns not presently displayed, and under Chosen are the columns presently displayed. Changes are made by highlighting your chosen column on this window, and moving it using the buttons in the centre to add or remove it from the display.
You can drag the items in the Chosen column into the order of your choice to change the order they are displayed in the list (top of the list is displayed on the furthest left, bottom of the list is displayed the furthest right).
Printing / exporting the contents of the table
You can export the stock information on the items displayed in the table by clicking on the Export to Excel button. Only the items displayed in the table will be exported and a fixed set of columns will be exported - this set is not affected by any changes you make to the displayed columns using the Customise button described above.
In your spreadsheet application you can manipulate or print the data as you please.
Filtering the list
Entering the item name or code in the box will filter the list; entering the first few characters of an item name will display only those items which begin with those letters (or numbers).

To display a specific item, either the item code or the full name should be entered.
To find all items containing ran enter @ran which will display all items which include the characters entered, not only those items where the characters entered are at the start of the item name - e.g. this will not only display any Ranitidine in stock, but will also display `Pyrantel', `Nitrofurantoin', Propranolol', etc..
Filtering by location
Alternatively you can filter by location. Leave the first search box blank and enter a location into the second search box. This will show only the items with that location.

Even more specific
To view an even more specific selection of stock you can filter by both item name and location. By entering your criteria into both boxes, only the stock which matches your specified name and location will appear.

Editing stock lines
If you have the permissions, you can double-click on one of the stock lines shown in the list and a window will open to allow you to edit some details of the stock line:

See the 4.01.05 Items - Stock tab page for details on what the various fields mean.
| Previous: 4.14. Repacking items | | Next: 4.16. Splitting a stock line |
4.16. Splitting a stock line
The Split feature of mSupply provides us with the ability to break down stock into smaller pack sizes, consolidate it into larger pack sizes or move part or all of a stock line to a new location. Here's how to use it:
- From the Item menu choose Show items to find the item to be split
- Enter the start of the item name and click Find
- Once the Item details window is displayed, choose Stock from the side bar list and you will see this window:

- Click on the line you want to split, then click Split:

- In the Quantity to split field enter the number of packs you want to move/split (if you're repacking the whole lot, then enter the total quantity - the number to the right of the word 'of'!)
- In New location enter the new location for the packs that are being split (leave it alone if you're not changing the location)
- In the New pack size field enter the The new pack size for the split items (leave this as it is if you're not changing the pack size!).
- Click OK and you're done - the changes will be immediately visible in the item stock details window.
Here's an example:

In this example, 2 packs of 1,000 Erythromycin tablets (of which there are 37 available) are being transferred to a new location, and the 'outer' of 1,000 (actually 10×100 shrink wrapped together) is being opened to become 10 individual packs of 100.
When the OK button is clicked, the original line will show 35 packs of 1,000 tablets and there will be a new stock line with the same batch and expiry information but with 20 packs of 100.
So, to summarise, you can use the split command to perform these actions:
- Change the location of some or all of a stock line
- Repack some of a stock line into a different pack size
- Both of the above at the same time!
When the new stock line is created, all the details of the existing stock line (such as manufacturer, donor, batch, expiry date, pallet pack size (number of inners in an outer) etc.) are copied over to it unchanged. Some other details, like volume per pack, weight per pack and outer (carton) pack size are changed according to the ratio of the new pack size to the original pack size.
Also, to make sure the audit trail is kept intact, a link is made between the transaction line that produced the original stock line and the new stock line.
Produce a movement report
mSupply provides a feature to produce a 'Movement report' for stock that you have moved to a different location using the split function. It's useful for printing off and giving to the person who is going to physically move the stock in the store.
Here's how to create one:
- Once you have entered the details of your split/new stock location, click on the checkbox labelled Print Location Movement report and click OK:

- The following report is displayed:

- Note that the original and new locations are clearly identified so a printed version of this report can be easily referred to when physically carrying out the move in the warehouse.
| Previous: 4.15. Show items with stock | | Next: 4.17. Stocktakes |
4.17. Stocktakes
Updated: Version 4.10
General
There are three main types of stocktakes:
- Partial stocktake: A partial stocktake means counting only a part of your stock. This may be a good way of splitting up counting all your stock, part of a system for counting all your stock in sections over a longer period of time or carrying out smaller periodic checks. You may select the stock to go in a stocktake by different locations, stock groups, types of items etc.
- Full stocktake: All items are counted at one time.
- Phased stocktakes: Items are counted in phases. See the full details on the 4.18. Phased stocktakes page.
A user can only create a stocktake or edit the lines on a stocktake if they have the appropriate permissions. See the 25.15. Managing users section for details.
Closing the store
Traditionally, during a full stocktake, the store is closed, and no transactions may take place until the exercise is completed.
The inconvenience caused by closure of the store varies from minor to significant. The benefit of using mSupply's stocktake module, while requiring that the store is closed while the physical stock check is in progress, is that the store may be opened immediately after the physical count is completed. Entry of the adjusted figures into mSupply® may be made at any convenient time over the next few days. Having said that normal operation can occur immediately after the stocktake, issuance will be affected by any discrepancies discovered during the stocktake.
It is recommended to Create inventory adjustments from the stocktake as soon as possible after the physical count.
Confirm Customer Invoices
mSupply will not allow stock that is on a Customer Invoice with status of new (nw) or suggested (sg) to be taken out of stock by any other transaction process, including an inventory adjustment flowing from a stocktake - refer Creating inventory adjustments.
It is HIGHLY RECOMMENDED to process (take the stock off the shelves) and confirm any customer invoices with a status of new (nw) or suggested (sg) before doing a stocktake - please see Issuing Goods to a Customer (Customer Invoices), Confirming an invoice for details on how to do that.
This is so important that mSupply will show you a warning message when you try to create a new stocktake if it detects and customer invoices with suggested status. Please read the warning and take suitable action.
Displaying stocktakes already performed
Select Show Stocktakes… from the Items menu to display any stocktakes already created or performed. This displays the following screen:
The Show: filter allows you to choose which stocktakes are displayed in the list. Options are:
- All: shows all stocktakes in the current store with any status for all time. Could be many of them!
- Current: selected by default when the window is displayed and shows all 'suggested' stocktakes (status = sg). These are stocktakes which have not yet been processed into inventory adjustments (finalised; status = fn)
- This year: shows all stocktakes of any status that have been created in the current year.
- Last year: shows all stocktakes of any status that were created in the year before the current one.
Note: there will be an additional Program column in the table if you have program based master lists created (see 4.05. Programs) so that you can easily see if any of your stocktakes are program based.
Buttons on the Stocktake list window
New stock take
A New stock take is the normal way that you would create a stocktake, described in more detail on the rest of this page.
New blank stock take
A New blank stock take This would be used only if you are going to use the stocktake process to add new stock, that is stock that you are sure is not already recorded as in your store.
Delete stock take
Delete stock take allows you to delete stocktakes that have not been processed (finalised) into inventory adjustments.
There is little point in keeping old stocktakes with status = “sg”, especially if you are about to create a new stocktake containing the same items. Indeed, it can be quite dangerous to leave old stocktakes with status = “sg” in your system. If time has passed since the stocktake was created, then the snapshot and actual quantities are almost certainly incorrect. For good housekeeping reasons, it is good practice to delete old “suggested” stocktakes (status = “sg”).
Creating a new stocktake
After viewing the current stocktakes, click on the New stock take button, and the following window will appear:

You can produce a stocktake for all items in your store by clicking OK without entering any filtering criteria. However, it will often be helpful to filter the stock that will be included in a number of ways as discussed below.
Filtering the stock to be included
You can filter by:
- Item properties Item name, code etc. as shown in this screenshot:

- Master list If you organise your items using master lists this can be a very powerful way of including items on particular master lists only in a stocktake e.g. for programmes
- Donor This filter is only displayed if the donor tracking preference is turned on (see Using the donor module)
- Locations. This is recommended when you are doing a full stocktake of a large warehouse where you can have several stocktake teams working simultaneously - see the Filtering by location section below.
- Expiry date. Search for items whose expiry is before a particular date. This allows you to easily remove all expired items from stock.
- Randomly selected. Select a number of items randomly chosen by mSupply. This is handy for the purposes of doing an audit.

Whatever filters you use, ad-hoc or non-stock items will never be included in a stocktake
Filtering the stock Expiry
You can carry out a stock take based on expiry dates for your stock. This is useful to review and to remove expired stock from your inventory.

Filtering by location
Filtering by location is an especially useful way of breaking up a large stocktake in to a series of smaller stocktakes. This also allows different teams to undertake different smaller stocktakes simultaneously.
Of course, it is not possible to filter by stock locations if locations have not been defined, and stock placed in to those locations!
- The “Shelf location” in the top left Item properties drop-down list is the default shelf location of the item, which is where stock of a particular item might usually stored. This is not a recommended way of organising a warehouse, and is included here only due to customer request.
- To filter the stock take by shelf location to include what stock is actually stored there (according to mSupply records!), use the Stock location filter.
In this example, the location filter has been set to equals (the default), and the entry in the box has been typed in as A. Only stock in shelf locations called A will be included in the stocktake.

Preparing the stocktake
The stocktake list is produced:
- Sorted alphabetically, by name
- Omitting items whose stock level is zero
At this point the status of the stocktake is sg (suggested i.e. it is still being worked on and has not affected stock in any way yet):

Now fill in the information at the top of the stocktake:
- Description: A default description is filled in for you. We recommend that edit this to make it more meaningful while processing and for when you look back at your records later. This description is what is visible when you see a list of stocktakes. For example, you could add
Annual stocktakeorMonthly check. And / or, if you are filtering by anything such as stock location, it is worth including that here, e.g.M02.12.2A. - Comment: Put any other information you need to record about the stocktake in here.
- Stock take date: This is the date you performed the stocktake and is set to the date the stocktake was created by default. Users will only be able to edit this if they have the Can edit stocktake dates permission set (see Managing users for more information). They will also be able to set the confirmation date of the inventory adjustments created from the stocktake when it has been finalised (but you can never change the date to before the Stock take date set in this field).
New line button: You can add new lines to the stocktake by clicking on this button (see the Adding items not in the stocktake section below)
Delete lines(s) button: Click on this to remove lines you have already selected in the list from the stocktake (you can use the usual Shift and Ctrl/Cmd clicking to select lines as usual).
Just a quick word about the read-only (non-editable) information displayed at the top of the stocktake:
- Stock take key: The stock take number. This is an automatically generated number which increments by 1 for each new stocktake. It is unique within a store only so it is possible for stocktakes from different stores to have the same number.
- Stock take entered date: The date the stocktake was created in mSupply.
- Stock take status: The current status is the stocktake:
- sg = suggested, the stocktake is still being worked on and is editable - new lines can be added or deleted and values can be edited etc.
- fn = finalised, the stocktake is complete and cannot be edited (inventory adjustments have been created form it)
The stocktake is a list of your stock, providing you with a 'snapshot' of your stock at a point in time. From this, mSupply enables you to create printed lists of your stock items from which you and your staff can do the physical stocktake.
Example for a large warehouse
A large warehouse can have thousands of locations. A full stocktake would run to tens or even hundreds of pages. This is a challenge to manage. In cases like this, it is recommended to create stocktakes broken down according to locations.
Remember to confirm any outstanding CIs with status = sg before you start, and don't let any of your staff create any new customer invoices until the stocktake is over, and preferably, all inventory adjustments have been processed.!
In large warehouses, stock locations are often labeled in a systematic pattern something like this:
A##.$$.%%, where,
- A = 'Room', for example,
M→ Main store room - ## = aisle numbers,
01,02,03, etc. - $$ = bay number,
01,02,03, etc. noting that a common convention is for even numbered aisles to have only even numbered bays, and similarly, odd numbered aisles to have only odd numbered bays. - %% = shelf number,
1A,1B,1C, etc.
For example, M20.02.4E would be the location name for the location in the Main store room, Aisle 20, Bay 02, Shelf 4E
| To create stocktakes for each | Filter Stock location by |
|---|---|
| Aisle | Starts with M01, Starts with M02, Starts with M03, etc. |
| Bay | Starts with M01.01, Starts with M01.03, Starts with M01.05, etc. |
| Shelf | Starts with M01.01.1A, Starts with M01.01.1B, Starts with M01.01.2A, Starts with M01.01.2B, etc. |
To speed things up and ensure that you have described your stocktakes correctly according to the stock locations filter, you can copy the text of your filter (before clicking OK) and then paste it at the end of the stocktake description. After clicking on the Stocktakes button on the Items navigator this can be done entirely with the keyboard!  For example, if you want to create a stocktake for all location in Bay M01.01:
Firstly, click on the Stocktakes button on the Items navigator
The Stocktake list… window appears. Then:
- Type Ctrl+N to start a New stock take
- Type Tab Tab Tab Tab Tab Tab Tab Tab (Tab x 8) to get to the Stock location equals pull-down button
- Type Down-arrow to get to the starts with option
- Type Tab to move the focus to the text entry field
- Type
M01.01 - Type Ctrl+A to select all text
- Type Ctrl+C to copy the selection to the clipboard
- Type Enter (same as clicking OK button).
The Stock take sheet… window appears. - Type Tab to highlight all text in the Description field
- Type End to move the cursor to the end of the existing text (If you are on a laptop where the End key is hard to find, the Right arrow (→) key will also work here)
- Type
- Type Ctrl+V (Pastes the clipboard)
- Type Enter (same as clicking OK & Next button).
The Stocktake list… window appears.
Repeat the above steps for each stocktake.
Example for fast moving items using a master list
It is often useful to regularly do a stocktake of fast moving items. A convenient way to do this is to create a master list of fast moving items called, say, Fast movers.
To create a stocktake containing just the items on this Fast movers master list:
- Confirm any outstanding CIs with status = sg
- Item > Stocktakes > New stock take
- Select the Fast movers option from the is on Master List pull-down
- Click OK

Print sheets to do the stocktake
Before printing you need to ensure that the order in which items are displayed is appropriate. By default the list is alphabetical, but for stocktaking purposes, it may be more appropriate to sort the list by location and then by item name; this is achieved by clicking on the Order by button and choosing Sort by location then item name

If you want another sort order, click a column heading for a simple sort, or choose the Custom sort option from the Order by button.
You can filter a stock list by entering the item name - or the first few characters of the name - or the item code in the box Item name/code in the top right area of the window, then clicking the Find button
Clicking on the Print icon displays the available options:

- General: contains several options. Click on it and you are presented with a further window:
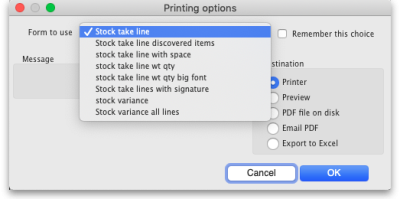 The Form to use drop down list contains these options:
- Stock take line - prints out all the lines on the stocktake, including their quantity, with a space to write the actual counted quantity. It looks like this:
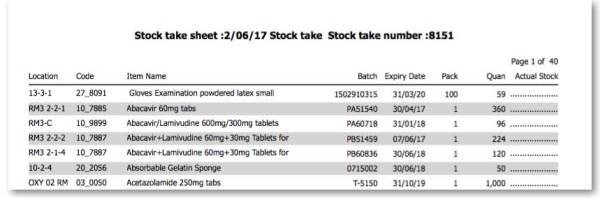
- Stock take line discovered items - prints out a sheet with all the headers but containing only blank rows. Perfect for writing down the details of new batches you discover during the stocktake. Looks like this:
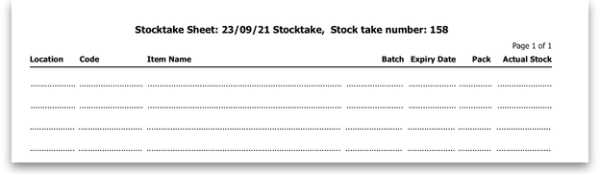
- Stock take line with space - is the same as the Stock take line printout but with no quantity and 5 lines of space under each line. Useful if you know there's a lot of stock in the warehouse that isn't in mSupply.
- Stock take line wt quantity - is the same as Stock take line but with no quantity. This is the one we recommend you normally use to give to the people carrying out the physical count. This helps to ensure that the quantity of stock on the shelves is actually counted and not just guessed!
- Stock take line wt quantity big font - is the same as the one above but printed in landscape with a bigger font. This is particularly helpful in warehouses with poor lighting (powercuts, etc.
 )
) - Stock take lines with signature - same as Stock take line wt quantity but the stocktake signature entered in the printing preferences is printed at the end.
- Stock variance - this shows the items that were adjusted after the stocktake was finalised. Similar to the Inventory adjustments option below but a slightly different format.
- Inventory adjustments: prints information about all the items that had their quantities adjusted because of the stocktake after the stocktake has been finalised (see finalise section below).
- Inventory adjustments-all items: prints information about inventory adjustments made after finalisation but includes all items, not just those which have had their quantities adjusted.


There is, of course, a further option - you may provide the staff performing the stocktake with blank sheets, requiring them to list the items, batches, expiry dates, locations, pack sizes and quantities manually. We don't recommend you use this option unless your printer is broken
Perform the stocktake
Allocate staff to perform the stocktake, instruct them in the process you wish to follow, and issue the sheets to them.
For a stocktake involving several staff, it is recommended to require the staff members to write their name and date on each stocktake sheet. This is especially helpful when trying to interpret difficult handwriting 
Enter quantities into the system
Once the physical stocktake has been completed, you are ready to make entries to record any differences in stock levels into the system. Remember that any item which mSupply calculates as having zero stock will not appear on the stocktake sheet.
Filtering the list by item name or code
To help quickly find any item you want to make any adjustments to, you can enter the first few characters of its name or its code in the Search by item name and code field. The displayed list of items will be changed each time you enter a character to show only the items whose name or code matches what you have entered so far. To return to the full list just delete everything in this field.
Making adjustments
If there are no differences between what was physically seen in the warehouse and what is shown in the stocktake for a particular line then you can leave it alone - no changes are necessary.
If the only difference between what is in mSupply and what was physically seen in the warehouse is the number of packs (the figure in Enter Quantity column) then click on the figure in the Enter Quantity column and edit it to match what was physically counted in the warehouse.
You can press the Tab key on the keyboard to quickly move through the editable fields on one row and then then to the next row to edit (Shift+Tab to go to the previous editable field).
If there is more of a discrepancy between what mSupply says you have in stock and what was phisically seen in the warehouse then double-click on the line. The line edit window will open:

You can now edit more details:
- Stock take qty: the number of packs you counted in the warehouse
- Batch: the batch or lot number of the stock
- Expiry date: the date the stock will expire
- Location: where the stock is located in the warehouse (type the first few letters of the location's code and press the Tab key on the keyboard to select the right location from a matching list)
- Cost price: the price one pack of this line of stock cost you. Check the 12 month average checkbox if you want mSupply to calculate a weighted average pack price based on the supplies of this item you have received in the last 12 months
- Sell price: the price you sell a pack of this line of stock for
- Comment: anything you want to remember that was notable about this line during the stocktake
- Donor: the donor of this line of stock (type the first few letters of the donor's code and press the Tab key on the keyboard to select the right location from a matching list). Will only be available if the Allow tracking of received stock by donor preference is turned on (see the Invoice preferences page for details)
Notice that you cannot change the Pack size value. If you want to do that then you must set the Stock take qty for this line to 0 and add a new line with the correct pack size (see the Adding items not in the stocktake list section below for details).
Adding items not in the stocktake list
In the event of an item being physically present in the warehouse, but not on the list then it needs to be added to the stocktake in mSupply:
- Click the New line button and this window will appear:
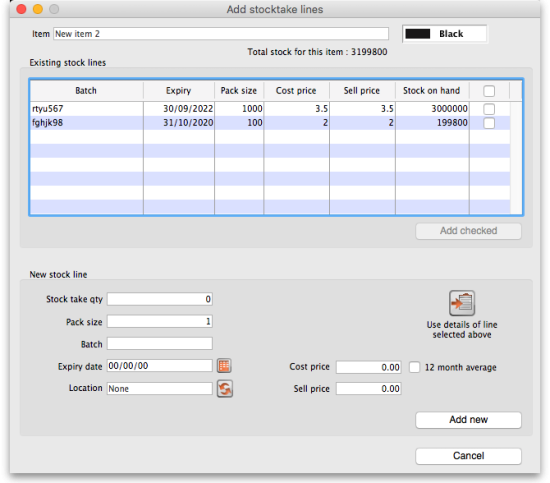
- If you want to add a line of stock that already exists in mSupply then, in the Existing stock lines table at the top, check the checkbox for the line you want to add and then click on the Add selected button. You can add more than one line if you wish - just check all the lines you want to add. If you check the checkbox in the header of the checkbox column this will check all the boxes for you (and uncheck them again if you uncheck it).
- If you want to add a new line of stock that doesn't exist in mSupply then enter its details in the New stock line section at the bottom and click on the Add new button to add it.
- Stock take qty: the number of packs you found in the warehouse.
- Pack size: the number of items in each pack that you found in the warehouse.
- Batch: the batch number of the item you found.
- Expiry date: the expiry date of the item you found (click on the calendar icon to select it or enter it manually).
- Location: the shelf location in the warehouse where you found the item (if you don't know the exact location then type the first few characters of the location label, press the Tab key on the keyboard and select the location from the list that appears).
- Cost price: if you know it, enter it in the currency you are using in your datafile. If you don't know it, you could check the 12 month average checkbox and mSupply will enter a weighted average price of all the stock of this item you received over the last 12 months.
- Sell price: if you know it, enter it in the currency you are using in your datafile.
- Use details of line selected above button: this is a shortcut to save typing values in all the fields in this section. If the details are similar to a stock line that is shown in the Existing stock lines table above then click on the line in the table to select it then click on this button. mSupply will copy the details of thew line into the fields in this section and you can then edit the ones that aren't quite right.
- You can also select a colour for the line in the stock take using the colour picker in the top right hand corner (set to black by default, as shown in the screenshot).

After clicking on the Add new button you are returned to the Stocktake sheet window, where the new line entered will now appear in the colour selected; note that the new line(s) appear at the bottom of the stocktake and they have a value of zero in the Snapshot column.
- If you add a new line to the stocktake that has the same details (pack size, batch, expiry, location, cost and sell price) as one already on the stocktake, you will be asked to confirm if you really want to add the line.
- All details of a new line added may be edited, but only the quantity or the location of existing lines on the sheet may be edited; this is performed by double clicking on the row you wish to edit.
- The Delete item button will only work to delete lines which you have added yourself (i.e. lines with a snapshot quantity of zero).
Adjustment reasons
If you have created at least one Positive inventory adjustment reason and one Negative inventory adjustment reason in the system (see the 16.10. Options (standard reasons) section for details) and at least one of each type is active, then an additional Adjustment reason column will be displayed in the stocktake window:

The column is read only but, if you edit the number in the Enter Quantity column then the line edit window will be opened and you must select an Adjustment reason (one of those you set up in the preferences - a Positive adjustment reason if you have increased the quantity compared to the snapshot value, a Negative adjustment reason if you have reduced the value):

When you finalise the stocktake and create the inventory adjustments (see below), the individual lines of the inventory adjustments will be given the same adjustment reasons you set for them in the stocktake.
Create inventory adjustments
When all necessary adjustments have been entered, you are ready to create the inventory adjustments.
Creating inventory adjustments (finalising the stocktake) is not reversible, so you have to be quite certain you've finished making all the changes you want to the stocktake before you do it.
Inventory adjustment categories
After you click on the Create inventory adjustments button, the following window will appear to ask you to confirm this is what you want to do:

Before you click on the OK button to confirm, you can select a transaction category to give to the inventory adjustments when they are created by clicking on the drop down list (these can be useful when it comes to reporting later). This drop down list is populated with all the transaction categories in your datafile that have a type of inventory adjustment (see section 22.07. Transaction categories for information on creating transaction categories).
What if there is insufficient stock to adjust?
If an item has limited stock and that stock is allocated to an invoice during stocktake, when you try to adjust the stock the following window will display giving you two options to choose from:

For the excel option a spreadsheet will open allowing you to analyse the invoices to which the stock is allocated. The highest invoice number is likely to be the one entered during stocktake.

Of course, closing off transactions until a stocktake is complete and avoiding these kinds of issues is by far the best practice.
If you have the Can edit stocktake dates permission (see Managing users) then you will be able to edit the confirmation dates of the inventory adjustments to match the stock take date.
Any changes to lines in a stocktake that don't include a change in quantity (e.g. a change in batch, expiry date or sell price only) will also result in stock in the system being updated when you click on the Create inventory adjustments button but it will not result in any lines being added to an inventory adjustment. You can see the changes in the system by viewing the details of the individual stock lines and all such changes are logged, on the stocktake (see the log tab when viewing the stocktake or 25.19. The system log) and the stock line's log itself (see Stock line details window).
Viewing inventory adjustments
Once inventory adjustments have been created, the status of the stocktake changes from suggested (sg), to finalised (fn). You will now observe a change in the buttons appearing on the Stocktake sheet:
- in the upper area, only the Print button is present
- while at the bottom two new buttons are present; Show added adjustments and Show reduced adjustments.

- Click on either button to display the related inventory adjustment transaction.
If the inventory adjustment quantities look wrong
It is possible for the stock reduction inventory adjustments created by your stocktake to have smaller quantities on them that you expect. They may even be zero like the example in this screenshot (and you know there should definitely be a reduction in stock because the counted quantity was less than the snapshot value in the stocktake):

The quantity might not be zero but still less than the snapshot minus the counted quantity specified in the stocktake.
This scenario is because stock was found on new or suggested status customer invoices. This stock is reserved for customers by mSupply but not removed form your total stock (see 8.01. Issuing goods to a customer (customer invoices)) and must be included in your count - if you don't include it in your count, then mSupply will try to remove it from your stock again when you finalise the stocktake. And if there's not enough stock, mSupply has to reduce the quantity on the reduction inventory adjustment. Which is the discrepancy you see when you look at the stock reduction inventory adjustment created by mSupply when you finalise the stocktake.
To avoid this scenario follow the golden stocktake rule:
Review and CONFIRM all Suggested (sg) or New (nw) status invoices before creating your stocktake.
If you must leave some customer invoices unconfirmed before finalising the stocktake then include the stock on them in your stocktake count. If you confirm the invoices after creating the stocktake but before finalising it you must reduce the count on your stocktake by the total amount of that stock line on the invoices you confirmed. As you can see, it can be complicated so it's much better to follow the golden rule. Trust us!
To understand further see the 28.04. How to remove stock lines that have ‘0’ available page.
Print the report
Clicking on the Print button and clicking on Inventory adjustments will print this information:

In this example, three adjustments have been made:
- Magnesium carbonate: present at the physical check but not on the sheet, has been added
- Peppermint oil has had its stock increased
- Sodium bicarbonate has been reduced in stock
Items that weren't changed don't show in the report - if you want to see all items, including those that weren't changed then click on the Print button and select the Inventory adjustments - all item option.
Some points to note:
- When you have created the stocktake sheet, it's like `taking a snapshot'; the physical stock at that location should not be removed until the stocktake has been performed; nor should stock be added.
- New transactions can however, be entered into the system.
- the Log tab on the Stocktake sheet will list any anomalies. An anomaly may occur if a transaction has been entered after the stocktake that issued more stock than you physically counted. Obviously someone has made a mistake in such a situation.
- There is on the stocktake window (lower left corner) a checkbox Locked , which, if checked, will allow neither deletion of the stocktake nor any changes to be made to it.

- Ok and Next - if you have no more stocktakes to add, click the 'OK' button, to add only the stocktake just completed. To add a further stocktake, click the 'OK & Next' button and proceed to add your next stocktake.

| Previous: 4.16. Splitting a stock line | | Next: 4.18. Phased stocktakes |