Table of Contents
Updated: Version 3.1
18.01. Introduction to tender management
Introduction
In order to achieve the best value for available funds, it is common practice to seek out the best prices for the medicines that will be required, usually for the forthcoming year, by publishing a tender. Normally, the full tender process creates a lot of work which can be very time consuming and error prone. The mSupply tender module is designed to make the process as simple as possible, to minimise the work involved and to reduce the chance of errors.
As usual in a tender process, forward planning is necessary, as the process must be started several months before the goods will be on site and available for use.
The work flow for using the tender module is:
- Prepare list of items and quantities. See Creating a new tender. When all items have been added to the tender, it should be set to confirmed status.
- Distribute list to suppliers. See Adding suppliers to a tender
- Create benchmark prices. See Using Benchmark prices
- Evaluate received quotations. See Receiving Quotations from suppliers
- Select preferred suppliers. See Accepting tenders. After selecting the preferred suppliers for all items, the tender should be set to finalised status.
- Create Purchase Orders. See Supplier responses & Creating Purchase Orders
From your usage history, mSupply can prepare a list of items and anticipated quantities. This list is distributed to suppliers, who are invited to submit, after a reasonable period of time, their quotations, inclusive of all additional charges., e.g. freight.
The list may be uploaded to the web, and interested suppliers invited to submit their quotations online. Conventional methods of submitting quotations are also available. We recommend the online method, as it reduces paper consumption, and is less labour intensive and less error-prone.
Once all the quotations have been received, mSupply will assist in processing them, comparing quotations, performing necessary currency conversions where appropriate, applying freight charges etc. mSupply will mark the lowest item price blue. If two lines are the same price and are the lowest price both will be coloured blue.
The user then has all the relevant information enabling informed choices to be made in selecting which supplier for which item.
Finally mSupply will create Purchase Orders for the successful bidding suppliers. While mSupply can perform all these tasks from stored usage data, it will allow users to change supplier and/or quantities, should special circumstances prevail in particular situations.
Preferences: There are preferences that can be set for the tender process, see tender preferences.
Note that for multi-user installations, Tender management activation requires payment of a fee. Please see the website here or contact Sustainable Solutions for more information.
Getting started
Select Show tenders… from the supplier menu or from the Navigator's Suppliers tab.

A window is shown with a list of current tenders (if any) and some options:

The Show drop down list is a filter which allows the list of tenders displayed to be changed:

Creating a new tender

Three options are available :
- New Generated Tender Once you have been running mSupply for a year, and providing that year is fairly typical of your overall usage, the New Generated Tender is recommended; this option will suggest quantities based on actual usage, having regard to seasonal fluctuations, thus eliminating any guesswork. Quantities are suggested only, and may be amended as required.
- New Tender - allows you to create the tender manually and is a more labour intensive process.
- Duplicate - select a single tender in the list and click on this button to create a tender that is a duplicate of the one you selected with the same items but no invited suppliers. The duplicate will have the same name but with “ - COPYX” after it, where X is the duplicate number. The duplicate will also have a status of “sg” (suggested), regardless of the status of the tender it was copied from.
- The creation (or deletion!) of a new tender will be logged by mSupply.
- All tenders belong to the store they are created in and will not be accessible in other stores (but supervisor mode users can view tenders in all stores). This also means that you can only access items visible in the store the tender is created in, whether you manually create or auto-generate your tender.
New generated tender (auto-generation)
To have mSupply automatically create a suggested tender based upon your projected demand, click on the New Generated Tender button, and confirm your intention by clicking Yes on the Confirm window.
This window will appear. You may recognise it from the Item usage report, the Suggested order report, and 6.01. Ordering stock from suppliers - it uses the same functionality (please see those pages for a detailed description of how to decide what to enter for the various options):

You can tailor your search by item in the usual way. Clicking the refresh button (double arrows near the centre) shows an estimate of how many items will be processed. Further refinements can be added. It is recommended to use the Calculate button to refine the Months of stock required figure by entering Lead time, Ordering Cycle and Buffer stock values directly. To find out what all the options do and how the calculation works, please see the 13.04. Purchasing reports page for details.
Processing all this data may take some minutes if you have a lot of stock items recorded in your system, so mSupply will ask you if you've got the time to do it. If you do, click `Yes'. A progress indicator will show you how much work is left to be done. When mSupply has finished processing everything, it will let you know:

Auto-generated tenders may be rather large, so you may wish to process several tenders with more specific criteria rather than one huge one at once.
You can choose to look at your tender immediately, or return to it later. If you click `Yes', you'll see something like this:

- Several default values have been entered for the Description (made up of the tender number, date and time of creation and number of months stock required), Issue (the current date) and Response by (one month from the current date) dates and Our ref (AUTO followed by the tender's number) fields at the top that you're going to want to change.
- The pack size will be determined by the preferred pack size. If no preferred pack size has been set, then a pack size of 1 is used.
- If the item has no defined units, this it leaves units blank, and enters a `Check units!' warning into the comments.
- Tender auto-generation will therefore be most useful if values are set for preferred pack size and units for the items.
New tender (manually entered)
To create a new tender manually, having opened the Tenders window by clicking on Show tenders on the menu, click the New Tender button.
This window opens:

Here you can fill in basic information about the tender.
- Description: Enter a description that will help you to recognize this tender and distinguish it from others. For example:
RFQ 18-013It is helpful if this Description matches any register of tenders / quotes that is already being maintained by your organisation. - Creation date: The date the tender was created. This defaults to today's date.
- Issue date: The date the tender is/was sent to suppliers. This also defaults to today's date, but can be changed.
- Response by date: The date by which suppliers must respond to the tender. It is left empty by default: if you leave it empty you will be prompted to enter it. When entering this date it must be after the current date (it cannot be today or in the past).
- Status: Tenders can have a status of sg/cn/fn (suggested, confirmed or finalised), which signifies its passage through the overall tender process. To change the status of the tender, simply select the new status from the drop down list and click on the OK button to save all changes. You will be asked to confirm a change because it has a significant impact on the editability of the tender. These are what the statuses mean:
- Suggested status - tender is still being built. Everything is editable.
- Confirmed status - list of items & quantities is complete and can no longer be edited. Suppliers invited to provide quotations may be added, and, once received, their responses may be added. Decisions may then be taken regarding which quotation is preferred for each tender item.
- Finalised status - no further editing may be performed, and the tender can now be used as a basis for purchasing
- Locked checkbox: Check this box to ensure the tender is not accidentally deleted.
- Our ref: This field may be used to enter a short reference code to appear in tender-related correspondence.
- Comment: The comment field is for your internal use. It is not printed on any tender documents.
Tabs on the tender details window
Details of the tender are managed through the tabs on the Tender Details window:

Items and compare prices tab
- This tab displays by default when you open a tender for editing. It displays the items currently included in the tender, and by selecting 'All', 'Filled' or 'Unfilled' from the drop-down list above and to the right of the list, you can select which items are displayed.
- New line button: click this to add a new item line to the tender. The addition of the new line will be logged by mSupply.
- Delete line button: select an item line from the list and click this button to remove it from the tender.
- Print reports button: click this to select one of several reports to print out or export to a spreadsheet. There are several to choose from and will give you the information you need to help evaluate or analyse a tender:
- Preferred suppliers only
- Winning tender lines
- All supplier responses
- Supplier quotes with adjusted price
- Supplier quotes for each item
- Tender lines with predicted cost
- Tender lines where the lowest price was not chosen.
- Confirm button: Click on this to confirm your tender. After confirmation you will not be able to add more items or suppliers.
- View on HSH button: If the tender has been uploaded ot the Health Supply Hub, you can click on this button to view it there.
- Export/Import Tender lines button: Only enabled if the tender is not confirmed or finalised status. When you click on this you are given an option to Import or Export the tender lines. If you click on the Export option then the existing tender lines will be exported to a spreadsheet which will be immediately opened for you if you have a spreadsheet application installed on your computer. The spreadsheet is in the correct format to allow importing into another tender. If you click on the Import option this window will open:
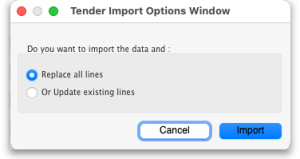 Click on the Replace all lines option if you want the contents of the import file to replace all existing lines on the tender or the Update existing lines option if you want any lines with matching item codes to be updated with the details in the import file (all lines in the import file for items that are not already on the tender will be added to the tender). The click on the Import button and you will be shown a window for selecting the import file. The file must be in the format described on the 17.14. Importing tenders page. After selecting the import file, double-click it or click on it to select it then click on the Open button to carry out the import. The tender will be updated and you will see the lines now on the tender.
 - Incoterm drop down list: Allows you to select an incoterm to apply to the tender. If you will be uploading the tender to the Health Supply Hub (see the 18.10. Using web tenders page for details) then the incoterm must be selected before you can upload the tender. You must also select it before you can confirm the tender.
- Search items text box: as you type in this text box, only items whose names start with what has been typed will be displayed in the table. You can use the “@” character as a wildcard to represent anything. For example, typing “@ol” will display only items with names which end in “ol”. This box is helpful for quickly finding a specific item. Overrides any selection made in the Show drop down list (see below).
- Show drop down list: is another way to change what items are displayed in the table. Selecting one of these options will override anything typed in the Search items text box:
- All - display all items without filtering
- Filled - display only those items for which a bid has been accepted
- No bids - display only those items for which no suppliers have made a bid
- Lowest cost not chosen - display only those items where the lowest offered cost price was not chosen as the preferred bid

Note that changes to tender lines will be logged by mSupply.
Notes tab

- This tab shows a field where you can add notes about your tender. This will not print on the documentation sent to suppliers.
- To start a new line (as with any text box), press Shift+Enter (although any long lines will wrap). See below for an example:
Choose suppliers and enter responses tab
- The use of this tab is used to manage sending of the tender to suppliers, and entering their responses. See the 18.03. Adding suppliers to a tender and inviting responses and 18.04. Adding supplier responses to a tender pages.
Standard conditions tab
- The use of this tab is described on the 18.02. Standard tender conditions page.
Purchase order tab
- The use of this tab is described on the 18.07. Analysing supplier responses and creating purchase orders page.
Reference documents tab
- The use of this tab is described on the 18.05. Tender reference documents page.
Tender preferences tab
- The use of this tab is described on the 18.07. Analysing supplier responses and creating purchase orders page.
Synchronise tab
- This tab will only appear if you are using the remote tender module have set up your remote tender preferences. The process and use of this tab is described on the 18.10. Using web tenders page.
Log tab
- This tab shows recent events relating to this particular tender. It will show, for example, changes in prices or other significant events. You cannot edit the details on this tab. If an event fails to be logged for any reason while the tender is being processed, you will be given an appropriate warning message.
Currencies tab
- This tab shows the currencies available in mSupply and the rates that were used in the tender. It is also the place to change the rates that are used to convert prices between the datafile's home currency and any other currency. See the 18.08. Tender currencies page for details.
Adding items to a tender
To add an item to a tender, click the New line button on the Items and Compare Prices tab.You will be shown a window like this, which opens at the Set tender item criteria tab:

- Type as much of the item name or code as you know, then press the Tab key. If only one item matches your entry, it will be filled in. If multiple items match, you will be shown the standard item choice list to choose the item you want. Any details completed in the Full description under the General tab of the selected item are displayed (Description).Should you wish to identify a line (or lines) for any reason, clicking on the Colour button presents you with a selection of colours available for the type on that line.
- Fill in the pack size and number of packs you wish to purchase, or the total quantity of individual units. mSupply will calculate the figure you don't enter for you. The Round quantities button will round the number of packs to the nearest reasonable number of whole packs (most useful for auto generated tenders when the number of packs can sometimes be set to a decimal number).
- Choose the units you wish to use.
- You may optionally enter a price per pack figure in the Estimated price field.
- Entries in the Comment field are for your internal use, and won't be printed on the tender documents you present to suppliers.
- In the Conditions field, enter any conditions which are specific to this item of the tender , but NOT applicable to the tender as a whole. These conditions will be printed on the tender letter with the item details.
- The Product specifications field is read only and automatically populated with anything entered in the item's Product specification field; see the 4.01.01. Items - General tab page for details,
- Click on OK & next to add the next item to the tender, and when you are finished, click on OK.
- The addition of a new line will be logged by mSupply.
It is perfectly possible to add the same item more than once to a tender. Each entry will be treated separately. This allows for the same item to be added, for example, in different pack sizes.
Note that it is also possible to use decimal pack sizes and number of packs, but not advisable. mSupply will ask you to confirm if you do use decimal values for either of these.
The second tab Compare supplier responses, is for use after suppliers have responded to the tender - refer Receiving quotations from suppliers - Comparing quotations from different suppliers.
Deleting tender items
Click the line you wish to delete so that it is highlighted, then click the Delete line button. If a supplier has already quoted on a tender item, you will be warned before deletion. The deletion of any tender lines will be logged by mSupply.
Editing tender items
From the Items and compare prices tab, double-click the tender line you wish to edit. The 'Edit tender item' window will open, allowing you to edit the details in the same way as entering a new tender item, above. Note: you cannot edit or delete lines on finalised tenders.
The Search item field allows you rapid access to any item in the tender - just enter the name (or first few letters of the name) of an item in the tender, and it will be displayed.
Here's how the Edit tender window looks when the item Ranitidine 25mg/mL injection has been selected; the automatically generated tender has calculated that 1023 ampoules are required; here you can edit the quantity to conform with, say a pack size of 10, so you would adjust the pack size to 10, and the quantity to 102 or 103.

You can use the OK & Next and OK & Previous buttons to go straight to the next or previous item in the list.
Note that any changes to a tender line are logged by mSupply.
| Previous: 18. Tenders | | Next: 18.02. Standard tender conditions |