Table of Contents
5.01. Names: using, adding and editing
About names
In mSupply a “name” is one of these:
- customer: a recipient of your goods
- supplier: someone who sends your store goods
- manufacturer: someone who makes the goods that you receive, store and distribute
- donor: an entity that donates goods to you (you can track donated stock)
- patient: someone you dispense goods to
- others: you'll find other types e.g. benchmarks mentioned through out the documentation
A name can also be more than one (or all!) of these at the same time.
Adding a customer, supplier, manufacturer, donor or benchmark
Adding a new customer
In a multi-store system, you will quite likely not want the new customer to be visible to every store. By default, mSupply will make a new customer visible only to the store that you are logged in to when you create the customer. This store will be made the Supplying store. Make sure that you are logged in to the supplying store before proceeding.
To add a new customer:
- Log in to the supplying store
- Choose Customer > new customer from the menu.
- The form shown below will come up.
- The customer checkbox will be checked and disabled (from editing).

Names can also be mSupply stores - refer Virtual stores. Customers that are not stores are Facilities - refer to the Name type, just under the Name in the screen-shot above.
Adding a new supplier
- To add a new supplier, choose Supplier > New supplier from the menu (makes sense really!)
- The window will look the same as for adding a customer, except the supplier checkbox will be checked and disabled (from editing).
Adding a new manufacturer
- To add a new manufacturer, choose Supplier > New manufacturer from the menu.
- The window will look the same as for adding a customer, except the manufacturer checkbox will be checked and disabled (from editing).
Adding a new donor or benchmark
- Select Customer > New customer or Supplier > New supplier from the menu.
- The same window for adding a new customer or supplier will open and you should check the Donor or Benchmark checkbox in the Category section.
Fields in the names entry window
Name Code
The unique code to identify this customer, supplier or manufacturer.
Charge to
mSupply is made to work in tandem with an accounting program (although it will also function just fine by itself). The “Charge to” code is what is exported with each invoice. Generally you should make the charge code and name code the same (If you want, there is an option in the Preferences > Misc tab to make sure this is the case). For example:
- If you have 3 hospitals you supply, but you send the bills to one centre for payment, you may want to enter each hospital with its own name code, and all of them with the same charge code. In your accounting program you would just enter one debtor (customer) with a code the same as the charge code. eg.
| Customer | Name code | Charge code |
|---|---|---|
| Fred H Hosp | fhhosp | bluehos |
| Mary P Hosp | mphosp | bluehos |
| Sam Q Hosp | sqhosp | bluehos |
- In your accounting program you would enter “Blue Hospitals Assoc” with the code “bluehos”
- For a supplier, if you have entered a default currency and margin these will be entered, but you can override them. Every supplier should have its currency entered (The currency it uses for your invoices). If the currency isn't yet in your system, close the name entry window and choose Currencies from the Special menu to add it.
- if you do not wish to use different name codes and charge codes, check the “supplier name code and charge must match” and “customer name code and charge must match” check boxes in the mSupply Preferences. If you do this, the charge code will automatically be identified with the name code.
- spaces are not allowed in name codes and charge codes
Either the “customer” or “supplier” check box will be checked as appropriate, depending on whether you have chosen “new supplier” or “new customer” from the menus to produce this window. However, you can still alter things here without upsetting mSupply.
Name
The customer/supplier name. (Remember you can use the Tab key to move from field to field)
If there are non-printable characters before or after the name, code or charge code they will be removed. Any non-printable characters in the name, code or charge code will be replaced with an underscore (_).
HSH code & HSH name
These are used when using the Health Supply Hub (replacement for the Remote tender module - see the Health Supply Hub page for details) to link suppliers or manmufacturers with their record on the Health Supply Hub server and maintained by The mSupply Foundation. If your system does not use the Health Supply Hub, then you can ignore these fields.
To link a supplier or manufacturer to one already entered in the Health Supply Hub:
- set your Health Supply Hub preferences (16.01. General preferences)
- click on the padlock icon next to the HSH code field to unlock it and enable the
 button.
 - click on the button.
mSupply will then search for a supplier or manufacturer (depending on whether the name is a supplier or manufacturer in mSupply) in the Health Supply Hub with a name having the same first letter. A window like this opens:

If the correct supplier or manufacturer is not shown in the list then clear the contents of the Quick search field. All suppliers or manufacturers registered on the Health Supply Hub are then displayed. You can refine the search by typing something in the Quick search field and only suppliers/manufacturers with names that begin with what you typed will be displayed.
When you see the supplier/manufacturer name that you wish to connect to the supplier in mSupply, double-click on it to select it; the Health Supply Hub code of the supplier/manufacturer will be put in the HSH code field and the supplier/manufacturer's Health Supply Hub name will be shown in the HSH name field.
It the search is unsuccessful or there is a problem connecting to the Health Supply Hub, you will be shown an appropriate message.
Note: if the name you are trying to link to the HSH is a customer then you shown a message telling you that linking it to a supplier or manufacturer in the Health Supply Hub is not possible.
Type
In the main entry screen, there are 4 check boxes to mark each entry as a customer, a supplier, a manufacturer and an additional Benchmark category. This last category is a feature of the Tender Management module, and is fully explained in that section, under Using Benchmark prices
Status - Hold checkbox
If this is checked this name is not visible to any store and can not be a supplier or customer.
Donor checkbox
This is applicable to suppliers only. There are a few situations in which this box should be checked:
- If this supplier/organisation provides goods free of charge (either in whole or in part).
- If this supplier/organisation provides funding (either in whole or in part) for purchasing.
Price Category
Selection of any of the categories will fix a certain price margin for that Supplier or Customer.The price category value is entered in File >Preferences > Prices . When goods are being issued to this customer, the selling price is increased/decreased by the percentage specified in the Preferences for this price category.
- Eg: Consider customer XYZ, who is in category B, and in the preferences category B is assigned a value of 50. If an item is issued to customer XYZ with a normal selling price of $10, the selling price on this invoice will be $15.
Address and contact details
These should be completed with relevant details
- For customers, you can enter separate delivery and billing addresses as necessary.
Other section
Categories
These category fields are used for reporting and are available for you to make whatever entries are appropriate in your situation. For example, you might wish to subdivide your Hospital category by number of beds, or your Clinics by the number of patients seen daily, etc. Or you may wish to identify your customers by their geographical location (region, district, state etc.) or by location type - urban, city centre, rural, remote, etc. The choice is yours - the main point to remember is that these fields are searchable, enabling you to produce reports relating to very specific criteria.
- There are 6 category fields available for selecting as required.
- Each category has its own drop down list containing the categories which have been defined using the menu item Supplier > Show categories… or Customer > Show categories… (see Name Categories for more details).
- The labels of these 6 categories can also be changed in the preferences (see General preferences, Names tab for details).
Custom fields
Custom fields are similar to Category fields, the main difference being that these fields are not validated using a drop-down list, and so can't be reliably used for categorisation.
Analysis
You can use this field to group together certain types of customers or suppliers. You can filter the report by selecting the group in the Analysis field.
Postal address
Here you can enter a postal address if it is different to the physical address of the supplier.
Supplying store
As of mSupply versions (Mobile and Desktop) released since 2019, the concept of a Supplying store is less relevant than it was. The feature is still active, can be utilised with custom code, and is the default store for internal orders are if this customer becomes a stoer in its own right.
Extra information for customers only
Shipping address: If the name is a customer, shipping address fields will be shown.
Extra information for suppliers only
Currency: Enter the currency code of the currency this supplier uses for invoicing you.
Margin: Enter the percentage margin to apply to items received from this supplier.
Freight factor: Enter the amount to add to quotations from this supplier to adjust quoted prices for freight. For example: a physical check on invoices from IDA reveals that freight to Nepal generally amounts to about 15% of the net value of the invoice. Therefore we would enter “1.15” in this field for IDA. Note that if suppliers quote you “CIF” prices, then you should enter “0” here.
About manufacturers
When you are receiving goods, you can optionally specify the manufacturer of each item. Manufacturers can be chosen from a list that is made up of names which have the Manufacturer checkbox checked.
For the manufacturer field to be shown, the option must be turned on:
- Special > Show stores > [choose your store and double-click] > Preferences tab
- Check the Able to specify manufacturer when receiving, ordering or quoting for items checkbox
Editing a customer, supplier or manufacturer
Finding a name
Before you can edit a name, you have to find it and display its details! For this example we will edit a customer. Editing a supplier is just the same, except that you start by choosing Show supplier from the Supplier menu.
Choose Customer > Show Customer. You are presented with a window to enter as much of the Customer name or code as you know:

- The slide bar at the top of the window may be set to Normal, at the left, or at intermediate points towards the Fuzzy end (right); this determines the accuracy of matching your entry; when set to Normal, the search will only match exactly what has been entered; when set at Fuzzy the search will list entries which are approximate matches to what has been entered. The accuracy with which the list matches the entry is determined by the position of the slider.
- If you leave the Name/Code text field empty, clicking the Find button will produce a full list of all customers.
- You can enter values for the other filters too (or them only!) if you want to refine your search.
- Note that the window has a series of radio buttons to select the target of your search - All names, Customers, Suppliers, Manufacturers, etc. So even if you start this search from, say, Customer > Show Customers…, by selecting the Suppliers radio button, you can search in suppliers rather than customers.
- The Exclude patients checkbox is checked by default and means that any patients you have in your datafile will not be included in the search. If you uncheck it, any patients in the current store will be included in the search.
- The Exclude hidden names checkbox is checked by default and means that any names hidden in your store (but probably visible in other stores) will not be included in the search. If you uncheck this box then the search will include all names in all stores, and their visibility will be ignored.
If the search finds only one name that matches the filter criteria you entered, its details window will be displayed. If more than one name matches then you are shown a list of them all

Buttons in the names list window
New
This button allows you to enter the details of a new customer
Modify
This button opens a window displaying the details of the highlighted customer, allowing their details to be modified.
Set Flags
This button allows you to mark certain names with a flag.
- First, highlight the names you wish to flag by holding down the control key (command on Mac) and clicking the names in the list you wish to use. Then click the Flags button to show a window where you can enter the flag you wish to add, and decide whether to replace any existing flags or append the new flag to the old one.
The Flag field can be no more than 16 characters long when set this way. It can be longer when set manually.
Clicking this button will print a list similar to the one displayed on screen.
Find
This button shows the same find window as choosing the menu item did so you can find a different group of names.
Order by
This button allows you to sort the displayed list by the criteria you choose. The Labels and Print buttons will use the order that is displayed. By default, names are displayed alphabetically based on the name column.
Merge
This button allows two customers to be merged into one; highlight the two entries click on the Merge button to display this window:

Choose the record you wish to keep and click on OK ; the data from the deleted record is then merged with the data of the record being kept. If you change your mind, click on the Cancel button, and the merger will be cancelled.
Labels
Clicking this button allows you to print address labels for the names in the list. The label editor is displayed.
Report
Click on this icon to open the Quick Report editor window. Use of the Quick Report is discussed elsewhere in the guide. See Custom Reporting Tutorial
Custom data
This allows you to bulk edit the Custom data fields associated with the displayed names. An editor window like this will be displayed:
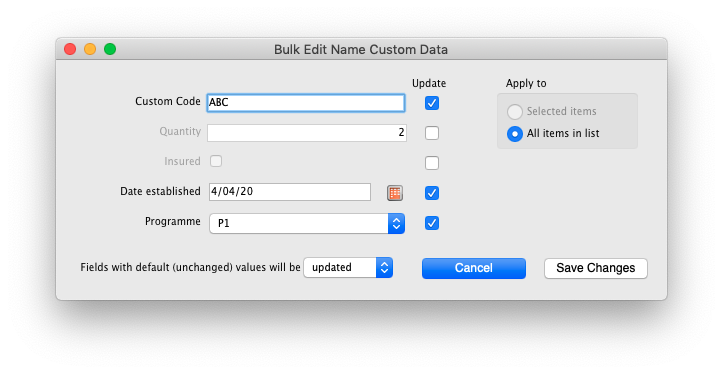
Only fields with their checkbox selected in the “Update” column will be modified. Note that you have the option to apply the changes to all names currently displayed in the list or only ones that you have selected before opening the editor.
Click “Save changes” to apply. After confirmation and processing, you will see your changes reflected immediately in the Custom Data column of the names list. It is recommended that you have the Custom Data column displayed (see Customise below) before bulk editing custom data so you can clearly see which names have been changed.
If you want to remove certain fields entirely from the names, select the field(s)' “Update” checkbox, then switch the selector at the bottom so it says “Fields with default (unchanged) values with be removed” (instead of “updated”). Any fields you haven't changed from their default values (i.e. blank for text, 0 for numbers, etc.) will be removed upon saving. You can completely remove all custom data for selected/displayed names by selecting all “Update” checkboxes, leaving all values default, and choosing the “removed” option.
Make sure you know what you're doing when bulk editing as you can easily over-write a lot of data if you're not careful.
Customise
Allows you to choose which columns to display using this window (Note: this only affects the columns you see in this list, it won't affect what other users see):

Columns on the left are available. Columns on the right are the ones in use in your names list. Click a row in either column then click the move left or right button to transfer it to the other column. Click OK when you're done, or Cancel if you want to stick with what you've got. Your choice of columns to display will be remembered for the next time you display a list of names (customers, suppliers etc.).
OK Button
Closes the window
Editing or viewing a name
To edit/view a particular name, if you are looking at a list of names double-click the name you want to edit on the list (no need to do this if you are already looking at the name's details page because only 1 name was returned from your search).
You will be shown the name's detail window which has a sidebar showing several tabs, General, Invoices, Backorders, Quotes etc. and opens at the General tab:

Edit any of the fields to the values you want. Note that fields with a padlock need to have the padlock unlocked (by clicking on it) first before you can edit the values. These actions are, of course, only possible if you have the appropriate permissions.
The Main/Billing Address fields will be disabled and not editable if the name beloings to a store. To edit these fields, do that on the store record. See the 26.07. Virtual stores page for details about this.
Deleting names
Click on the Delete button in the bottom left hand corner to delete the name.
If a name has transactions entered against it, you will not be able to uncheck the relevant check box in the Category section, and you will not be able to delete it. For example, if a supplier has invoices entered against it, you will not be able to uncheck the Supplier check box, and you will not be able to delete the supplier.
Putting a name on Hold
If you wish to prevent future transactions with a name, change it's status to on 'Hold'.
Invoices tab
Here you can view the invoices for a customer or supplier.

Note that the Total outstanding field shows a customer's payment balance and is only shown if the customer receipts module is turned on (see 11.02. Receiving payments from customers).
You are able to edit an invoice directly from this window by double-clicking the one you wish to edit. A new window will open with the invoice details displayed.

Buttons on the Invoices tab
Print Range
Click this button to print a range of invoices for a customer. You will be asked to enter the first and last invoice numbers to be printed.
Aging
Click this button to display a list of aging categories and the outstanding unpaid balance for each invoice in each category.

Dates
Choose a date range from this menu to show quickly recent invoices, or to revert to showing all invoices
Backorders tab

- Here you can view, add and edit the backorders for a customer. mSupply allows entry of backorders against suppliers as well, but we are not sure why you would want to do this!
Buttons on the Backorders tab
New backorder
Clicking this button presents you with a window where you can add a backorder line for this customer.

- Type at least a portion of the item code or item name, then press the Tab key.
- Today's date is automatically entered. You can change the date if you like
- Enter the total quantity owing.
- Enter a comment (e.g. an expected arrival date)
- Click OK to save changes and exit the window.
Delete backorder
Click a backorder line to highlight it, then click this button to delete the line. You can also select several at once (using ctrl/cmd+click and shift+click) or all the backorders in the list using ctrl/cmd+a and delete them at once as well.
Copy
This command copies the backorder to the clipboard, allowing you to paste the report into an email message, word processor or spreadsheet document.
The list of backordered items for the customer is printed.
Viewing backorders
Double-click a backorder line to edit the line. You will be shown the backorder entry window, where you can change any details you wish.
Show
This drop-down list allows you to choose which backorders to display.

- Backorders are normal items that have not been supplied to customers.
- Ad Hoc items are items that customers have ordered but which you do not want to add to your stock list, rather making a special order just for that customer.
Quotes tab

You can view the quotations you have entered in mSupply for this supplier.
Notes tab
To add, edit or delete a note, click on the Notes tab, and this window displays:

Click on New note to create a note, or select an existing note and double click on it to view, edit or delete it.

- The date on which you are entering a new note is already completed, and in the main panel you should type in the wording of the note itself.
- In the lower left of the window is a drop-down list offering various choices concerning the displaying of the note on screen; it may appear as an alert when a Supplier invoice is created, when a Purchase Order is created, etc..
If never is chosen, the note will never be displayed on screen, and if all is chosen, it will display for all events for this customer/supplier. You may also set the background colour of the note , but as the text is always black, dark colours should be avoided. A further option allows you to have one or more audible `beeps' sound when the note is displayed. Each note will display according to the attributes set for it, independently of other notes defined for the same customer/supplier.
Subsequently, when this customer/supplier is selected and depending on the display settings made, the note will appear on screen. Be aware that the note does not disappear automatically - you must close it manually.
The text of a note can be up to 32,000 characters.
Click OK when you are finished.
Contacts tab

Adding a contact
To add a contact for this customer or supplier, click the Add contact button, then enter the details in the window that appears:

- Info if related to a customer or supplier textbox: read only. Shows the name of the customer or supplier this contact belongs to. Will be empty if this contact does not belong to a name.
- Web login: in this section you enter the authorisation details that this contact will have if it is used for accessing the REST API or one of mSupply's web interfaces. See the 19.03. mSupply customer web interface and 19.09. mSupply REST API pages, for example, for more details.
Deleting a contact
To delete a contact, click on the contact you wish to delete, then click the Delete contact button.
Group tab

Groups are only relevant to customers, not suppliers.
If this customer has been added to a group, this tab displays the name of that group. An explanation of groups and how to work with them is here: Show groups...

Here you can select the group of which a customer is a member. When you choose a group, you will be shown a list of item departments which are linked to the chosen group. Once the group system is activated in the Preferences, only items belonging to one of the listed departments (or items with no department) may be supplied to that customer.
Purchase orders tab

This tab shows a view of Purchase Orders for the current name, and applies to suppliers only.
Web log-in tab

If you are allowing customers to access their order information using the mSupply web server, this is the window where you assign a logon name and password to a customer.
Also displayed on this tab is the internet connection speed. It should be noted that this value is derived from your network settings, and may not be edited manually.
Item lists tab

This tab is used to assign Item master lists to customers for use in requisitions created in supplying stores.

For a facility or customer, you can set the master list to function as any of:
- In imprest form for use in the Imprest method
- Ordering list for web, for online web orders that the facility or customer may want to place.
- Price list: Causes prices configured on this list set the price for items sold to this customer - refer to the Price per unit field in Adding items to a master list.
Stock history tab

A list of stock histories, showing dates of both the stock take and the date of entry into the computer, the ID reference, the status and the type, is displayed.
Store Visibility tab
Updated version 4.12
The tab shows which stores the customer/supplier is visible in. Only when the visibility checkbox is checked will the customer/supplier be visible to ‘this’ store, which is needed if the store will receive and/or issue goods from ‘this’ store.

There can be a huge number of stores in this list. If you want to find a particular store or group of stores you can type in the Search stores field just above the list. This will restrict the list to only stores with a name that contains what you have typed.
- All on button: When clicked, this will check all the checkboxes in the Visible in store column and the button label will change to All off. Clicking it then will uncheck all the checkboxes.
- Copy button: Will copy the current state of the Visible in store checkboxes.
- Paste button: Will make the current state of all the Visible in store checkboxes the same as it was when the Copy button was clicked.
- You can only edit the visibility of any name in another store if you have permission to login to the store and to edit name visibility in that store:
- if you're just editing visibility in a single store, then an error dialog will popup and the state of its Visible in store checkbox will revert to its previous value.
- however, when using the bulk All on, Copy and Paste buttons to update visibility in multiple stores, there is no error dialog and only the stores that you have permission for will be affected.
- If you edit the visibility of store name A in store B, then the visibility of store name B in store A will be updated to match i.e. inter-store visibility is always symmetrical.
- If you are using a syncing system, and editing visibility for a store name, that can affect the sync settings for the store on other sites i.e. if you make it invisible to all stores which are Active on a site, then the sync status will become None on that site; and if you make it visible to at least one store which is Active on a site, then the sync status will become Transfer on that site - see Store sync-with options.
- In a syncing system, facility names (customers, suppliers, etc.) can only be created and edited on the primary server. Patients can be created in any dispensary, including on a sync site. After that, their visibility is controlled on the central server (after they sync there) in the same way as other names, so everything on this tab (including the All on, Copy and Paste buttons) will be read only on a sync satellite.
When a customer / supplier is created, it will only be made visible in:
- its home store (the store that you are logged into when the name is created; see Home store for details), and
- any other stores if their store preference Names created in other stores not visible in this store is switched
OFF(there's an equivalent store preference for patients, which can be switchedOFFto make new patients visible in other dispensary stores) - see Store preferences for more details.
Photo tab
On this tab you can assign a photo of the customer or supplier and set their world map coordinates. Both of these can be used in reports.

Adding or deleting a Photo
To add a photo, either copy the contents of a file to the clipboard and paste them into the image area or click on the Add photo button and select the picture file (png, jpg, bmp or gif files supported).
To delete a photo either click on it in the image area and press the delete key on your keyboard or click on the Delete photo button.
Map coordinates
- You can use Google Maps to find the latitude and longitude coordinates of a customer. The format of the numbers copied from Google maps is “latitude, longitude”.
- Copy these numbers into the Map coordinates field and press the Tab key on the keyboard. mSupply will copy the Latitude and Longitude numbers to their appropriate Lat and Long fields below.
- You can also enter the numbers manually into the Lat and Long fields shown in the screenshot.
- You can then view the customer's location by clicking the View on Map button.
Custom data tab

This tab shows all the custom fields that have been set up in the preferences. See the 16.11. Custom fields page for details.
You can edit or enter values in the fields as required. When you click on the OK or OK & Next buttons the values will be saved.
Log tab

This tab shows a list of all the log entries that belong to this name. These entries will also appear with all the other logs for other events throughout mSupply in the log. See the 25.19. The system log page for details.
If you want to see more details about one of the logs, double-click on it in the list and a detail window, populated with the log's details, will open.
Supplier hub tab

This tab allows you to register suppliers in the mSupply supplier hub. Enter the site name you wish to register the supplier with in the Site name field and click on the Register button.
Tags tab

This tab allows you to assign any name tags that you have setup to this name. The table shows a list of all the name tags currently setup in your system. To assign one to this name, simply check the corresponding checkbox in the Use column.
If the list of tags is long, you can type something in the Search tags field to make the list display tags which contain what you typed only.
Please note: if you assign a tag to a name that is also a store, the tag will be copied to that store's store tags. See the 25.08. Virtual stores page for details on store tags.
See the 5.05. Name tags page for details on how to create and edit name tags.
Import new name codes
If you need to change the name codes for a selection of names, it is a technically challenging process that is easy to get wrong if done manually, especially if you intend to re-use existing codes (not recommended!). Custom code has been developed to do this in bulk. Please contact Sustainable Solutions on support@msupply.foundation to discuss this. Include a link to this heading Code to update Name codes  .
.
The relevant details are:
- Method:
z_importExcelToUpdateNameCode
| Previous: 5. Customers and Suppliers | | Next: 5.02. Contacts |