This is an old revision of the document!
4.01. About items
An item in mSupply is usually a product that you purchase from a supplier, hold in stock and supply to a customer. However, there are also other types of items:
- A service item has no stock, but can still be added to customer invoices and charged for. Service item examples are a freight charge, a consultation fee, an express delivery fee, etc.
- A cross reference item points to another item, so that when it is chosen in a list, it is substituted with the item to which it refers. This allows you to have items in your system that are referred to by trade name, but are only issued according to their generic name.
Managing items is mostly done from the Item menu or Item tab on the Navigator. The item menu also contains commands for managing lists related to items such as accounts, drug interactions and units.
For how to add a new item, see Adding a New item.
Item menu

Show items
Use this command for viewing or editing just about any information about an item.
First you are presented with a window asking you to enter search criteria to find the items you are interested in:

If you click on the Find button (or press the Enter key on the keyboard) without changing anything you will be shown a list of all the visible items in your store. But you can refine the search by entering and selecting different values in the different filter lines shown in the window. If you enter no value for a filter then that filter is ignored.
Randomly select x items from returned list text box: If you enter a number in here mSupply will randomly select that number of items from the items which match the search criteria you have entered in the filters above. Beware: if there are less items returned from the search than the number you enter in here mSupply will return all the items it found with no random selection.
Exclude hidden items checkbox: This is checked by default and means that only items that are visible in the store you are logged into are included in the search. If you uncheck this box then all items in all stores in your datafile will be included in the search.
If only one item is found by your search then its details are displayed, otherwise you will be shown a list of matching items.
The Complex find button gives you access to a more powerful query editor where you can find a very specific set of items. A tutorial on using the query editor is to be found in the custom reports section.
To do a “contains” search, use the wildcard character '@'; e.g. entering “@250” will find all items with “250” anywhere in their name.
Here's an example of a list of items displayed after clicking the Find button:

Double-click the item in the list to view its details.
Items list view
New item: Click this button to enter the details of a new item you are adding to your inventory. You can find out how to do this here
Report: Click this button to open a report editor window where you can design a report. The report will use the currently displayed records (not the highlighted records).
Set values: A flag is a quick way of identifying a group of items for use in a report.

* You can set and remove flags for multiple items at the same time. To do so, hold down the control key (command key on Mac) and click on the lines you wish to flag. They will become highlighted. Then click the “set flags” button. You will be shown a window like this:
We recommend you use a single character (or two) as the flag.
If you choose Append to existing flags, any items with existing flags will have the new flag added to the end of the flag. If you choose Replace existing flags, then the selected items will have their flags cleared. Note that you can clear all flags for all items by selecting all items (control - A) then leaving the Set flag to. field blank, clicking “Replace existing flags”, and then clicking the OK button.
Find: Clicking this button displays the Find window, the same as if you had chosen Items > Show items.
Order by: Clicking this button will bring up the standard Order by window, where you can choose fields by which to sort the displayed items
Print: Click this button to print the items currently displayed in a list.
Modify: Click this button to show details for the first record that is highlighted. Clicking the OK and Next button in the item details window will jump to the next highlighted record. To select multiple records, hold down the control key (command on Mac) while you click on the records you wish to select.
Duplicate: Click this button to create a new item with the same details as the selected item. A message box like the one below will appear. Click on button Duplicate to confirm creating the duplicate. Note that the only difference you will see between the existing item and the newly created item is the name of the new item ends with the text '(copy)'. The new item will be added to the end of the currently displayed list of items.

Note that for recording and audit purposes a Log event is created when an item is duplicated. For more information on log events see The Log
Customise list: Clicking this button will show a window where you
can choose which fields from the items table are shown in the list view. See
Working with lists.
Item details window

Buttons in the item details window
Delete: Provided that an item has no transactions, quotes, order lines or backorder lines, it can be deleted, and this button performs that action.
Once you have received stock for an item, it cannot be deleted. You can delete an item immediately after you have created it or imported it. Note that if you have imported an item and stock, you can delete it, and it's associated stock will be deleted too (but not once it has been used in a transaction such as an invoice or build).
OK & Next: Saves changes, exits the window, then brings up the next item in the item list. If you did not have an item list open, or if you have reached the last item in the list, you will be returned to the list or the initial menus, depending on your starting point.
Cancel: Exits the window without saving changes.
Changes you have made to quotes, notes and backorders will be saved, even if you click Cancel .
OK: Saves changes then exits the window.
Tabs on the item details window
The item details window displays a vertical list of 'tabs' down the left side. Click on the appropriate item to view a 'tab' displaying particular information about an item. The Item Details Window normally opens at the General tab.
General tab
What are those lock icons? To minimise the chance of accidental amendment, some critical fields have a lock icon to the left of it. To change any of these fields, you must click on the lock icon first, and then enter the new value in the field.
Item name: This is the name by which mSupply will refer to the item.
Store: The store which you are using is displayed here. For mSupply systems that are only using a single store, this field is not relevant. For users managing more than one store, the desired store may be selected from the drop down menu. For users having access to all stores, and wishing to work with the cumulative data from them all, one of the options displayed will be “Supervisor - All stores” - refer Miscellaneous topics, Supervisor Mode.
- You should avoid changing the name of an item to that of another item. If you have accidentally created two copies of the same item, these should be merged - refer Merging two items.
- Historical records will still record the original name, but future invoices and invoices in process will pick up the new name when you add or edit an invoice line.
Item code: This is the code assigned to the item. This should be a unique code, and ideally, should not be a part of another code. For example, 1034 is unique, but is a part of 1034a, and so these two codes should ideally not coexist in an mSupply system.
General
Units: Choose the unit you use for this item. It is useful to distinguish items you issue by pack (eg eye drops) from items you issue by volume (eg oral liquids)
Department: You can assign each item to a department by choosing from the list of departments here. To set up departments, refer Managing Item Access....
Category: Provided that you have defined item categories, the appropriate category should be selected using the drop down list which displays your defined categories - refer Item categories.
Interaction group: Here you can choose the interaction group for the item - refer Manage drug interaction groups.
Item Flag: The item flag field is designed for bulk editing, where you use the list view to update many items at once. You can enter or edit an individual item's flag(s) here, though it can be easier to do so using The list view.
Universal Code: mSupply has the ability to look up and store a Universal Code for each item. Click on the select button  to look up a universal code. mSupply will look up matches based on the first three letters of the item name. Ensure you carefully select the correct item from the list when using this feature.
If you want new universal codes added to the system send an email to support@msupply.org.nz
You can search universal codes from a web browser at https://universalcodes.msupply.org.nz/
Catalogue Code: Frequently organisations may apply a second code to an item - e.g. one for auditing purposes, in addition to one for general use. This field allows the entry of such a code.. Provided the Include catalogue code for each item box is checked under Preferences > Misc, a report on Catalogue codes may be produced.
Hold: do not issue: If this box is checked, the item will not be available to be issued on invoices. It will still appear in lists, but you will get a warning if you choose it when issuing stock, and will be required to choose a different item.
Putting the Item on hold applies to all stock lines of the item in the store you are currently logged into. If you wish to hold selected stock lines only, you should do that by editing the individual stock lines using Show items with stock.
Issue in builds only: Checking this box will mean that the item cannot be issued on customer invoices. This is useful in situations like where an item which by law can not be sold in an unprocessed state, but is used to 'build' (refer Building (Manufacturing) Items) another item which is legal for distribution.
Allow pack to one conversion: Checking this box allows stock of the item to be repacked to “1”.
Convert pack to one when receiving: If this box is checked, when you receive items the pack size will automatically be converted to “1”. This is primarily for use in dispensary mode, but may be useful in other
situations too.
For example: say you receive 50 x 100 boxes of paracetamol tablets, but you issue variable amounts of paracetmol tablets on invoices. If this option is checked, as you receive the stock on a supplier invoice, it will be converted to 5000 (quantity) x 1 (pack size). You will now be able to issue any quantity you like. The cost and sell price are automatically adjusted for the new pack size.
Shelf locations
Shelf Location: The default shelf location for this item in this store. When you receive items into stock, they will be given the shelf location you enter here unless a different location is chosen. Type as much of the location (ie the first few characters) or code as you know, then press the Tab key. If only one location code matches your entry it will be filled in automatically, otherwise you will be shown a standard choice list like this:

Select the location you want by double-clicking a line or by clicking once on the line and then clicking OK
Each stock line can have its own shelf location, or can share a location with another stock line.
Bulk Shelf Location: Similar to shelf location but it is used to store bulk quantities of goods/items. You can enter a code here in the same manner as for the Shelf Location.
Preferred pack size: This is the default pack size that will be chosen when receiving new goods or adding an item to a purchase order. It will also be used for comparison of quotations from suppliers (i.e. the adjusted price used when comparing quotations is the price if all quotes for the pack size defined here.
Restricted to Here you can choose from a list of Location types. For example, all cool store locations could have been given a type of “cool” and then if the item you are editing should be kept in a cool store, choose that type here, and you will only be able to receive that item into a cool store location.
Volume per pack: If you are using available volume tracking in your warehouse, then fill in the default volume for one pack of the preferred packsize of the item here.
mSupply® always stores volumes as m3 (cubic metres), but you can enter a volume as millilitres (mL), litres (L) also.
<HTML>
</HTML>
| You enter | Value displayed | mSupply® stores |
|---|---|---|
| 30ml | 30ml | 0.00003 m3 |
| 1500L | 1.5 m3 | 1.5 m3 |
| 600 L | 600 L | 0.6 m3 |
| 1500 ml | 1.5 L | 0.0015 m3 |
<HTML>
</HTML>
Outer pack size: The number of default packs per default outer pack
Outer pack volume: The volume for the default outer pack. This may be different to an exact multiple of the volume per default pack you entered above, as outer packs may have their own packing. (For example, vaccine packs may come in an insulated container.)
Weight per pack: The weight of a default pack in kg.
Pricing
Default margin: This is the margin that will be applied to this item on supplier invoices to calculate the selling price. Note that if a supplier margin is also set, there is a setting in the Preferences > Invoices 1 that determines which margin will be used. Note also that if a default selling price is set, this price will take priority and be used rather than the margin.
Default sell price of preferred pack size: Only enter a price here if you want a fixed selling price for this item. Enter the price for one unit (eg 1 capsule or 1 gm). A price entered here will override any margins you have specified for either the supplier or the item.
Price editable when issuing: Check this box to enable this feature
Full description
This field may be used for entering a fuller description of the item should the item name alone be insufficient.
VEN category
Like all categorisations, this one is used for reporting. VEN category options available are:
- Not assigned
- Vital
- Essential
- Not essential
You can select one of the options only and Not assigned will be selected for all items by default.
Authorities, including the WHO, are inconsistent on whether N should stand for Necessary or Not essential. It makes no difference to mSupply, but if you want this changed in your installation of mSupply, talk to Sustainable Solutions
Stock category
These categorisations are used for reporting and you can check as many as are appropriate. You don't have to check any, they are entirely optional.
Custom fields
These are 7 fields available for users to store information appropriate to their operation. These fields may be queried when performing a search or producing a custom report. Their default names are user_field_1, user_field_2, etc.., but these labels may easily be edited to more descriptive ones as required..
Field types:
- Fields 1,2,3 & 6 are text fields
- Field 5 is a numerical field
- Fields 4 & 7 are boolean - True/False (Yes /No) entry.
To set the names of the user fields, refer General Preferences, Miscellaneous tab.
Misc(ellaneous) tab
This window has settings for:
- cautionary warnings used when dispensing medicines
- accounts used when exporting transaction information
- SMS (text) messaging
- Price list

Warnings: Warnings which apply to this item are chosen from a standard list. This list is set up using the Special > Warnings menu.
Use the Add button to add a warning for the item. This will open the below window where you can choose the warning from a list. Double click on the warning you want to use. You may also add new warnings to the list by clicking the new button.

To delete a warning, click on its line then click the Delete button.
When an item has more than one warning, the warning that has priority will be automatically printed on the label. You can add other warnings as part of the label directions if required.
To give a warning priority, double-click its line in the list and check the Priority box:

A warning's text may only be edited by choosing Warnings from the Special menu
Accounts: You can set the general ledger account to be used for exporting purchase and supply transactions involving this item here.
To set each account enter a portion of the account description or code and press the Tab key. You will be shown a standard choice list if more than one account matches what you typed.
SMS settings: These settings concern the item and SMS messages from mobile phones.
SMS code: This is the code that will be entered in an SMS to refer to the item. Keep the code short and unique! If you change this code you must notify all the users who send SMS messages to mSupply about the new code, otherwise they will not know how to refer to this item in their SMS messages. Because of this, you can only change this item after you 'unlock' the padlock next to it by clicking on it. When you unlock the padlock you will be shown a warning that SMS users must be told about the new code.
SMS pack size: The pack size to use to convert the pack size quantities entered in an SMS message into item quantities. You must enter a value greater than or equal to 1 for this if you have entered an SMS code. Otherwise this field is ignored.
Price list
On Price list: If this box is checked, this item will be included when the price list is produced - refer Other Reports.
Catalogue price: The price for the item that will be used when you produce the price list
Catalogue pack size: The pack size for the item that will be used when you produce the price list
The Catalogue pack size can differ from the preferred pack size on the General tab
Usage tab

The Usage tab allows you to view the item usage per month for the previous 24 months. This information is very useful for quickly spotting a trend in usage for a particular item.
Below the list of usage for each month there is a drop down list to choose from 1 to 24 months. After choosing a value, the Mean (average) usage and Standard deviation figures will be updated to give the figures for the period chosen (the period is from the selected number of months ago to the current day).
Refresh usage button: This button allows you to update the usage with transactions that were added since you opened the window (this applies to multi-user mode). It also allows you to show the usage with or without build transactions included in the totals, depending on whether or not the Include builds checkbox is checked.
Show Graph button: Clicking this button shows the same information in a graphical format:

One coloured set of bars shows the usage for the current year, another coloured set shows the usage for the previous year (if data is available).
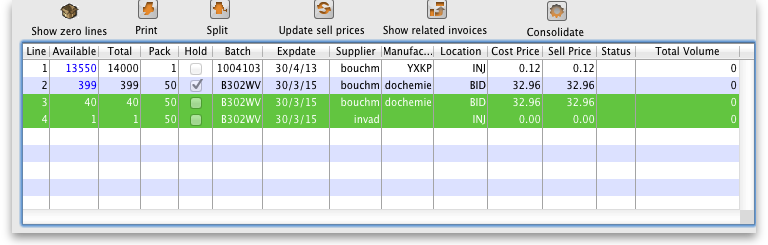
Stock tab

The “Stock” window shows the lines of stock for this item together with the stock on hand. mSupply® will calculate how many days this stock will last, based on your usage over a number of months - you can specify how many months.
If you have turned on any of the custom stock fields in store preferences they will be displayed as columns (between the Supplier and Manufacturer columns) in the list of stock lines on this tab and the information you entered for these fields when the stock was received will be shown in the appropriate cells.
Show zero lines: This button will show all the lines that are still in your data file, but which have no stock on hand. If you can think of a use for this information, please let us know! When you click the button the button title changes to “hide zero lines”, which allows you to get back to the info you really wanted.
Splitting: There may be occasions when you need to split your stock- e.g. if you are moving it, say, from a store to a dispensary or clinic, or when you are repacking some stock; select the line to be split, and click on the Split icon to show a window allowing you to enter the quantity to be split, the new location, and - if applicable - the new pack size.
In the example shown, 2 packs of 1,000 Erythromycin tablets are being transferred to a new location, and the `outer' of 1,000 ( actually 10 x100 shrink wrapped together) is being opened to yield 10 individual packs of 100.

Update sell prices: Clicking on this icon will update the selling prices of the highlighted line(s). mSupply® will use the figure entered in the Default sell price of preferred packsize field in the General tab, which must show the updated price before this will take effect. If you make use of the Default margin field, and you update this figure, then Supply® will calculate the updated sell price using it. Note that mSupply® looks first in the Default sell price … field, and any figure entered there takes precedence.
Labels: Clicking this button will print shelf labels for the highlighted stock line(s). The shelf label includes the location, the item name and code, and the batch and expiry.
Here's a (bad) example

Show related invoices
Highlight a line then click on this button to display a list of transactions which used this particular line.
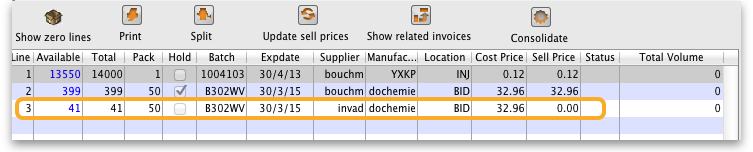
Consolidate
You can consolidate (join 2 stock lines together) if they have
- The same batch #
- The same expiry
- The same pack size
- Are at the same location
If 2 stock lines you want to consolidate are at different locations, edit one of the stock lines to move it to the location of the other stock line, then consolidate. This reflects what you would have had to do physically anyhow!
- Hold down the control key (command on Mac)
- Click on the two lines you want to consolidate
- Click consolidate
- If the two stock lines are at different locations you'll be warned and asked if you want to continue.
- You're shown this window
- Choose which stock line to keep.
- Click OK

An example:
- Before:
- After:


Other information on the stock details page
Stock
Minimum stock: The minimum stock you wish to keep on hand. Note that you do not need to enter a quantity here for mSupply®'s ordering system to work. In fact, it is better in most cases to leave this number set to zero. This field should only be filled in if you absolutely must keep a minimum on hand. For example, if you stock naloxone for narcotic over dosage reduction, and even if you only use 1 vial every year, you have decided you need to keep five vials on hand, you would enter “5” as the minimum quantity for naloxone.
Stock on hand: The total stock of this item on hand.
Stock on order: The total quantity of stock of this item on order from suppliers
Non-stock items
If this is a non-stock item, you can check this check box. If there is one, you can specify the default customer for the item, otherwise leave this box blank. For more on this topic see Non-stock items
Months Cover
You can use this calculator to estimate the time left until the stock of this item runs out. The values which appear estimating the time it takes to use the stock on hand (and on order) are calculated from the average usage of the last few months. You can choose the number (from 1 to 24) of months used to calculate this in the drop down list.
You can also exclude stock that will expire soon. Enter a number of months and any stock that expires before your chosen time frame will be excluded from the calculation.
If you would like to know how much stock to order so that you have enough for the next few months, enter the number of months you would like stock for. After entering or changing any or all of these values, click Calculate to see the results.
Editing a stock line or viewing more stock line details
To edit the cost price and selling price for an item line, double-click the line you wish to edit.
The Item stock line details window is displayed:

Stock lines > General tab
This tab shows the details of a stock line.It also gives you total and available quantity of that stock line.
Hold checkbox: To hold a stock line, check the Hold check-box. Once an stock line is held, it cannot be issued. It will still appear in the available stock window, but held stock lines will have a check box in the hold column, and if a user attempts to issue from the stock line they will be informed that the stock line is on hold.
The Hold: do not issue option in the General options takes precedence, and if that option is checked, then no stock may be issued, regardless of batch.
Stock lines > Ledger tab
This tab shows a list of transactions (supplier and customer invoices, inventory adjustments etc.) for the item being viewed. You can use this window to see a list of customers who have been supplied with this particular item:

The In/Out column tells you whether the transaction on that line brought stock in to, or took stock out of, mSupply.
Stock lines > Status tab (vaccine vial monitoring)
A window appears with 4 columns:
- Date
- VVM status
- Entered by
- Comment
There are two buttons:
- New
- Delete.
This has been specifically designed to use the Vaccine Vial Monitoring (VVM) feature. All vaccines requiring cold storage bear a VVM label which registers cumulative heat exposure over time; the combined effects of heat and time cause the inner square of the label to darken gradually and irreversibly. A comprehensive description of VVM is available in WHO's pdf document accessible. Stock lines of vaccines should have their status VVM labels regularly checked, and assigned to the relevant status; Clicking on the New button allows the details to be recorded.

Should a stock line of vaccines have the status 3 (or 4), the Hold checkbox under the General tab should be checked.
Stock lines > Reference documents tab

The standard Document Management window appears. See Reference documents for more information on the use of such documents.
Ledger tab
The item Ledger tab lists individual transactions for the item in question. By default is shows all transactions for the current year:

The Type column has a shorthand label for the type of transaction:
- si = supplier invoice and inventory adjustment to increase the amount of stock
- ci = customer invoice column describe
- sc = supplier credit or inventory adjustment to reduce the amount of stock
- cc = customer credit
Note that all supplier lines have a grey background and customer lines have a white background to help you identify them easily.
The Quan column shows the number of packs of pack size shown in the Pack column that were involved in the transaction.
As a quick indicator, if the transaction reduced the amount of stock in mSupply then the number is negative.
Filtering the ledger list

Two drop down lists are available to filter the transactions you see in the table:
You can use the Show…. drop-down list to show:
- All transactions (the default)
- Only supplier transactions (supplier invoices)
- Only customer transactions (customer invoices)
- Inventory adjustments
- Repacks
- Transactions whose status is `New'
- Transactions whose status is `Suggested'
- Transactions whose status is `New or suggested'
- Transactions for just one name (click on a transaction line for the name you are interested in)
- Transactions for one particular item line. This will show the supplier invoice on which the item line was received, and all subsequent issues of that item line to customers.
- Same batch as selected - this will show all the supplier invoice on which the batch was received, and all subsequent issues of that batch to customers. This can be useful for tracing a particular batch of medicines.
The other drop down list allows selection from a variety of periods during which transactions occurred.

Clicking on the column headings of the transaction list will sort the list by the information in that column. The column header will be underlined to show by which column the list is sorted.
If the cost price column is blank, this is because the current user does not have permission to view cost prices. (This option can be turned on or off for each user from the “File > edit users…” menu item).
If you want to view an invoice for one of the displayed lines, simply double-click the line you are interested in. The invoice (or payment, as the case may be) will be shown in a new window.
Printing the ledger list

Clicking this button will give you the following printing choices:
- the information currently displayed in the window
- a complete ledger from the start of your year
- stock movement for a specific period or between two dates of your choice

Quotes tab

A quotation is a record of a price you have been given by a supplier. For each item you can have multiple quotes recorded, reflecting different prices you have been quoted from different suppliers, or even different prices from the one supplier for different pack sizes.
When you come to compare quotes, there are several factors that need to be taken into account. By entering the information in mSupply® you are able to find the best price once these factors have been taken into account, and you build a history of quotations from each supplier.
The date until which the quote is valid is displayed, and you can choose to display all quotes, or currently valid quotes.
There may be occasions when a supplier has quoted for an item from two or more manufacturers, and in such cases, the manufacturer's name will appear in the column headed Manufacturer .
Cost: Cost is the price for that pack size in your local currency, taking into account the freight factor and the exchange rate.
Adjusted cost: Adjusted cost is the price for your “preferred pack size” you have entered for that item. This second price allows for a direct comparison between suppliers. Note that if you change the “preferred pack” for an item, all your quotes will be updated to reflect the new pack size.
Comparing quotes:: Click “Adj cost” heading in the list of quotes to bring the cheapest quote to the top of the list.
Add a new quote
Click the “new quote” button. The quotes input window will open

- Type as much of the supplier code as you know, then press the Tab key- you will be presented with a list of suppliers if there is more than one to choose from.
- Enter the price and the pack size in the currency you have been quoted.
- Note that the currency and freight factor are filled in with the information you have entered for the supplier.
- If the supplier has quoted in a different currency to the supplier's default currency, you can change the currency for this quotation from the drop-down list on the right.
- The freight factor is the factor you need to add to the supplier's prices to account for delivery costs. If your supplier includes these costs in the quoted price (i.e. prices are “CIF”), the freight factor for the supplier should be set to “1”. If your supplier adds freight that amounts to about 15% of the invoice price, set the freight factor to 1.15.
Strip pack: This check box allows easy identification of quotes that are for strip/blister packed items (as opposed to “loose” items).
Preferred: This check box allows you to identify one (or more) suppliers as the preferred supplier for the item. One of the ordering methods uses the “preferred” check box to indicate which items should be considered for ordering from a particular supplier. See Ordering from suppliers for more details.
Supplier code: If you are using electronic invoice transfer, you must use this field to record the code for the item that this supplier uses on their electronic invoices.
Supplier bar code: Here you can record the bar code identifier for this product.
Price Break: Enter the quantity that generates a price break along with the percentage discount that will apply once this quantity is reached.
Freight: Enter the value for the preferred pack (outer pack) and the freight for that pack provided by the supplier.
Click OK to accept the details, or cancel if you decide not to add a quote for this item.
To modify a quote:
Double-click the line you want to edit.
In the window that appears you can change the date, the supplier, the price, the pack size, the Strip check box, or the Preferred check box.
To delete a quote:
- Click on the quote line you wish to delete
- Click the Delete quote button
- Confirm that you want to proceed
Backorders tab

You can view the backorders for an item here. To edit a backorder, double-click the line you wish to edit.

To add a new backorder for this item, click the New backorder button. This window will be shown:

- Enter part of the customer name, then press Tab to search for the customer.
- Enter the order date, quantity and any comment, then click OK to save the new backorder entry.
To delete a backorder, click the line you wish to delete, then click the Delete backorder button.
The total stock on backorder is shown below the list.
Notes tab

You can add and edit notes for an item here.
Click the New note button to add a note. A note can be up to 32,000 characters.

The date on which you are entering the note is already completed, and in the main panel you should type in the wording of the note itself. In the lower left of the window is a drop-down list offering various choices concerning the displaying of the note on screen; it may appear as an alert when this item is issued on a customer invoice, received on a supplier invoice, or, if all is chosen, it will display for both customer and supplier invoices.

You may also set the background colour of the note, but as the text is always black, dark colours should be avoided. A further option allows you to have one or more audible `beeps' sound when the note is displayed. Each note will display according to the attributes set for it, independently of other notes defined for the same item.
Subsequently, when the item is selected (depending on the specified display settings), the note will appear on screen; be aware that the note does not disappear automatically - you must close it/them manually.
To edit a note, double-click the note in the list you want to edit.
Reconcile tab

Clicking the Reconcile button will give a summary of usage.
It is useful for checking mSupply® is working as it should be! If you get an error here it is most likely due to your using mSupply® when a power failure occurred. In multi-user versions we are able to provide you with a log file that will allow you to incorporate transactions entered even if a power failure has occurred. In normal use, with a UPS, mSupply® will automatically save data and you will not see an error here.
Bill of materials tab
This may not be showing if you do not have a registration for mSupply® that enables manufacturing, or the buttons may be dimmed so you can not make entries if your user permissions do not allow you to view Bills of Materials.

Here you can specify a Bill of Materials for the item if it is a manufactured item. Once you have done so, and have checked the Use a Bill of Materials to manufacture this item check box, when you enter a new build, it can be automatically filled out with the correct materials (ingredients) and the correct quantities for the total to be manufactured.
Use a bill of materials to manufacture this item: If this check box (1) is not checked, the bill of materials (if one has been entered) will not be used when manufacturing builds.
New ingredient: This button(2) allows you to add items to the bill of materials.
You will be shown a window like this:

Enter the start of the item name or code then press the Tab key. If only one matching entry is found, you can then enter the quantity. otherwise you will be shown a list of matching items. Double-click the item you wish to use.
Click the OK button when you have finished, and the item will be added to the bill of materials for the item you are editing.
Note: (3) Be careful to enter quantities corresponding to the units you have specified for the item.
Delete ingredient: To delete an ingredient, first click on the ingredient you wish to delete so that it is highlighted, then click this button.
Print: This button allows you to print the bill of materials that is displayed.
Quantity of finished product this bill of materials is for: This is the total quantity of this item that will be produced by the bill of materials that is entered for the item. Be careful to set this quantity and the units correctly.
Manufacture Method: This panel may be used to record the steps in the manufacturing process. When you are entering a build you have the option to print the manufacture method along with the build ingredient list. For more information see Building (Manufacturing) Items
Purchase orders tab

- The Show drop down list beside allows filtering the display of Purchase Orders according to their status - All, Suggested, etc. -
- If you double-click a row the Purchase order will be opened in a new window.
Order options tab

Never order this item: If you have items that are “one-offs” or have been discontinued, use this check box to stop them appearing in orders.
Hold: do not receive: If this check-box is checked, you can not receive this item into the store you are currently logged into. This can be useful if you have changed to using a different item, and you do not want people to accidentally use the redundant item.
Expiry date required on receive: When this is checked, you will be unable to receive this item unless an expiry date is entered for it. Therefore it is best to check this box for items that will always have an expiry date such as oral medicines and to leave it unchecked for items that will never have an expiry date such as surgical instruments.
- You will be warned if you try to add or edit an item on a goods receipt or a supplier invoice that has no expiry date entered. Also, you will not be able to finalise a goods receipt that contains items which have no expiry date entered.
Dispensing tab

Default directions
A feature of mSupply® which can reduce the time taken to dispense a prescription is its use of abbreviated patient directions, which allows the entry of a short sequence of characters that expand to meaningful text. This is where you can set an item's default directions which will be used at the time of dispensing. When there is more than one entry, priority is given to the direction that is ranked at no.1 under Priority, and it will be automatically suggested for the item when you dispense it. Further information on the use of abbreviations will be found in the section Dispensing, Abbreviations
In cases where multiple abbreviated directions have been defined, the required one(s) will be available from a drop-down list when dispensing the item. Note that even if you set up default directions, you can override these at the time of dispensing, either with longhand text or by editing the abbreviation that has been entered.
Warning: If you choose to use this option be very careful to:
- Inform other users that default directions have been entered.
- Ensure the directions are appropriate.
- Check each prescription dispensed, and change the directions if the prescription has different directions to the default set.
- Update the default directions if you change any of the abbreviations.
Add button: Click this button to show a window where you can add directions. You can enter any combination of directions and text. (Abbreviations are managed by choosing Special > Abbreviations)
Delete button: Click a line, then click this button to delete directions you no longer need, or if you have made an error.
Picture, Instructions and Purpose
These fields provide default information to be used with the Patient medication records system.
Item Picture: You can drag and drop or past a picture into this field. Common file formats such as JPG and PNG are accepted.
When you add a picture, the size is shown to the left- we suggest pictures are less than 200KB each.
To clear a picture, click on the field and paste it.
Purpose: Enter the purpose of the medication here. This will be available to add to patient medication records
Instructions: Enter the medication instructions here. For example, you might want to explain about sensitivity to sunlight with long term use, or that certain foods should be avoided. This will be available to add to patient medication records. Note this is separate to the medication warnings system, which will print on dispensing labels.
Other fields
Warn if user tries to issue more than field: You can enter a number here and have the user warned if they try to dispense more than this quantity.
Reporting tab

ATC Category: This field is intended for the ATC code. The use of ATC codes and DDD values is discussed in detail here.
DDD value: The DDD value is the defined daily dose of the item. For example, doxycycline's DDD value is 100mg., while that of Amoxycillin is 1g. DDDs are a means of quantifying the issue of medicines by doses rather than by the raw number of units dispensed.
DDD factor: Defined Daily Dose factor- this is the number of units of the item that make up the DDD value. In the case of amoxycillin 250mg capsules the DDD factor is 4, while amoxycillin 500mg capsules have a factor of 2. For Doxycycline 100mg tablets the DDD factor is 1
ABC category: This option allows you to mark items that are commonly used and then report on only those items. For Reports using this category, see Items and Stock reports
Log tab
mSupply® maintains a record of any changes to an item's details - name, code or units. The log window displays a list of such changes, under the headings:
- Date
- Time
- User and Event
- Event Type
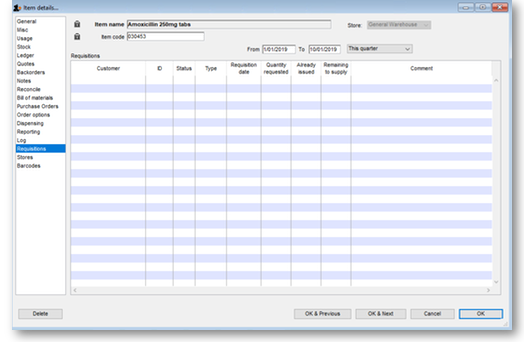
Requisitions tab
Selecting Requisitions shows the stocktakes featuring this item,
- Choose a date range from the drop-down list to show custom stocktakes within that range.
- Double-click a row to view the customer stocktake in question.
Stores tab
Only users who have Admin privileges may access this feature. See section 25.15. Managing users
Selecting this item shows the stores where this item is visible, and allows these stores to be set to Active using the checkbox.

If the Active checkbox is unchecked, the item will not be visible when logged in to that store
Note that
- you can only change the visibility of an item for the store you're logged in to.
- you can not make an item invisible in a store if it has stock on hand in that store.
Seeing an invisible item
Once an item has been made invisible it will no longer show up in your items list when performing a normal find items task. To include invisible items when finding items, untick the Exclude hidden items box:
The items list will now display any invisible items and you will be able to able to make them visible again in the store tab.
If your mSupply system is a Primary - Satellite synced system, you can only change visibility of items on the Primary server.
| Previous: 4. Items | | Next: 4.02. Adding a new item |