Updated: Version 4.02
6.04. Ordering from one store to another (internal orders)
If you run mSupply using virtual stores then you can place an order for goods with another store within mSupply.
There are two ways you can do this:
- Create Purchase Orders. This method was the 'original' method, and is not recommended. In fact, from mSupply v7.0 this method has been removed.
- The recommended (since mSupply v4.01) method is Internal Orders.
Internal orders are the desktop equivalent of supplier requisitions in mSupply mobile.
Internal Orders are a simpler and easier way to place orders to another store if you've already been using purchase orders and goods received records in your workflow:
- In the requesting store:
- Create an Internal Order to the supplying store.
- When the internal order is finalised, a response requisition is automatically created in the supplying store
- In the supplying store:
- One or more customer invoices can be created from a single response requisition
- When each customer invoice is finalised, a supplier invoice is automatically created in the requesting store
Internal Orders
Internal Orders are also known as request requisitions or supplier requisitions.
Entering an internal order
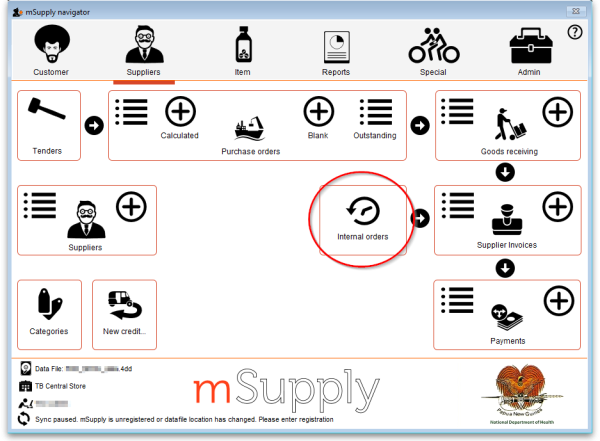
To begin the process, choose Supplier > Show internal orders or click on the Internal orders icon on the Suppliers tab of the Navigator:
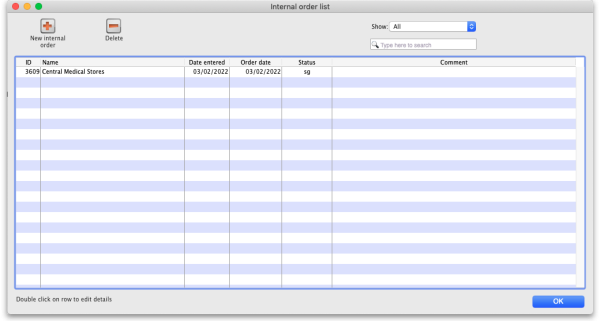
The following window will open, showing you a list of all existing internal orders:
- Show drop down list: Set top Past 30 days by default, which will display all internal orders created in the last 30 days. You can select other options to display All of them or those created in certain time periods or with certain statuses.
- Type here to search field: If the list of requisitions is long you can type something in this field to display only requisitions in the list with a supplier name, comment, program or requisition number which contain what you have typed.
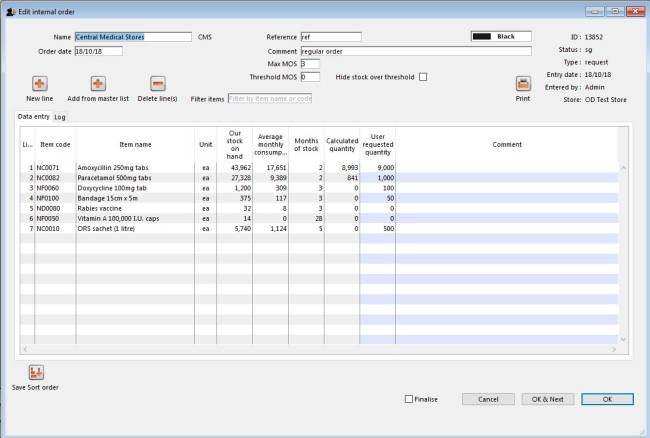
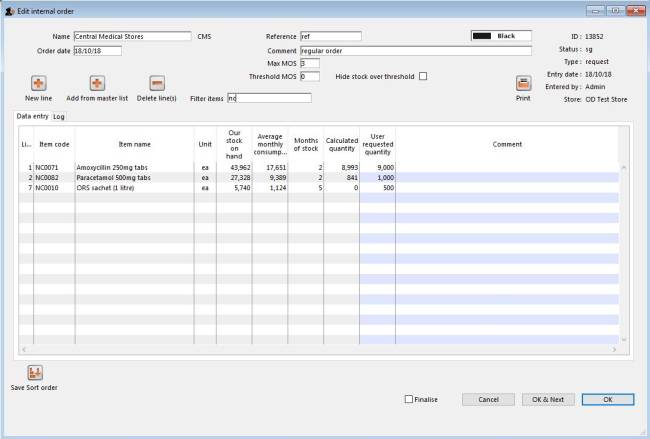
Either double-click on an existing order to edit it, or click the New internal order button to create a new one. The new internal order window will open. The example below has a few lines already entered: (Note: if you have activated programs in mSupply see you will see a program selection window as shown in the Programs section below)
- The Name will default to the supplying store for the current store, but any other visible store in the data file can be selected in the usual way (i.e. enter the first few characters and hit the Tab key to find matches).
- The Order date defaults to the current date. You can change it.
- Use either the New line button to manually add a single item, or Add from master list to add any items in the current store's master list which are not there already.
- If adding from a master list, the cursor will go into the first new item's User requested quantity cell.
- If adding a single item, the cursor will go into the User requested quantity cell for that item when it has been added. When you click on the New line button, this window opens:
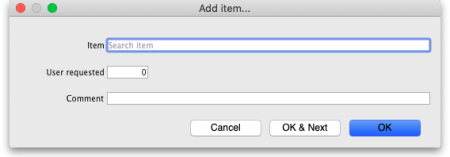
- Item: Type the first few characters of the item's name and press the Tab key on the keyboard to select the item from a list of items whose name or code begins with what you typed.
- User requested: The quantity of units of the item the customer is requesting.
- Comment: Any comment you want the supplier to see for this item.
- Click on the OK button to add the line to the requisition, click the OK & Next button to add this line and empty the window so you can add another item right away or click the Cancel button to close the window without adding the current item to the requisition.
- For each item,
- mSupply already knows Our stock on hand
- mSupply calculates the Average monthly consumption based on what the store has issued over the last 12 months (or less if the store hasn't been operating that long).
- mSupply calculates the Months of stock from Our current stock on hand and the Average monthly consumption (this is therefore the months of stock at the current rate of consumption).
- The Calculated quantity is then worked out by multiplying the Average monthly consumption by the Max MOS (maximum months of stock), and then subtracting Our stock on hand. If the resulting value is negative, a value of
0will be displayed.
- If the Use consumption and stock from customers for internal orders store preference is turned on (see 25.08. Virtual stores, preferences for details) then the Our current stock on hand figure comes from the sum of all stock currently held by all the customers of this store and the stock consumed is taken as the stock issued to all customers. Note that customer stores are those that have this store set as their supplying store.
- The Max MOS is critical to this calculation, and you can change it.
- There is an industry rule of thumb that the Max MOS should be set to 3 times the ordering cycle.
- The default Max MOS is
3.0, which is based on an a monthly ordering cycle. - If, for example the ordering cycle was every two months, then Max MOS should be set to 3 x 2 =
6.0.
- Hitting the Tab key will move the cursor into the Comment cell and, if there's another line below, hitting Tab again will move the cursor into the next User requested quantity cell.
- If necessary, use the Delete line(s) button to remove selected item lines.
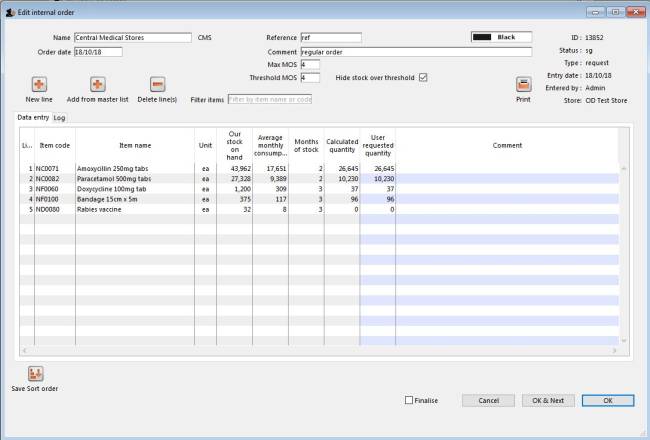
If the order has a lot of item lines, you can filter them by typing into the Filter items field, which will change to display the number of visible items out of the total number in the order:
Note that, while a filter is active, some of the other buttons are disabled e.g. you can't save the sort order unless all lines are visible.
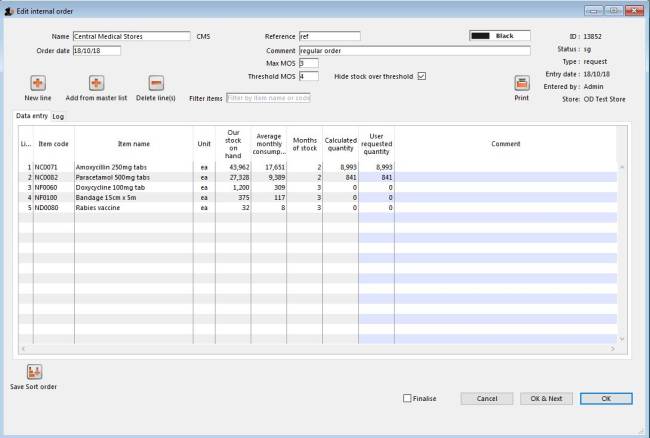
You can also filter item lines which have a lot of stock (and therefore don't need to be ordered) by entering a value in the Threshold MOS field. This will automatically tick the Hide stock over threshold checkbox, and hide any lines which have their Months of stock greater than or equal to Threshold MOS.
If you have set up requisition categories (see the 8.07. Stock control methods for your customers (requisitions) page for details) then a Category drop-down list will be visible just to the right of the Max MOS field and you will be able to select a category for this internal order.
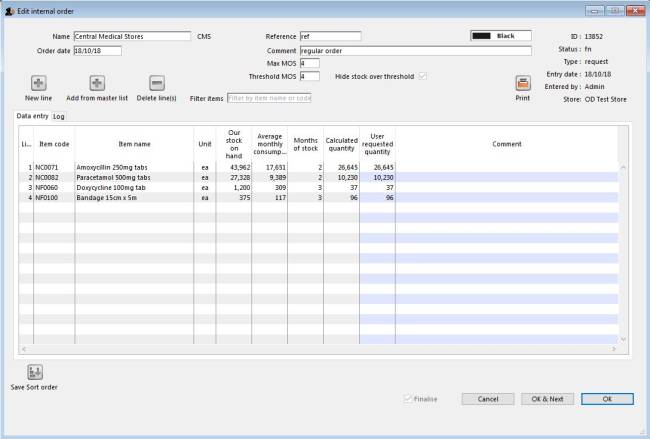
Once you are satisfied, tick the Finalise checkbox. This will prevent further editing, and automatically delete any lines which have a requested quantity of zero.
When the order is then saved, it will automatically generate a corresponding response requisition in the supplying store. From there, one or more customer invoices can be raised in the supplying store which, when finalised, appear as supplier invoices back in the requesting store in the same way as regular stock transfers.
Programs
See the 4.05. Programs page for information on setting up programs.
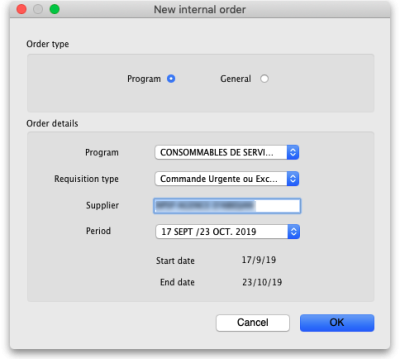
Using programs activates a comprehensive system for managing orders and supplies by program. When you click on the New internal order button, before the order window opens, another window appears to allow you to select the program and period etc. that the order belongs to:
- Order type: Selecting General will create a standard, non-program based requisition and none of the Order details section fields will apply. Selecting Program will create a program based requisition and you must fill in the details in the Order details section.
- Order details section
- Program: The program this requisition belongs to. Select one of the programs you have defined and assigned to this store.
- Requisition type: Select one of the types of order you have defined for this program. Normal orders will follow the quantification rules and be limited in the number of orders per period. Emergency orders will not follow quantification rules and will not be limited in the numbers of orders per period but will typically be limited in the numbers of lines that can be entered on them.
- Supplier: The supplying store for this store will be selected by default. Other stores can be seleted if required.
- Period: The period this requisition is for. Will contain a list of all the periods which are still available for you to enter a requisition for i.e. those for which you have not already entered the maximum number of requisitions. The Start date and End date fields show the dates of the start and end of the selected period.
When you click on the OK button on this window, the requisition is created for you. The items defined for the program are automatically added to it and the suggested order quantity is calculated for you following the quantification rules.
Note that items belonging to the program will only be added to the order if they are also visible in the supplying store. This is to avoid the situation where you request an item that they don't have visible to them and therefore can never have any stock to supply!
Purchase orders
- This method of ordering stock from another mSupply store is deprecated: Internal Orders (above) is the way to do it.
- Purchase orders are used for Ordering stock from suppliers outside of mSupply
Using a purchase order to order from another store
For the most part, the process is the same as for creating a normal purchase order. There are, however, a few significant differences:
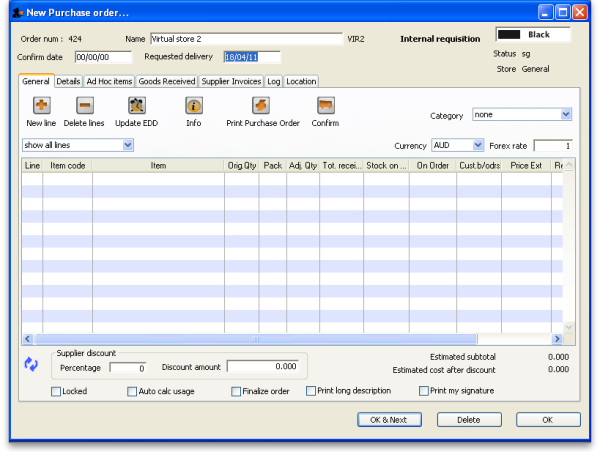
- In the Name field of the purchase order, enter the name of the store which will supply your goods.
The names of suppliers which are stores will appear in RED in the choice list of suppliers. If the name of the store you select as a supplier is BLACK, then you have not chosen another store as a supplier (you will be creating a standard purchase order not an internal requisition), and the instructions in the remainder of this section do not apply.
Note: From mSupply v7.0 this method of ordering from another store has been removed. Store names have been filtered out of the name selection so it is not possible to send an internal requisition to another store this way.
- The Internal requisition label will appear after the name to indicate that this is going to be an internal requisition.
Enter the purchase order lines as normal and when you're finished, confirm the purchase order (at this point you may be prompted to enter budget and/or category information, depending on your preferences):
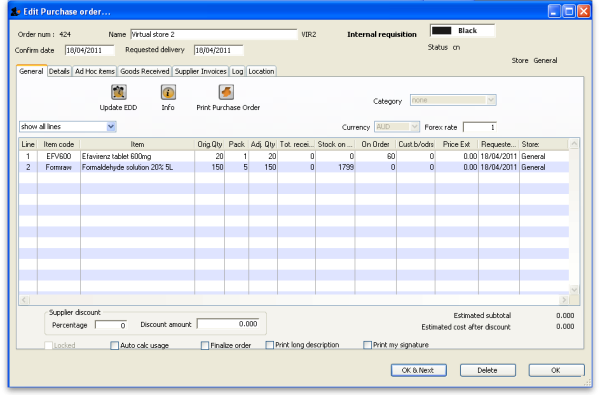
Once confirmed, it will no longer be possible to:
- modify the purchase order lines, except for updating the expected data of delivery (EDD).
- delete the purchase order or any of its lines (mSupply will give you a warning if you try).
Processing the order (supplying store)
For versions of mSupply newer than v4.01, confirming the purchase order will create a response requisition in the supplying store (with your store's name in the Name field). This allows the supplying store to create multiple customer invoices to supply the order (and hence to better handle partially fulfilled orders). Once each customer invoice has been finalised, a goods received note for the purchase order will be created back in the store where you created the purchase order which started this whole process off (called the customer or receiving store).
Handling partially fulfilled orders
If you have unfilled lines on the customer invoice (i.e. red placeholder lines), when you finalise the customer invoice you will be asked if you want to create a new invoice with the unfilled lines. This new invoice retains the link to the purchase order that created the original customer invoice, and can be used to issue further goods to the customer.
Note that you can also create another invoice that is linked to the original purchase order at any time by using the "Duplicate" button on the toolbar of the customer invoice list.
Receiving the goods (requesting store)
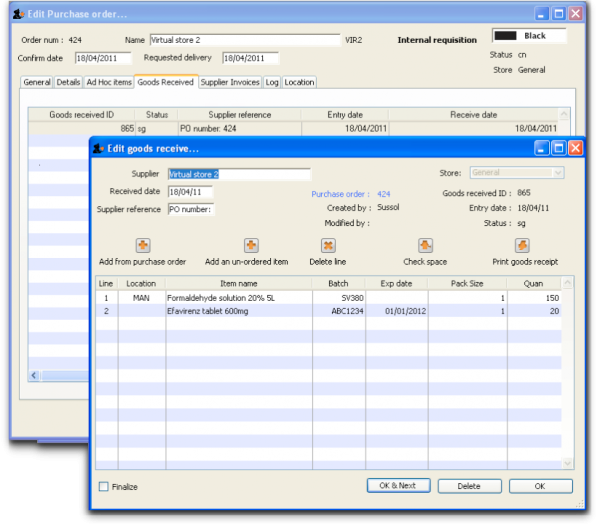
Now, back in your store, where you created the purchase order which started this whole process off, you can view the goods received record via the Suppliers tab on the Navigator or via the File > Supplier > Show goods received menu item (or via the File > Supplier > Show purchase orders > Goods received tab)
Notice that on the goods received note the lines from the customer invoice will have been filled in automatically. Process the goods received note in the normal way and note that, as with all other goods received, the goods are not added to your store's stock and available for issue until the goods received note has been finalised and the resulting supplier invoice confirmed. Note that, from mSupply v3.85, the original purchase order lines will only be updated with the stock received when the goods received note has been finalised.
| Previous: 6.03. Purchase order categories | | Next: 6.05. Multi-store Purchase Orders |
