This is an old revision of the document!
3.05. Creating and viewing items
Creating a new item
In this section of the tutorial, we are going to add two new items to our mSupply database. From the navigator's opening screen, click on Item, the 3rd large icon on the top of the screen.
![]()
The following screen appears:

Click on the New item icon (the large “+”). You are presented with a window with a number of fields to enter:

Below is a list of fields and the text to be entered into each field. You can use Tab to move from field to field or, using the mouse, click on the field you want to edit.
- Type: The default entry normal is shown in the drop-down list and should not be changed.
- Item code: Enter
amo500c.
- Item name: Enter
Amoxycillin 500mg tab/cap.
If you make a mistake, you can click in a field and edit the value.
- Units: The default entry is None. The options are: unit, ea (for each), gm and ml.
- Price list: Click in the box so a check appears in it. This means that when we export a price list, the price for this item will be included.
- Shelf location: Enter
a3. Amoxycillin is stored on shelf 3, section a of our imaginary store. Note that “A” is interpreted differently from “a”, so it is important to be consistent and use all upper case or all lower case letters for shelf locations.
- Preferred pack size: Enter
100. This means we want a 100-unit pack to be our standard for comparing prices of this item.
- Category: If a list of categories has been defined, this field allows the item which is being added to be placed in its appropriate category.
- Normal stock, Critical stock, Essential drug, ATC category, DDD value, DDD factor, Weight, Non stock item, Default customer: For this tutorial, ignore these fields and leave them blank.
- Click the OK & Next button to add this item to mSupply. The window's fields will clear allowing you to add a further item.
If you have no more items to add, click the OK button. If you accidentally click OK & Next and then want to exit, just click the Cancel button. The Amoxycillin 500mg tab/cap would still be entered, as it was saved when you pressed the OK & Next button.
Proceed to add a further item with the following details:
| Field | Enter…. |
|---|---|
| Item code | amo125s |
| Item name | Amoxycillin 125mg/5ml syrup |
| Units | mL |
| Price list | check the checkbox |
| Shelf location | a7 |
| Preferred pack size | 60 |
Click OK now that you have added the item, then click Cancel to exit the window.
Congratulations! You have now added 2 items to our example data file. Let's go and see how to find them.
Viewing item details
Click on Show items from the navigator's Item panel.

You will be presented with a window to find items:

Type a into the text entry area, then click the Find button. A list of all the items whose name or code starts with “a” is shown.

We will choose the Amoxycillin 250mg tabs/caps - an item that was already in the example data file. To choose the item, double-click anywhere on its line in the window. You will now see a window that displays a lot of information about “Amoxycillin 250mg tab/caps”. You can see stock on hand, view and edit supplier quotations, view usage for the last 24 months, view backorders, and read and edit notes.

At this stage, we only want to know how to view the information. For an explanation of all the information displayed see 4.01.01. Items - General tab. When you have finished viewing the information, click the OK button to return to the list of items.
If you want to view a different item, you can double-click its line. Otherwise, click the X button in the top right corner (on Windows) or the top left corner (on a Mac) to exit and return to the navigator screen.
| Previous: 3.04. Navigator | | Next: 3.06. Customers and suppliers |
3.06. Customers and suppliers
Adding a customer or supplier
In this section of the tutorial, we will add a new supplier and a new customer.
Adding a supplier
From the top of the mSupply navigator screen, click on the 2nd of the large icons, Suppliers, and then click on New Supplier from the navigator panel. You will see this window:

You can enter the details for your new supplier in this window.
| Field | What to do…. |
|---|---|
| Name | |
| Code | Enter “Acmep” to identify the Supplier (Acme Pharmaceuticals). You need to choose a unique code for each name. Try to choose a logical system, as the code is used to look up the Supplier (or Customer) when you are entering invoice data. (for example, try to start the code with at least the first three letters of the Supplier name) |
| Charge to | Enter “Acmep” again. This field is only used when exporting data to an accounting program - this code must match the code you use for the supplier in your accounting program. |
| Name | Enter “Acme Pharmaceuticals” - the name of our supplier. |
| Master ID | Ignore for now |
| Contact | |
| Email, Web site etc. | Fill in with the appropriate details |
| Status | |
| Hold checkbox | If this box is checked for supplier or customer, that particular supplier or customer can neither supply nor be supplied with items. |
| Preferred checkbox | Leave unchecked |
| Price Category | |
| Price Category | This applies to customers. It is possible to assign multiple sell prices to customers. Leave it set to “A”. |
| Currency | |
| Currency | The field is automatically filled in with “Nrs” (=Nepali rupees - the default currency in our example data). This is the currency that this supplier will use to bill us. |
| Supplier details | |
| Margin | Enter “10”. Items purchased from this supplier will have a 10% margin added to calculate the selling price. |
| Freight factor | Enter “1”. Acme Pharmaceuticals does not charge any freight to us. Their prices are “CIF”(Cost, Insurance & Freight to named port). This field is only used for comparing quotations from suppliers - it is not used for actual invoices. |
| Printing | |
| Print invoices | Ignore for now |
| Category | |
| Customer check box | Leave this box unchecked, as we are entering a new Supplier. |
| Supplier check box | As you chose “new supplier” this box is already checked. |
| Manufacturer | Leave unchecked |
| Benchmark | Leave unchecked |
| Other | |
| Category 1-6 | Ignore for now |
| Custom 1-3 | Ignore for now |
| Flag | Ignore for now |
| Comment | You can enter a brief note here (Ignore it for now) |
| Addresses | |
| Address, Main, Postal and Shipping address. | You can complete these with appropriate values. |
If you are satisfied with the details, click OK. You will be returned to the mSupply navigator screen.
Adding a customer
From the top of the mSupply navigator screen, click on the 1st of the large icons, Customers, and then click on New Customer from the navigator panel. You will be presented with a window similar to the New Supplier one above to enter the customer's details.
Fill in the fields as follows:
| Field | What to do |
|---|---|
| Name | |
| Code | Enter “bluec” |
| Charge to | Enter “bluec” |
| Name | Enter “Blue Cross Hospital” - the name of our customer. |
| Master ID | Ignore for now |
| Contact | |
| email, web site, etc. | You can complete these with appropriate values. |
| Status | |
| Hold checkbox | If this box is checked for supplier or customer, that particular supplier or customer can neither supply nor be supplied with items. |
| Price Category | |
| Price Category | This applies to customers. It is possible to assign multiple sell prices to customers. Leave it set to “A”. |
| Category | |
| Customer check box | As you chose “new customer” this box is already checked. |
| Supplier check box | Leave this box unchecked, as we are not entering a new Supplier. |
| Manufacturer, Benchmark check boxes | Leave these unchecked too |
| Other | |
| Category 1-6 | Ignore for now |
| Custom 1-3 | Ignore for now |
| Flag | Ignore for now |
| Comment | You can enter a brief note here (Ignore it for now) |
| Print invoices | Ignore for now |
| Addresses | |
| Address, Main, Postal and Shipping address. | You can complete these with appropriate values. |
Click the OK button to save the details and exit the window.
Editing a customer or supplier
Let's now look up Acme Pharmaceuticals.
- Choose Show suppliers from the navigator's Supplier panel. You are presented with a window to enter as much of the supplier's name or code as you know.

For information on the Normal - Fuzzy slider, see Editing a Customer, Supplier or Manufacturer
For this tutorial, just click the Find button. You will get a list of all suppliers.

- Double-click “Acme Pharmaceuticals” entry in the list. You will be shown the same window the same as you used to add Acme Pharmaceuticals as a new supplier.

- Note the window has Tabs down the left side in the sidebar: General, Invoices, Backorders, Quotes, Notes, etc. Let's add a note for Acme pharmaceuticals:
- Click on the Notes tab.

- Click on the New Note button. Today's date is entered automatically and highlighted. Click inside the Note Entry field.
- Enter
This is a test notethen click the OK button.

- The first line of your note text will appear in the list of notes.
- Click OK to exit viewing/editing the Acme Pharmaceutical supplier, then click OK again to exit the list of suppliers.
| Previous: 3.05. Creating and viewing items | | Next: 3.07. Viewing Names in Google Maps |
3.01. The tutorial like no other
For a glossary of terms please refer to section 1.05. Terms, definitions and conventions used in this user guide
Only mSupply®'s basic features are covered in this tutorial. The enhanced features are covered in-depth in later sections of the user guide.
mSupply explained
This chart shows the common steps in most pharmaceutical supply processes. The manufacturing step only applies to manufacturers.
mSupply work flow diagram
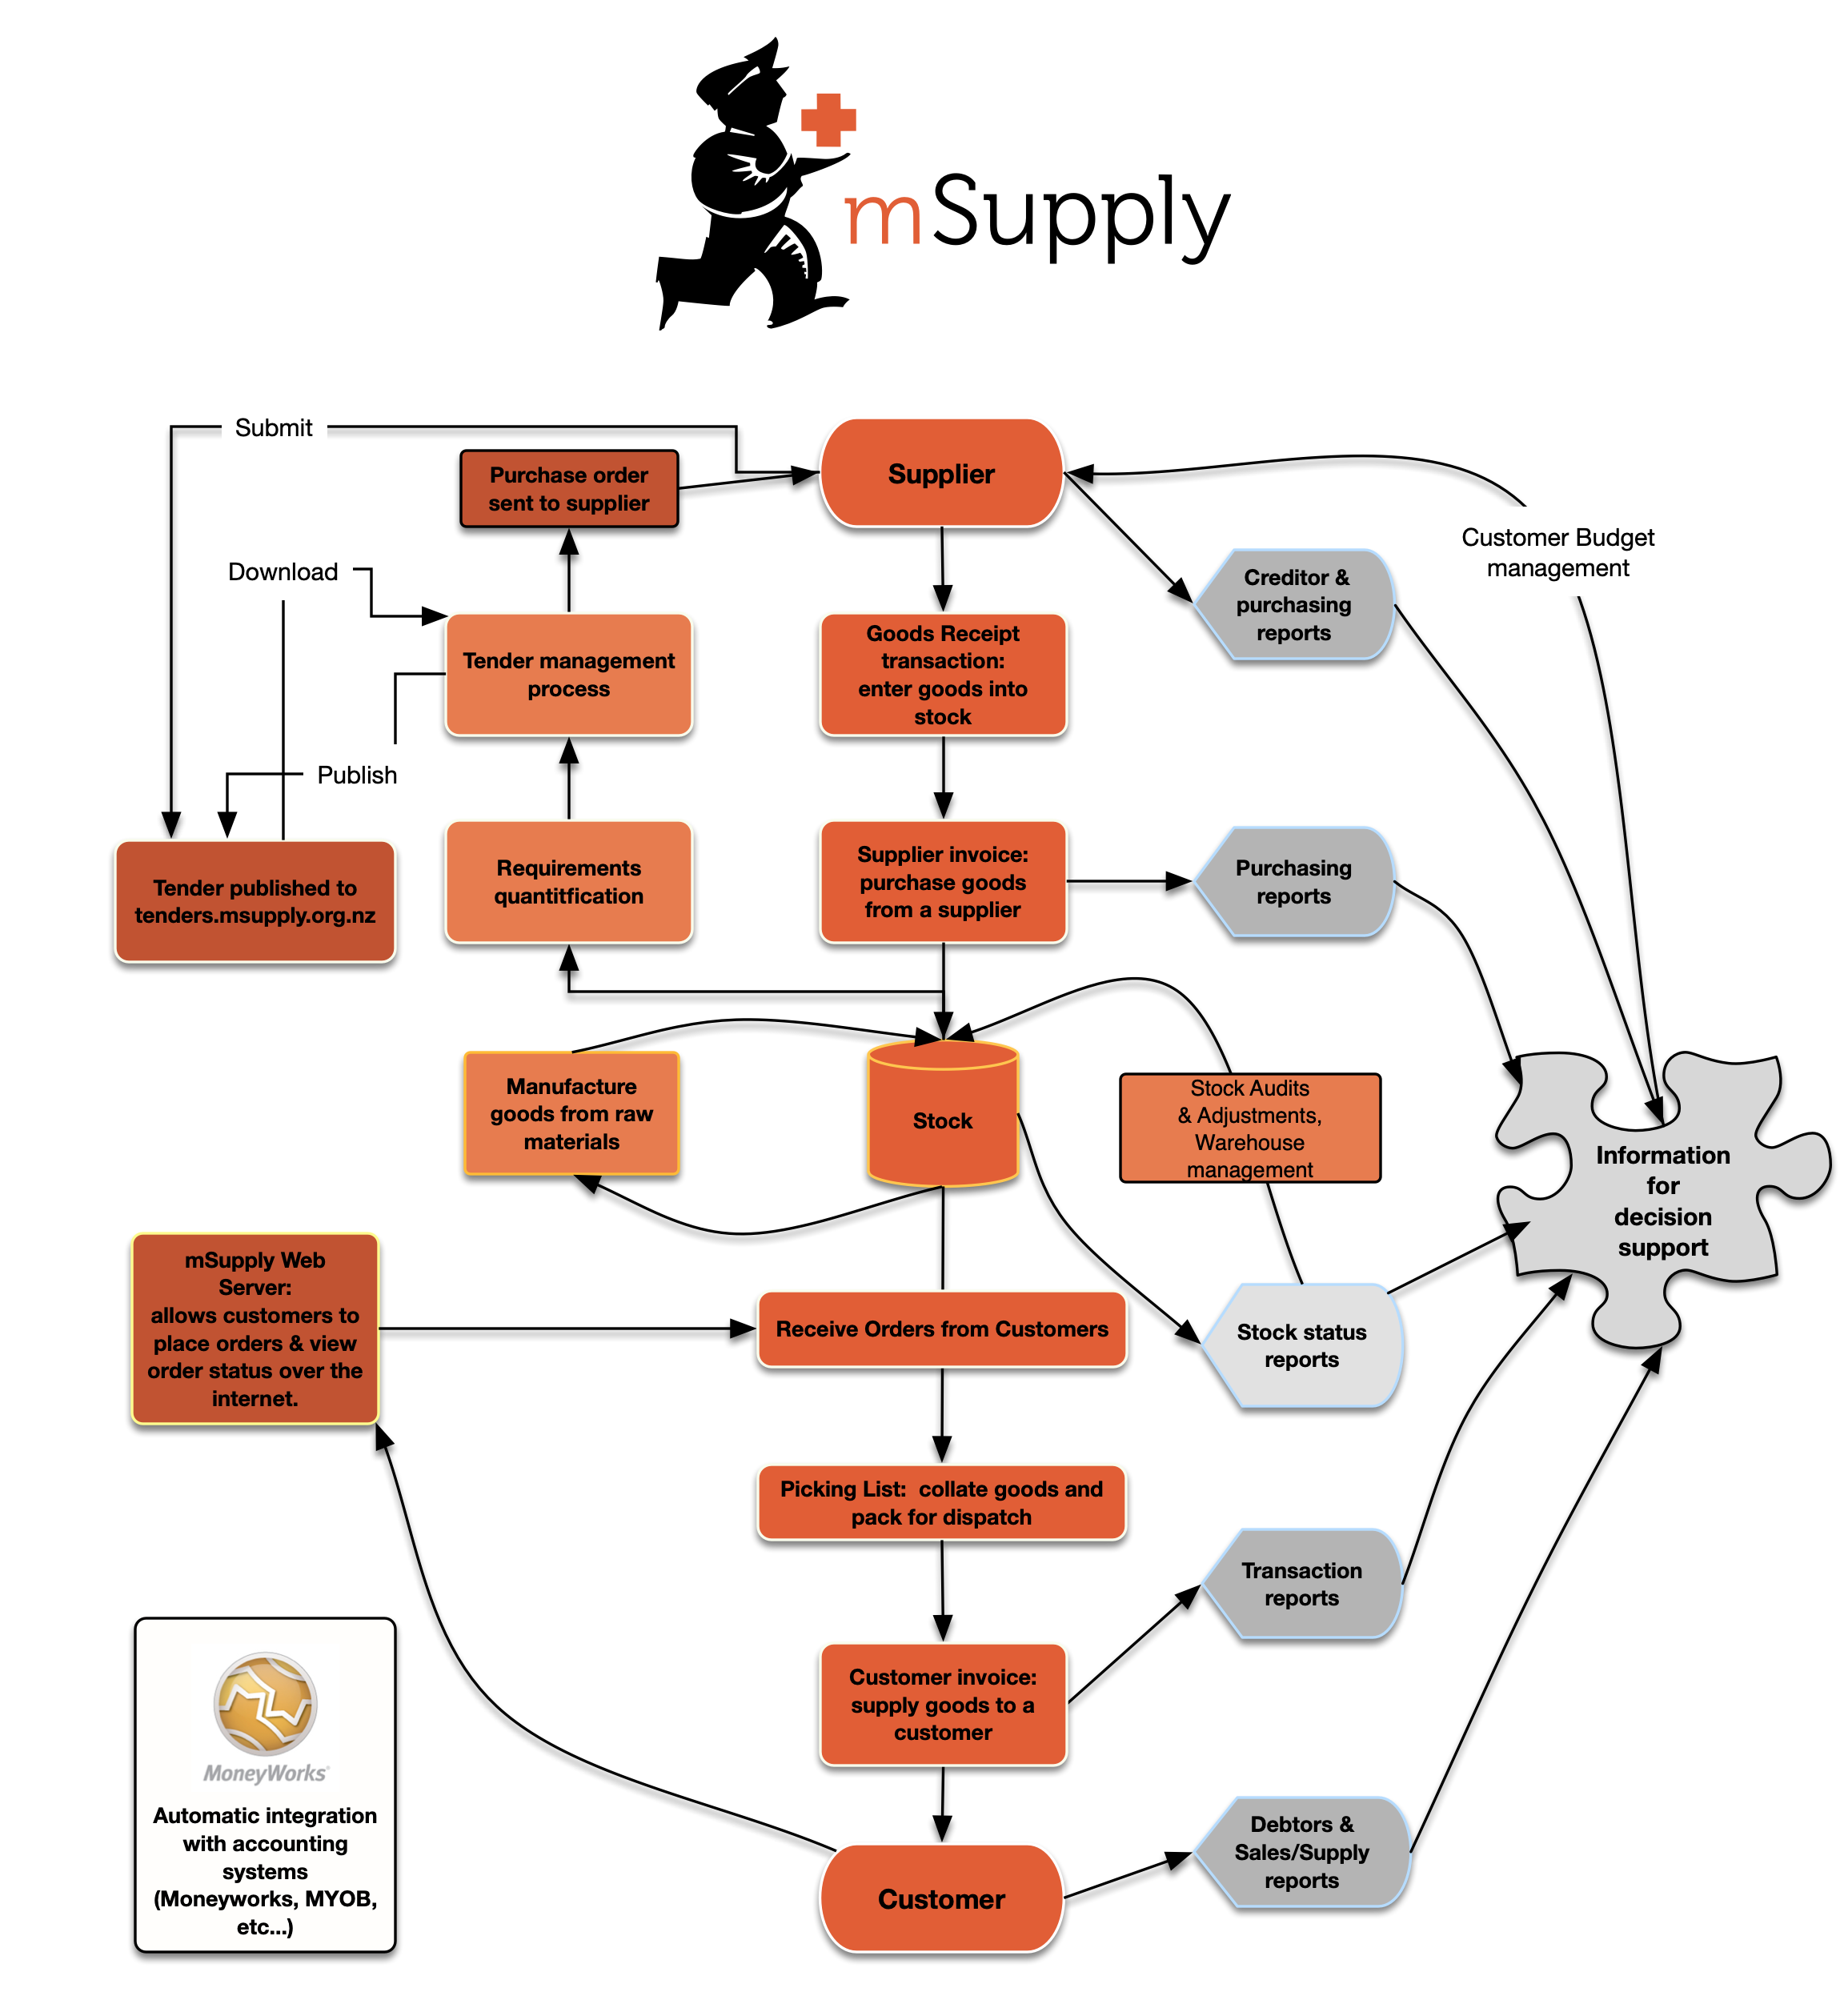
The two most common transaction types in mSupply are the supplier invoice (si) and the customer invoice (ci). These transactions record stock purchases from suppliers, and stock supplies to customers respectively. mSupply records stock adjustments through these two transactions. So, given an opening balance of stock, mSupply will show a series of transactions that result in the recorded closing stock.
Of course, there is much more to it than that, but these two transactions are the core of the system.
Note that mSupply has dozens of preference settings (File>Preferences) which change the behaviour of many aspects of the software. If you have changed the preferences from their default settings, some parts of this tutorial may not be as stated below. To work through the tutorial, we recommend you start with a fresh copy of the example data to ensure the preferences are set correctly.
Before starting the tutorial, you will need to have installed mSupply and opened the example database. If you haven't done so, see section 2.02. Installation.
mSupply runs best with a screen resolution of 1024 x 768 or greater. If you have your screen set to 950 x 850 or lower, some windows will not fit on the screen. To change screen resolution:
- Windows: right-click anywhere on the desktop, select Properties > Settings, and make the necessary changes.
- Macintosh: Choose Apple > System Preferences… then click on the Displays icon and set a new resolution
| Previous: 3. Tutorial | | Next: 3.02. Logging in |
3.08. Enter incoming goods (supplier invoices)
In some countries, an invoice for incoming goods is referred to as a “bill” - in mSupply we use “supplier invoice” to mean the same thing.
Let's suppose we have just received a shipment containing two items from Acme Pharmaceuticals, and we want to enter these goods into stock. The invoice looks like this:
| From: Acme Pharmaceuticals Bill: no.A939 | ||||||
| Item | Quan | Pack | Batch | Expiry | Price | Extension |
|---|---|---|---|---|---|---|
| Amoxycillin Caps 250mg | 1000 | 100 | b93333 | 31/12/2015 | 344 | 344,000.00 |
| Cotrimoxazole 240mg/5mL susp | 65 | 60 | bb23d | 31/10/2015 | 21 | 1,365.00 |
| Cotrimoxazole 240mg/5mL susp | 100 | 60 | bb22d | 31/01/2016 | 21 | 2,100.00 |
| Total: | 347,465.00 | |||||
Choose Supplier>New invoice from the menu or mSupply navigator screen.

The cursor will be positioned in the Name field. Type a and then press Tab. If there is only one supplier whose name starts with “a”, the details will automatically be filled in.

In our case, there are two suppliers whose names starts with “a”, so you will see a window listing both of these suppliers. Double-click the line containing “Acme Pharmaceuticals” to choose them for this invoice. The insertion point will jump to the Their ref field.
- Type
A939into the Their ref field. Press Tab to advance to the Comment field.
- In the Comment field you can type a comment or information to identify the invoice.
- Note that the margin is showing as 10 percent (the percentage that will be added to your cost price to obtain the selling price).
- Click the New line button to add the first invoice line. You will be presented with the window for adding invoice lines.

- The cursor will be positioned in the Item field. Type
a, then press Tab. You will see a window listing all items whose name starts with “a”. Double-click the Amoxycillin 250mg tab/cap entry to choose it.- In the Quantity field, enter the number of packs received
1000. Note that this is the number of packs, not the total quantity of capsules. - Enter the pack size
100. - You can ignore the Location and Volume per pack fields for this tutorial.
- Enter the batch number
b93333. - Enter the expiry date
31/12/14(Presuming you have dates set up to enter as dd/mm/yy. If your dates are set to the USA's mm/dd/yy format, enter12/31/14). You only have to enter 2 digits for the year as long as the year is between 1961 and 2060. Dates outside this range must have the year entered as four digits (yyyy). - In the Invoice line cost field enter the pack cost price
344. - The table shown in the picture at the bottom appears if you have Show previous purchases checked in your preferences. It will show purchases you have made of this item in the past.
- Donor is the donor who provided funds for the goods on this invoice. You can create donors by activating donor tracking in File/Preferences/Suppliers/New Supplier and then check the donor checkbox.
As we have another line to add, click the OK and Next button. The entry is recorded, and the window is now blank to accept your second invoice line.
- Enter
cinto the item name field and press Tab. In the list of items showing, you will find Cotrimoxazole 240mg/5mL susp. Double-click the entry. - Enter the remaining invoice details for “Cotrimoxazole 240mg/5mL susp”:
- quantity
65. - pack size
60. Note that it is better to record the actual volume of most packs, unless the volume is not important - e.g. with eye-drops where you could record the pack as “1”. - batch
bb23d. - expiry
31/12/13. - price
21.00(You can just enter21).
Click the OK & Next button to save the details and start to enter another item.
Now enter the third item on the supplier invoice from the example invoice from Acme Pharmaceuticals above. When you have finished, click the OK button to take you back to the main list of invoices.
Our invoice will now have 3 items added to it. The invoice total should read “347,465”, and should appear like this:

If you have made a mistake, click on the relevant line, which will now be highlighted; double-clicking on it allows you to edit it. You will be shown the line details again, and you can then make corrections and click the OK button to save your changes.
There are 3 icons in the bottom left corner of the invoice window.

- This allows you to rearrange the order in which the lines are shown on the invoice
- Here you can make a note of anything relevant to this invoice
- This will copy the details of the invoice to the clipboard
Now click the OK button. As long as you have left the “print” checkbox (bottom right corner) checked, you will be asked if you want to print the invoice (you may do so). Note that when you print, you are shown two windows. The first window is the page setup for your printer, the second window allows you to specify how many copies to print, etc. (The second window also has a “preview” checkbox, where you can preview the print job).

As this invoice is a “supplier invoice” it has been “confirmed” when you clicked the OK button in the invoice entry window. You can view and edit the invoice details until the invoice is finalised. Note that if you issue some of the stock you have just entered to a customer, some fields will no longer be editable.
NOTE: as of mSupply v190, a more precise alternative for entering received goods has been implemented. See section 7.02. Goods receipts for information on viewing and editing supplier invoices created via Goods Receipts.
| Previous: 3.07. Viewing Names in Google Maps | | Next: 3.09. Enter outgoing goods (customer invoices) |
3.07. Viewing Names in Google Maps
If you know the exact geographical location of the supplier or customer, the Lat (latitude) and Long (longitude) fields can be completed in their Photo tab.
You should use the following conventions when entering the exact geographic location for a supplier or customer:
- Use decimal degrees (not degrees, minutes and seconds)
- In the Lat field, locations south of the equator are entered as negative - i.e. the number is preceded by a '-' sign
- In the Long field, locations west of the prime meridian are entered as negative - i.e. the number is preceded by a '-' sign
You can use Google Maps to find the exact geographical location. Find the desired location on Google Maps and place the cursor on it. Right-click and select What's here from the drop-down list. Google Maps will display the geographical coordinates (the first number is latitude and the second number is longitude). These should be noted and copied to the Lat and Long fields in mSupply.
In our example, the location of the imaginary Acme Pharmaceuticals is on Chetrapati in Kathmandu. Click on the Google Maps button to display a map of the vicinity. The precise location is pinpointed by a green arrow.

| Previous: 3.06. Customers and suppliers | | Next: 3.08. Enter incoming goods (supplier invoices) |
3.02. Logging in
When mSupply starts you will be presented with the login window:

This is the login window for when mSupply is started for the first time.
Username
Select your username from the list.
- Only users from your facility will be displayed. If the list is long, you can type the first few characters of your username in the Search users field to shorten the list to usernames that begin with what you have typed, sorted alphabetically.
- If you're just opening mSupply for the first time after installing it, select user 1(pass= user1).
- Each time it opens, mSupply will default to the user who last logged in.
Password
Enter your password. When this window opens, the focus is on the password field. This allows the user who last logged in to be able to quickly log in again.
If using the user 1(pass= user1) name, type user1 as the password.
Store
Select the store you want to log in to from the drop-down list.
- Most mSupply users will only be able to access a single store. For users who have access to more than one store, the login screen allows you to select any of the stores to which you have access. Once you have logged in you can switch the store without logging out - see Switching stores.
- After selecting the desired store, all transactions you process will relate to that store.
- Supervisors and other Level 1 users will have an additional menu item, Supervisor - All stores. In this mode, all stores are accessible. You would use this mode, for example, when placing an order for supplies that will be distributed to a number of stores or for reporting on more than one store - see 26.07. Virtual stores.
- HIS - if you have enabled the Hospital Info System (HIS) in the user login permission settings, and at least one licence is allocated to HIS (see HIS preferences), then you will also see Hospital Info System in the list of stores. If you select this, the login mode automatically changes to HIS mode.
In a synchronisation system (29.01. Introduction to Synchronisation) the user will see a list of all the active stores they have permission to log into in this datafile.
Messages
View any messages that might be displayed.
Click OK
Finally, click OK to login. If login is successful you will be taken to the navigator screen.
As with all windows in mSupply, pressing the Enter key at any point produces the same result as clicking on the highlighted button, which, for this window, is the OK button. This facilitates fast keyboard control.
There are various options that can be set that cause a user to be taken to other screens or shown other information after logging in successfully. For example, Reminders or Invoices preferences.
Journal file
If one has not already been set up and if you are using a single user copy of mSupply, after logging in you will be asked to select the location for the journal file. A good place is to put it in the same folder as the datafile. You will only be asked to do this once.
The journal file is a place that mSupply records every database transaction that occurs after the last backup. It is used for repairing a damaged datafile and for investigating some types of errors.
| Previous: 3.01. The tutorial like no other | | Next: 3.03. Opening the example data file |
3.04. Navigator
Overview
The mSupply navigator provides access to most of the functions you will be using regularly in mSupply. Many of these functions can also be opened using shortcut keys. Once you have gained some experience, you may find it quicker to use the shortcuts.

The navigator always opens at the Customers screen in Store mode, shown above, or the Patients screen in Dispensary mode, shown below.

Displayed along the top of the screen are four items of information:
- the mode selected at login (Store or Dispensary)
- the store in which you are working - for most users, this will be General
- the active data file
- the user currently logged in
Immediately below this, there are six large icons, Customers or Patients, Suppliers, Item, Reports, Special and Admin. When you click on one of these large icons, the panel below will display more icons for each of the available functions and procedures. You can select the smaller panel icons by clicking on the icon, or by advancing through the icons with the right and left arrow keys and pressing Enter.
In the next part of the tutorial, you will be using the Items panel of the navigator. As the same procedures are common to all panels, you will quickly become familiar with them.
The bottom right area of the navigator screen is available for displaying your logo. In our example, the logo of “Acme Medical Supplies” is displayed. You can add your logo by through the menu File>Preferences>Logo - see 16.06. Entering a new logo.
| Previous: 3.03. Opening the example data file | | Next: 3.05. Creating and viewing items |
3.03. Opening the example data file
You will have two icons on your desktop - double-click the mSupply icon.
If you are opening mSupply for the first time, the program should automatically open the example data file.
The full path to the data file is displayed, along with other useful information by choosing Menu>Help>About mSupply.

If you have already been using mSupply and have another data file open, but would like to open the example data file for training, then you can use Menu>File>Open data file… to open the example data file. In Windows, by default the example data folder is stored at c:/mSupply/database/; navigate to the location and open the data file.

If you have chosen a different location from the one suggested by the installer, the example folder will be in your chosen location.
A login window is presented as mSupply opens the data file.

The user 1 (pass= “user1”) entry should be highlighted, but if it is not, select this name.
Type user1 at 2. Enter your password.
The Choose store if available drop-down list will display General. The Choose login mode if available drop-down list will display Store. These should not be changed.
The message panel states that the example database will be used.
Click the OK button and the mSupply navigator screen appears.
| Previous: 3.02. Logging in | | Next: 3.04. Navigator |
3.09. Enter outgoing goods (customer invoices)
Now let's suppose we have just received an order as follows: <HTML>
</HTML>
| From: | Blue Cross Hospital |
|---|---|
| Order number: | PO882 |
| Delivery: Express courier please | |
| Item | Quan |
| Amoxycillin 250mg tab/caps | 10,000 |
| Cotrimoxazole 240mg/5mL susp | 120 |
<HTML>
</HTML>
Choose New invoice from the Customer Invoice menu, and the following window appears:

Type b into the Name field, and press Tab. You will be presented with a list of customers whose name starts with “b”. Double-click the Blue Cross Hospital row to select it.
- In the Their ref field enter
PO882. - In the Comment field enter
This afternoon by courier - Click the New line button to add a line to the invoice. You are presented with the Add item window.

Enter the following details:
- Type
ainto the Name field then press Tab. In the list you are presented with, double-click on the Amoxycillin 250mg tab/cap row.

- You will see that a list of available stock has appeared in the window, and the cursor has moved to the Line number field. Enter
2to choose line 2. (The list is sorted so batches with the shortest expiry date are at the top - usually you would choose the shortest expiry batch, but today we're being different!).

- Quantity field - the line we have chosen has a pack size of 100, so you will need to enter a quantity of
100to make a total of 10,000
Click the OK & Next button to add the second line of the order.
This time enter c and press Tab. Double-click on the Cotrimoxazole 240mg/5mL susp row. The window will close and the list of available batches and quantities will be completed.

Note that in the list of available stock, the stock we entered from “Acme Pharmaceuticals” earlier in this tutorial is at the top of the list. This is because the list is sorted so items with the shortest expiry date are at the top of the list.
Line 1 is selected, despite the insufficient stock of line 1 to meet the order of 120. Nevertheless, you should enter 120 in the Quantity field, press Tab, and the following message will appear:

For this tutorial, choose Distribute. Distribute is likely to be your normal choice. Distribute will mean that the stock needed to complete the order will be drawn from another batch/batches, starting with the batch which will be the first to expire. There will be occasions, however, when you wish to override this automatic means of distribution. If this is the case, you would select Try Again and manually select the batches from which you wish to meet the order.
Click the OK & Next button
Because the invoice has not been confirmed, the “available” amount for the line is decreased, but the “total stc” (total stock) will remain the same. mSupply includes these lines in the list so you can see stock that has been allocated to an invoice but has not yet left your store. You can then edit the other invoice if stock is urgently needed on the current invoice.
Click OK as we are finished entering lines. You will be returned to the main Customer invoice window.

At the bottom right of the invoice you will see the invoice total.
- As the customer has requested an express courier, we will charge them Rs200 for the service (Rs = rupees the currency in our tutorial).
- At the bottom of the window you will see the Other charges field. Enter
Courier chargeand press Tab. - In the amount field enter 200 and press Tab. The new total should be 37,020.00.
Now we are ready to print a packing slip. Make sure that the Print checkbox is checked in the bottom right corner, and click OK. A window appears displaying your print options.

We want to print a packing slip, so the default settings are correct. You will notice the packing slip printed has a column where you can record the actual quantity packed.
Confirming the invoice
Let's suppose the order was successfully packed according to the packing slip, and you now want to confirm the order and print an invoice to pack with the goods. (We're in a hurry - the express courier is on her way!)
First, we need to look up the invoice.
- Choose Show invoices from the Customer invoices menu.
- If you know the invoice number (printed on the packing slip) you can enter it. Or, to bring a list of the most recent invoices, you enter the number of invoices to view. As we know the invoice we want is the last one to be entered, you can type
1and click OK - you will be taken straight to the invoice.
Click the Confirm truck icon.

Today's date will appear in the Confirm date field. Click OK to confirm you want to proceed.
The invoice is confirmed, and you are given the opportunity to print an invoice.
| Previous: 3.08. Enter incoming goods (supplier invoices) | | Next: 3.10. Entering quotations |
3.10. Entering quotations
mSupply allows you to keep a record of prices that suppliers have quoted to you for each item. Let's assume that you have just received 2 quotations for Amoxycillin 250mg capsules. One of the companies has used US dollars for their quotation, and the other has used British pounds. Before entering the details of the quotations, it is necessary that both of these currencies are recognised in mSupply. To achieve this, choose the menu item Special>Currencies. This window appears:

Click on the New button, and a window appears which allows you to enter another currency:

- Enter
USDin the Currency field. - In the Rate field you should enter the number of units of the default currency - in this case Nepali Rupees - equivalent to 1 US dollar. At the time this tutorial was created, the rate was 71.74 N.Rs. to US $1. Enter
71.74in the Rate field. - Click on the OK button.
Repeat the above for British pounds - assume that the rate is 116.36.
Once you have completed this, the Currencies window should look like this:

We're now ready to proceed.
To enter a quotation:
- Choose Items>Show items
- Type
Amoxthen press Enter - Double-click the Amoxycillin 250mg caps entry on the list
- The item view window, on the left, has vertical content list (General, Usage, Quotes). Click the Quotes line.
- Click the New Quote button.
- Note that the item is entered for us. We need to choose a supplier and enter their price details.
- Enter
Arbin the supplier field and press Tab. Arbuckle distribution is automatically chosen. They have quoted in US dollars, so choose USD from the currency menu. - Their price is US $3.50 per 100 capsules, so enter
3.5in the price field and100in the pack size field. - Click OK to save the entry
- Now click new quote again and enter the following details:
<HTML>
</HTML>
| Supplier | Gold Medical Supplies |
|---|---|
| Currency | Sterling [GBP] |
| Price | 20.00 |
| Pack size | 1000 |
<HTML>
</HTML>
Click OK when you are done.
Now we can see the list of quotes, which should look like this:

Notice how the adjusted price takes into account differences in pack size and currency, so you can easily compare suppliers.
| Previous: 3.09. Enter outgoing goods (customer invoices) | | Next: 3.11. Working with lists |
3.12. Where to now?
- Use the example database to experiment with different commands as you read about them in the user guide.
- Have a “dummy run” at starting a new data file and using it.
- Return to our main documentation page at www.docs.msupply.org.nz
| Previous: 3.11. Working with lists | | Next: 4. Items |
3.11. Working with lists
Whenever you perform a search in mSupply resulting in more than one item being found, you will be presented with a list of records (e.g. items, names, contacts or another list) that match the criteria you entered.
mSupply uses two types of list display.
- Shorter lists, such as an invoice or stock lists, are displayed with a striped background. These lists have resizable and moveable columns. They also and have an indicator to show the sorted column. Their use is discussed in the next chapter.
- Longer lists, such as item and transaction lists, which can have thousands or millions of records.
In this tutorial section, look at the tools for handling of the longer lists.
When longer lists are displayed, a series of buttons are available along the top of the window, as shown in the below screenshot (note only a small list is shown for the purposes of the tutorial):

General
Viewing or editing a particular record: To view or edit a record, double-click the row in the list you wish to view. A new window will open showing the details of the record you clicked.
Column widths: The easiest way to change column widths is to drag the dividers (the dividing line) between the columns in the list view. Note that if the total column width is too wide for the window, a horizontal scroll bar is added to the list allowing you to view columns to the right of those displayed.
Choosing the column order: To change the sequence of the columns in a list, drag a column header to a new location.
Customising
Clicking the Customise button in the toolbar will display this window:

The list on the left-hand side gives all of the available fields (displayed in columns). The list on the right-hand side is a list of fields (columns) you are currently using.
To add a field to your view, click on the field in the left-hand list. You can control-click to add multiple columns at the same time. Then click > >, the right-pointing button, in-between the lists.
To remove a field from your view, select the field(s) to remove from the right-hand list,. Then click < <, the left-pointing button, to move the fields back to the available list.
You can not remove the first column for any list as it is the key column to identify each row uniquely.
Renaming columns: By double-clicking on a field name in the right-hand list you can change the column title.
Ordering
Ordering a list is the same as sorting it. Frequently a column may be ordered by clicking on the column heading. The column will be sorted in ascending order. Ascending means:
- A > Z (upper and lowercase are not considered different)
- 1 > 2 > 3 for numbers
- earlier dates to later dates
Descending means the opposite of Ascending.
Note that ordering a list does not add or remove any records from the list. It simply changes the order in which the records are displayed.
Should you require two (or more) sort parameters, clicking the Order by button opens the following window:

The Available Fields list will reflect the type of records you are viewing. In our example, the list shown is for Items.
To order by a particular field, double-click it in the left-hand list. You can also drag fields to the right-hand list, or highlight the field in the left-hand list and click the right-pointing arrow. You can order by multiple fields by adding further fields to the right-hand list. Double-clicking on the flags and item name fields in our example results in this window:

To remove a field: Highlight the field in the Ordered by Fields list, then click the single left-pointing arrow between the two lists. The double left-pointing arrow will clear all fields from the Ordered by Fields list
To change field ordering: Each item in the Ordered by Fields list has a small triangle to the right. If pointing up, the ordering will be ascending. If pointing down, descending. To change the direction, click on the triangle for each field.
Using formulae: If you want to order by a formula, click the Add Formula button. Here the formula window is shown, and the formula Length([items]code) has been entered.

Using this formula would allow you to identify items whose item code is shorter/longer than your organisation's specifications.
Click the OK button to close the window.
Once the details are entered, click the Order by button to order the list.
Printing lists
You can press the print icon to send the list to Excel. The list will display in Excel with the column headings you have selected.
Find
This button opens a simple find window where you can enter the start of the item name or code.

Complex finds: The window shown above has a Complex Find button. This allows you to perform a search using multiple criteria. Clicking this button shows the query editor

Within this window there are four areas from which you have to choose or set a value for each line of a query.
- Available fields, select the field that you are looking for
- Operands, select the operand that is appropriate for your search
- Value, enter your specific criterion
- For queries with more than one criterion, click Add line, then complete as above but also with the appropriate conjunction
For example, if you want to find all items whose default pack size is greater than ten and whose code starts with A these are the required steps:
- Click on default_pack_size in the available fields list
- Click on is strictly greater than in the Comparisons list
- Enter
10in the value field - Click the Add line button
- Scroll down the available fields lists then click on code in the available fields list.
- Click on is in the Comparisons list
- Enter
a@in the value field (note the wildcard character @ has been used to find all items whose code has a as the first character) - Click the Query button to perform the query
Before step 8, the window would look like this:

The upper area of the query editor shows a summary of the query that is about to be performed.
This example will return a list of items where both the search criteria are met because the conjunction And was used. If you wanted to find items that matched only one of the criteria entered, you would click on the second line in the large upper panel to select it, and then click on the Or button where the conjunctions are displayed.
Saving and Using saved queries: If you have spent time on developing a particular query, and you are likely to use the same query in the future, click the Save… button. You will be asked to choose a name and location to save the query. The saved file is very small.
Then when a blank query window is first shown, you can click the Load… button and locating the saved query.
Thanks for working through the tutorial. We hope you learnt something useful, and now feel confident to start using mSupply!
| Previous: 3.10. Entering quotations | | Next: 3.12. Where to now? |