25.15. Managing users
About users, groups and templates
mSupply has a comprehensive system of controlling user access, allowing you to manage in fine detail what each user can do and see in the system. You can manage users individually, in groups or a mixture of both - whichever is most suitable for your situation.
User permissions are per-store, so a user can have different permissions when logged into different stores.
If you have many users that need to have the same permissions (because they carry out the same role, for example), User groups are for you; see the User groups section below for details on how to use them.
You can also set user permissions using templates. These quickly enable you to set permissions for usres using a preset selection of permissions. See the Permission templates section below for details.
Users and sync
A few points to remember if you are working with users on a synced system and with newer versions of mSupply:
- Users are normally created and configured on the Legacy mSupply Central server. These settings are then copied to remote sites when the store is transferred to the remote site.
- Normally, when these configuration settings are altered on the Legacy mSupply Central server after a store has been migrated, the settings do not get synced to the remote site. It is now possible to sync user permission settings across all stores that they have permission to log in to, regardless of which site the store is on (on the Edit user > Login rights tab). As mSupply is currently configured, this setting defaults to ‘off’, and needs to be turned on every time a user is edited.
- Users can be created and edited on a Legacy mSupply remote site. Name details of any newly created user on a remote site will sync back to the Legacy mSupply Central server. This is primarily for the sake of reporting transactions. Any permission edits made on the remote site will not sync back to the Legacy mSupply Central server.
- As of 2025-07-28, users can not be created or permissions edited on mSupply Mobile (Deprecated) or Open mSupply sites.
Adding and editing users and groups
User access is managed by choosing File > Edit users from the menus, or by choosing Admin > Edit users in the Navigator. When clicking on this option you are presented with a list of current users:

The list shows you the following information:
- User The user's name.
- Job title The user's job title, as entered on the details tab of the user's details form.
- Group The group the user belongs to. Will be blank of the user does not belong to a group.
- Active Checked if the user is allowed to login to the system.
To view groups rather than users, choose Groups from the Show Drop-down list at the top-right of the window. The list changes slightly to look like this:

Now the list shows you slightly different information:
- Group The name of the group
- Active Checked if the group is active. If the group is active then all users in the group are allowed to login to the system. If the group is inactive (checkbox unchecked), all users in the group are inactive and are not allowed to login to the system.
Double-click a user (or group) to edit their details or delete them. Click the New User button to add a new user (or the New group button to add a new group). Doing either will open the user details window (described below - for a new user or group all the tabs are empty, for an existing user or group the tabs are filled with their current settings)
Reports
When viewing either groups or users in the list you can different user reports by clicking on the Reports button. When you do that a small submenu appears with the following options:
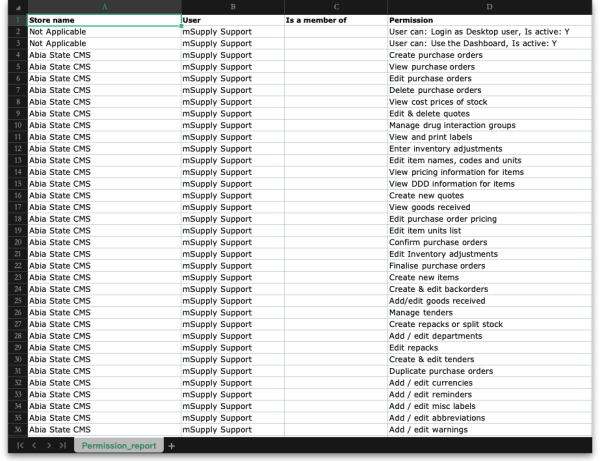
- Permission report: produces a report which shows all the permissions the selected (highlighted) user or group has in all stores in the datafile. It looks like this:
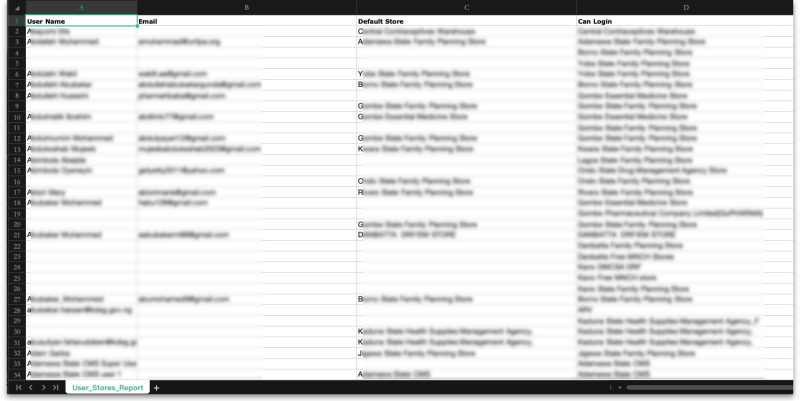
- User stores report: produces a report which shows all the stores all the users in the datafile can login to. It looks like this:


As soon as you click on one of the options, the report is generated and opened in your spreadsheet application.
User details window
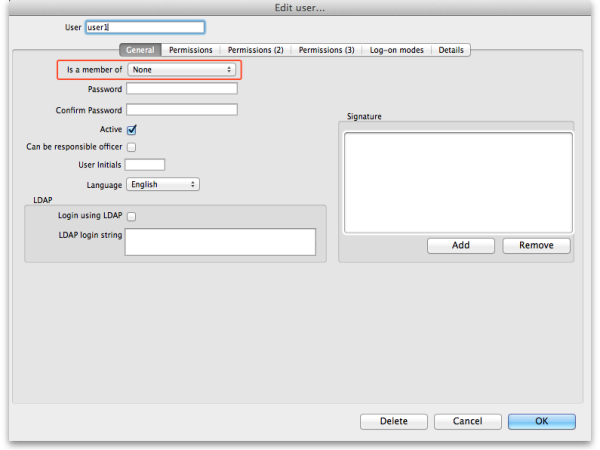
If you want to change a user's permissions and find out that all their permissions are greyed out and uneditable then it means they are a member of a group. To edit their permissions separately from the group, they must first be removed from the group:
- Edit the user, change the Is a member of drop down list to
None, click OK (see below for details). - Open the user again and their permissions will be editable.
Refer to User groups below for more details. If the user is to remain part of the group then you must change the group's permissions (see Editing a group below) but beware, this will change the permissions for all users who belong to the group, not just the user you're interested in.

This window has several tabs, all described below.
General tab
Is a member of
Used to select the user group the user belongs to (see below). When the window loads, it displays the group the user currently belongs to. It will show “None” if they are not a member of any group.
Password
This text box will always appear empty when the window is loaded. It must be set for a new user. It can be used here to change the password of an existing user. The @ character is not allowed in usernames.
Confirm password
If something is entered in the Password textbox, then the same text must be entered in this textbox. This step makes sure you set the password to what you think you're setting it to!
Active
If this checkbox is checked, then that user has permission to use the system, and their name will appear in the login window. If this checkbox is unchecked the user will not be allowed to login to the system and their name will not appear in the login window.
If you want to disable a user, perhaps because the staff member has left the organisation, then they must be made 'inactive':
- Edit the user, uncheck the Active checkbox, click OK.
If the Active checkbox is greyed out, it is because they are a member of a group. You will need to first remove them from the group before you can make them 'inactive':
- Edit the user, change the Is a member of to
None - Edit the user, uncheck the Active checkbox, click OK.
Of course, if the whole group of users needs to be made inactive then you can just uncheck the Active checkbox for the group.
Can be responsible officer
If this checkbox is checked, the name of that user will appear for selection in the Responsible Officer selector on the Transport Details tab of a Customer invoice.
User initials
User initials should be entered in this field.
Language
Allows you to select which language the user wants to use in mSupply. As of August 2020, supported languages are:
- English
- French
- Lao
- Spanish
- Khmer
- Portuguese (partially complete)
LDAP section
This section can be used to check a user's login credentials against an LDAP (Lightweight Directory Access Protocol) server. If you are going to use LDAP you must fill in the server details in the General Preferences, LDAP tab first.
- Login using LDAP: Check this if you want this user's login details to be checked against your LDAP server. Means that you can have some users logging in normally and some being checked against your LDAP server. Helpful if there's a delay in users being given LDAP credentials for any reason.
- LDAP login string: Enter any string which has to be used with the LDAP login. Will be provided by the LDAP administrator if required.
Windows username
The username the user logs into window systems with. Used to provide single-sign-on capability when the user is logging in remotely to an mSupply client running on a Windows server.
License category
Used to select which user license category the user belongs to. This will contain a list of all user categories currently set up in the datafile. See License management for details.
User belongs to State/Region
Used to select the name category 1 that the user belongs to. Only used in some customised versions of mSupply.
Signature
Use to add or remove an image of a user's scanned signature for displaying on invoices for example
Tags
Use to apply 'tags' to a user. These tags can then be used to control access to various features for users according to the tag.
User Can:
Used to give the following controls to users:
- Login as Desktop user
- Use the Dashboard - this is necessary if you want the user to be able to see dashboards
- Receive email notifications - this is necessary to enable reports to be emailed on a schedule to a user or group of users. Multiple reports for a User will appear on different tabs of an excel workbook. This needs to be configured by Sustainable Solutions, so get in touch if you're interested and we'll set this up for you.
- Use system - if checked the user can login to the remote authorisation web app as an authoriser. See the 26.15. Remote authorisation page for details.
When a user is added to a group, the User can settings are set to those of the group i.e. they are inherited from the group. However, the User can section is still editable for an individual user - the settings are not controlled by the group after the user has been added to it.
Permissions tabs
These are where you can set access to the many features and functions on a store-by-store basis for each user or group. There are three Permissions tabs and each are shown in the screenshots below:


Buttons on the Permissions tabs
Store
The Store drop down list allows you to select the store for which permissions are being displayed and set on the current tab.
You can type in the drop down list. If you do this, when you click on the down arrow to open it, you will only be shown stores in the list which start with what you typed. Or, if you prefix it with the mSupply wildcard character, “@”, you only see stores which contain what you typed. Very helpful if you have many, many stores and want to find a specific one or group of stores.
All on
The All on button turns on all the permissions on the current tab. There are exceptions to this for safety reasons; the Update pack size, cost and sell price, Add/edit users and Access server administration permissions on the Permissions tab are not turned on with the All on button.
Copy
The Copy button copies the permission for this store to an internal clipboard. The following window opens:
- In the Permission tabs section, select which tabs you want to copy the permissions from by checking their checkboxes.
- In the table, select the stores you want to paste the permissions of the current store to by checking them in the Selected column.
- Click the OK button to copy the selected permissions tabs of the current store to the selected stores. Click the Cancel button to close the window without doing anything.
Permissions
Most of the permissions are self explanatory. Those that need more explanation are given below:
| Permission | Details |
|---|---|
| Permissions Tab | |
| View stock | If not checked the user is not able to view the current stock list (see the 4.15. Show items with stock page), view the Stock tab of an item's details window (see the 4.01.05. Items - Stock tab page), not able to view stocktakes (see the 4.17. Stocktakes page) or view any reports in the Stock and items section on the Reports tab of the Navigator (see the 13.02. Stock and items reports page). If this permission is checked then they can do all these things unless they are prevented by not having other permissions e.g. if a user has this permission but they do not have the View stocktakes permission then they will still not be able to access Stocktakes. |
| Update pack size, cost and sell price | If checked the user is able to edit the pack size, cost and sell price of supplier invoice lines that have already had stock issued from them, provided that the SI has not been finalised. See the 7.01. Supplier invoices page for details. |
| Add/edit users | To prevent you being locked out of your datafile permanently, mSupply will not allow you to turn off this preference for the first 2 users which already exist when you open mSupply for the first time. You should always treat these users as admin users. |
| Access server administration | If this is checked the user will be able to access the server administration windows, as described on the 25.13. mSupply server administration page. Only assign this permission to users who really know what they are doing! |
| Add/edit sync sites | If checked the user is able to edit site settings in a synchronisation system (see the 29.02. Synchronisation Sites page for details). This includes being able to use the sync site wizard (29.03. Sync Site Wizard (Superseded)). |
| Disallow adding an unordered item to a Goods Received note | If checked the user is not able to add items to a goods received note that are not included on a purchase order (see the 7.02. Goods receipts page for details) |
| Permissions (2) Tab | |
| Add patients | If checked, the user can add new patients into the system |
| Edit patient details | If checked, the user can edit the details of patients already entered into the system. Of course, this means they can also view the details of patients in the system |
| View patients | If checked, the user can view patients' details in the system. If not checked then the user will not be able to see any patient details. |
| Change transportation dates on finalised invoice | If checked, the user can edit the Order written date, Order received date, Expected arrival date, Actual arrival date and Ship date fields on the Transport details tab of finalised customer invoices |
| Edit user fields on finalised invoices | The user fields are the 4 custom transaction fields that can be enabled in the preferences - see Invoices Preferences for details. If this is enabled the user can edit the contents of these fields on transactions that have already been finalised |
| Change invoice category on finalised invoice | If checked the user can edit the transaction category of invoices (customer, supplier and inventory adjustments) |
| Transfer goods between stores | If checked the user can create a customer invoice with a store as the customer (i.e create a stock transfer) |
| Finalise stock transfers | If checked the user can finalise a customer invoice where the customer is another store (i.e. a stock transfer) |
| Return stock from supplier invoices | If checked a Return selected lines button will appear for the user on finalised supplier invoices, allowing them to return the goods on the invoice. See the 9.01. Returning goods section for details |
| Return stock from customer invoices | If checked a Return selected lines button will appear for the user on finalised customer invoices, allowing them to return the goods on the invoice. See the 9.02. Receiving goods back from a customer section for details |
| Pack boxes | If checked the user is allowed to manage boxes and assign stock to boxes on a customer invoice, even if the user does not have the Edit customer invoices permission. See the 8.06. Box management page for details |
| Permissions (3) Tab | |
| Edit stocktake dates | If checked the user can edit the Stock take date field at the top of a stocktake and the confirmed date of inventory adjustments created from the stocktake (see Creating a new stocktake) for details |
| Edit store details | If checked the user can edit the store details and preferences, including using the bulk store preferences editor. |
| Edit visibility in stores | If checked the user can edit the visibility of names and items in different stores. If it is unchecked they can't - either in the Store tab of a name or item's details window or the Visibility tab of a store's details window (in fact, the Visibility tab won't even be visible for them) |
| Add/import customer budgets | If this is checked the user can import or add budgets for a customer, if unchecked they cannot |
| View temperature breach configurations | If checked, the user can view temperature breach configurations in the vaccine/cold chain module. See the 20.01. Vaccine Vial Monitoring (VVM) page for details. Temperature breach configurations can only be edited in the Cold chain app or in mSupply mobile. |
| View and edit vaccine vial monitor status | If checked, the user can view and edit the statuses that vaccine vial monitors have. See the 20.01. Vaccine Vial Monitoring (VVM) page for details. |
| View sensor details | If checked the user can view temperature sensor details. See the 20.03. Cold Chain App Notifications page for details. |
| Edit sensor location | If checked the user can edit the warehouse location attached to a sensor. See the 20.03. Cold Chain App Notifications page for details. |
| Edit/delete customer budgets | If this is checked the user can edit or delete budgets for a customer, if unchecked they cannot |
| Create customer invoices from requisitions | If this is checked the user can create customer invoice from the Create customer invoice button on requisitions. You can use this in conjunction with the Create customer invoices permission on the Permissions (2) tab to force all distribution to be carried out from requisitions. |
| View assets | If this is checked, the user is allowed to search the assets in the system and see their details |
| Add/edit assets | If this is checked, the user can also change the details of assets |
| Setup assets | If this is checked a user can manage the setup of assets e.g. add or edit asset statuses, conditions, properties etc. (see the assets setup page for details of the various setup options) |
| Change asset status | If checked, the user can make an asset's proposed status its current status. |
Notifications tab
On this tab, you determine what notifications (alerts) a user will see, and when they will see them:

To enable a particular alert type for a user simply check the checkbox in the Is enabled column. Any alert type that has its Is enabled checkbox unchecked will not be displayed for a user.
Show notifications window on login: If this is checked, as soon as a user logs in, the notifications window (displaying all the notifications they have selected in the table above), will be displayed for them. If this is unchecked, the notifications window will only be shown when the user clicks on the notifications icon on the Navigator:

Please note that the notifications displayed realte only to the store that the user is logged in to.
Show cold chain breach alerts: If this is checked the user will see temperature breach alerts (in the store in the Store drop down list above the table - this is a per store permission) passed to mSupply by the cold chain app (see https://docs.msupply.foundation/coldchain/introduction/ for details). If this is not checked then a user will not see temperature breach alerts that occur in this store. Please note that a user must have login rights to a store to be able to see breach alerts, whether this permission is turned on or not.
Open mSupply permissions tab

This tab contains permissions that only affect Open mSupply users. Currently Open mSupply must connect to an existing mSupply server, which takes care of the authentication and synchronisation. Soon, when we've re-written the central synchronisation server in Open mSupply, there will be no need for this tab. Until then, permissions that only apply to users of Open mSupply will appear on this tab.
This tab is included in the permissions copying functionality of the Copy button at the bottom of the window (see the Buttons on the permissions tabs section for details).
| Permission | Details |
|---|---|
| Can confirm internal order as sent | If checked then the user can Finalise an internal order in mSupply terms or Send it in Open mSupply terminology. |
| Cold chain API access | If checked then the username and password of this user can be used to access the cold chain REST API built into Open mSupply. |
| Can modify central data | If checked then the user can edit settings that are counted as central data in Open mSupply e.g. demographics indicators. |
| Program permissions | This section is used to define which programs this user is allowed to view or edit data for. The table will contain a list of all the Open mSupply programs that have been setup in the datafile and there will be checkboxes for each in the View and Edit columns. Click on the appropriate checkboxes to check them and give the user the appropriate permissions. The Toggle view and Toggle edit buttons check or uncheck all the checkboxes in the View and Edit columns respectively. If the list of programs is long you can type something in the Search programs box to make the list display programs that contain what you typed only. |
Login rights tab
On this tab you set which stores the user can login to:

If there are too many stores in the list, you can restrict the display by typing in the Search stores text box: only stores with names starting with what you type will be displayed.
If you need a more complex type of search then click on the Complex search button and this filter window will open (you will recognise it as very similar to the customer or supplier search window):

Make your filter selections as required, click on the Find button and only the stores which match the filters you have set will be displayed in the table.
The Toggle all in selection button turns on (checks) all the Can login checkboxes for all the stores shown in the list. Clicking it again will turn them off.
The Is disabled column indicates whether a store is disabled or not and can't be edited.
You can check one box in the Default store column - this will be the store the user is offered by default every time they login or switch stores.
In the Can login column you can check the box for each store the user is allowed to login to. All the stores in your mSupply datafile are displayed here in alphabetical order. Please note:
- The “Drug Registration” store is a special store used for the mSupply medicine registration functionality. See Registration for more details. Checking this box will allow the user to login to the Registration module.
- The “Hospital Info System” is another special store used for mSupply's built-in Hospital Information system. See here for more details. Checking this box will allow the user to login to the HIS module.
- “Supervisor - All stores” stores is a special mode to allow users to view information in and run reports over multiple stores. See here for more information.
Sync user across all login stores
The Sync user across all login stores checkbox is only displayed if the user is logged into the primary server in a synchronisation system. If this checkbox is checked, when the OK button is clicked the user's details are synchronised to all the stores that the user is allowed to login to, whichever sites those stores are Active on. In this way, an administrator in a synchronisation system is able to edit user permissions and settings and have them automatically synchronised to all relevant sites, rather than having to log in remotely to those sites and configure permissions locally.
As you can imagine, Sync user across all login stores is a powerful feature, and can have unintended consequences. Therefore as of 2025-11-04, there are restrictions on who can be configured as a 'special user'. Contact support@msupply.foundation for assistance.
Sync user across all login stores will propagate:
- Group permissions
- User group membership (which group the user is a member of)
- User permissions, if the user is not a member of a group
- User store login permissions
Sync user across all login stores will NOT propagate:
- User deletion
- Group deletion
Deleting the user or group on remote sites must be carried out by either of:
- Manually logging in to those sites and editing users, or
- Development and execution of custom 'footrunner' code on the Central server that will propagate these changes. Contact support@msupply.foundation for assistance.
Details tab

Here some personal details including job title, address and email address of the user can be recorded. The job title will appear in the Job title column in the list of users and the email address is used when using email functionality or other special functions in mSupply.
Other than that, these fields are for reference only, providing a handy place to record information about your system users.
Dashboard tab

On this tab you set which dashboard tabs will appear on the dashboard when the user logs into it. Of course, you have to set up the dashboard tabs before you can assign them to a user's dashboard. See Dashboard for instructions on doing that.
Once the dashboard tabs have been setup, they will appear in the Available column of this tab. You can see the “Test_tab” in the screenshot above. Anything in the Chosen column will be displayed on the user's dashboard. So, to make a dashboard tab appear on the user's dashboard, select it in the Available column and click on the >> icon to move the tab into the Chosen column. And to remove a dashboard tab from the user's dashboard, simply select it in the Chosen column and click on the << icon to move it back into the Available column.
Create a new user
To create a new user do this:
- Go to File > Edit users… and click on the New user button
- Enter the user name
- Assign a password
- Enter the password again in the Confirm password text box
- Go to the permissions tabs and set up permissions (3 tabs) OR select which group the user is to belong to using the Is a member of drop down list on the General tab (you must do one of these because you'll have noticed that when you create a new user they have absolutely no permissions at all!)
- Go to the Login rights tab and set the stores the user can login to.
- Click OK when you're done.
- The user should now be able to log in.
- After the user logs in, they may want to change their password.
Delete a user or group
To delete a user do this:
- Go to File > Edit users…
- Double-click the name of the user or group you want to delete in the list
- Click on the Delete button on the bottom of the edit user window that opens
Note that you won't be able to delete a group that has users belonging to it. If you really want to delete the group, remove all users from the group first by editing their Is a member of fields.
User groups
mSupply allows for a high granularity of user permission configuration. There are literally hundreds of user permissions possible for each store in an mSupply system. User groups assist with management of these user permissions.
- Users can be configured to:
- Log in to particular stores
- Have a range of general user permissions such as access to the dashboard
- Users can also be configured to have permission to view or edit data while logged in to particular stores.
- If users are a member of a group, then permission to view or edit data while logged in to particular stores is governed by the group membership.
A user can have permission to view or edit data while logged in to a particular store, either directly or through membership of a group. If you want the user to exercise these permissions then they will also need to have permission to log in to the store  .
.
This can be very helpful if you have a common set of permissions that you want a class of users to have, and this class of user exists in hundreds of stores. For example, the position and duties of the Officer in Charge (OIC) will often be common to all stores. However, you don't want the OIC of one store being able to exercise those same permissions in the 'wrong' store. To achieve this, you can:
- Log in to one store and configure an OIC group with all the necessary OIC permissions
- Copy and paste these permissions to every relevant store
- Create an OIC user for each store, make them a member of the OIC group
- Configure them to be able to have login rights to only the store in which you want them to exercise these permissions
Adding a group
Show the list of groups by opening the “Edit user” window and then choosing “Groups” from the “Show” Drop-down menu

To add a group, click the Add Group button. You will be shown a window where you add the group name. You then set permissions for the group in the same way as you set permissions for a user (above):

You will only be able to set checkboxes which can have different settings in different stores. Anything that is not a checkbox and or any checkbox that applies across all stores cannot be set in a group's permissions (another way of saying this is that they cannot be controlled by a group). These items will all be disabled when creating or editing a group and are editable in the individual users' permissions only.
Editing a group
First, show the list of groups by opening the “Edit user” window and then choosing “Groups” from the “Show” Drop-down menu:
Then double click on a group in the list. The same window as for adding a group opens but it is populated with the group's current settings. Change these settings as described for a new group above and click on the OK button to save them.
Active users and groups
All permissions and most checkbox settings in a user settings are controlled by the group. One exception is login rights to different stores (managed for each user individually). Another exception is whether a user is active or not (active means that they are allowed to login to mSupply). By default, the active status of a group does not set the active status of all users in the group to match. However, you can make all users in a group inactive by editing the group and clicking on the Update status for all members button:

When you click on the Active checkbox for a group it does nothing except changee the state of the checkbox. However, when you click on the Update status for all members button, all members of the group have their Active status set to that of the checkbox in this group.
Using groups
Groups are a quick way of setting and managing permissions for many people at a time. Users belonging to a group take the permissions of that group: when a user is a member of a group you cannot edit their permissions directly, you must edit the group's permissions. And if you edit the group's permissions, you edit the permissions for every user in the group. To assign a user to a group, do the following:
- Go to File > Edit users
- Double click on the user you want to edit
- On the general tab of the window which opens, use the Is a member of drop down list to select the group the user is to belong to:
- Click on the OK button to save you changes.

Permission templates
Permission templates are pre-set selections of permissions that you can select for individual users or a group. They give you a quick way of setting all the permissions for a user or group in a particular store. The permissions can be edited after setting, they are not controlled by the template (like they are by a group).
Using permission templates
To use a template you must be creating or editing a user who is not part of a group or creating or editing a group.
Using a new user who is not part of a group as an example (but the same methodology applies for existing users or new and existing groups), go to the Permissions, Permissions (2), Permissions (3) or Open mSupply permissions tabs and you will see a User permissions template at the bottom:

Click on the button and the template selection window will open:

If the template list is long, type something in the Type here to search field and only those templates which contain what you have typed will show in the list.
Click on the template you want to use for the user's permissions and click on the OK button. The user's permissions on the Permissions, Permissions (2), Permissions (3) and Open mSupply permissions tabs, regardless of which tab you clicked the User permissions template button on, are set to those contained in the template for the store which is selected in the Store drop-down list ONLY:

You can now repeat this process for assigning permissions in other stores for this user/group by selecting the appropriate store in the Store drop-down list before clicking on the User permissions template button.
The permissions can still be manually edited by clicking on them if desired.
When you have finished setting permissions for the user or group, click on the OK button to save the permissions.
Using your own permission templates
The example above showed using system defined permission templates. You can create your own and use those instead.
Your own templates are created as user group permission reports which you then load into a user's permissions. To do this, follow these steps:
- Create a user group which has the permissions you require as a template set on the Permissions, Permissions (2), Permissions (3) and Open mSupply permissions tabs (see the User groups section above for instructions on how to do this)
- View the list of user groups (see the Adding and editing users and groups section above for instructions on how to do this)
- Run a Permission report for that group (see the Reports section above for instructions on how to do this)
- Save the report as a
.csvfile from your spreadsheet application - Now create or edit the user to which you want to apply these permissions to (double-click it in the list of users)
- Click on the Permissions, Permissions (2), Permissions (3) or Open mSupply permissions tab and select the store you want to set tyhte permissions for in the Store drop-down list in the top right corner of the window.
- Hold down the Shift key on the keyboard and click on the User permissions template button at the bottom of the screen
- A file selection window will appear. Navigate to the csv file you saved in step 4 above, select it and click on the Open button
- The user template selection window will open with only one entry in the table. The entry has the name of the group you ran the permissions report for in step 3. Select that entry and click on the OK button
- The user permissions for all the tabs are loaded from the file and you see them set in the user's details window
- You can further edit these permissions if you wish or copy them to other stores (using the Copy button at the bottom of the window). When you are finished, click on the OK button on the user details window to save the permissions
User license categories
A menu item on the Special menu of the navigator gives access to a form to view and edit user license categories, including the number of users belonging to them that can be logged in at any one time. A DDL on the user input form allows a user to be assigned to a category and a new permission covers the ability to edit these license categories and membership of them. Finally, a check on the OK button of the login form will check that there are less than the maximum users belonging to the license category the user belongs to already logged in.
| Previous: 25.14. mSupply deployment | | Next: 25.16. Show connected users |